• site home
  • blog home
  • galleries
  • contact
  • underwater
  • the bleeding edge

the last word

Photography meets digital computer technology. Photography wins -- most of the time.

You are here: Home / The Last Word / Towards a macro MTF test protocol

Towards a macro MTF test protocol

April 22, 2016 JimK 24 Comments

I’m thinking about doing a report comparing several 100ish mm macro lenses, and I need a protocol to do modulation transfer function (MTF) and longitudinal chromatic aberration (LoCA) testing. I find it much more fun to devise new protocols than perform the old ones, so I jumped at the chance.

I can’t use any of my printed targets for this kind of testing, because I can’t print the edges sharply enough. I’d read that a razor blade is the gold standard for a slanted edge, so I came up with the following precision razor blade mount:

_DSC6707

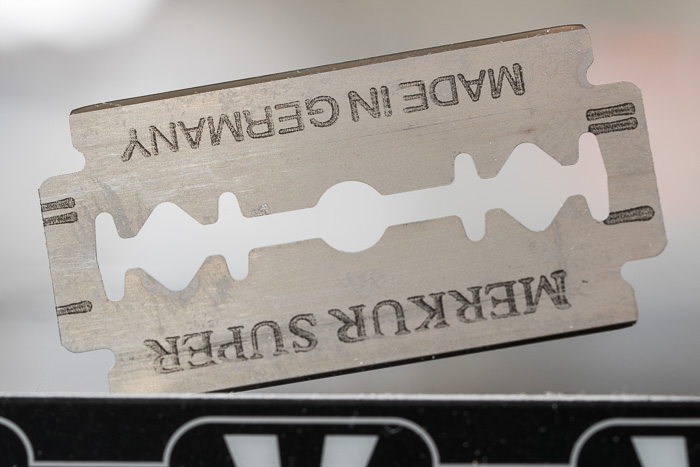
The blade is stuck into an AF tuning tool, which is mounted to a tripod with a gear head that I can use for alignment. Behind the razor blade is a white piece of paper illuminated by two Westcott 5000K LED panels. When you turn the room lights off and the panels on, here’s what you see:

_DSC6708

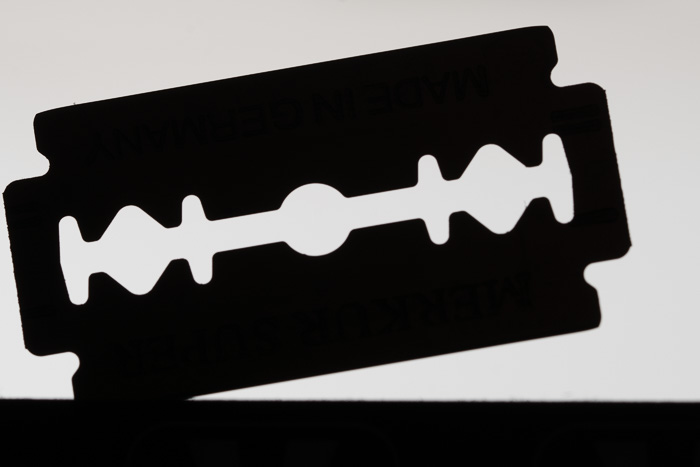
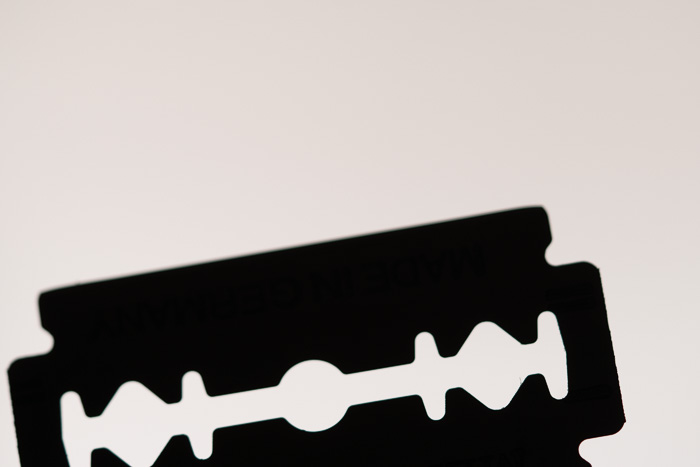
For on-axis pictures, you put the blade edge in the center of the image:

_DSC6709

After that, it was just a matter of modifying my old motorized-rail protocol. Here’s the first experiment I tried:

  • Sony a7RII
  • ISO 100
  • Manual exposure
  • Manual focus, set at one position
  • Sony 90mm f/2.8 G Macro lens
  • Cognisys computer-driven focusing rail
  • 130 exposures 250 um  apart
  • Lens distance  set at 1:2 magnification mark
  • Document mode decoding with DCRAW
  • MTF50s for all the raw color planes plus withe balanced calculated using MTF Mapper
  • Graphing in Excel

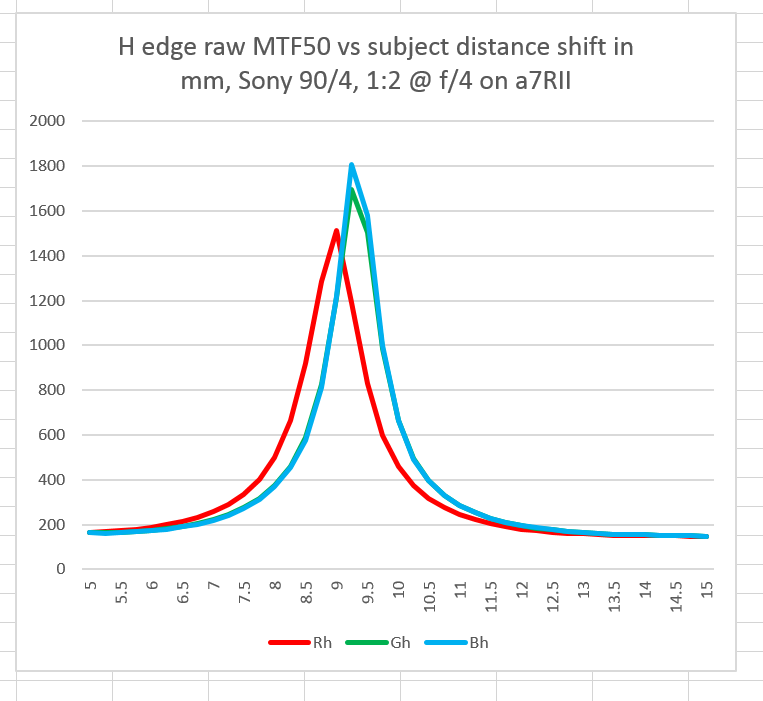
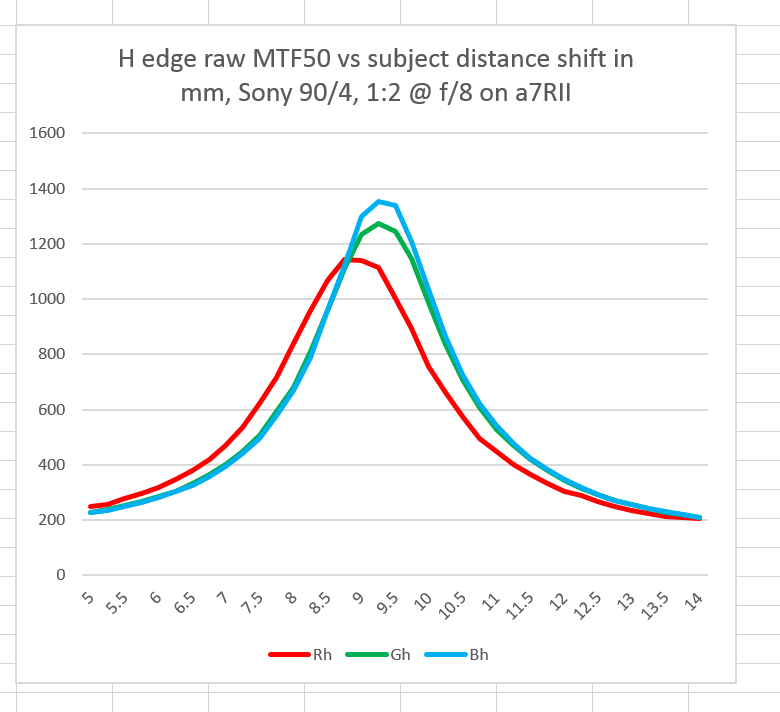
Here’s a plot at f/2.8:

mtf sony 90 f28

Distance is the horizontal axis, with the left hand size having the subject farther from the camera than the right hand side (The camera moves closer to the subject by 250 um after each exposure).

The first thing I noticed was that it looks like I missed the peak of all three raw planes because the steps were too big. Imagine that! 250 um steps are too big! Next time I’ll use 100 um or maybe even 50 um. I may have to make more exposures to make sure I get the peaks in the middle.

The next thing was the absolute value of the green and blue peaks. They are quite high for this lens, considering that we’re looking at raw channels with absolutely no sharpening and we probably missed the actual peaks. It looks like a razor blade may be a better slanted edge target than my printed ones, even at much longer subject distances.

The third thing of note was the LoCA, with the red channel achieving best focus with the camera farther away than the best-focus distance for the other two channels. The difference is about 500 um; I’ll be able to measure it more accurately when I redo the test with smaller steps.

At f/4:

mtf sony 90 f4

Same idea, but the lens is getting sharper. I probably missed the peak in the red and blue channels.

F/5.6:

mtf sony 90 f56

Not quite as sharp, and the LoCA is about the same.

F/8:

mtf sony 90 f8

Sharpness is coming down, but the lens is still quite sharp.

F/11:

mtf sony 90 f11

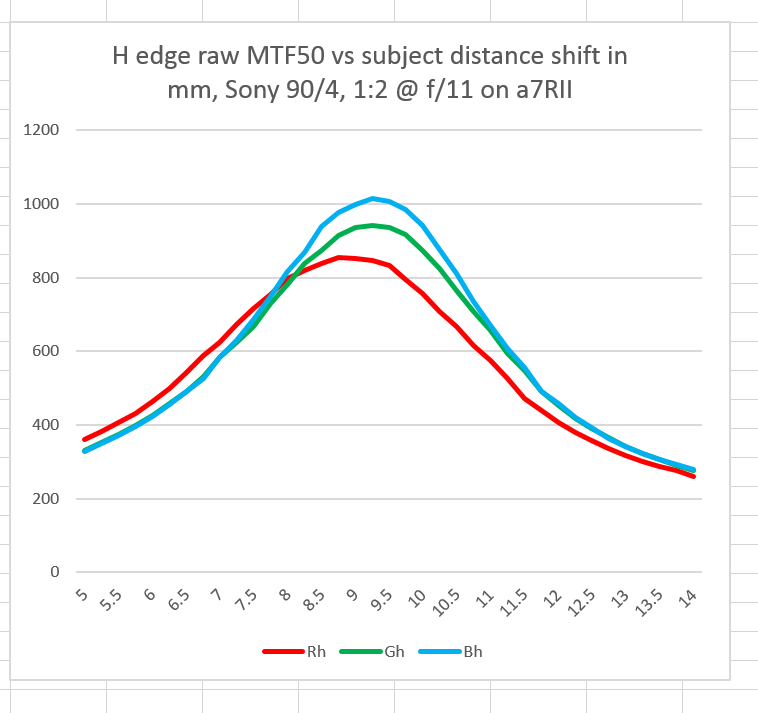
Now we’re really losing sharpness. The LoCA hasn’t actually gotten better, but you won’t see it in real images because it will be masked by the depth of field.

If we plot the white balanced MTF50 curves on one graph, we can check for focus shift:Sony 90 focus shift

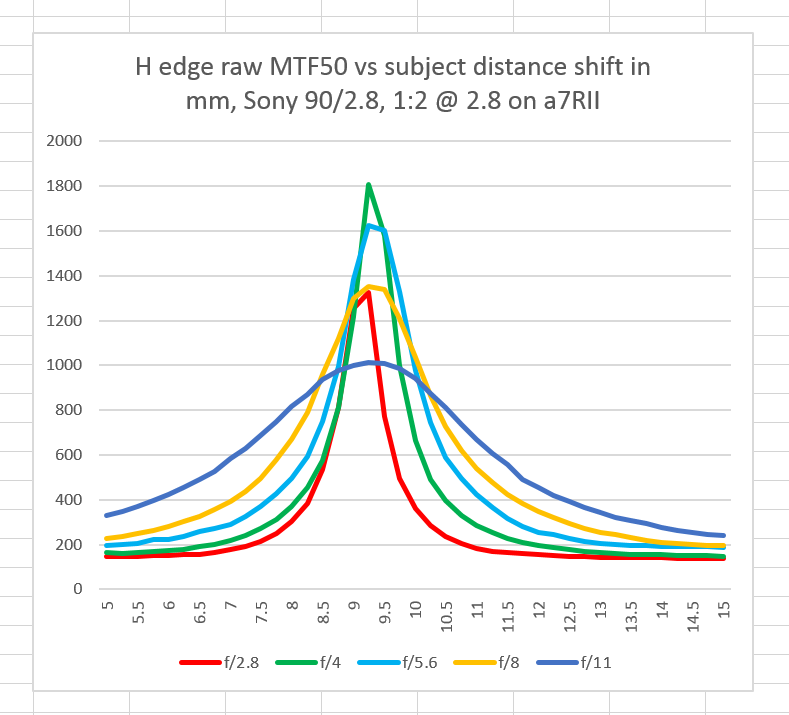
There is some, but it’s not bad. I’ll check again with smaller steps.

I think this protocol will work fine.


The Last Word

← Sensor MTF with a perfect lens Restricting yourself to one lens vendor →

Comments

  1. CarVac says

    April 22, 2016 at 1:48 pm

    Does Sony compensate for the actual exit pupil based f-number like Nikon does? That’ll affect comparisons of macro lenses.

    Also, regarding the loss in MTF at narrow apertures that you show here: I made a discovery that part of the loss of contrast at small apertures is actually caused by reflections off the edge of the diaphragm blade, in addition to diffraction. Simply looking at the exit pupil of a lens from the side with a light shining through shows the edge of the aperture reflecting light. As the aperture gets physically smaller, the perimeter increases relative to the area and so the reflections contribute more of the illumination relative to the image forming light.

    This is what makes lenses with odd blade counts have alternating length diffraction star points: the one on the side of the blade in question is shorter and due purely to diffraction, while the one on the opposite side is brighter and longer, due to diffraction and reflection.

    Any chance you could somehow measure this? Compare extreme stopped down performance loss between lenses, and correlate that with sunstar asymmetry? It might depend on how the diaphragm is constructed; perhaps consumer lenses with thicker plastic diaphragm blades might suffer more contrast loss than an extremely fine metal diaphragm because of a larger reflective area.

    It might be good to look at MTF at a given frequency rather than MTF50 for that.

    Reply
    • Jim says

      April 22, 2016 at 2:19 pm

      Also, regarding the loss in MTF at narrow apertures that you show here: I made a discovery that part of the loss of contrast at small apertures is actually caused by reflections off the edge of the diaphragm blade, in addition to diffraction. Simply looking at the exit pupil of a lens from the side with a light shining through shows the edge of the aperture reflecting light. As the aperture gets physically smaller, the perimeter increases relative to the area and so the reflections contribute more of the illumination relative to the image forming light.

      That’s an excellent point, and might go a long way to explaining why lenses start to look worse than you’d expect as you stop them down if all the loss were from diffraction.

      Jim

      Reply
  2. Jack Hogan says

    April 23, 2016 at 12:24 am

    Excellent Jim. Two things:
    1) When a razor blade is used I have often seen it first blackened by candle smoke or other mean
    2) It would be interesting to find out how much of the improved sharpness is due to the sharper edge and how much simply because this lens is fine tuned for close subjects.

    Jack

    Reply
    • Jim says

      April 23, 2016 at 7:21 am

      1) When a razor blade is used I have often seen it first blackened by candle smoke or other mean

      Yes, I’ve seen that as well. But it didn’t look like it needed it for contrast, and I was afraid the bits of carbon would roughen the edge.

      2) It would be interesting to find out how much of the improved sharpness is due to the sharper edge and how much simply because this lens is fine tuned for close subjects.

      I know of no way to test that.

      Jim

      Reply
      • Jack Hogan says

        April 23, 2016 at 2:01 pm

        How about taking captures of the blade from (much) further away? Far enough to make the point but not so far that the edge will be too short for a reliable reading.

        Reply
        • Jim says

          April 23, 2016 at 3:58 pm

          Worth a try. The blade is going to be much smaller than my usual target at my usual distances.

          Reply
  3. tex andrews says

    April 23, 2016 at 4:46 am

    Several 100-ish macro lenses! Wow, that’s a lot of testing ;-}
    Hope you are getting towards full recovery, btw…

    Reply
    • Jim says

      April 23, 2016 at 7:22 am

      Eats, shoots, and leaves.

      Reply
  4. Frans says

    April 25, 2016 at 3:59 am

    You can try vwdof (http://toothwalker.org/optics/vwdof.html) to calculate the expected DOF. Scaling the DOF at 0.5x magnification versus whatever magnification you normally use (in your other tests) will give you a reasonable estimate of the expected focus step size.

    Reply
  5. Bernard says

    May 31, 2016 at 4:37 am

    Hi Jim,
    you really made me curious about these focal shifts. I have started to do razor blade tests with an Otus 55mm that I have on visit. I work at 1:12.5 to have reasonable DoF for my simple nodal rail. I would like to know the options you use for
    Document mode decoding with DCRAW
    and the options for mtf_mapper as well, for the two cases
    raw color planes
    white balanced

    Reply
    • Jim says

      May 31, 2016 at 1:28 pm

      Do you know Matlab? That would make the knowledge transfer easier. If not, I can pot something with a bit more work.

      Reply
  6. Bernard says

    June 2, 2016 at 1:30 am

    I am no Matlab user. Getting the calculation done is not the problem. Making sure the data is right at every stage of the process is an issue.. That is why I am interested to learn the right options to use for dcraw and for mtf_mapper

    Reply
  7. Aleks_andr says

    August 27, 2021 at 6:44 am

    Thank you for sharing this.
    When you opened your image in MTF Mapper, did you select the edge manually or opened it as a single edge image as something else? I am trying to test my camera using the razor blade method.
    Thanks,
    Aleks

    Reply
    • JimK says

      August 27, 2021 at 6:49 am

      The edge was selected by the Matlab program I wrote, based upon a crop selection dialog. It looks to MTF mapper like manual selection.

      Reply

Trackbacks

  1. Focus shift and LoCA in the Leica-R 100/2.8 Apo Macro | The Last Word says:
    April 25, 2016 at 11:40 am

    […] Towards a macro MTF test protocol […]

    Reply
  2. FOCUS SHIFT AND LOCA IN THE Zeiss 100/2 Makro-Planar | The Last Word says:
    April 26, 2016 at 9:14 am

    […] Towards a macro MTF test protocol […]

    Reply
  3. FOCUS SHIFT AND LOCA IN THE Sony 90/2.8 FE Macro | The Last Word says:
    April 26, 2016 at 8:53 pm

    […] Towards a macro MTF test protocol […]

    Reply
  4. Kitchen optics and LoCA | The Last Word says:
    May 5, 2016 at 2:27 pm

    […] Towards a macro MTF test protocol […]

    Reply
  5. A seven-shot focus shift test | The Last Word says:
    May 14, 2016 at 11:48 am

    […] Towards a macro MTF test protocol […]

    Reply
  6. Fuji 120/4 macro focus shift and LoCA says:
    April 9, 2017 at 11:52 am

    […] Towards a macro MTF test protocol […]

    Reply
  7. Fuji 63/2.8 focus shift and LoCA says:
    April 11, 2017 at 1:24 pm

    […] took the same general experimental protocol that I used in the last post on the Fuji 120mm f/4 G macro lens and applied it to the 63 m f/2.8 […]

    Reply
  8. a7RII/Otus 55 vs GFX/Fuji 63 says:
    April 14, 2017 at 10:56 am

    […] using a variant of the protocol described here. The subject distance was 6 feet, which is about as far back as I can get with these lenses on […]

    Reply
  9. Fuji 120/4 Macro at 1:2 on GFX: LoCA and focus shift says:
    April 25, 2017 at 11:08 am

    […] You can read up on the test protocol here. […]

    Reply
  10. Focus shift and LoCA in Sony 90/2.8 FE Macro says:
    July 9, 2017 at 9:13 am

    […] Towards a macro MTF test protocol […]

    Reply

Leave a Reply Cancel reply

Your email address will not be published. Required fields are marked *

May 2025
S M T W T F S
 123
45678910
11121314151617
18192021222324
25262728293031
« Apr    

Articles

  • About
    • Patents and papers about color
    • Who am I?
  • How to…
    • Backing up photographic images
    • How to change email providers
    • How to shoot slanted edge images for me
  • Lens screening testing
    • Equipment and Software
    • Examples
      • Bad and OK 200-600 at 600
      • Excellent 180-400 zoom
      • Fair 14-30mm zoom
      • Good 100-200 mm MF zoom
      • Good 100-400 zoom
      • Good 100mm lens on P1 P45+
      • Good 120mm MF lens
      • Good 18mm FF lens
      • Good 24-105 mm FF lens
      • Good 24-70 FF zoom
      • Good 35 mm FF lens
      • Good 35-70 MF lens
      • Good 60 mm lens on IQ3-100
      • Good 63 mm MF lens
      • Good 65 mm FF lens
      • Good 85 mm FF lens
      • Good and bad 25mm FF lenses
      • Good zoom at 24 mm
      • Marginal 18mm lens
      • Marginal 35mm FF lens
      • Mildly problematic 55 mm FF lens
      • OK 16-35mm zoom
      • OK 60mm lens on P1 P45+
      • OK Sony 600mm f/4
      • Pretty good 16-35 FF zoom
      • Pretty good 90mm FF lens
      • Problematic 400 mm FF lens
      • Tilted 20 mm f/1.8 FF lens
      • Tilted 30 mm MF lens
      • Tilted 50 mm FF lens
      • Two 15mm FF lenses
    • Found a problem – now what?
    • Goals for this test
    • Minimum target distances
      • MFT
      • APS-C
      • Full frame
      • Small medium format
    • Printable Siemens Star targets
    • Target size on sensor
      • MFT
      • APS-C
      • Full frame
      • Small medium format
    • Test instructions — postproduction
    • Test instructions — reading the images
    • Test instructions – capture
    • Theory of the test
    • What’s wrong with conventional lens screening?
  • Previsualization heresy
  • Privacy Policy
  • Recommended photographic web sites
  • Using in-camera histograms for ETTR
    • Acknowledgments
    • Why ETTR?
    • Normal in-camera histograms
    • Image processing for in-camera histograms
    • Making the in-camera histogram closely represent the raw histogram
    • Shortcuts to UniWB
    • Preparing for monitor-based UniWB
    • A one-step UniWB procedure
    • The math behind the one-step method
    • Iteration using Newton’s Method

Category List

Recent Comments

  • bob lozano on The 16-Bit Fallacy: Why More Isn’t Always Better in Medium Format Cameras
  • JimK on Goldilocks and the three flashes
  • DC Wedding Photographer on Goldilocks and the three flashes
  • Wedding Photographer in DC on The 16-Bit Fallacy: Why More Isn’t Always Better in Medium Format Cameras
  • JimK on Fujifilm GFX 100S II precision
  • Renjie Zhu on Fujifilm GFX 100S II precision
  • JimK on Fuji 20-35/4 landscape field curvature at 23mm vs 23/4 GF
  • Ivo de Man on Fuji 20-35/4 landscape field curvature at 23mm vs 23/4 GF
  • JimK on Fuji 20-35/4 landscape field curvature at 23mm vs 23/4 GF
  • JimK on Fuji 20-35/4 landscape field curvature at 23mm vs 23/4 GF

Archives

Copyright © 2025 · Daily Dish Pro On Genesis Framework · WordPress · Log in

Unless otherwise noted, all images copyright Jim Kasson.