• site home
  • blog home
  • galleries
  • contact
  • underwater
  • the bleeding edge

the last word

Photography meets digital computer technology. Photography wins -- most of the time.

You are here: Home / The Last Word / Visual effects of dynamic range — a7RII

Visual effects of dynamic range — a7RII

October 12, 2015 JimK 6 Comments

There was some interest on DPR on what difference various amounts of dynamic range made in a picture. This post is an effort to provide some examples.

In order to see the effects of dynamic range, you need a high dynamic range scene. If you’re shooting a subject with low dynamic range, almost any modern camera with a reasonable size sensor will work just fine.

You also need a way to measure dynamic range. There are two main ways to do that, engineering dynamic range (EDR) and photographic dynamic range (PDR).

EDR is the ratio of full scale to the image noise level that is unrelated to light falling on the sensor; it is often, but not always, the ratio of full scale to the noise when the sensor is exposed to a dark field, like the back of a lens cap. Here’s an analysis of the a7RII’s EDR.

PDR is the ratio of full scale to the noise at some signal level that defines the lower limit of photographic interest, a level so noisy that signals below that level would be considered inferior to photographic quality. Bill Claff has devised a PDR metric that compensates for resolution differences between cameras. It’s the one that I favor, and he’s published PDR graphs for many cameras.

To do a test of the visual effect of dynamic range, we need a convenient way to change the dynamic range of the camera. Fortunately, most cameras, including the Sony a7RII, come with a handy control for adjusting dynamic range. It’s called the ISO adjustment.

Take a look at this graph:

a7rii EDR

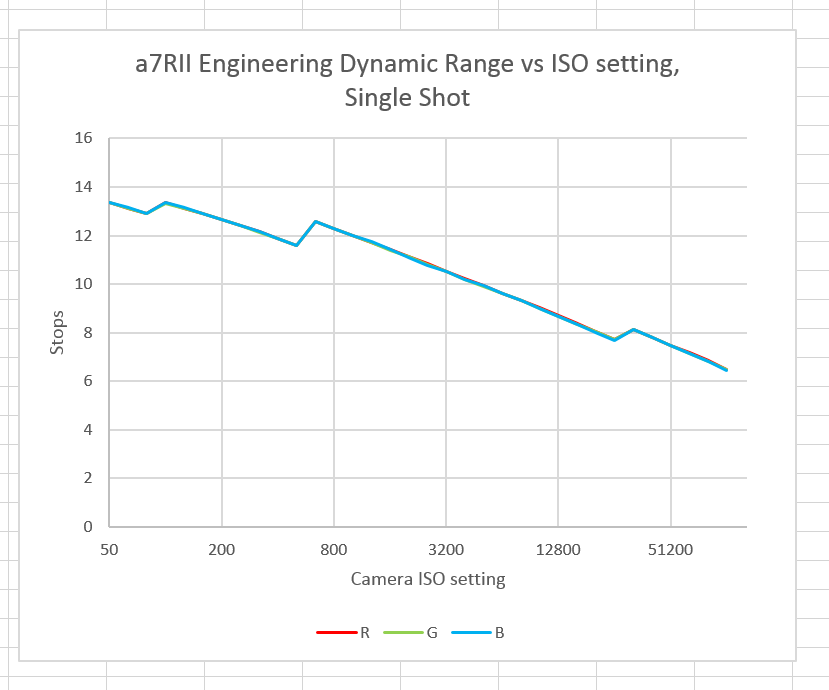
In it, the EDR is converted to stops. You can see that the EDR of the a7RII is about 13.2 stops at ISO 100, 12.7 at ISO 200, 12 at ISO 400, 12.3 at ISO 800, 11.5 at ISO 1600, 10.6 at ISO 3200, and so on.

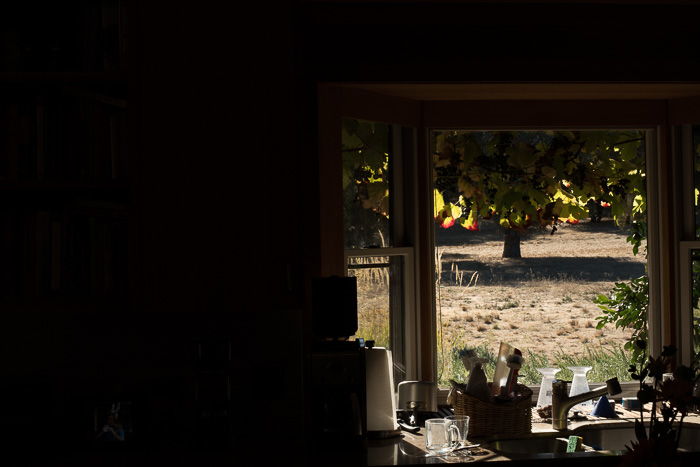
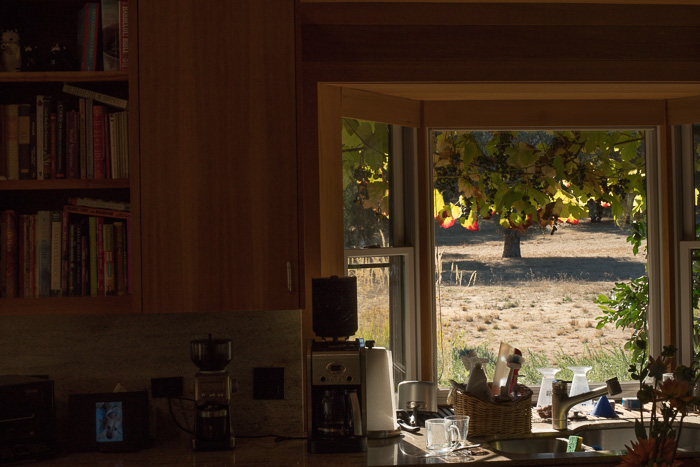
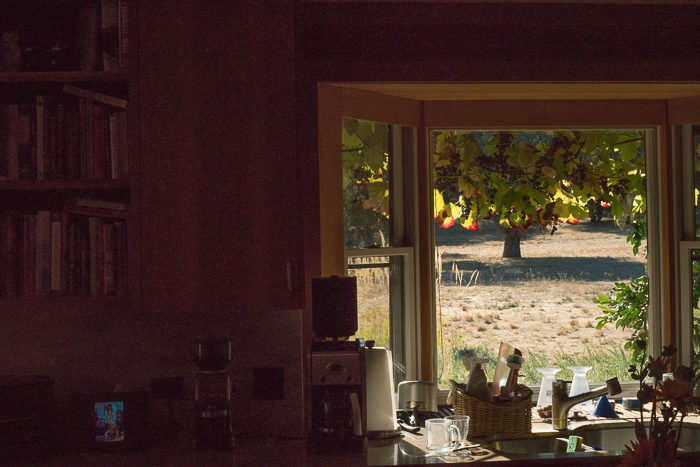
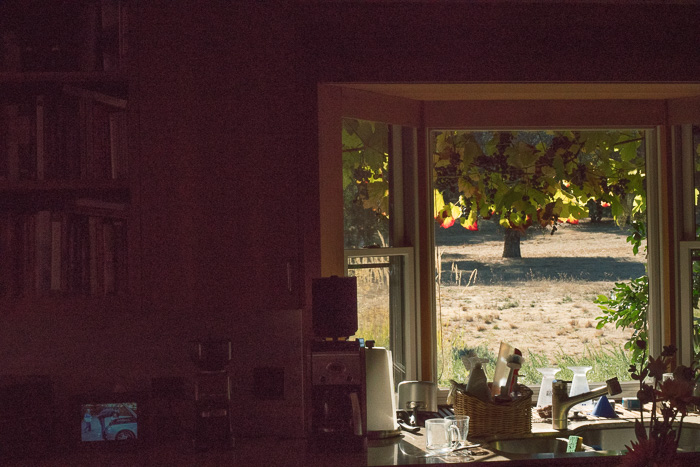
In order to do a visual test, I picked a high dynamic range scene. The one I chose many would consider unphotographable, at least with only one capture, but I wanted something that would stress the camera’s capabilities.

I put a Otus 55mm f/1.4 lens on an a7RII. I wanted a lens with very little flare, which would reduce the dynamic range as seen by the sensor. I put the camera on a tripod, set the self timer to 2 seconds, and made a series of exposures at ISO 100, 200, 400, 800, 1600, 3299, 6400, and 12800, exposing for the highlights and decreasing the shutter speed a stop at each change in ISO setting. ‘

I developed the images in Lightroom with default settings except for the white balance, which was set to Daylight.

The images all look very similar, so I’ll only show you the ISO 100 and 12800 ones.

ISO 100
ISO 100
ISO 12800
ISO 12800

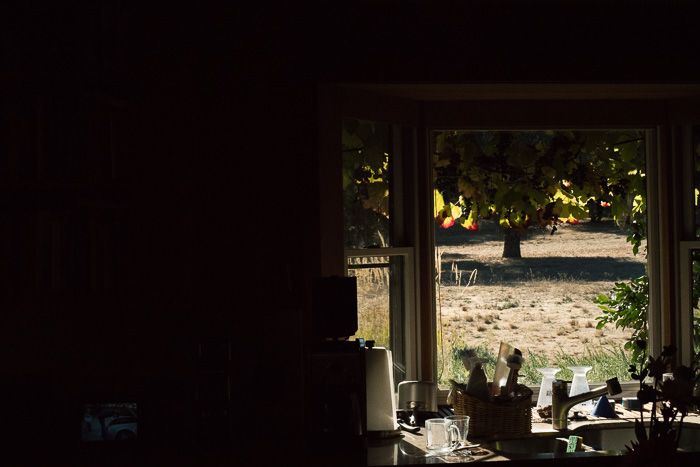
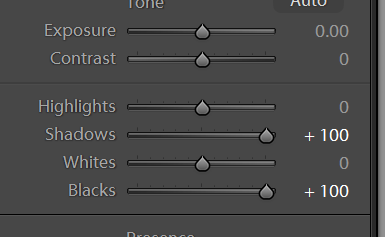
I next made a really big shadow move on all the images:

lr shadows

Here are the results:

ISO 100
ISO 100
ISO 200
ISO 200
ISO 400
ISO 400
ISO 800
ISO 800
ISO 1600
ISO 1600
ISO 3200
ISO 3200
ISO 6400
ISO 6400
ISO 12800
ISO 12800

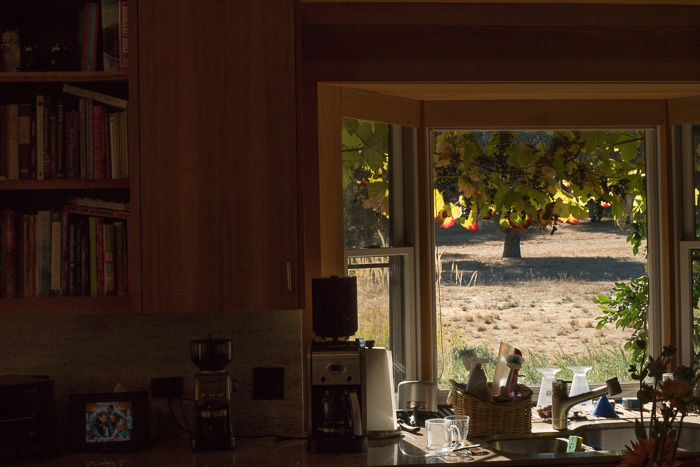
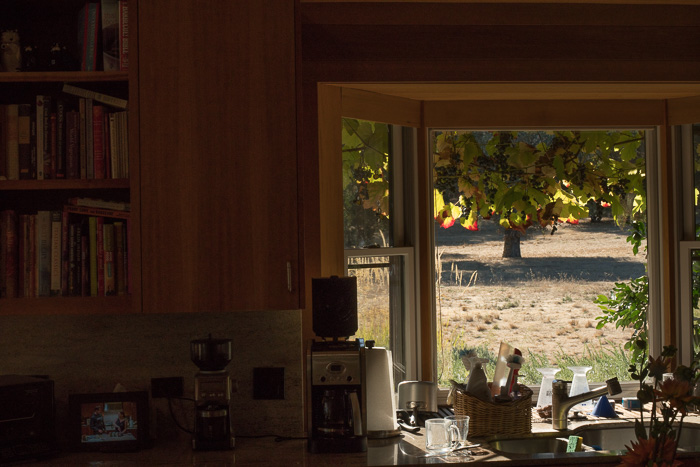
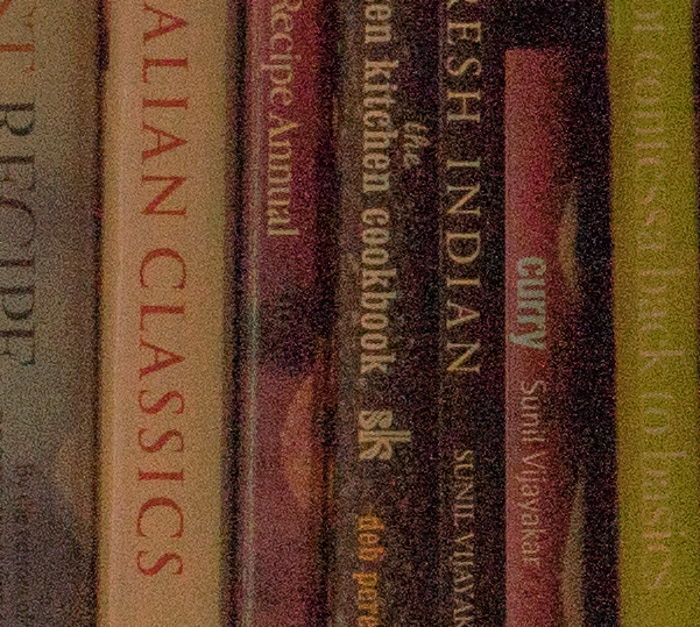
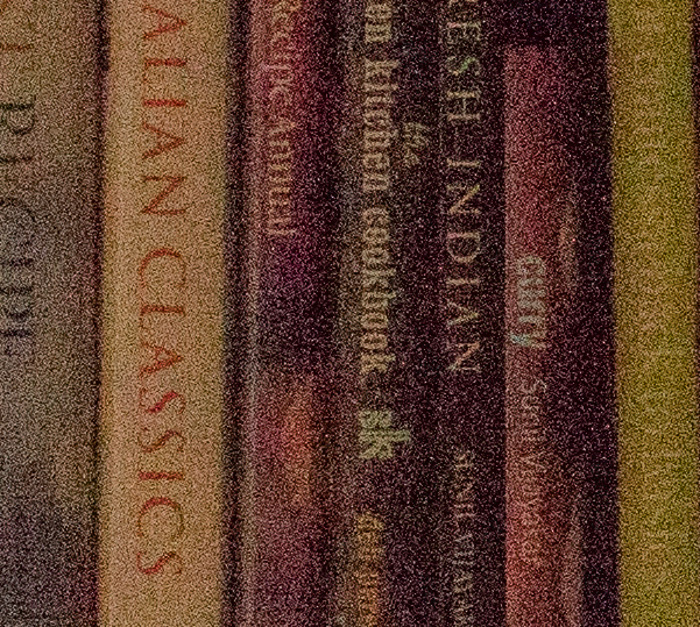
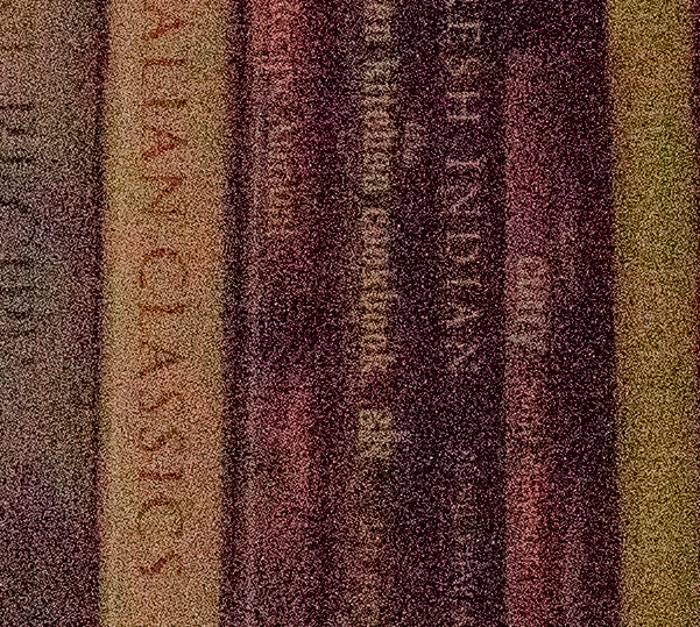
Not much difference at screen resolution, huh? Let’s look at the books (there are indeed books) at 1:1.

ISO 100
ISO 100
ISO 200
ISO 200
ISO 400
ISO 400
ISO 800
ISO 800
ISO 1600
ISO 1600
ISO 3200
ISO 3200
ISO 6400
ISO 6400
ISO 12800
ISO 12800

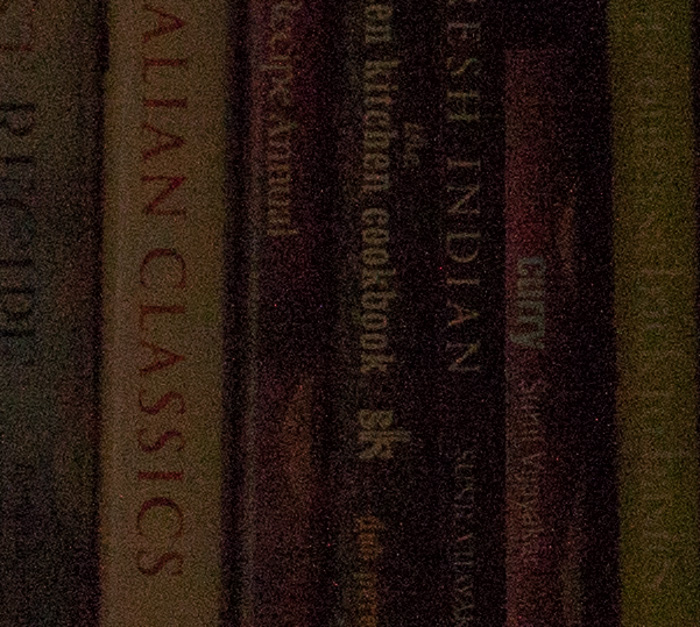
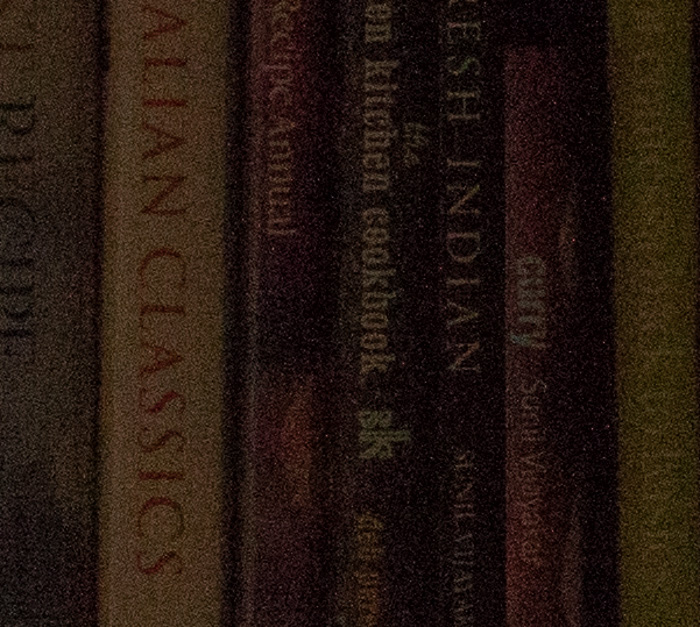
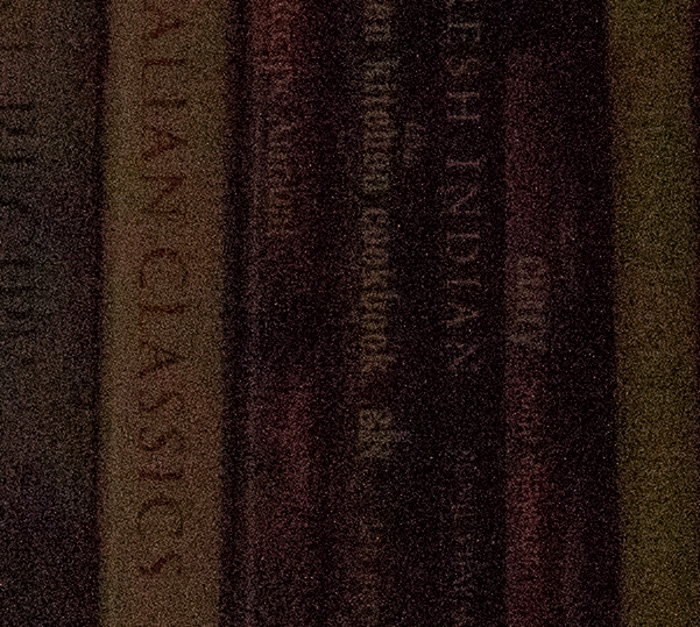
It’s remarkable how much dynamic range a modern full-frame camera like the a7RII has. I’d only consider the last two images unusable for most (but not all – – they’d be fine for the web) purposes.

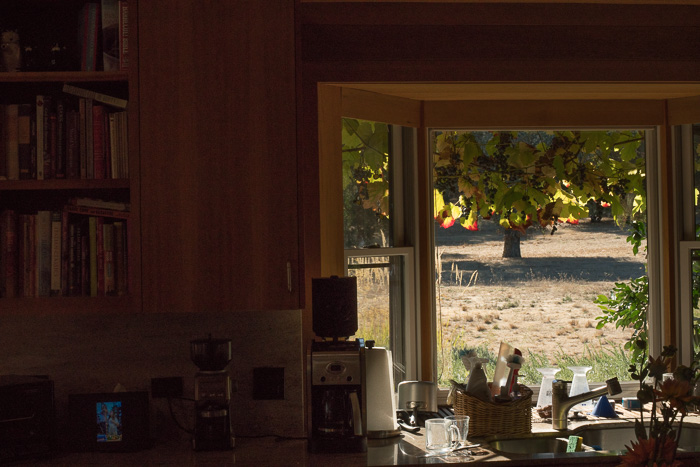
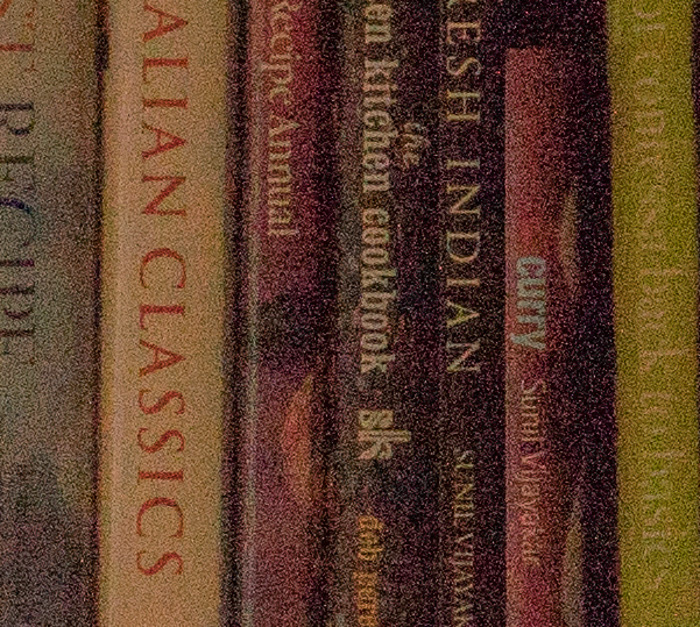
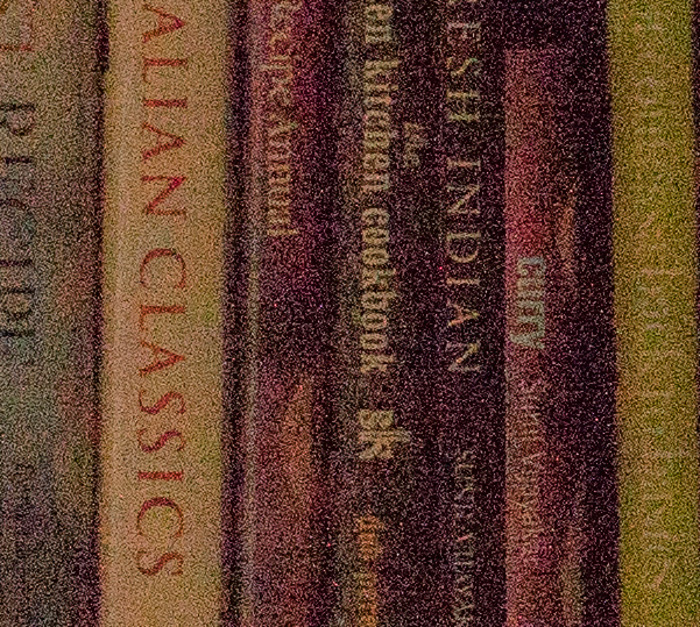
If you want to consider a really extreme push, here are a set of images with another two stops of Exposure.

ISO 100
ISO 100
ISO 200
ISO 200
ISO 400
ISO 400
ISO 800
ISO 800
ISO 1600
ISO 1600
ISO 3200
ISO 3200
ISO 6400
ISO 6400
ISO 12800
ISO 12800


The Last Word

← MTF testing of 70-200mm lenses Taming the a7RII EVF/LCD autoswitching →

Comments

  1. Dennis Watts says

    October 12, 2015 at 2:02 pm

    It has been my experience that Capture One does a far better job of processing the a7rII raw files. Is there any chance you could process some of the higher ISO raw files so we could do a side-by-side comparison?

    Also, what is your feeling on the new uncompressed format that’s coming?

    Reply
    • Jim says

      October 12, 2015 at 2:10 pm

      Sorry, I don’t use C1, just Lr and Iridient. I don’t think any raw developer can make a silk purse out of a sow’s ear, although they all have their strengths.

      I’m looking forward to the new raw format, but I hope that it’s losslessly compressed instead of uncompressed. If it’s uncompressed, I’d call Sony’s releasing it malicious obedience.

      Jim

      Reply
      • CarVac says

        October 13, 2015 at 9:17 am

        It’s pretty clearly uncompressed, and worse, not even bit-packed. The old scheme stored 8 bits per pixel averaged over each block, and the new scheme stores exactly twice that.

        I wouldn’t call it malice though; it’s their loss. Their ASICs may not have the capacity to perform a good lossless compression algorithm without possibly compromising software stability in other aspects of the camera.

        Reply
      • Dennis Watts says

        October 13, 2015 at 8:34 pm

        I wouldn’t claim silk purse quality. I am merely saying I have both, and C1 is better at converting the raw file. Considering that it is free why not post a comparison?

        I agree Lossless would be better. Weather they (sony) are really listening? Who knows? I feel like the photogs on the sony design team need more voice.

        Reply
        • Jim says

          October 13, 2015 at 8:49 pm

          I wouldn’t claim silk purse quality. I am merely saying I have both, and C1 is better at converting the raw file. Considering that it is free why not post a comparison?

          So many things to test, so little time…

          Jim

          Reply
  2. Dennis Watts says

    October 14, 2015 at 10:42 am

    10-4
    If I had the time I would do it for you 😉

    Reply

Leave a Reply Cancel reply

Your email address will not be published. Required fields are marked *

May 2025
S M T W T F S
 123
45678910
11121314151617
18192021222324
25262728293031
« Apr    

Articles

  • About
    • Patents and papers about color
    • Who am I?
  • How to…
    • Backing up photographic images
    • How to change email providers
    • How to shoot slanted edge images for me
  • Lens screening testing
    • Equipment and Software
    • Examples
      • Bad and OK 200-600 at 600
      • Excellent 180-400 zoom
      • Fair 14-30mm zoom
      • Good 100-200 mm MF zoom
      • Good 100-400 zoom
      • Good 100mm lens on P1 P45+
      • Good 120mm MF lens
      • Good 18mm FF lens
      • Good 24-105 mm FF lens
      • Good 24-70 FF zoom
      • Good 35 mm FF lens
      • Good 35-70 MF lens
      • Good 60 mm lens on IQ3-100
      • Good 63 mm MF lens
      • Good 65 mm FF lens
      • Good 85 mm FF lens
      • Good and bad 25mm FF lenses
      • Good zoom at 24 mm
      • Marginal 18mm lens
      • Marginal 35mm FF lens
      • Mildly problematic 55 mm FF lens
      • OK 16-35mm zoom
      • OK 60mm lens on P1 P45+
      • OK Sony 600mm f/4
      • Pretty good 16-35 FF zoom
      • Pretty good 90mm FF lens
      • Problematic 400 mm FF lens
      • Tilted 20 mm f/1.8 FF lens
      • Tilted 30 mm MF lens
      • Tilted 50 mm FF lens
      • Two 15mm FF lenses
    • Found a problem – now what?
    • Goals for this test
    • Minimum target distances
      • MFT
      • APS-C
      • Full frame
      • Small medium format
    • Printable Siemens Star targets
    • Target size on sensor
      • MFT
      • APS-C
      • Full frame
      • Small medium format
    • Test instructions — postproduction
    • Test instructions — reading the images
    • Test instructions – capture
    • Theory of the test
    • What’s wrong with conventional lens screening?
  • Previsualization heresy
  • Privacy Policy
  • Recommended photographic web sites
  • Using in-camera histograms for ETTR
    • Acknowledgments
    • Why ETTR?
    • Normal in-camera histograms
    • Image processing for in-camera histograms
    • Making the in-camera histogram closely represent the raw histogram
    • Shortcuts to UniWB
    • Preparing for monitor-based UniWB
    • A one-step UniWB procedure
    • The math behind the one-step method
    • Iteration using Newton’s Method

Category List

Recent Comments

  • JimK on Goldilocks and the three flashes
  • DC Wedding Photographer on Goldilocks and the three flashes
  • Wedding Photographer in DC on The 16-Bit Fallacy: Why More Isn’t Always Better in Medium Format Cameras
  • JimK on Fujifilm GFX 100S II precision
  • Renjie Zhu on Fujifilm GFX 100S II precision
  • JimK on Fuji 20-35/4 landscape field curvature at 23mm vs 23/4 GF
  • Ivo de Man on Fuji 20-35/4 landscape field curvature at 23mm vs 23/4 GF
  • JimK on Fuji 20-35/4 landscape field curvature at 23mm vs 23/4 GF
  • JimK on Fuji 20-35/4 landscape field curvature at 23mm vs 23/4 GF
  • Ivo de Man on Fuji 20-35/4 landscape field curvature at 23mm vs 23/4 GF

Archives

Copyright © 2025 · Daily Dish Pro On Genesis Framework · WordPress · Log in

Unless otherwise noted, all images copyright Jim Kasson.