• site home
  • blog home
  • galleries
  • contact
  • underwater
  • the bleeding edge

the last word

Photography meets digital computer technology. Photography wins -- most of the time.

You are here: Home / The Last Word / Sharpness testing strategy, part 2

Sharpness testing strategy, part 2

December 30, 2013 JimK Leave a Comment

Yesterday I wrote about sharpness testing, with emphasis on lighting the target. I’ve been thinking about the target itself.

I’ve been using a set of targets of my own design.

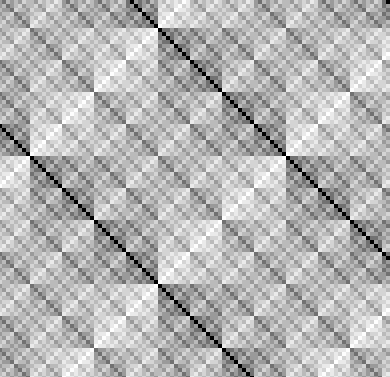
Here’s a very tight crop of one:

6 layers

They are characterized by a lot of fairly wide bandwidth high-frequency energy that is uniform across the frame, so that similar measurements may be made at any position. Images of the target are analyzed by computer programs of my own design. This allows

  • An assessment of overall sharpness across entire image field
  • Detection of field flatness issues or resolution that varies by location (unfortunately, these cannot be separated) by analysis of slow variations in sharpness across the field
  • Numerical sharpness results
  • Tolerance of alignment differences
  • No feature recognition necessary
  • Because it has a broad range of high spatial frequencies, distance and magnification aren’t critical

The drawbacks of this target are:

  • It is next to useless for visual analysis.
  • It is completely non-standard, and that provides a challenge for those who wish to reproduce or extend my experiments
  • My analyses are likewise non-standard, with the same result
  • It does not distinguish between tangential and sagittal errors
  • It is difficult to focus on; this can be fixed by including lower spatial frequencies, but that reduces the signal-to-noise ratio of the highest spatial frequencies
  • It is difficult-to-impossible to compare results made with sensors of different resolution
  • It is made up of horizontal and vertical rectangles, which means that the diagonal resolution is about 1.4 times the horizontal and vertical resolution.

For all those reasons, I’ve started to explore using standard targets like the older ISO 12233 target, and analyses using imatest. The target solves all of the problems with my self-designed target that I mentioned above. However, it has a few drawbacks of its own:

  • It’s too small when used with high-resolution cameras like the Sony a7R. You can fill the field with it, but its resolution will then be far less than the camera’s.
  • It doesn’t provide a large range of resolutions, so image size and magnification is important. With Bayer-CFA sensors, it’s not that easy to find the magnification that provides a clear, crisp image at the low end and completely smooth, unresolved grayness at the high end.

Nevertheless, I’ll be working with it in the next few days and reporting on the experience.
The Last Word

← No Nikon E lenses on the Sony a7R a7R and D800E shutter slap testing with ISO 12233 →

Leave a Reply Cancel reply

Your email address will not be published. Required fields are marked *

May 2025
S M T W T F S
 123
45678910
11121314151617
18192021222324
25262728293031
« Apr    

Articles

  • About
    • Patents and papers about color
    • Who am I?
  • How to…
    • Backing up photographic images
    • How to change email providers
    • How to shoot slanted edge images for me
  • Lens screening testing
    • Equipment and Software
    • Examples
      • Bad and OK 200-600 at 600
      • Excellent 180-400 zoom
      • Fair 14-30mm zoom
      • Good 100-200 mm MF zoom
      • Good 100-400 zoom
      • Good 100mm lens on P1 P45+
      • Good 120mm MF lens
      • Good 18mm FF lens
      • Good 24-105 mm FF lens
      • Good 24-70 FF zoom
      • Good 35 mm FF lens
      • Good 35-70 MF lens
      • Good 60 mm lens on IQ3-100
      • Good 63 mm MF lens
      • Good 65 mm FF lens
      • Good 85 mm FF lens
      • Good and bad 25mm FF lenses
      • Good zoom at 24 mm
      • Marginal 18mm lens
      • Marginal 35mm FF lens
      • Mildly problematic 55 mm FF lens
      • OK 16-35mm zoom
      • OK 60mm lens on P1 P45+
      • OK Sony 600mm f/4
      • Pretty good 16-35 FF zoom
      • Pretty good 90mm FF lens
      • Problematic 400 mm FF lens
      • Tilted 20 mm f/1.8 FF lens
      • Tilted 30 mm MF lens
      • Tilted 50 mm FF lens
      • Two 15mm FF lenses
    • Found a problem – now what?
    • Goals for this test
    • Minimum target distances
      • MFT
      • APS-C
      • Full frame
      • Small medium format
    • Printable Siemens Star targets
    • Target size on sensor
      • MFT
      • APS-C
      • Full frame
      • Small medium format
    • Test instructions — postproduction
    • Test instructions — reading the images
    • Test instructions – capture
    • Theory of the test
    • What’s wrong with conventional lens screening?
  • Previsualization heresy
  • Privacy Policy
  • Recommended photographic web sites
  • Using in-camera histograms for ETTR
    • Acknowledgments
    • Why ETTR?
    • Normal in-camera histograms
    • Image processing for in-camera histograms
    • Making the in-camera histogram closely represent the raw histogram
    • Shortcuts to UniWB
    • Preparing for monitor-based UniWB
    • A one-step UniWB procedure
    • The math behind the one-step method
    • Iteration using Newton’s Method

Category List

Recent Comments

  • JimK on How Sensor Noise Scales with Exposure Time
  • Štěpán Kaňa on Calculating reach for wildlife photography
  • Štěpán Kaňa on How Sensor Noise Scales with Exposure Time
  • JimK on Calculating reach for wildlife photography
  • Geofrey on Calculating reach for wildlife photography
  • JimK on Calculating reach for wildlife photography
  • Geofrey on Calculating reach for wildlife photography
  • Javier Sanchez on The 16-Bit Fallacy: Why More Isn’t Always Better in Medium Format Cameras
  • Mike MacDonald on Your photograph looks like a painting?
  • Mike MacDonald on Your photograph looks like a painting?

Archives

Copyright © 2025 · Daily Dish Pro On Genesis Framework · WordPress · Log in

Unless otherwise noted, all images copyright Jim Kasson.