I’m looking for a way to do shutter slap testing with sub-pixel sensitivity without spending a lot of money on variable intensity LED Fresnel lights. It occurred to me that I might be able to get what I need using neutral density filters to compensate exposures for different shutter speeds.
Before I get started with what I did with the ND filters and what the results were, let me tell you a little about the results of my preliminary experiments. Basically, when you’re looking at changes to aliasing patterns for clues to what’s going on with the camera motion, there is precious little that doesn’t make a difference. ISO settings matter: they affect the noise and that affects the resolving power and that affects the moiré patterns. The number of photons hitting the sensor matters: see above. Apertures matter: they affect the resolving power of the lens, which is sometime greater, and sometimes less, than the resolution of the sensor. How well you focus certainly matters, and it’s hard – impossible, actually – to be consistently spot on. The spectrum of the illuminant matters: bluer light is sharper.
Like the chemical photographer who exhibits only the perfect print and doesn’t show you the soggy pile of rejects, I will spare you all the things that I’ve tried today that haven’t worked at all.
In what I’m going to talk about for the rest of the post, my objectives were
- To see if a ND filter introduced losses that would obscure the shutter-slap effects I’m looking for
- Assuming the answer to the first bullet is no, to see if the a7R shutter slap made images exposed with a normal lens at 1/125 second (one of the reported trouble speeds with this focal-length lens) look worse than images exposed at 1/500 or 1/30. With any camera/lens/tripod/head combination, there is usually a range of shutter speeds for with shutter-slap or mirror-slap blur is the greatest; shutter speeds faster than that range allow the shutter to “freeze” the camera motion, and shutter speed lower than that range allow most of the exposure to occur after the worst of the vibrations are over.
- To compare a7R images to D800E (with the mirror locked up) images with the same lens, apertures, and shutter speeds to see if the a7R represents a step backward in image quality at the sampled shutter speeds.
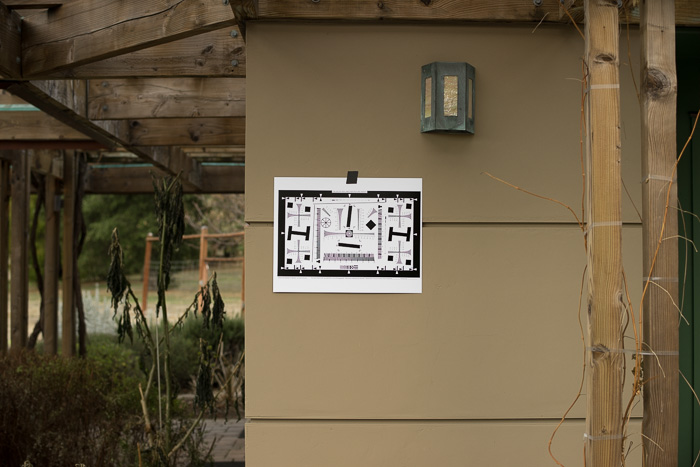
I used the AF-S Nikkor 58mm f/1.4G as the test lens. This lens is substantially heavier than the Sony/Zeiss 55mm f/1.8 FE lens that some have reported difficulty with at 1/125, and that extra heft may reduce blur at that speed. I used a RRS TVC-34L Versa Series 3 tripod with an Arca Swiss Cube head and RRS plates on both the D800E and the a7R. I placed the tripod on a surface of concrete pavers, with the target in open shade.
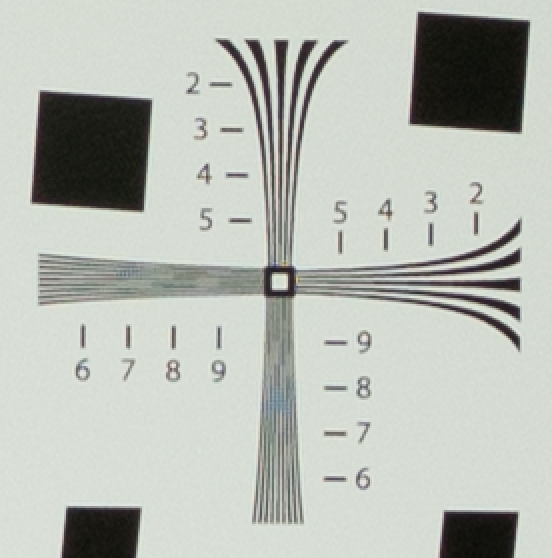
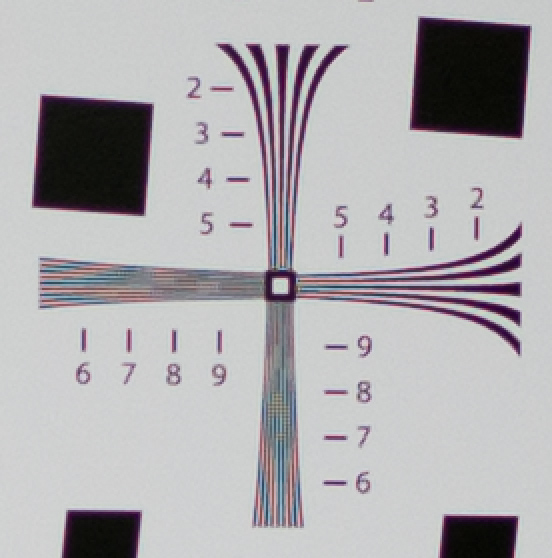
Here’s the whole image, as seen by the a7R:
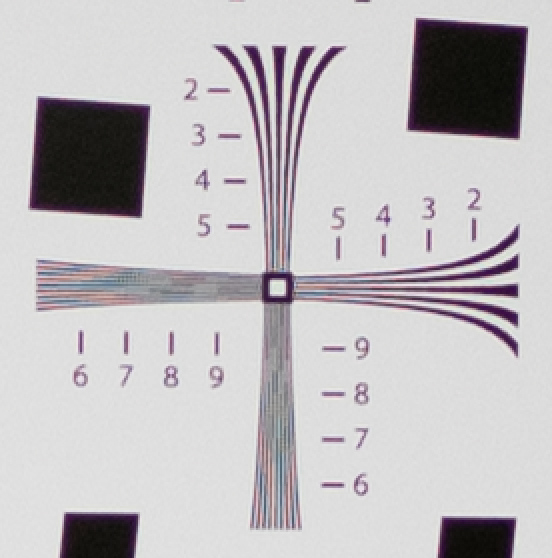
Now I’m going to show you some tight crops of an area at the upper right that allows measurement of vertical and horizontal resolution. They were demosaiced and processed in Lightroom 5.3 with the Adobe default settings, except for white balance and exposure. They have been enlarged by a factor of two using nearest neighbor interpolation, so that each pixel in the original image is replaced by a 2×2 square with the same RGB values.
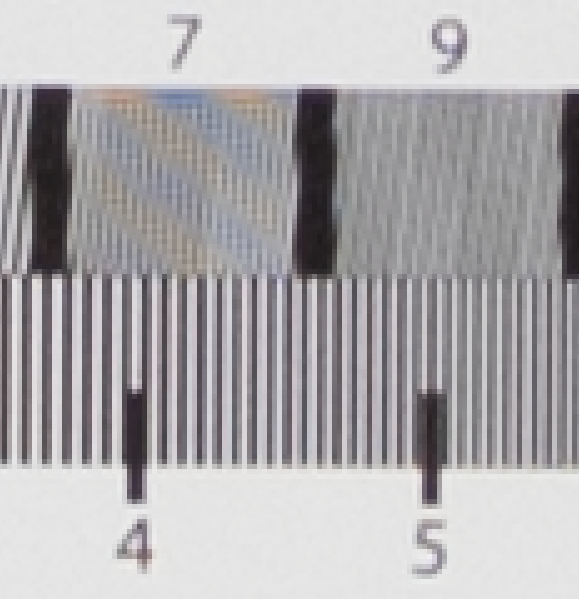
I focused at f/1.4 and made an exposure without the filter; f/3.2 at 1/500 at ISO 400:
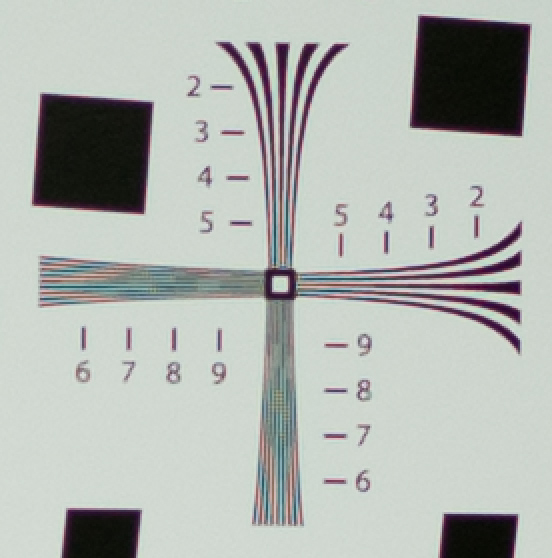
Then I slipped a 72mm Tokina 2-stop ND filter on, and made an exposure at 1/125:
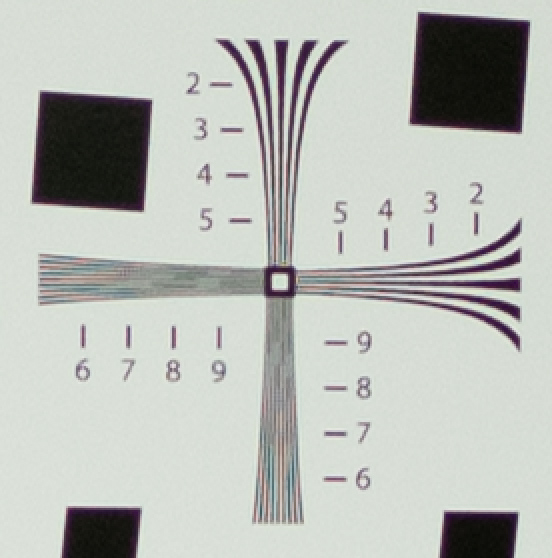
You can see that the ND filter isn’t really neutral; it has a green cast. You can also see that the image made at that fastest shutter speed has greater horizontal and vertical resolution. The contrast of the close-together lines is greater, and there are more Bayer pattern color aliasing errors. The change in resolution between the two images is not striking. It’s also not obvious at this point that the degraded resolution of the 1/125 image is due to camera shake or the effects of the ND filter. In order to gain some insight into that issue, I refocused and made two more exposures:
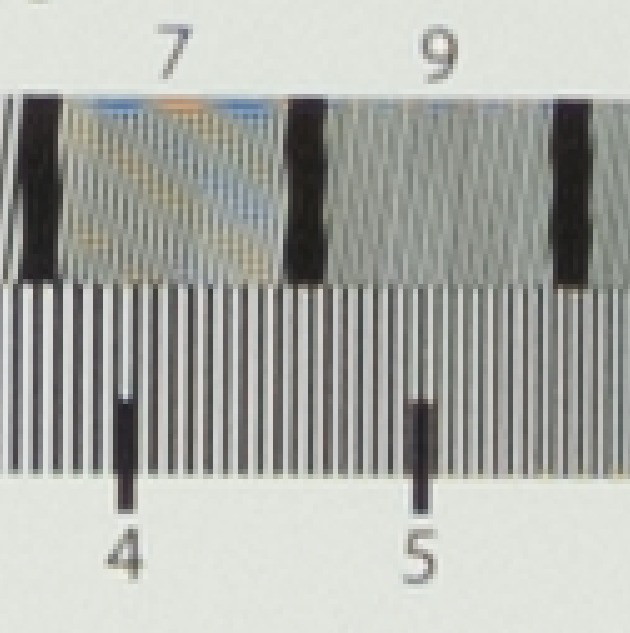
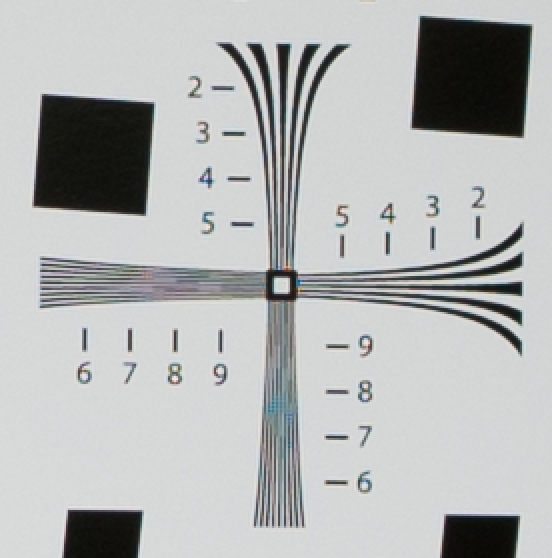
The first is at 1/125 at f/6.3 with no ND filter:
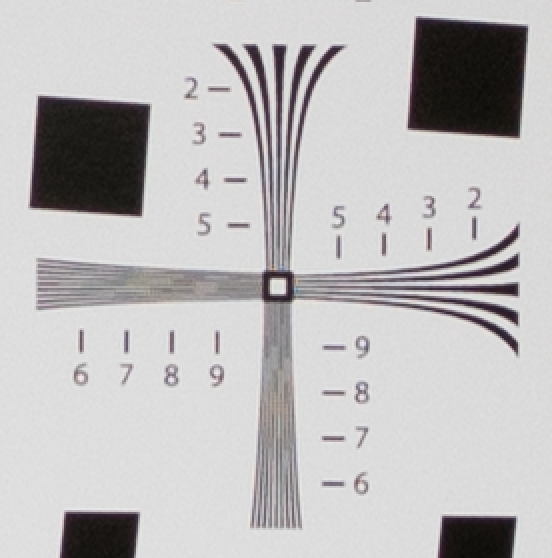
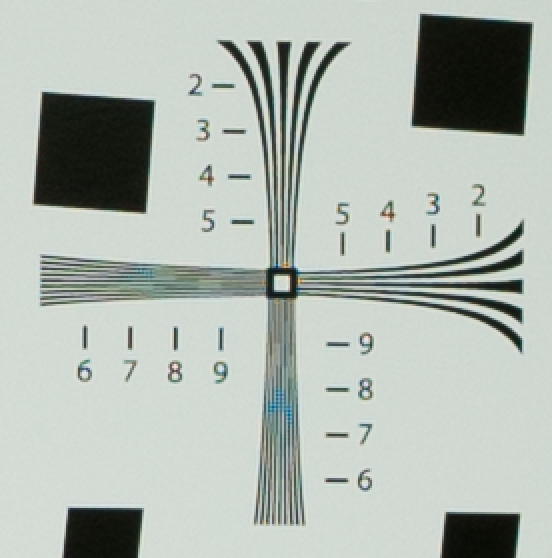
The next is at 1/30 with the ND filter in place:
The image without the ND filter is about the same as the image with the filter. But here’s something simultaneously interesting and concerning: the image with the ND filter at 1/125 is sharper than the image at 1/125 without the ND filter. That indicates that the focus was better in the first pair of pictures.
Looking at another section of the target, we can see that the 1/125 image:
Is slightly less sharp than the 1/30 image:
I focused on the center element, which exhibited striking moiré and false color patterns when close to in focus.
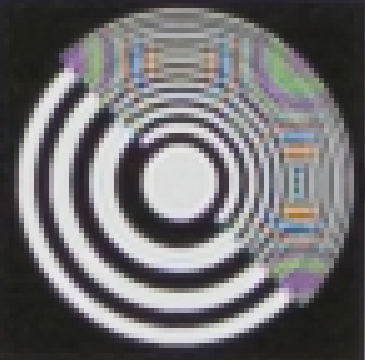
Focusing these images was tricky, with almost-imperceptible movements of the focus ring making big differences in the moiré patterns seen in the finder at maximum magnification. Just removing one’s hand from the focusing ring can produce moiré changes in the finder. I am not sure that adding and removing the ND filter can be done without making changes to the focusing. Focusing is also difficult because the designers of the 58mm lens were concentrating on building an autofocus lens, and manual focus took a back seat to that. As proof, let me point out that the entire focusing range of the lens is achieved with a 90-degree twist of the focusing ring. When all is said and done, the effects of the shutter shock are on the same order as the focusing errors under nearly ideal conditions.
It’s a challenging business. So challenging, in fact, that we should think about whether or not the changes we can see in this very controlled testing situation aren’t unimportant in real field use.
The next thing to look at is the performance of the same lens on the Nikon D800E. I set up the camera in live view, with a shutter delay set to 2 seconds, and the drive control set to Mirror Up. In this mode, the first press of the shutter release closes the shutter (the mirror is already up since we’re in live view). The second press of the shutter release trips the shutter after a two-second delay.
Without the filter; f/3.2 at 1/500 at ISO 400:
With the 72mm Tokina 2-stop ND filter on, at 1/125:
The images are slightly different, but it’s hard to say which one is sharper.
Now at 1/125 at f/6.3 with no ND filter:
And at 1/30 with the ND filter in place:
Neither of these is quite as sharp as the images in the first set, probably as a result of focus error, possibly in combination with sub-pixel alignment differences – it’s impossible to change the filter without causing tiny changes to the camera position.
So, my conclusions are that there’s more blur at 1/125 with the a7R and the Nikon 58mm f/1.4 than at 1/500 and slightly more than at 1/30 (although better focus could cause me to reconsider the slightly part), and that that blur is probably the effect of shutter shock, since, with the D800E using MUP mode and a 2-second shutter delay, 1/125 is not worse than the other two shutter speeds.
One thing that surprised me about this testing was the absence of a preferential direction for the shutter-slap blur. With the a7R’s vertical shutter motion, I would have thought that we’d see more blur in the horizontal elements of the test target than the vertical ones.
The wisdom of using the presence of sampling artifacts like moiré and false color as a proxy for true image sharpness is, in my mind, natural but questionable. The topic deserves further examination.
As to what this testing means for further shutter-slap testing using ND filters, more work is also necessary. It’s clear that producing a 1/3 stop series with ordinary ND filters is not practical. We would have to use different numbers of filters for different shutter speeds, and changing the filters would be laborious and possibly affect focus. The only practical way to proceed is to find out if variable ND filters are up to the task. There’s also the question of whether I’m up to the task of finding out.
One other thing is clear to me from doing these tests: working outdoors is far from ideal. There are subtle changes to the light that occur throughout a series of tests, even if you try to work fast, and working fast is conducive to making mistakes. A long-term solution will involve moving indoors. That brings us back around to lighting. The cheap way to light the target indoors is to use tungsten incandescent bulbs. The problem with those lighting sources, aside from heat and blown breakers, is that their output is biased towards the red end of the spectrum, and thus they’re not the source to use if you want that sharpest image. Can they produce images that are sharp enough? Answering that question requires more testing. Can you detect a pattern here?
A good test with interesting results. I’m very glad someone is comparing two cameras. I’m a little concerned about the focus variable between shots and the need to touch the camera setup by installing an ND filter. It could be delicate or stubborn.
In my tests I created an image with no shutter vibration as a comparison image. Even if focus wasn’t spot on, (is it ever?) at least there is a vibration free image to compare the others to. The image with no shutter vibration is created when strobes are fired at 7 seconds during a 10 sec shutter opening in a dark room. The only variable that may effect sharpness is going from strobe light to incandescent light and of course shutter vibration.
I did find that shutter vibration increases with slower shutter speeds 1/160 – 1/20sec tested in 1/3 stops. This was using a collar and adapter setup and at 200mm.
I have a feeling that adapters and collars have a great influence on the results of shutter vibration.
I would very much like to create a strobe-based comparison image, but with the lighting equipment available to me, I can’t do that with the same spectrum as the shutter-mediated images. By shelling out $5K for LED Fresnel lighting, I could fix that, but I’d like to avoid the expense if possible. I’ve found the difference in spectral distribution from strobe to the incandescent illumination I have makes accurate comparisons impossible.
It’s a work in progress. More to come.
My gut agrees with you about adapters, but I have no testing to confirm that — yet.
Jim
I know for sure collars do. They allow the shutter or mirror or both to act at the end of a torsion pendulum, rather than at the fulcrum, where things are stiffer.
One test that I could perform without changing illuminant spectrum is triggering the strobe as you did and using normal X-synch at 1/160 second, and testing strobe durations from 1/400 second through 1/13000 second. The images would only be comparable pairwise with pairs of the same duration, since energy changes with duration. I haven’t tried this test since I figured that with cameras with lenses shorter then 135mm and mounted directly to the tripod head, that they’d all be sharp, and I don’t have a way to get durations linger than about 1/400 second.
Jim, Ferrell: Many thanks to both of you and others for taking the time to check into this effect and post your findings. As a new A7r owner and “wannabe” photography enthusiast, I find this topic very interesting and informative. Regardless of where one might stand on whether the effect exists or not there is a lot to be learned reading the various posts, debates, findings and attempts to prove/disprove the effect. In a matter of a few weeks reading all these posts I have learned more about the effects of adapters, clamps, tripods, shutter speeds, shutters, pixels, lenses, filters, handheld vs tripod than I would have ever learned otherwise. Please keep up the good work–I am a much better photographer for it!
Hi Jim
In this article (January 1, 2014) the EXIF info on your first 4 target images does not appear to match the text, both for camera and shutter speeds… they all say f/5, 1/50s, ISO 400, D800E.
Rory
Thanks, Rory. I’ll look into it and report back.
Jim
Rory, when I process most of these images for my observation and for the web, I export them as layers to Photoshop, where I align them, change color space to sRGB (if I remember), res them up, etc. In the stack are often images that I don’t use in the blog. Then I click on the layer I want to export, and save the image as JPEG.
I conducted an experiment. I created a stack in Photoshop with layers from various exposures. Then I saved several versions of the file with various layers visible. In all cases, the EXIF data in the JPEG was that of whatever image happened to be the bottom image in the stack.
I can see how this could be confusing to someone who is looking at the EXIF data. I suppose the right thing to do is to strip out the EXIF data, since it is not only useless, but misleading. I can’t find a place in the Photoshop save dialog to omit the data. I guess I could import the images into Lightroom, and export them with the EXIF data stripped out. That seems like a lot of work, and I’m not 100% sure that Lr won’t mess with the JPEG data in the process. I suppose I could test.
Or I could post a disclaimer. I’m not sure what to do about this. Any ideas? Do you know of an easy way to strip off the EXIF data in a JPEG file?
[added later: I’ve done some more testing, and it’s not the bottom layer that Ps uses for the EXIF data. I’m not sure, but I think it’s the first layer added. Here’s what I did. I took a stack, created a new layer which I left blank, and moved it to the bottom. The EXIF data in the saved JPEG didn’t change. Hmmm…]
Jim