• site home
  • blog home
  • galleries
  • contact
  • underwater
  • the bleeding edge

the last word

Photography meets digital computer technology. Photography wins -- most of the time.

You are here: Home / D850 / Exposure strategies for the D850 — numbers

Exposure strategies for the D850 — numbers

July 9, 2018 JimK 6 Comments

This is the 66th (!) in a series of posts on the Nikon D850.   You should be able to find all the posts about that camera in the Category List on the right sidebar, below the Articles widget. There’s a drop-down menu there that you can use to get to all the posts in this series; just look for “D850”.

The Nikon D850 uses a Sony sensor that, like many modern Sony full frame and APS-C devices, uses conversion gain changing technology licensed from Aptina (Since acquired by ON Semiconductor). That technology is called DR-Pix, and you can read about it here. This approach lowers the read noise for higher ISO photos. In a sense, the camera can be thought of as having two base ISOs. In the D850, the real base ISO of the camera is 64, and the high conversion gain is applied at ISOs of 400 and above, so you could think of ISO 400 as a kind of “base ISO”.

What does this mean to photographers? I’m going to look at that in this and the next few posts. This one will cover the quantitative implications. If you’re not a fan of numbers and charts, you’re in luck; the next posts will cover the same concepts visually. Then I’ll attempt to develop strategies for taking advantage of the camera’s characteristics.

The change in conversion gain causes the D850’s engineering dynamic range (EDR) to take a jump at ISO 400.

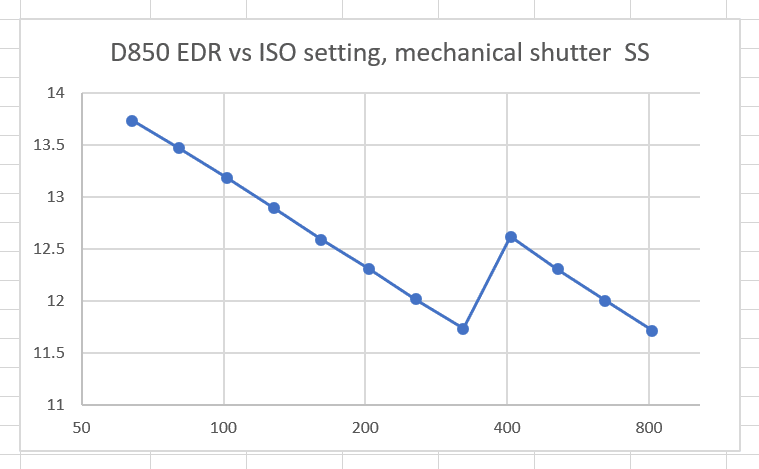
But EDR is not of much use to photographers, at least directly. A more significant metric is the signal-to-noise ratio (SNR) in the shadows. So let’s take a look at that:

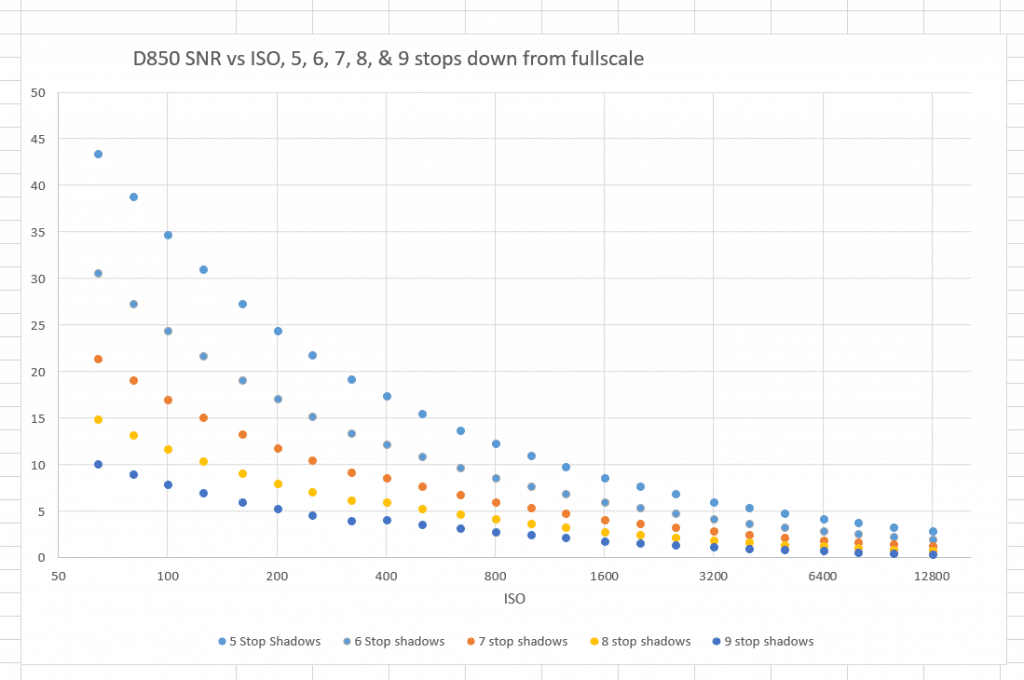
The kink that was so evident in the EDR curve has little effect away from the very deepest shadows. If we measure the SNR in stops, it’s a bit easier to see:

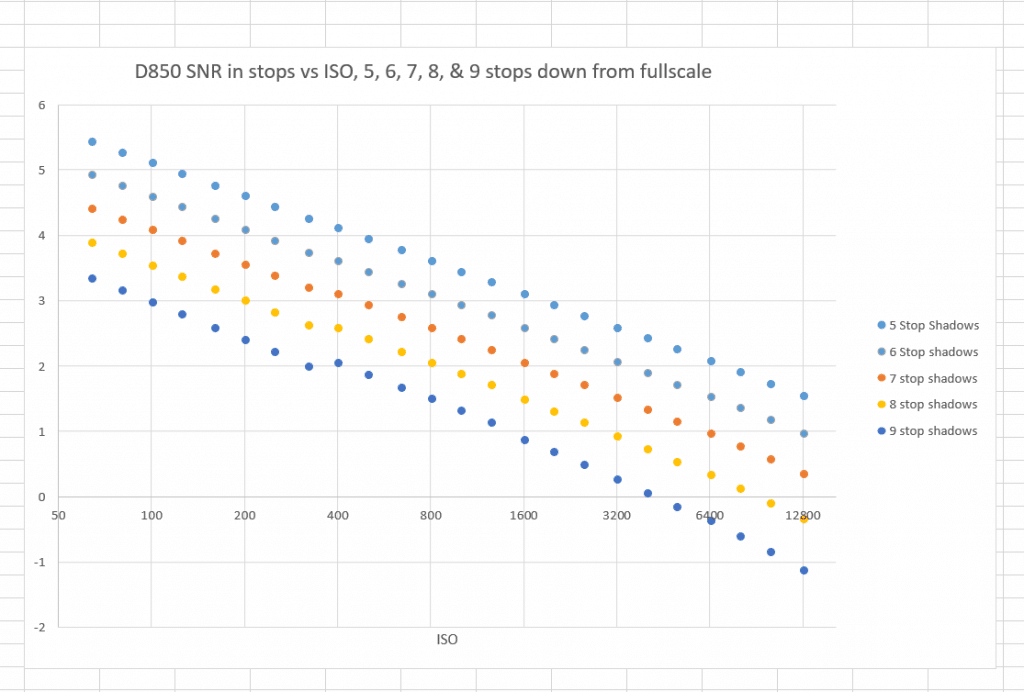
You’ll notice that the SNR, when measured in stops, rolls off fairly close to linearly. When the SNR drops by half a stop every time the ISO setting is doubled, that’s called “ISO-less” behavior. The noise is entirely determined by the photon noise, which is in turn entirely determined by the exposure. The ISO setting has, per se, nothing to do with it. The ISO setting does affect the SNR since we’re measuring it in stops down from full scale, and raising ISO lowers full scale.

How close to ISO-less is the D850? Let’s look at the improvement in SNR that is created by turning up the ISO as opposed to leaving it at 100, and then switching it to 400.

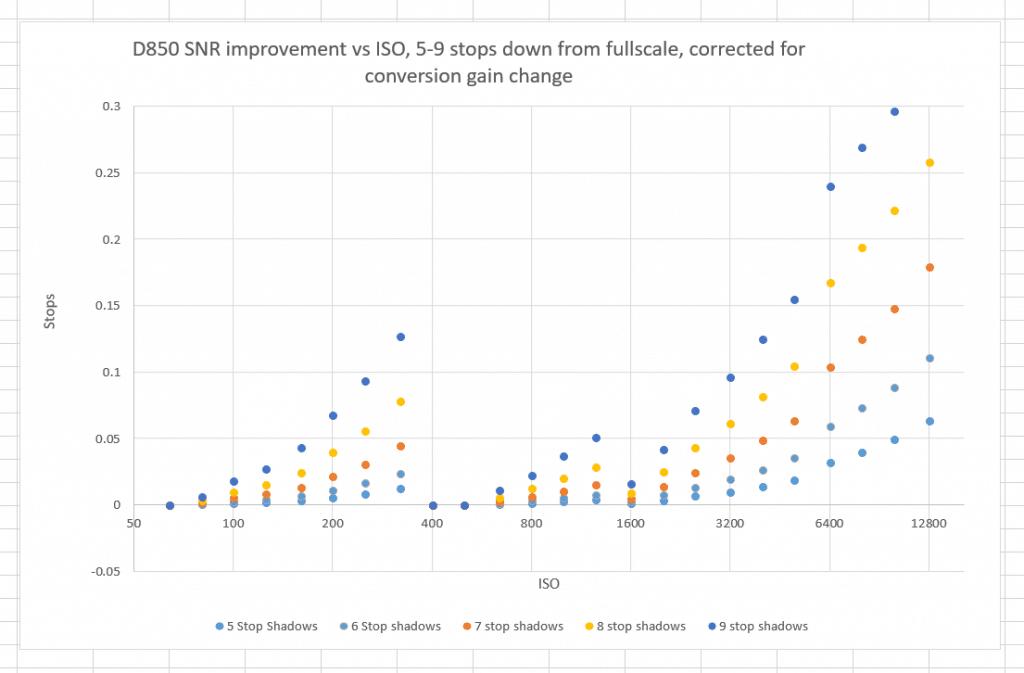
Note the vertical scale; less than a third of a stop from top to bottom. Even with the shadows 9 stops down from fullscale, the D850 is pretty close to ISOless, once you correct for the conversion gain increase as ISO 400 and above. There is some funny business going on at ISO 1600 and above. I suspect digital processing in the camera, but I haven’t been able to prove it.

Let’s zoom in on the above set of curves:

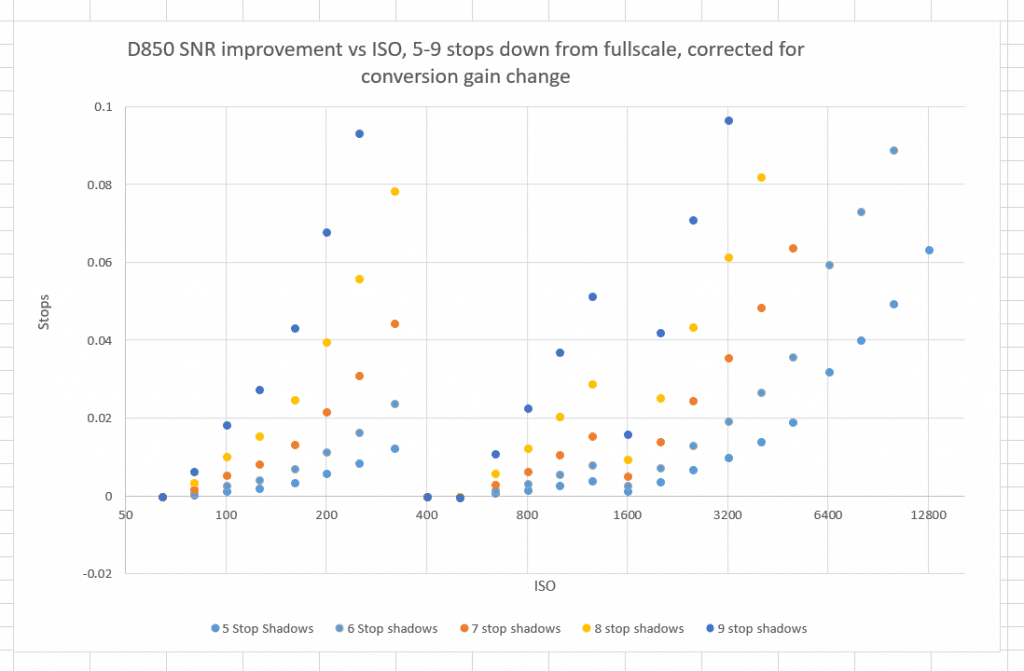
Now the whole vertical span is only a tenth of a stop. If you’re shooting raw and care only about shadows that are 5 or six stops down from full scale, it’s pretty clear that the ISO knob is not helping. You might just as well leave it at 100 or 400 and push the brightness in post-production. Even if you’re concerned about deeper shadows, the ISO know doesn’t make much difference except for that 320-400 step. There is slightly more reason to use the ISO control in the 64-320 region than in the 400-1600 one.

Now let’s take the above set of curves and prune out all the data with an SNR of under 4. Many people would argue that such noisy information is not photographically useful in many circumstances.

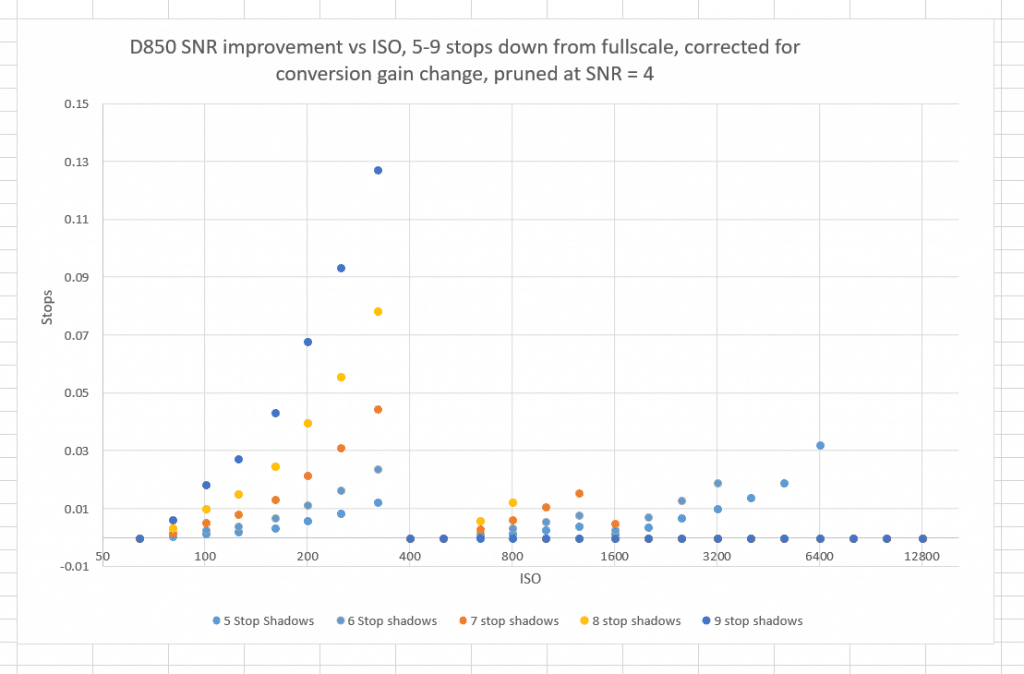
Now the case is even stronger that, above ISO 400, you’re at least as well off to set the camera at 400 and push in post.

There are practical considerations, and I’ll get to them in a later post in this set.


D850

← Lighting a fire with a strobe? D850 shadow noise — ISOs 64-320 →

Comments

  1. Arthur says

    July 13, 2018 at 6:31 am

    Jim – thank you for working on the 850 again. I will be tuned in for the time to come.

    Reply
    • JimK says

      July 13, 2018 at 8:16 am

      Thanks, Arthur. I’ve got one more post to do on D850 exposure strategy, and then that’s all the D850 stuff that I have planned. Of course, I’m always welcome to suggestions, but since the GFX firmware update that added focus stacking, I’m not using the D850 very much at all, so I haven’t discovered new things that I want to test.

      I might do a comparison of a7RIII and D850 exposure strategies. I suspect they will be very much the same, once a 2/3 stop correction is made to the ISO numbers.

      Reply

Trackbacks

  1. D850 exposure strategy — manual settings says:
    July 12, 2018 at 12:58 pm

    […] few days ago, I performed a quantitative analysis of the D850 noise performance versus ISO setting. Then I made a series of posts showing visually what’s going on with the camera in that […]

    Reply
  2. D850 exposure strategy — auto-exposure settings says:
    July 22, 2018 at 12:50 pm

    […] This is the 73rd in a series of posts on the Nikon D850. You should be able to find all the posts about that camera in the Category List on the right sidebar, below the Articles widget. There’s a drop-down menu there that you can use to get to all the posts in this series; just look for “D850”. If you’re new to this thread, it’s probaby a good idea to start reading here. […]

    Reply
  3. Exposure strategies for the a7RIII — numbers says:
    July 25, 2018 at 9:29 am

    […] about the optimal exposure and ISO setting strategy for the Nikon D850. The first one of those is here. Now I’m going to so the same thing for the a7RIII. The cameras are in many ways similar, so […]

    Reply
  4. a7RIII exposure strategy — manual settings says:
    July 25, 2018 at 2:06 pm

    […] few days ago, I performed a quantitative analysis of the a7RIII noise performance versus ISO setting. Then I made a series of posts showing visually what’s going on with the camera in that […]

    Reply

Leave a Reply Cancel reply

Your email address will not be published. Required fields are marked *

May 2025
S M T W T F S
 123
45678910
11121314151617
18192021222324
25262728293031
« Apr    

Articles

  • About
    • Patents and papers about color
    • Who am I?
  • How to…
    • Backing up photographic images
    • How to change email providers
    • How to shoot slanted edge images for me
  • Lens screening testing
    • Equipment and Software
    • Examples
      • Bad and OK 200-600 at 600
      • Excellent 180-400 zoom
      • Fair 14-30mm zoom
      • Good 100-200 mm MF zoom
      • Good 100-400 zoom
      • Good 100mm lens on P1 P45+
      • Good 120mm MF lens
      • Good 18mm FF lens
      • Good 24-105 mm FF lens
      • Good 24-70 FF zoom
      • Good 35 mm FF lens
      • Good 35-70 MF lens
      • Good 60 mm lens on IQ3-100
      • Good 63 mm MF lens
      • Good 65 mm FF lens
      • Good 85 mm FF lens
      • Good and bad 25mm FF lenses
      • Good zoom at 24 mm
      • Marginal 18mm lens
      • Marginal 35mm FF lens
      • Mildly problematic 55 mm FF lens
      • OK 16-35mm zoom
      • OK 60mm lens on P1 P45+
      • OK Sony 600mm f/4
      • Pretty good 16-35 FF zoom
      • Pretty good 90mm FF lens
      • Problematic 400 mm FF lens
      • Tilted 20 mm f/1.8 FF lens
      • Tilted 30 mm MF lens
      • Tilted 50 mm FF lens
      • Two 15mm FF lenses
    • Found a problem – now what?
    • Goals for this test
    • Minimum target distances
      • MFT
      • APS-C
      • Full frame
      • Small medium format
    • Printable Siemens Star targets
    • Target size on sensor
      • MFT
      • APS-C
      • Full frame
      • Small medium format
    • Test instructions — postproduction
    • Test instructions — reading the images
    • Test instructions – capture
    • Theory of the test
    • What’s wrong with conventional lens screening?
  • Previsualization heresy
  • Privacy Policy
  • Recommended photographic web sites
  • Using in-camera histograms for ETTR
    • Acknowledgments
    • Why ETTR?
    • Normal in-camera histograms
    • Image processing for in-camera histograms
    • Making the in-camera histogram closely represent the raw histogram
    • Shortcuts to UniWB
    • Preparing for monitor-based UniWB
    • A one-step UniWB procedure
    • The math behind the one-step method
    • Iteration using Newton’s Method

Category List

Recent Comments

  • bob lozano on The 16-Bit Fallacy: Why More Isn’t Always Better in Medium Format Cameras
  • JimK on Goldilocks and the three flashes
  • DC Wedding Photographer on Goldilocks and the three flashes
  • Wedding Photographer in DC on The 16-Bit Fallacy: Why More Isn’t Always Better in Medium Format Cameras
  • JimK on Fujifilm GFX 100S II precision
  • Renjie Zhu on Fujifilm GFX 100S II precision
  • JimK on Fuji 20-35/4 landscape field curvature at 23mm vs 23/4 GF
  • Ivo de Man on Fuji 20-35/4 landscape field curvature at 23mm vs 23/4 GF
  • JimK on Fuji 20-35/4 landscape field curvature at 23mm vs 23/4 GF
  • JimK on Fuji 20-35/4 landscape field curvature at 23mm vs 23/4 GF

Archives

Copyright © 2025 · Daily Dish Pro On Genesis Framework · WordPress · Log in

Unless otherwise noted, all images copyright Jim Kasson.