This is one in a series of posts on the Fujifilm GFX 100. You should be able to find all the posts about that camera in the Category List on the right sidebar, below the Articles widget. There’s a drop-down menu there that you can use to get to all the posts in this series; just look for “GFX 100”.
There have been web anecdotes about the GFX 100 files needing a lot of sharpening, and speculation that it’s because the raw converters aren’t dialed in for the camera yet. I, too, am interested in this topic, but from a different perspective. I would like to know if the GFX 100 raw files themselves are more or less sharp than the GFX 50S and GFX 50R files at a pixel level, and also whether they are sharper at a picture level.
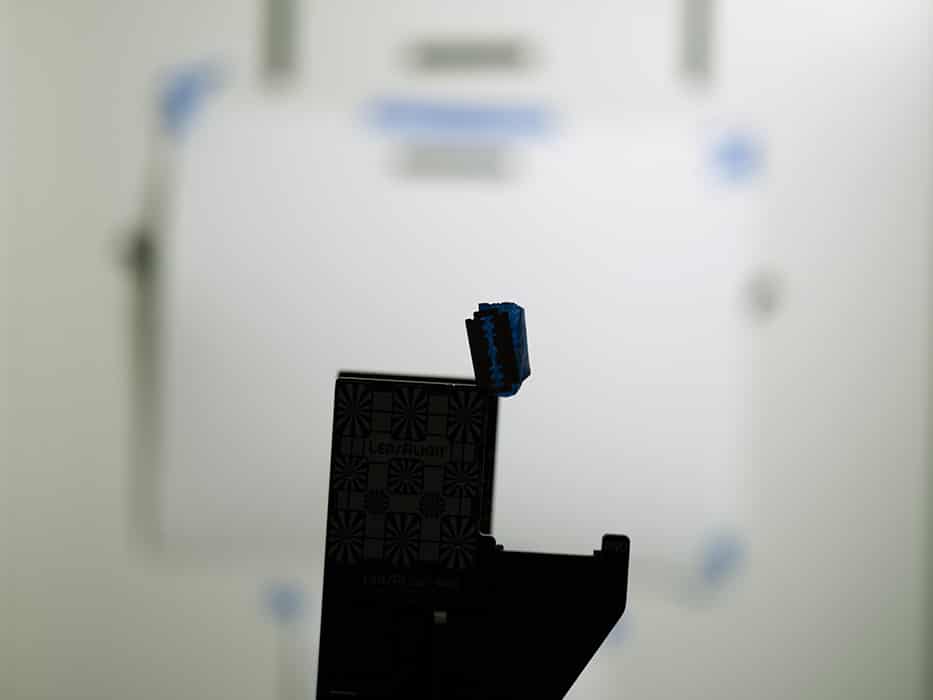
Fortunately, I have a way to find out: my focus-bracketed razor-blade slanted edge MTF test. To perform this test, I backlight an ordinary — well, they used to be ordinary — double edged razor blade, make a series of exposures at different focused distances, and analyze the raw files with a MatLab program I’ve written which uses MTFMapper to perform slanted edge analysis of the four raw planes. A tip of the hat to Frans van den Berg for doing such a great job with MTFMapper, and one to Jack Hogan for some of the Matlab code.
Here’s the first shot of the 500-image series, with the lens set to f/2, and focused a hair in front of the razor blade’s edge.
In the past, I’ve used a Cognisys motorized rail to automate the focus shifting. It’s a precise technique, but it’s fiddly to set up, and takes a long time to run, since you have to wait at each step for some time after the motor stops, so that vibrations can die down. For this test, I decided to use the focus bracketing feature of the GFX 100. As in the case of the GFX 50S, to use this feature, you focus to the closest distance of the series, and tell the camera how many exposures it should make, how long it should wait between each one, and what should be the size of the focus step between each exposure in the series. The camera then takes into account the f-stop to hold the circle of confusion constant, and exposes a series of raw images that you can later process. I used the GFX 100’s electronic shutter for this series, so I set the wait time to zero.
I used a 5600 Kelvin light source, ISO 100, and one-third stops between f/2 and f/5.6 inclusive. Usually I do whole stops, but, as a side project, I was interested in finding the sharpest aperture of the 110/2 in this test.
After I unwound the corrections the camera makes to hold the CoC constant with f-stop, I got this data:
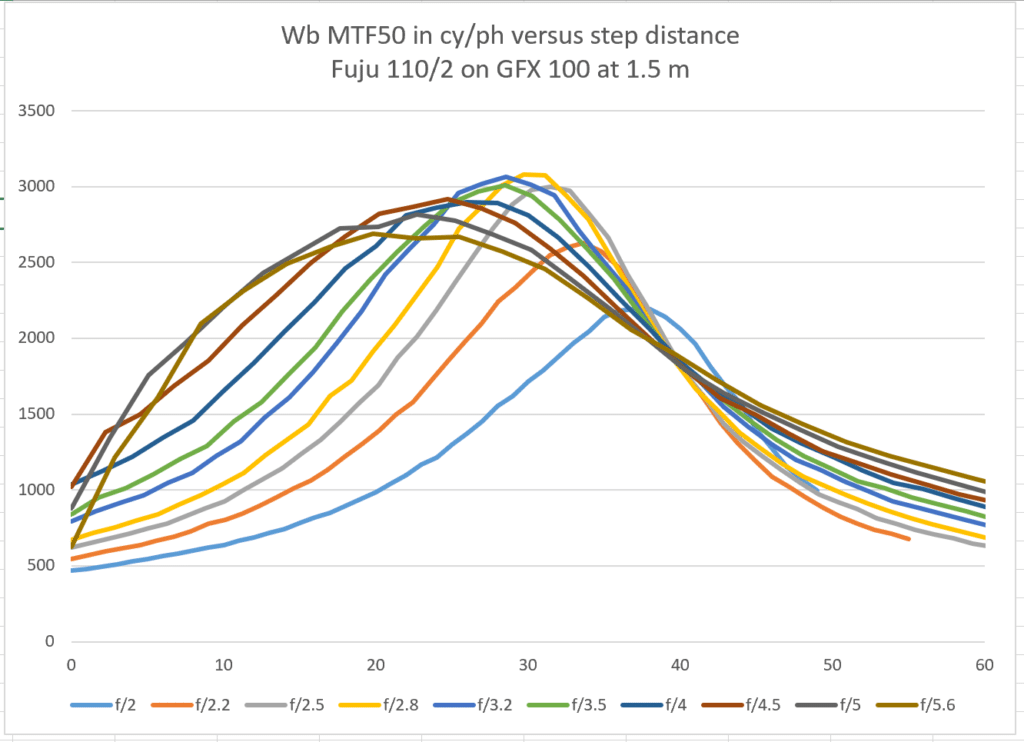
The vertical axis is the MTF50 of white-balanced-weighted raw MTFs, normalized to the picture height, which makes the units cycles per picture height. Techies, don’t worry; you’ll be able to see the individual raw channels down below. Because I’ve unwound the CoC correction, the horizontal axis is focus distance in arbitrary units.
Here are a few things you can learn from the above plot:
- F/2.8 is the sharpest f-stop at this distance
- f/2 and f/2.2 are a fair amount softer, but f/2.5 is very sharp.
- You don’t lose all that much sharpness even at f/5.6, but the sweet spot of the lens is between f/2.5 and f/4.
- There’s enough focus shift that you should focus at the taking aperture.
- The MTF50s obtained are about the same as I got earlier with the same lens on a GFX 50S.
- That means that the pixel-level sharpness of the GFX 100 is less than the GFX 50S, and the picture-level sharpness is about the same.
That last bullet is sort of a surprise, but if you remember the backstory on the GFX 50S microlenses, maybe not so much. When Fuji announced the GFX 50S, they make a big production out of the fact that the microlenses were smaller than usual, which reduced CFA crosstalk and increased sharpness, at the expense of moire. They have made no such assertions about the GFX 100, leading me to think that the microlenses are big enough to give essentially 100% fill factor. A consequence of that would be a loss in pixel-level sharpness. The numbers don’t quite add up, though; Brandon Dube’s analysis of the GFX 50S effective pixel size gave about the equivalent of a 4.8 um 100% fill factor pixel. That’s bigger than the supposed 3.76 um fill factor pixel in the GFX 100.
This will need some more looking in to.
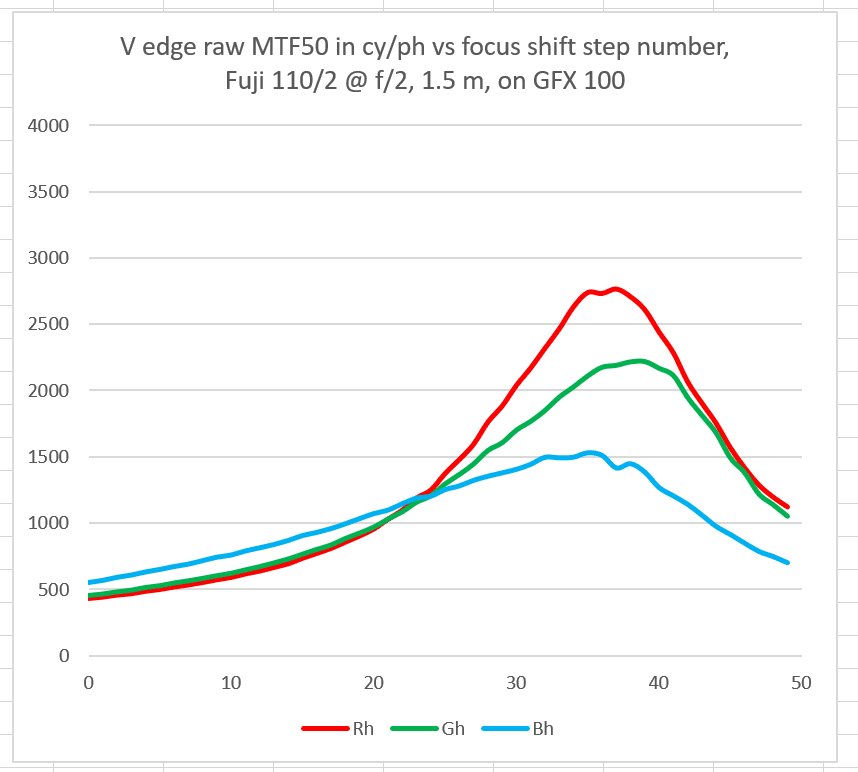
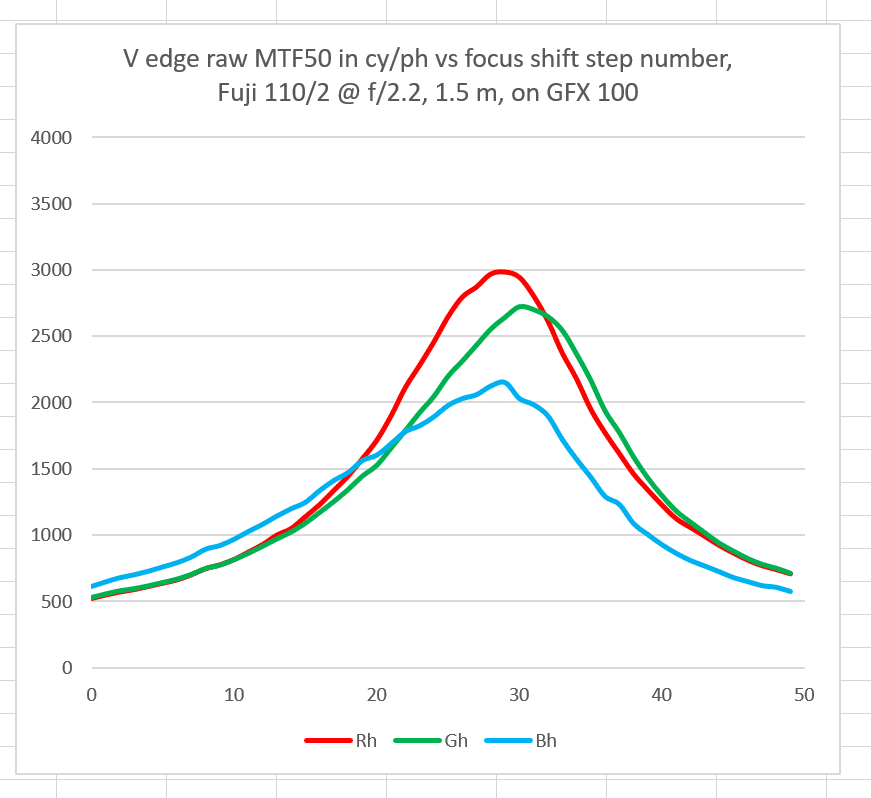
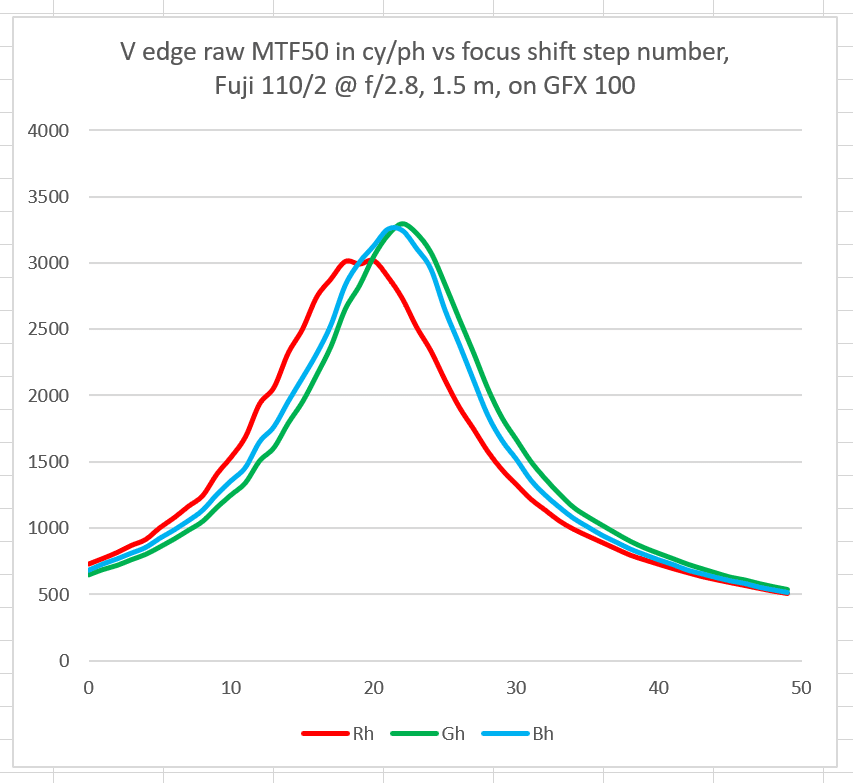
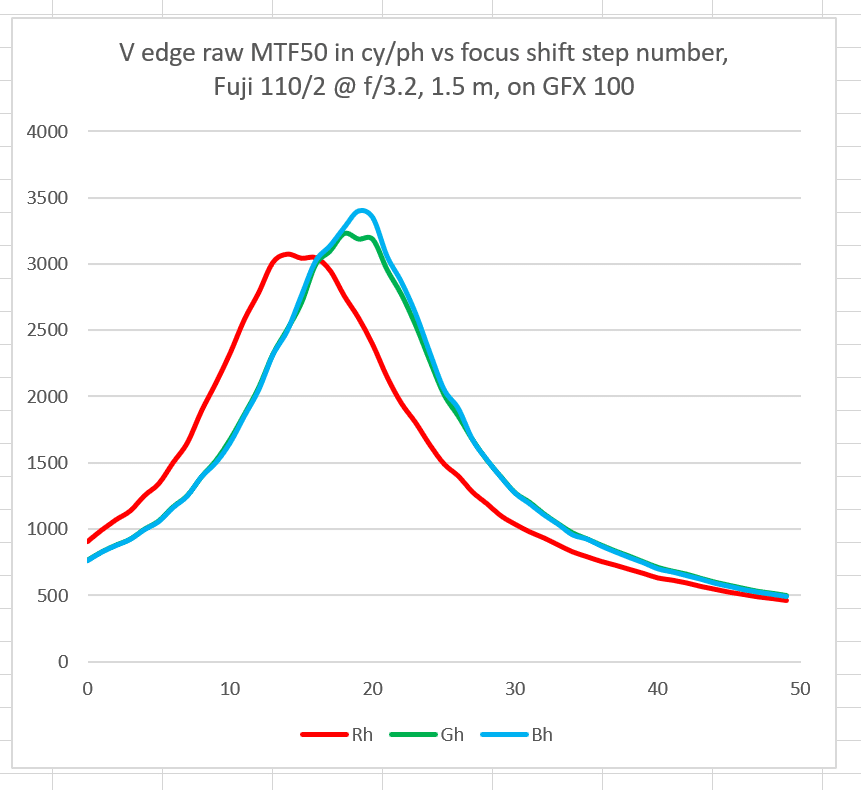
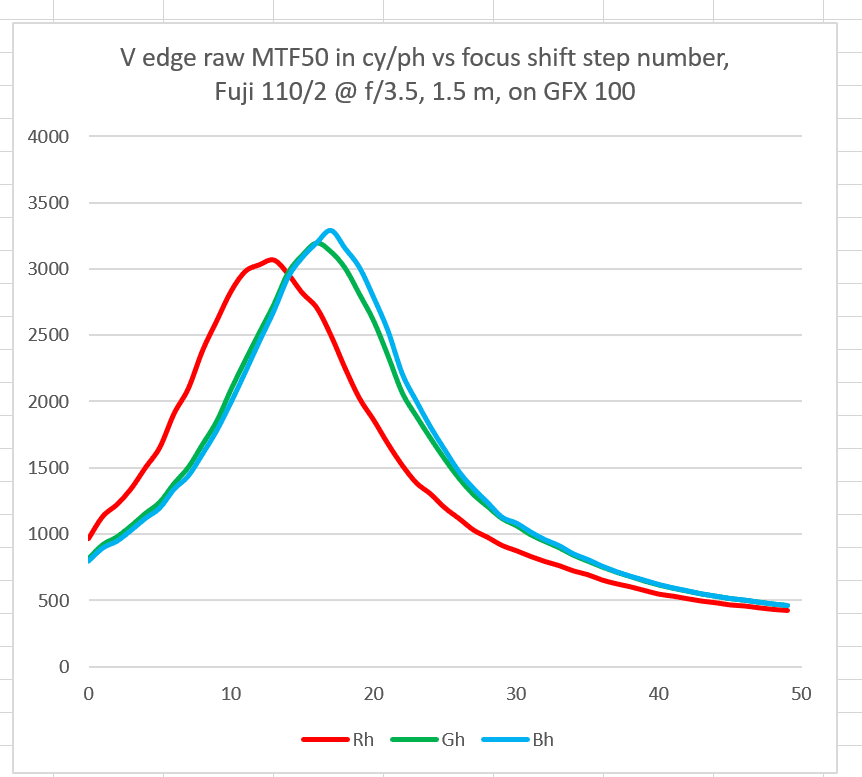
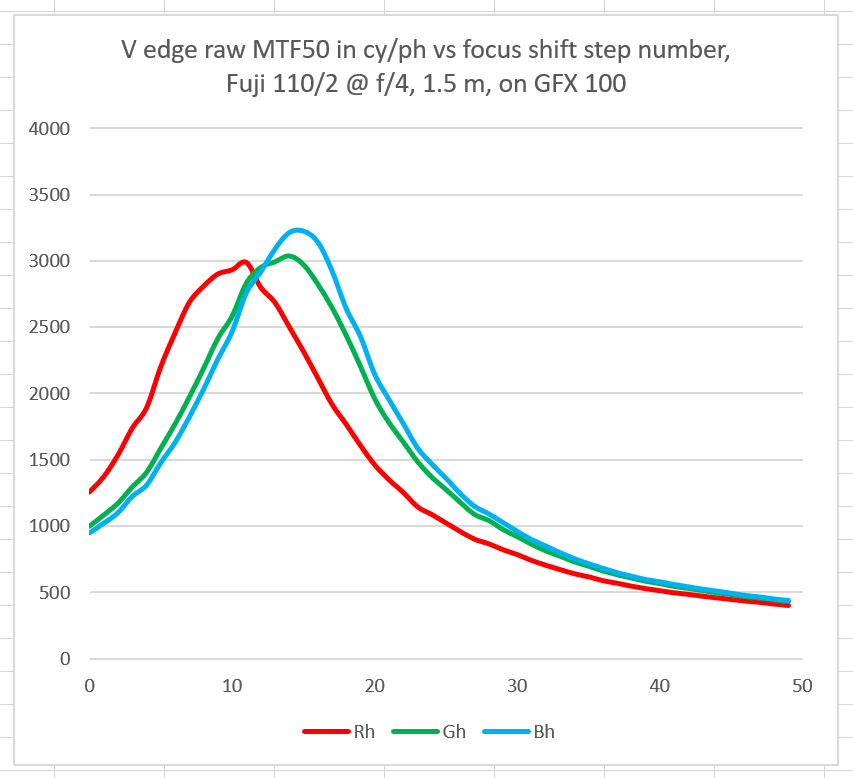
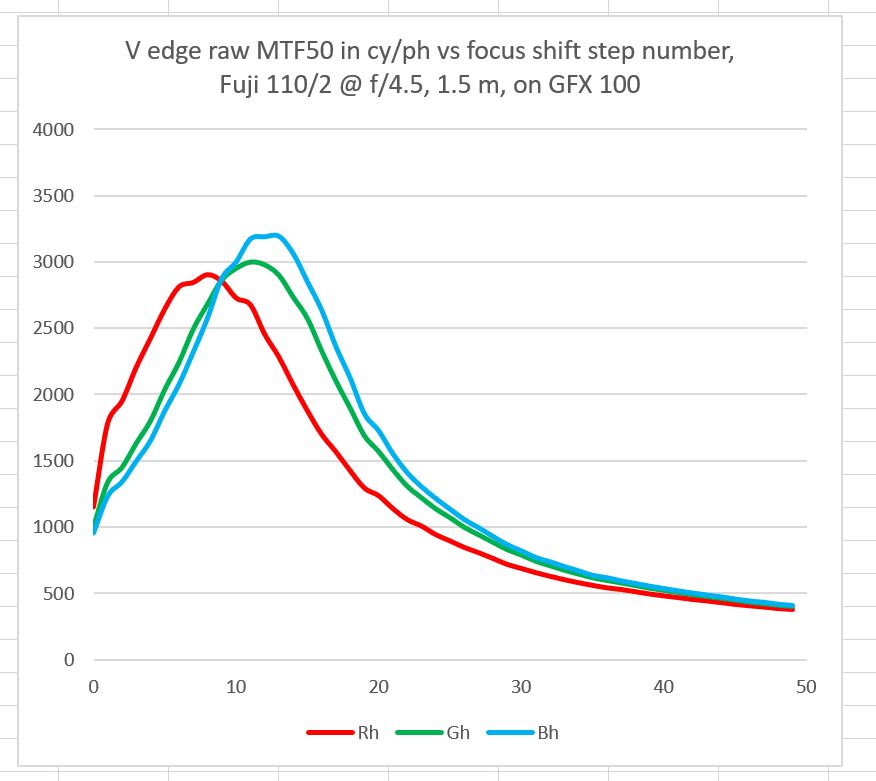
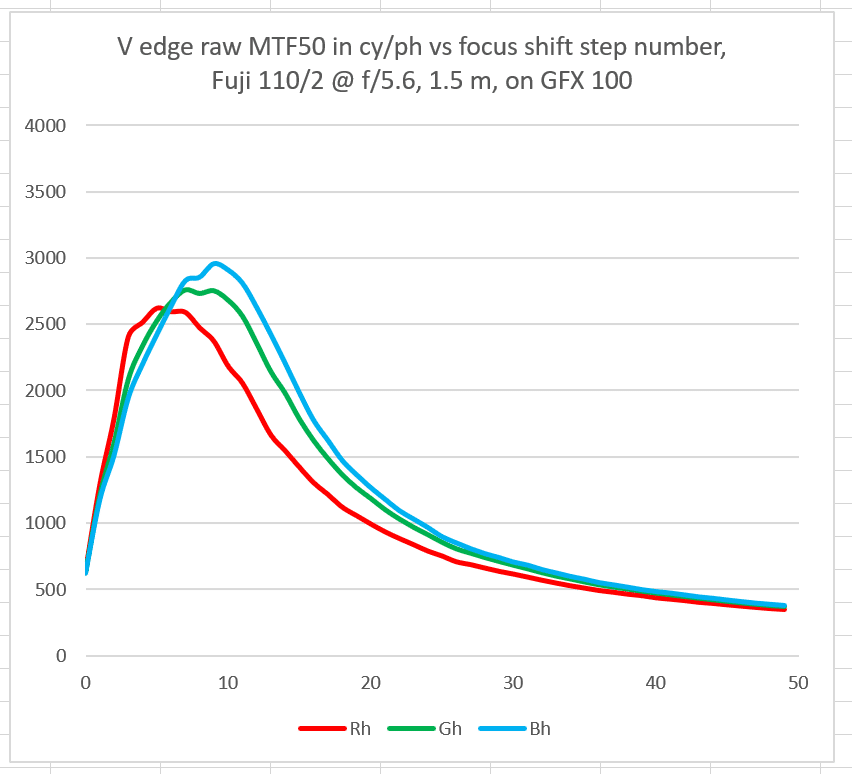
If you’re interested in longitudinal chromatic aberration (LoCA), and would like to see the underlying data for the plot above, the next set of graphs will help. The horizontal axis is now simply the step number, with no unwinding of the GFX 100’s correction for lens stop, so you can’t compare lines across graphs at the same horizontal axis points, but by looking at the location of the peaks in each raw channel, you can take the measure of the LoCA that the lens exhibits.
If you don’t want to bother with the graphs, I’ll bottom-line it: there isn’t very much LoCA at all.


With apologies in advance for being so old-fashioned, I often put a few little USAF 1951 test charts on the shelves of my preferred indoor lens-test target, a 2m+ by 3m+ bookcase. As a newbie to the GF system I had several lenses to screen, and while they are just as fine as everyone says, it was obvious from the get-go that there was less kaleidoscopic false color with the GFX 100 than with “lesser” Sony and Nikon cameras. Maybe Hogan was nearer right about the GFX 50 fill-factor than Dube with his very involved approach.
And perhaps the promised land of oversampling is coming within view.
PS: There is a typo in the last bullet point.
Thanks. Fixed.
Hi Jim,
I am not entirely surprised about your findings on sharpness, though I got better results from the GFX 100 compared to the GFX 50S on DPReviews test images. But, they used f/8 on GFX 50 and f/5.6 on the GFX 100.
If you are using Lightroom, we never know what sharpening it does even when sharpening is set to zero.
May be interesting to compare MTF 20 instead of MTF 50, or just plot the MTF curves up to Nyquist, using cy/ PH.
Best regards
Erik
These analyses were done without demosaicing.
Ah, I am deeply impressed!
Best regards
Erik
Hi Jim,
A calculation – with 110 mm EFL and 1500 mm subject distance, the pixels represent 55 microns on the edge, as opposed to 77 microns for the G50. I’m not sure on the condition of your razor blade, but it may be the case that you are entering a realm where the influence of the blade is significant. Though I suspect this is rather not the case, since the 85 Otus model matched so exquisitely.
What do the best focus MTF vs. Freq curves look like (cy/mm axis, please) with the two cameras plotted on top of each other?
Erik also suggested that. That’s something I’ll look at tomorrow.
Hi Jim, good show. With regards to the ‘strength’ of the microlenses on the GFX-50s, there appears to be an error in the procedure estimating Fill Factor in the linked article resulting in an overestimate of the effective FF, as mentioned at the time in the comments below it.
A better estimate of effective FIll Factor on the GFX-50s is 64% or less by area (0.8x or less linearly). Should you be interested, send me the raw file where the green channel peaks at f/3.5 or f/4.5 in the GFX-100 and I will try to come up with an estimate of FF for it.
Jack