• site home
  • blog home
  • galleries
  • contact
  • underwater
  • the bleeding edge

the last word

Photography meets digital computer technology. Photography wins -- most of the time.

You are here: Home / GFX 100S / Long exposure noise in X2D 100C, GFX 100x, part 4

Long exposure noise in X2D 100C, GFX 100x, part 4

November 15, 2022 JimK 3 Comments

This is the 36th in a series of posts on the Hasselblad X2D 100C camera and the XCD lenses. You will be able to find all the posts in this series by looking at the righthand column on this page and finding the Category “X2D”.

In the previous two posts, I looked at 15 minute dark field exposures made with the Hasselblad X2D and the GFX 100S at ISO 800 and 1000 respectively.

There appear to be many people whose main use for long-exposure images is for subject blurring. Those people typically use neutral density filters and base ISO. I received requests to condict the same sort of 15-minute exposure tests at the base ISO for both cameras.

I made two exposures.

  • GFX 100S, LENR off, ISO 100, 14-bit precision, 15 minutes, 45mm f/2.8 GF lens and lens cap, f/32.
  • X2D 100C, ISO 64, 14-bit precision, 17 minutes, 38mm f/2.5 XCD lens and lens cap f/32.

I analyzed the images using RawDigger, and calculated the raw channel engineering dynamic range (EDR), which in this case I’m defining as full scale over the rms noise (the standard deviation of the noise), using a 600×600 pixel center crop.


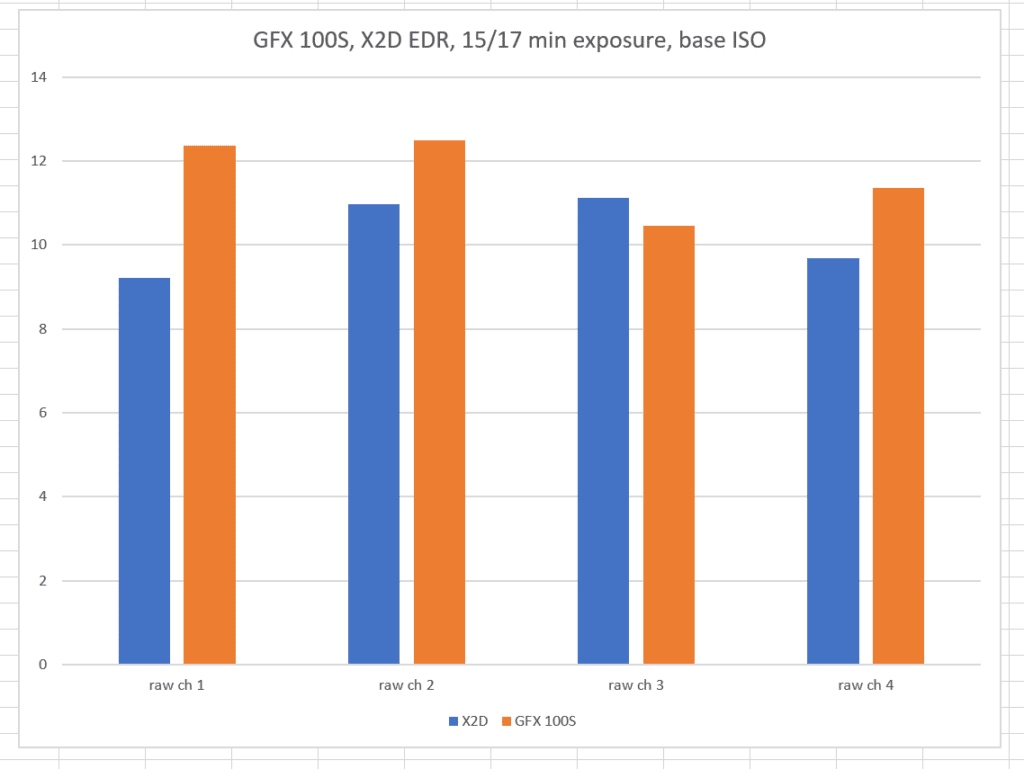
In three of the four raw channels, the GFX 100S has significantly better EDR. But the raw channels are assigned to different color layers on the two cameras.

  • Plane 1 on the X2D is red, and plane 1 on the GFX is green
  • Plane 2 on the X2D is green, and plane 2 on the GFX is red
  • Plane 3 on the X2D is green, and plane 3 on the GFX is blue
  • Plane 4 on the X2D is blue, and plane 4 on the GFX is green

Let’s plot by raw plane color.

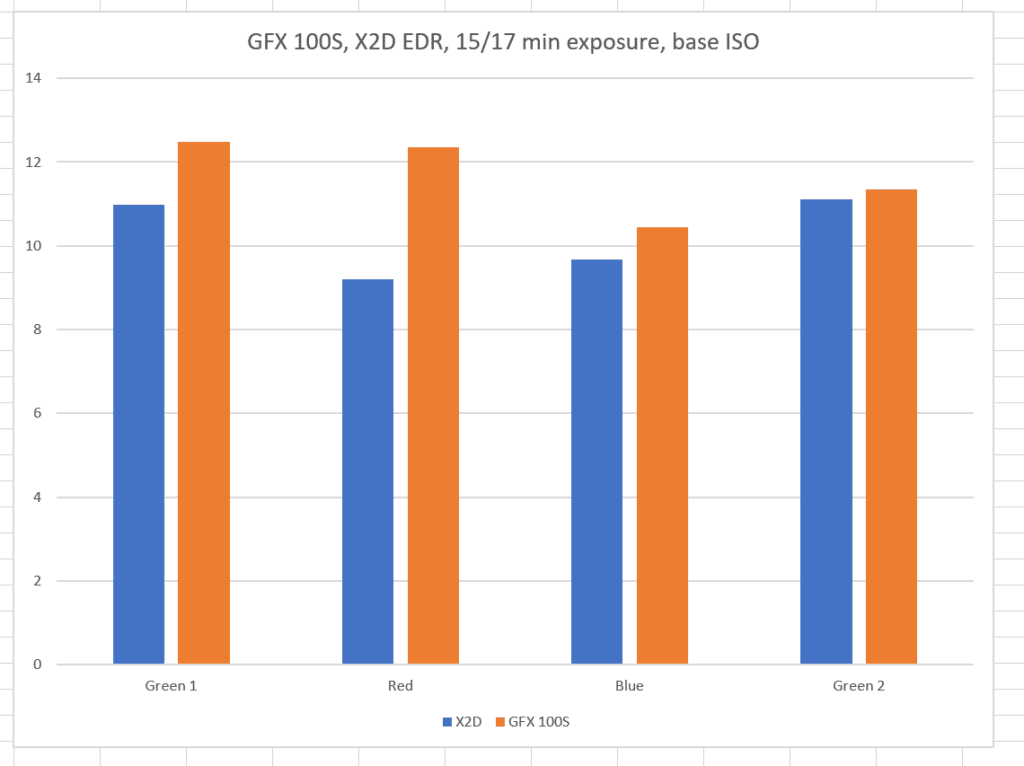
Now the GFX 100S is better everywhere, but the second green channel is close to a tie.

There are differences in the black point calibration of the two images:

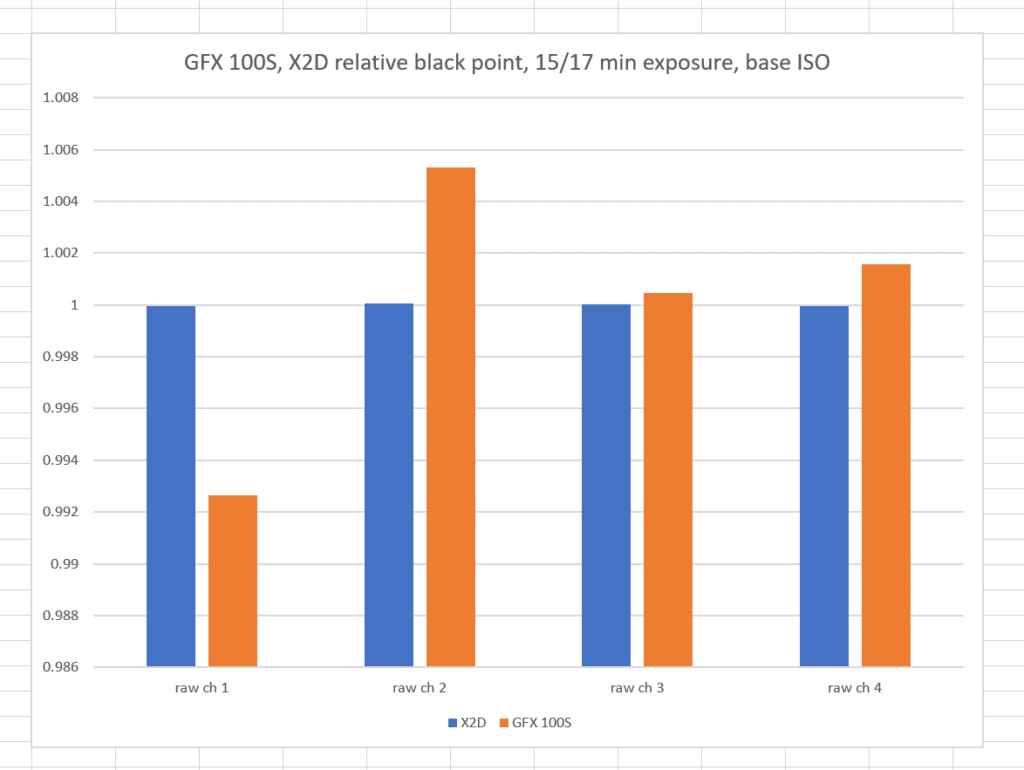
The X2D is remarkably consistent across the raw channels. The GFX, while still excellent, is much worse.

I brought the images into Lightroom, and gave them both a 9-stop exposure push, with white balance set to daylight, and sharpening and noise reduction turned off. Here’s a 1:1 crop from the center part of the image.

GFX


X2D

It looks like there is some processing taking place on the X2D image that is resulting in a radial black point shift.


The GFX 100S is on the right, and the H2D is on the left. The GFX image appears noisier.

Developing in Phocus with defaults except for white balance and exposure yields this:

Phocus gets the black point right in the center of the image.

Here’s Phocus development with noise reduction turned off:

Here’s an image with lens corrections turned off in Phocus:

That’s hard to beat.

Here’s a set of spectral analyses of the raw planes.

The red planes:


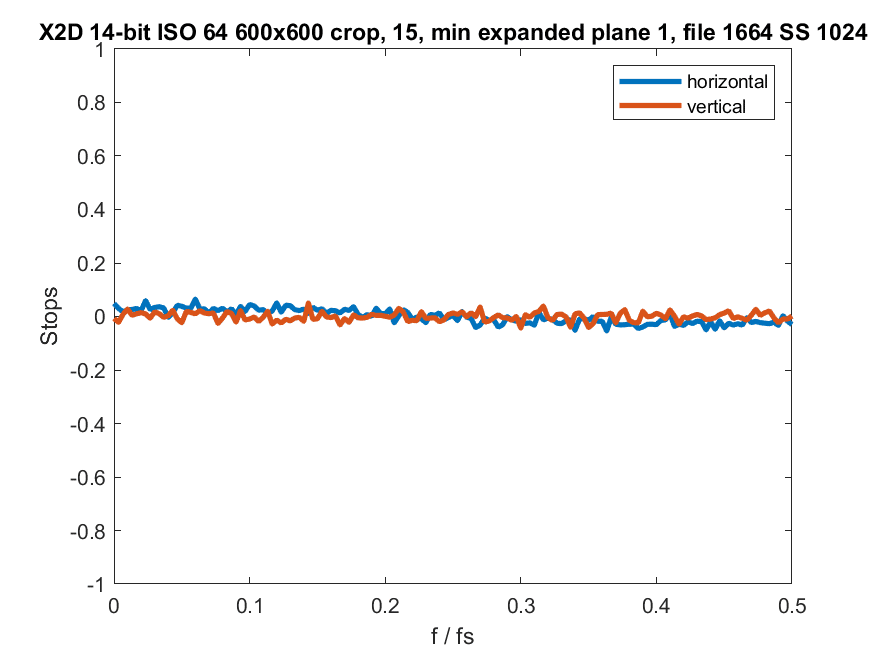
The vertical axes are different so that you can see how much energy there is on the GFX image at frequency equals zero.

Aside from the GFX spike at dc, the spectra are pretty flat.

The blue planes:


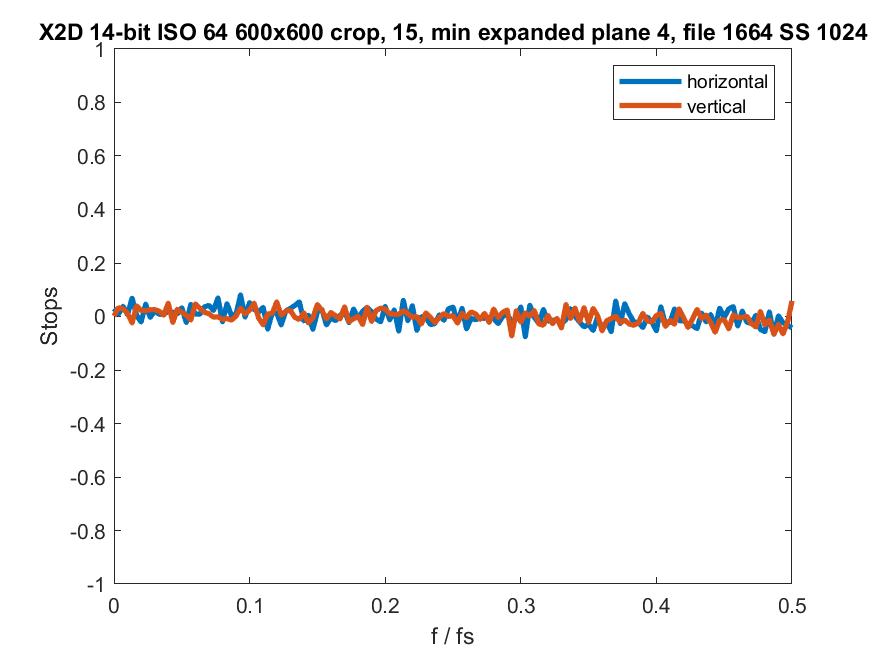
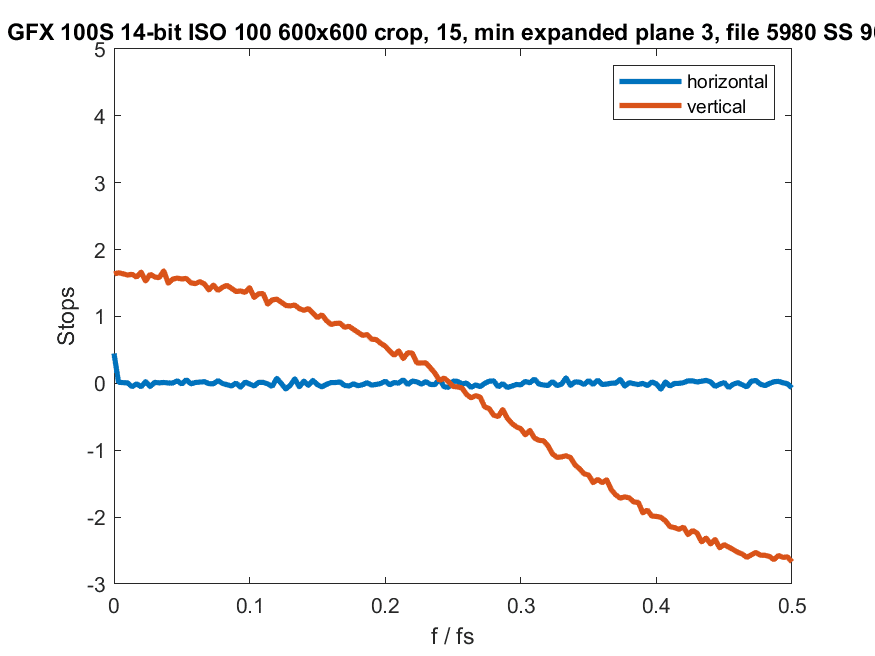
The GFX has a big high frequency rolloff.

The first green channel for each camera:


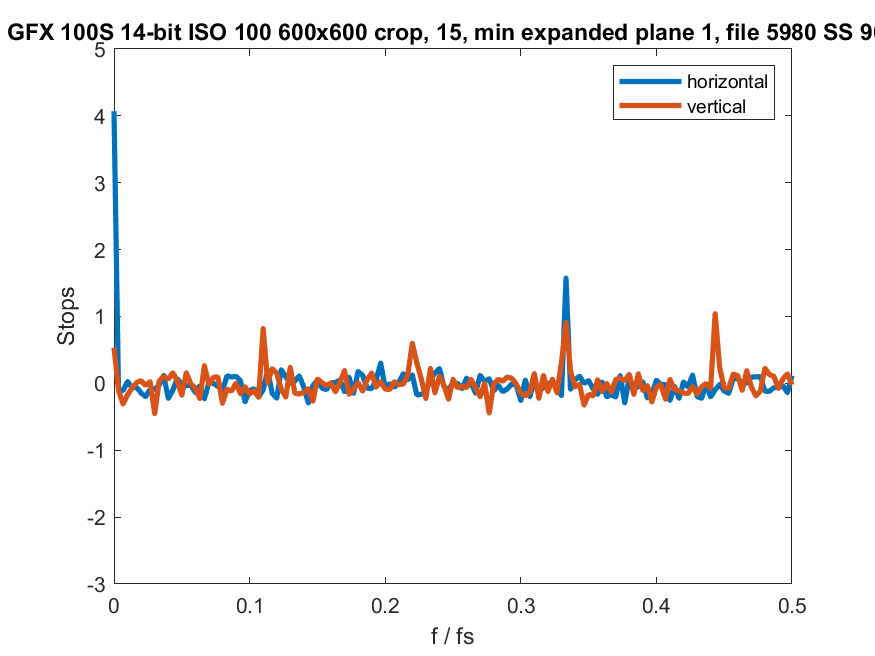
Big spike at dc for the GFX.

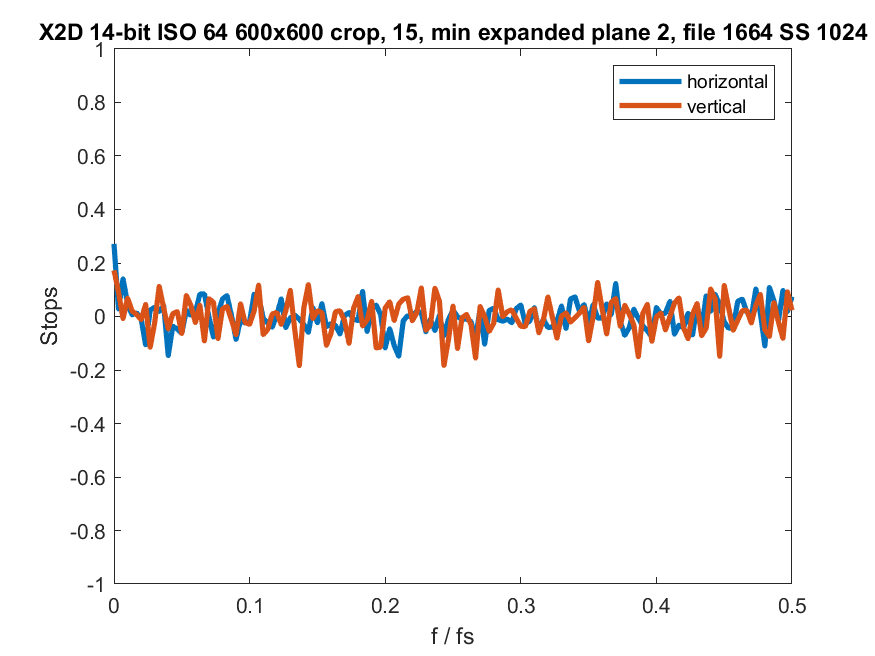
The other green channels:


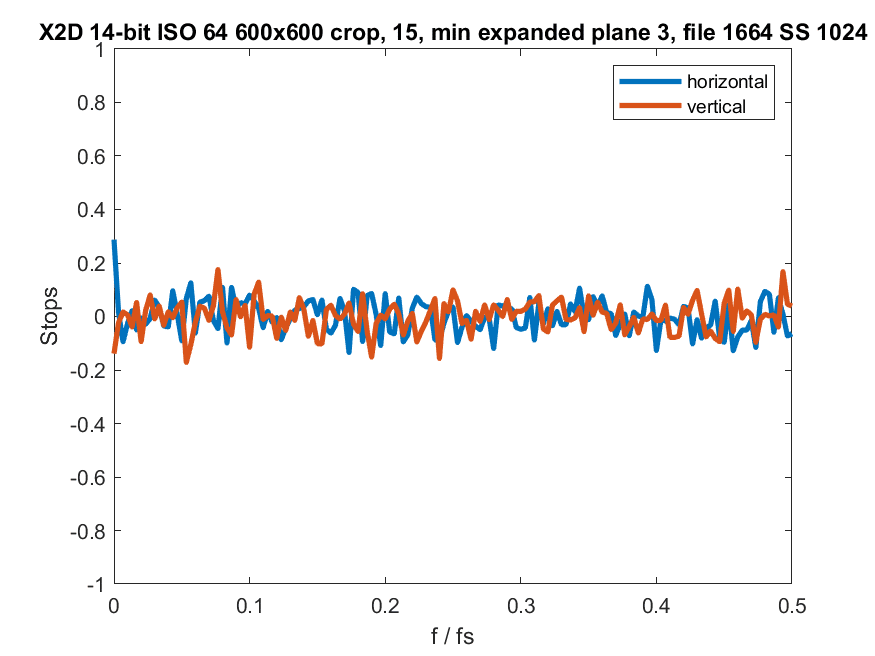
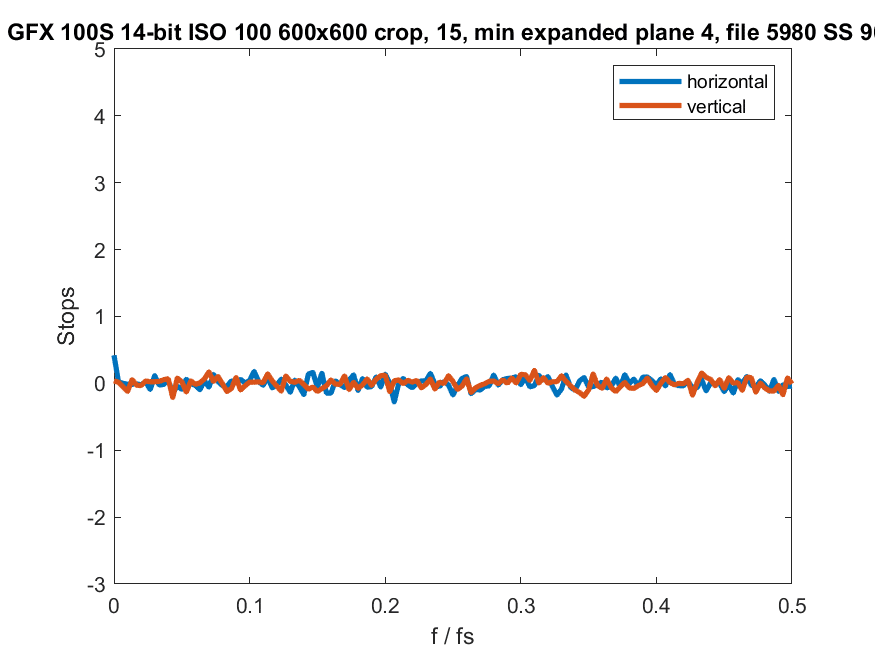
Those are both pretty flat.

GFX 100S, X2D

← Long exposure noise in X2D 100C, GFX 100x, part 3 Hasselblad X2D long-exposure noise, 4 & 5 stop pushes →

Comments

  1. Alan says

    November 15, 2022 at 4:41 pm

    Does the high frequency roll off indicate there is spatial filtering for noise reduction going on? How does the noise “clean up” when processed in post when comparing the two?

    Reply
  2. Eric says

    November 15, 2022 at 8:07 pm

    Have you tried these images also in Phocus and C1? From previous work with HB backs, I would expect Phocus to do better with noise than LR. Not sure for the Fuji, but maybe C1 will do better?

    Reply
    • JimK says

      November 16, 2022 at 9:54 am

      I just added Phocus images. Big improvement. I don’t use C1 anymore.

      Reply

Leave a Reply Cancel reply

Your email address will not be published. Required fields are marked *

May 2025
S M T W T F S
 123
45678910
11121314151617
18192021222324
25262728293031
« Apr    

Articles

  • About
    • Patents and papers about color
    • Who am I?
  • How to…
    • Backing up photographic images
    • How to change email providers
    • How to shoot slanted edge images for me
  • Lens screening testing
    • Equipment and Software
    • Examples
      • Bad and OK 200-600 at 600
      • Excellent 180-400 zoom
      • Fair 14-30mm zoom
      • Good 100-200 mm MF zoom
      • Good 100-400 zoom
      • Good 100mm lens on P1 P45+
      • Good 120mm MF lens
      • Good 18mm FF lens
      • Good 24-105 mm FF lens
      • Good 24-70 FF zoom
      • Good 35 mm FF lens
      • Good 35-70 MF lens
      • Good 60 mm lens on IQ3-100
      • Good 63 mm MF lens
      • Good 65 mm FF lens
      • Good 85 mm FF lens
      • Good and bad 25mm FF lenses
      • Good zoom at 24 mm
      • Marginal 18mm lens
      • Marginal 35mm FF lens
      • Mildly problematic 55 mm FF lens
      • OK 16-35mm zoom
      • OK 60mm lens on P1 P45+
      • OK Sony 600mm f/4
      • Pretty good 16-35 FF zoom
      • Pretty good 90mm FF lens
      • Problematic 400 mm FF lens
      • Tilted 20 mm f/1.8 FF lens
      • Tilted 30 mm MF lens
      • Tilted 50 mm FF lens
      • Two 15mm FF lenses
    • Found a problem – now what?
    • Goals for this test
    • Minimum target distances
      • MFT
      • APS-C
      • Full frame
      • Small medium format
    • Printable Siemens Star targets
    • Target size on sensor
      • MFT
      • APS-C
      • Full frame
      • Small medium format
    • Test instructions — postproduction
    • Test instructions — reading the images
    • Test instructions – capture
    • Theory of the test
    • What’s wrong with conventional lens screening?
  • Previsualization heresy
  • Privacy Policy
  • Recommended photographic web sites
  • Using in-camera histograms for ETTR
    • Acknowledgments
    • Why ETTR?
    • Normal in-camera histograms
    • Image processing for in-camera histograms
    • Making the in-camera histogram closely represent the raw histogram
    • Shortcuts to UniWB
    • Preparing for monitor-based UniWB
    • A one-step UniWB procedure
    • The math behind the one-step method
    • Iteration using Newton’s Method

Category List

Recent Comments

  • bob lozano on The 16-Bit Fallacy: Why More Isn’t Always Better in Medium Format Cameras
  • JimK on Goldilocks and the three flashes
  • DC Wedding Photographer on Goldilocks and the three flashes
  • Wedding Photographer in DC on The 16-Bit Fallacy: Why More Isn’t Always Better in Medium Format Cameras
  • JimK on Fujifilm GFX 100S II precision
  • Renjie Zhu on Fujifilm GFX 100S II precision
  • JimK on Fuji 20-35/4 landscape field curvature at 23mm vs 23/4 GF
  • Ivo de Man on Fuji 20-35/4 landscape field curvature at 23mm vs 23/4 GF
  • JimK on Fuji 20-35/4 landscape field curvature at 23mm vs 23/4 GF
  • JimK on Fuji 20-35/4 landscape field curvature at 23mm vs 23/4 GF

Archives

Copyright © 2025 · Daily Dish Pro On Genesis Framework · WordPress · Log in

Unless otherwise noted, all images copyright Jim Kasson.