This is a part of series of posts on the Fujifilm GFX 50S You can find all the posts about that camera in the Category List on the right sidebar, below the Articles widget. There’s a drop-down menu there that you can use to get to all the posts in this series; just look for “GFX 50S”.
I’ve recently finished a series of posts about the optimal exposure and ISO setting strategy for the Nikon D850 and the Sony a7RIII. The first one of those is here. In response to a query, I’m now going to do the same thing for the GFX.
Unlike the D850 and the a7RIII, the GFX uses a sensor that does not use conversion gain changing technology licensed from Aptina (Since acquired by ON Semiconductor). That technology is called DR-Pix, and you can read about it here. Most modern Sony large sensors have DR-Pix, and its absence in the 33×44 mm sensor in the GFX is an indication of the sensor’s age.
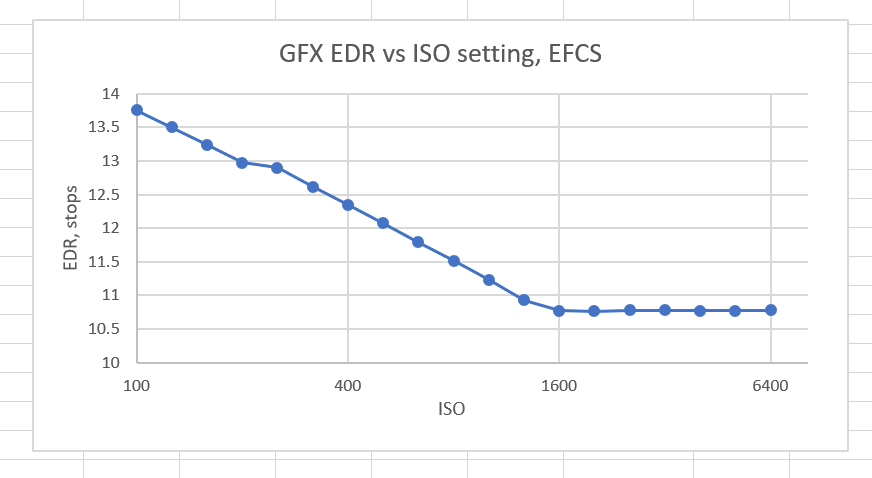
Here’s the Engineering Dynamic Range (EDR) of the GFX versus ISO setting.
The EDR starts out behaving as you’d expect, dropping as the ISO goes up. But at ISO 1600, something peculiar happens. The EDR stops changing. That’s because, after ISO 1600, the camera ceases to apply progressively more gain to the signals that make up the raw values. Instead, it writes metadata that instructs the raw converter to apply the appropriate gain.
Here’s what the EDR would look like if the raw converter did what most cameras that use digital gain do before they write the data:
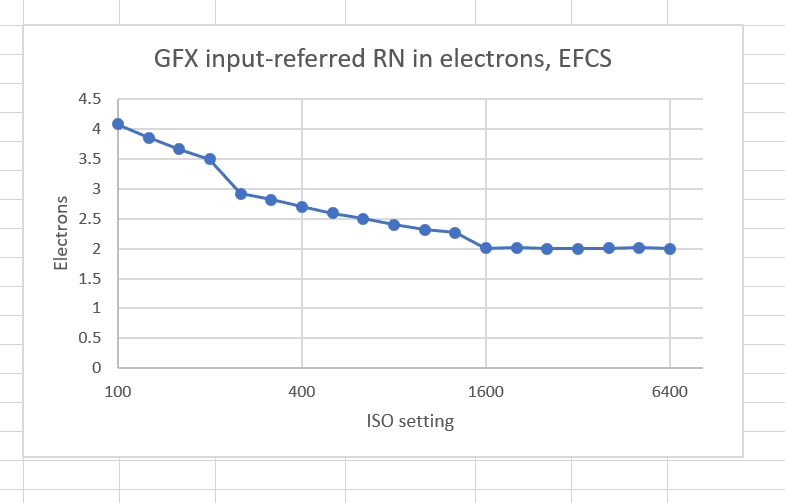
For completeness, here is the input-referred read noise, in electrons:
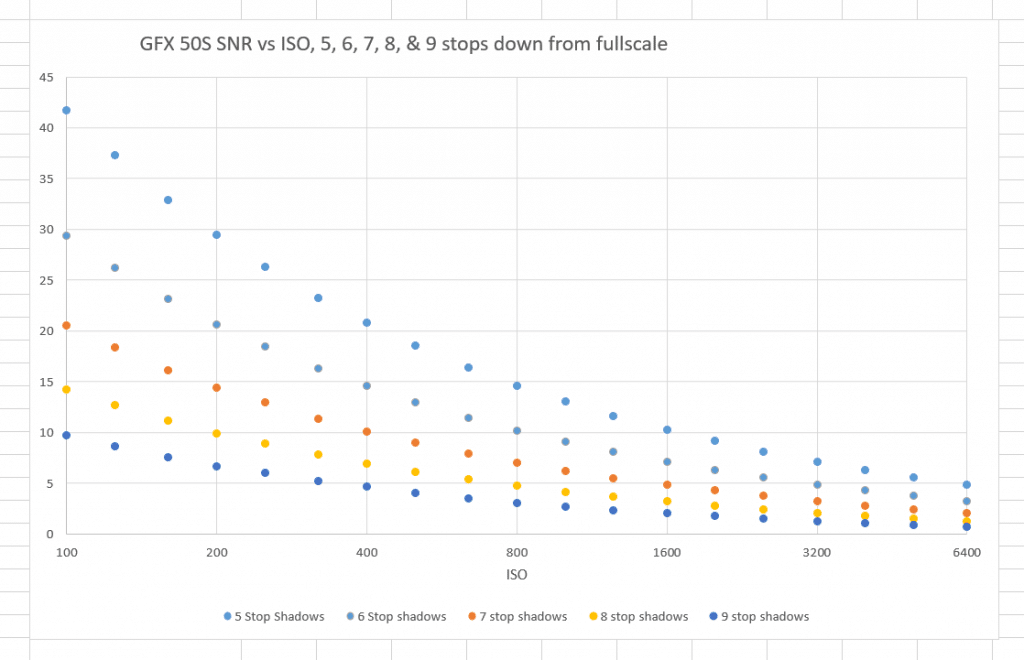
EDR is not of much use to photographers, at least directly. A more significant metric is the signal-to-noise ratio (SNR) in the shadows. So let’s take a look at that:
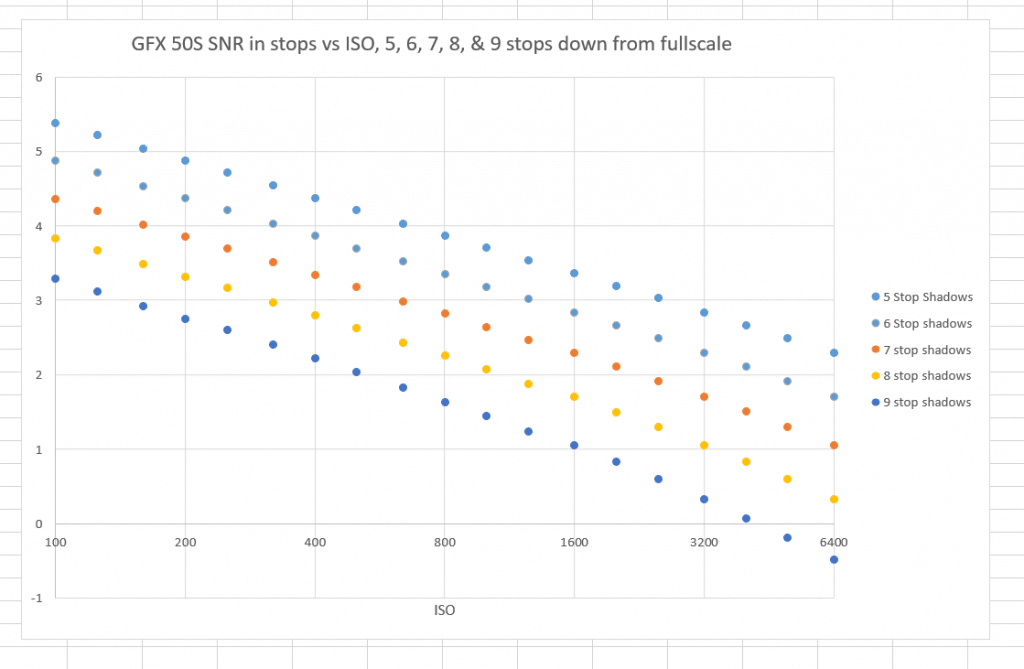
Photographers usually like to see the SNR measures in stops:
You’ll notice that the SNR, when measured in stops, rolls off fairly close to linearly. When the SNR drops by half a stop every time the ISO setting is doubled, that’s called “ISO-less” behavior. The noise is entirely determined by the photon noise, which is in turn entirely determined by the exposure. The ISO setting has, per se, nothing to do with it. The ISO setting does affect the SNR since we’re measuring it in stops down from full scale, and raising ISO lowers full scale.
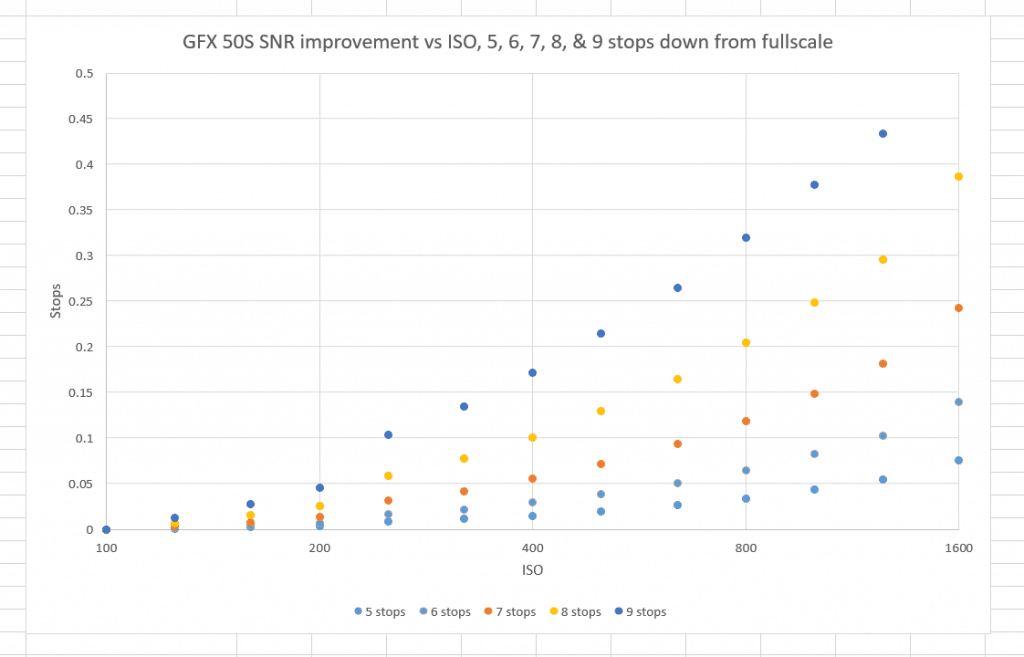
How close to ISO-less is the GFX? Let’s look at the improvement in SNR that is created by turning up the ISO as opposed to leaving it at 100.
The “expose at base ISO and push in post” approach has the least effect on the moderately dark shadows of 5 and 6 stops down from full scale. For them, the less than 1/10 stop penalty is minimal. But you probably wouldn’t want to do that if you were really concerned about the 8 and 9 stop shadows.
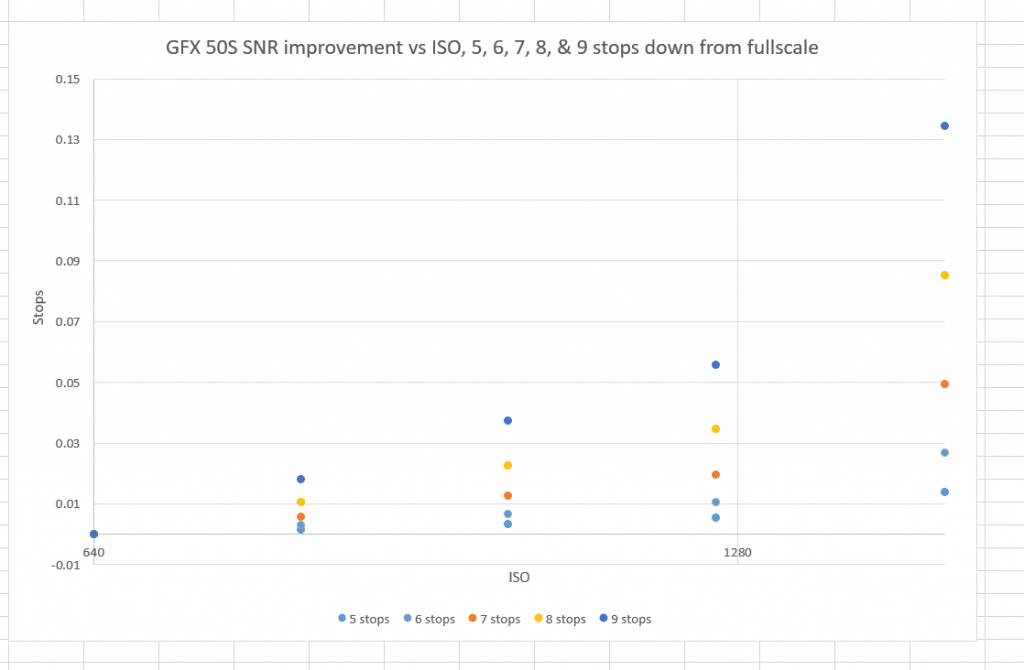
Let’s split the difference. What if we stop advancing the ISO after 640?
Now even the 9 stop shadows aren’t hurt much over turning up the ISO, and we get a lot of increased headroom if we leave it at 640.
So, assuming that you are setting your f-stops, shutter speeds, and ISO settings manually, what is the best strategy?
If you can, expose to the right (ETTR) at base ISO. This is a no-brainer and is true for just about any digital camera. What keeps it from working all the time?
- You can’t tell from the in-camera histogram whether the raw file is saturating. UniWB helps, but most people don’t want to go to all that trouble and look at green preview images, and even UniWB is not a panacea.
- You may need more light on the sensor. Depth of field (DOF) requirements and dealing with camera motion and subject motion often conspire to make the ideal exposure impractical.
So now what, assuming that you’re shooting RAW?
- Decide on the f-stop you need based on DOF, not the light.
- Decide on the shutter speed you need based on motion blur, not the light.
- Then set the ISO; deciding that gets a bit more complicated.
The first thing to do is figure out the ISO that would place the significant highlights on the right side of the histogram; let’s call that the metered ISO. ) I want to reserve ETTR for base ISO exposures, and we’ve already decided that this scene won’t let us do ETTR at base ISO.)
- If that ISO is 100 or as much as one stop over, set the ISO to 100 and make the exposure. If that ISO is as much as three stops over, set the ISO to 640 and make the exposure. You’ll get more highlight protection, and it won’t cost you anything significant in shadow noise.
- If that ISO is between 640 and 4000, and you think you’ve got the highlights handled, set the ISO to 640, and use that exposure. This will produce images that are, by conventional metering standards, more and more “underexposed” as the metered ISO rises.
- If that ISO is over 4000, set the ISO setting to that ISO; the camera will use the gain for ISO 1600.
That sounds complicated, but once you’ve gone through the steps a few times, you can figure out the camera settings you need instantly.
If you want to use aperture preferred metering, the cardinal rule remains the same: If you can, expose to the right (ETTR) at base ISO. With the GFX, you can use the live view histogram, or take shot and look at the histogram as you review the capture. Set your exposure compensation (EC) so that your meter will give you that exposure. You might want to bias the exposure slightly towards underexposure if the light is changing since it’s easier to deal with a bit more noise in the shadows than blown highlights.
But let’s ask what you should so if the ETTR exposure is too long for you or requires a wider lens opening than you want to use. If the lens opening is the most important thing to you:
- Set the ISO to base ISO
- Set the camera to aperture-priority exposure mode
- Set the aperture to whatever you wish
- If the ETTR exposure is acceptable, you’re done; take the shot
- If the shutter speed is too long, and you want some extra highlight protection, crank the EC down (make the numbers more negative) until you get an acceptable shutter speed.
- Stop when you get to two stops underexposed from the ETTR setting.
- If that gets you an acceptable shutter speed, you’re done; take the shot.
- If not, set the ISO to 640
- If the exposure is acceptable, you’re done; take the shot.
- If the shutter speed is too long, and you want some extra highlight protection, crank the EC down (make the numbers more negative) until you get an acceptable shutter speed.
- Stop when you get to three stops underexposed.
- If that’s still a short enough exposure, increase ISO until you get a shutter speed you can live with, keeping the EC three stops underexposed.
If the shutter speed is what’s key for you, use the above procedure, but set the camera to S mode and swap aperture and shutter speed in the protocol.

Gerd Peters says
Hello Jim,
Thanks for the article – it helps me to get to the bottom of a problem.
In the GFX, the colors are irreversibly tilted at high ISO values (e.g., 12800). I can see it first at ~ ISO 6400 where light suddenly turns in yellow and shadow turns in blue / green.
The white balance is consistent across all images. I have then made another ISO series with the Pentax 645Z (same sensor) because the problem does not occur. Colors and noise are as expected.
Then I made an ISO series in JPEG with the GFX – the problem does not arise.
Now after your article – where I know that from ISO 1600 the RAW converter controls it via the metadata – I think it’s up to Lightroom.
I’ll try it with another RAW converter to test against.
Thank you for your trouble with the article.
Greeting Gerd
PS: I use Windows 10 and LR ABO Model respectively in the current version.