• site home
  • blog home
  • galleries
  • contact
  • underwater
  • the bleeding edge

the last word

Photography meets digital computer technology. Photography wins -- most of the time.

You are here: Home / The Last Word / A naïve approach to camera/developer color accuracy

A naïve approach to camera/developer color accuracy

December 18, 2015 JimK 3 Comments

This is the tenth in a series of posts on color reproduction. The series starts here.

Now that I’ve tested your tolerance for theory, let’s jump right into practice, at the deep end.

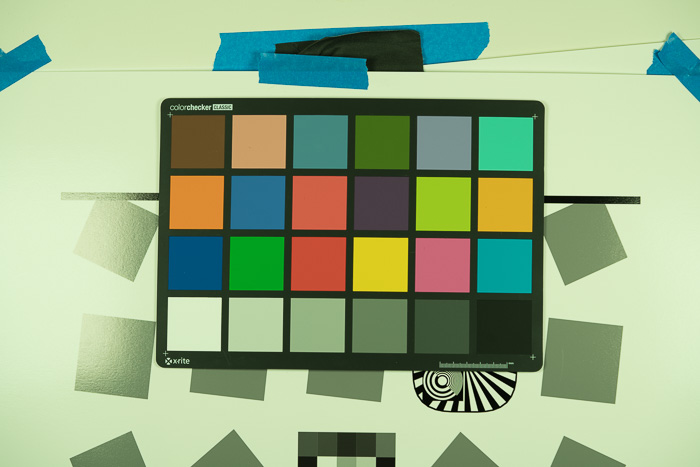
Let’s say I’ve got a Sony a7RII in my hand, and I’d like to know how accurate the colors are when the raw image is developed in Lightroom with Adobe Standard profile and default settings. I also have a Macbeth Classic Color Checker that’s of newish vintage (they do fade, you know).

Since I had both of those things, I decided to do a quick and dirty test.

Here’s what I did.

I velcroed the chart to a convenient door.

I lit it with two 12×12 inch Wescott LED panels that are capable of producing light with color temperatures from 2800K to 6000K. They do this by mixing two kinds of LEDs, so there aren’t really as many independent illuminants as you might think. The panels were about three feet from the target, and at a 45 degree angle to minimize reflections.

I shot the target with a Sony 90mm f/2.8 macro lens at f/5.6 with the camera in A mode with +1 EV exposure compensation.

I made two exposures at each of the following indicated color temperatures: 2800K, 3200K, 4000K, 5000K, 6000K.

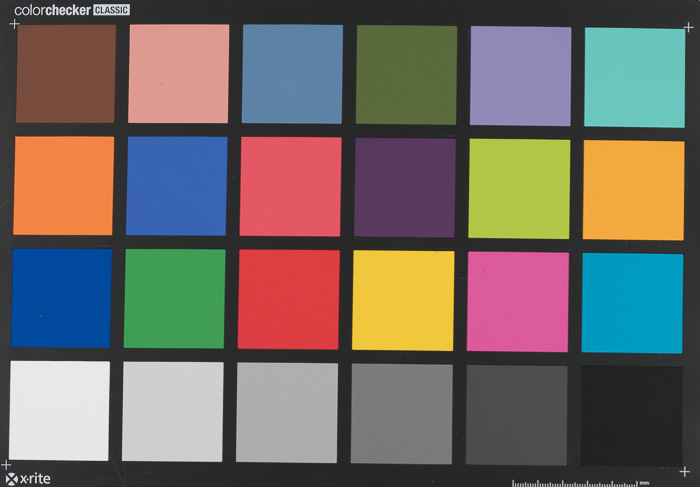
I brought all the images into Lightroom, where they looked like this:

_DSC6716

This is with the camera’s auto white balance setting, and is with the illuminant set to 4000K.

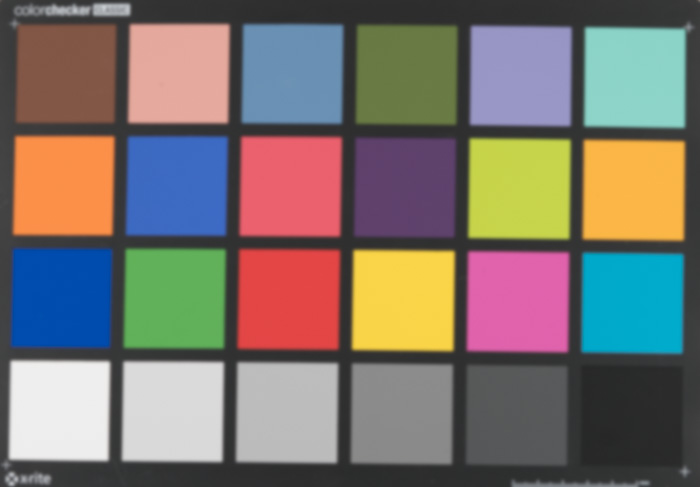
I cropped the images to the chart, and white balanced each to the third gray square from the left. That made the 4000K image look like this:

_DSC6715

I left all the settings at the default, and exported all the images to Photoshop as layers in Pro Photo RGB, with 15+ bits per primary.

In Ps, I applied a 10 pixel Gaussian blur to each layer.

_DSC6713-Edit

Then I measured the eight-bit PPRGB values, entering them into the Lab version of Bruce Lindbloom’s Color Checker spreadsheet. Here’s what the PPRGB page looked like for the 6000K exposure:

pprgb macbeth 6K

There are lots of things to look at here, and I’ll get to a lot of them in the next few posts. Between now and then, imagine what you’d do to make this test more accurate.

The Last Word

← Strategies for 3D LUT camera profile generation a7RII/Lr ASP 6000K color accuracy →

Comments

  1. N/A says

    December 18, 2015 at 4:00 pm

    spectrometer… for both light and target, several times, average… no LEDs – but better spectrum… flat field shot… drape in black matte cloth everything around the target (floor, ceiling, sides) just with holes for lens and light and no bright background behind the target (why ‘d you want reflections back into your lens) … average several raw shots … make the target even smaller within the frame, even 90 macro @ 5.6 … consider several different exposures (separated by 1 EV) with proportional adjusting spectal measurments of the target…

    Reply

Trackbacks

  1. a7RII/Lr ASP 6000K color accuracy | The Last Word says:
    December 19, 2015 at 12:05 pm

    […] Sorry about the terse title. There are going to be a bunch of similar posts, and I wanted to make this one easy to find later. ASP stands for Adobe Standard Profile. I think you can figure out the rest. For more information on where I got the numbers that we’ll be looking at in this post, see here. […]

    Reply
  2. a7RII/Lr ASP, Camera Neutral 6000K color accuracy | The Last Word says:
    December 20, 2015 at 10:10 am

    […] About the terse title: a7RII stands for the Sony alpha 7R Mark II. Lr stands for Lightroom ASP stands for Adobe Standard Profile. Camera Neutral is the other profile I used for this post. I think you can figure out the rest. For more information on where I got the numbers that we’ll be looking at here, see this. […]

    Reply

Leave a Reply Cancel reply

Your email address will not be published. Required fields are marked *

May 2025
S M T W T F S
 123
45678910
11121314151617
18192021222324
25262728293031
« Apr    

Articles

  • About
    • Patents and papers about color
    • Who am I?
  • How to…
    • Backing up photographic images
    • How to change email providers
    • How to shoot slanted edge images for me
  • Lens screening testing
    • Equipment and Software
    • Examples
      • Bad and OK 200-600 at 600
      • Excellent 180-400 zoom
      • Fair 14-30mm zoom
      • Good 100-200 mm MF zoom
      • Good 100-400 zoom
      • Good 100mm lens on P1 P45+
      • Good 120mm MF lens
      • Good 18mm FF lens
      • Good 24-105 mm FF lens
      • Good 24-70 FF zoom
      • Good 35 mm FF lens
      • Good 35-70 MF lens
      • Good 60 mm lens on IQ3-100
      • Good 63 mm MF lens
      • Good 65 mm FF lens
      • Good 85 mm FF lens
      • Good and bad 25mm FF lenses
      • Good zoom at 24 mm
      • Marginal 18mm lens
      • Marginal 35mm FF lens
      • Mildly problematic 55 mm FF lens
      • OK 16-35mm zoom
      • OK 60mm lens on P1 P45+
      • OK Sony 600mm f/4
      • Pretty good 16-35 FF zoom
      • Pretty good 90mm FF lens
      • Problematic 400 mm FF lens
      • Tilted 20 mm f/1.8 FF lens
      • Tilted 30 mm MF lens
      • Tilted 50 mm FF lens
      • Two 15mm FF lenses
    • Found a problem – now what?
    • Goals for this test
    • Minimum target distances
      • MFT
      • APS-C
      • Full frame
      • Small medium format
    • Printable Siemens Star targets
    • Target size on sensor
      • MFT
      • APS-C
      • Full frame
      • Small medium format
    • Test instructions — postproduction
    • Test instructions — reading the images
    • Test instructions – capture
    • Theory of the test
    • What’s wrong with conventional lens screening?
  • Previsualization heresy
  • Privacy Policy
  • Recommended photographic web sites
  • Using in-camera histograms for ETTR
    • Acknowledgments
    • Why ETTR?
    • Normal in-camera histograms
    • Image processing for in-camera histograms
    • Making the in-camera histogram closely represent the raw histogram
    • Shortcuts to UniWB
    • Preparing for monitor-based UniWB
    • A one-step UniWB procedure
    • The math behind the one-step method
    • Iteration using Newton’s Method

Category List

Recent Comments

  • JimK on Goldilocks and the three flashes
  • DC Wedding Photographer on Goldilocks and the three flashes
  • Wedding Photographer in DC on The 16-Bit Fallacy: Why More Isn’t Always Better in Medium Format Cameras
  • JimK on Fujifilm GFX 100S II precision
  • Renjie Zhu on Fujifilm GFX 100S II precision
  • JimK on Fuji 20-35/4 landscape field curvature at 23mm vs 23/4 GF
  • Ivo de Man on Fuji 20-35/4 landscape field curvature at 23mm vs 23/4 GF
  • JimK on Fuji 20-35/4 landscape field curvature at 23mm vs 23/4 GF
  • JimK on Fuji 20-35/4 landscape field curvature at 23mm vs 23/4 GF
  • Ivo de Man on Fuji 20-35/4 landscape field curvature at 23mm vs 23/4 GF

Archives

Copyright © 2025 · Daily Dish Pro On Genesis Framework · WordPress · Log in

Unless otherwise noted, all images copyright Jim Kasson.