• site home
  • blog home
  • galleries
  • contact
  • underwater
  • the bleeding edge

the last word

Photography meets digital computer technology. Photography wins -- most of the time.

You are here: Home / The Last Word / Another medium tele test — Batis PDAF

Another medium tele test — Batis PDAF

February 27, 2016 JimK 9 Comments

This is a continuation of a test of the following lenses on the Sony a7RII:

  • Zeiss 85mm f/1.8 Batis.
  • Zeiss 85mm f/1.4 Otus.
  • Leica 90mm f/2 Apo Summicron-M ASPH.
  • AF-S Nikkor 85mm f/1.4 G.
  • Sony 90mm f/2.8 FE Macro.

The test starts here.

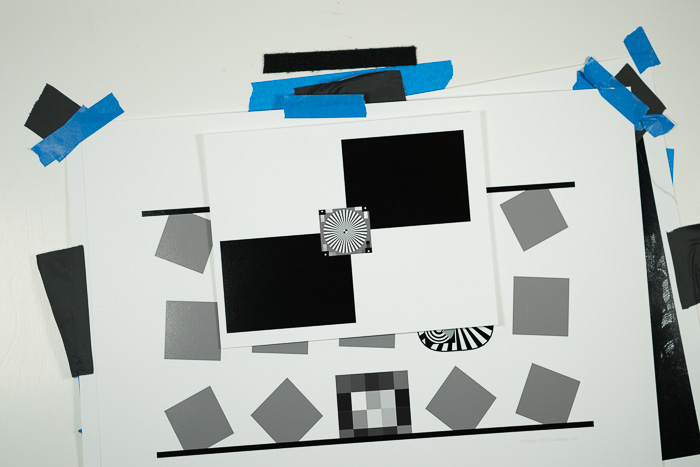
I lit a slanted-edge target with two Westcott LED panels, and set the color temperature to 5000K. The target has a medium-contrast Siemens star in the center, which I used for both manual and automatic focusing.

_DSC9984

I mounted a Sony a7RII to the Cognisys computer-driven focusing rail. I set the controller up to use 192mm of travel and make 49 exposures 4mm apart. I set the assembly 8 feet from the on-axis target, mounted the lens, focused a little short of mid-rail using manual focusing, and focused on the star using AF-S with  flexible spot, PDAF on,  AF priority. I used two spot sizes, small and medium. I exposed 49-shot series. I used f/1.8 and f/5.6.  I used Jack Hogan’s Matlab program, MTF Mapper, and DCRAW to pick the horizontal edges and calculate the MTF50s for the raw color planes, imported the data into Excel, and plotted the results in cycles per picture height vs subject distance change (note: not image distance change, which is what I used yesterday).

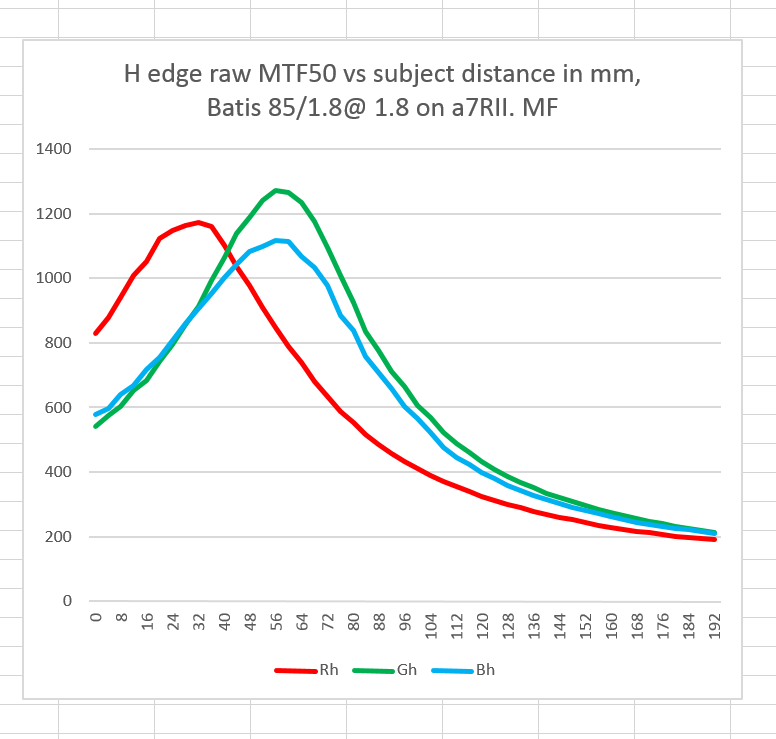
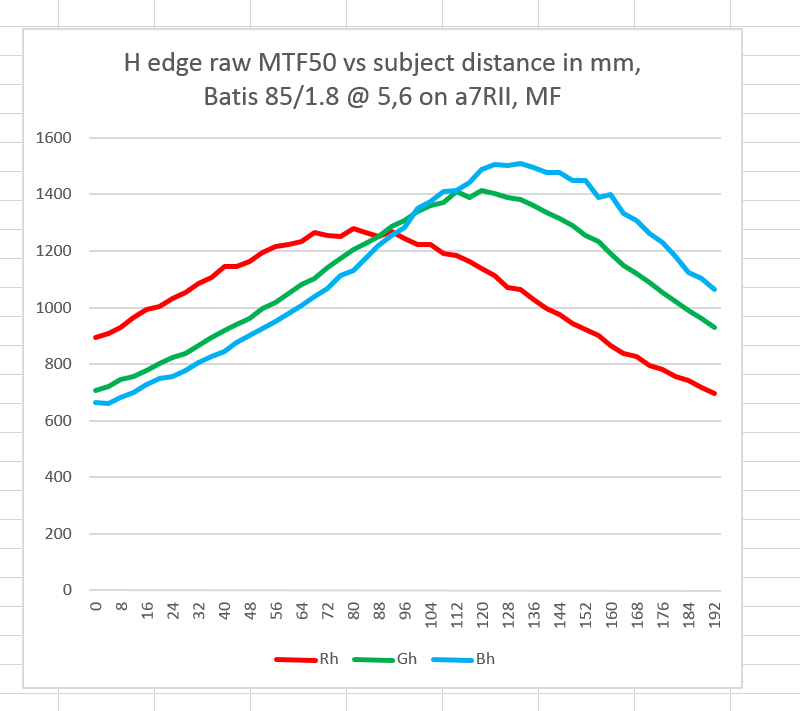
At f/1.8 and manual focus:

Batis 18 MF sub

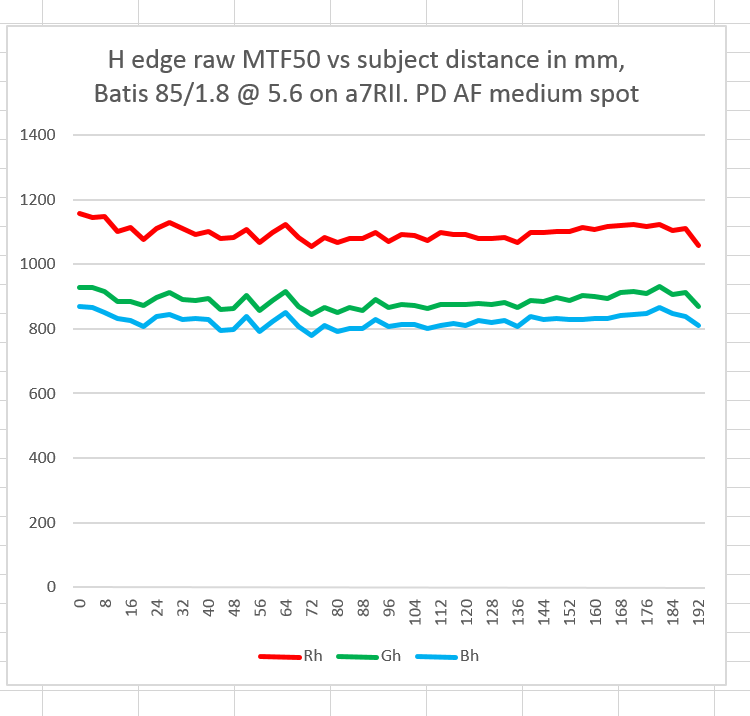
I tried to used the small spot, but the camera couldn’t focus on more than half the shots, so here are the curves for the medium spot:

Batis 18 PDAFm sub

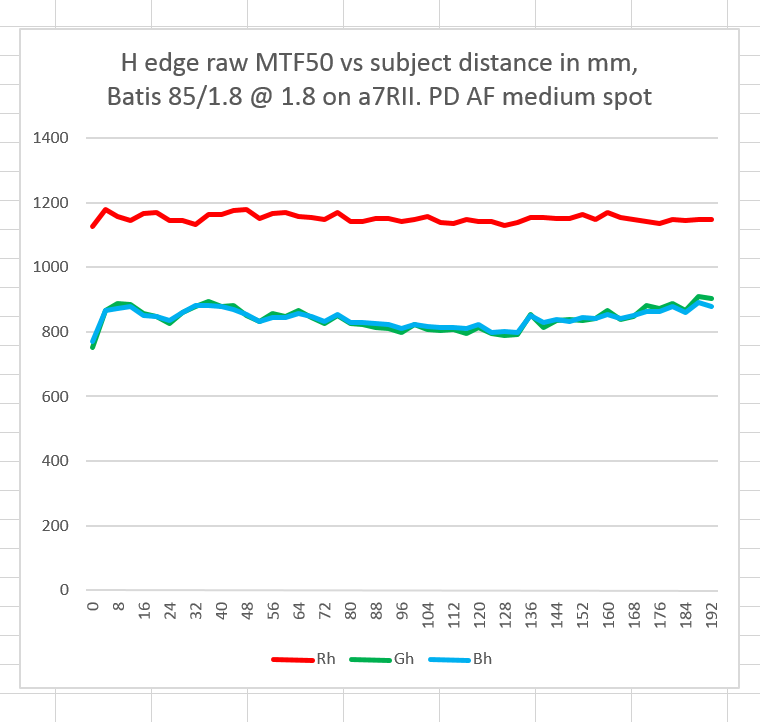
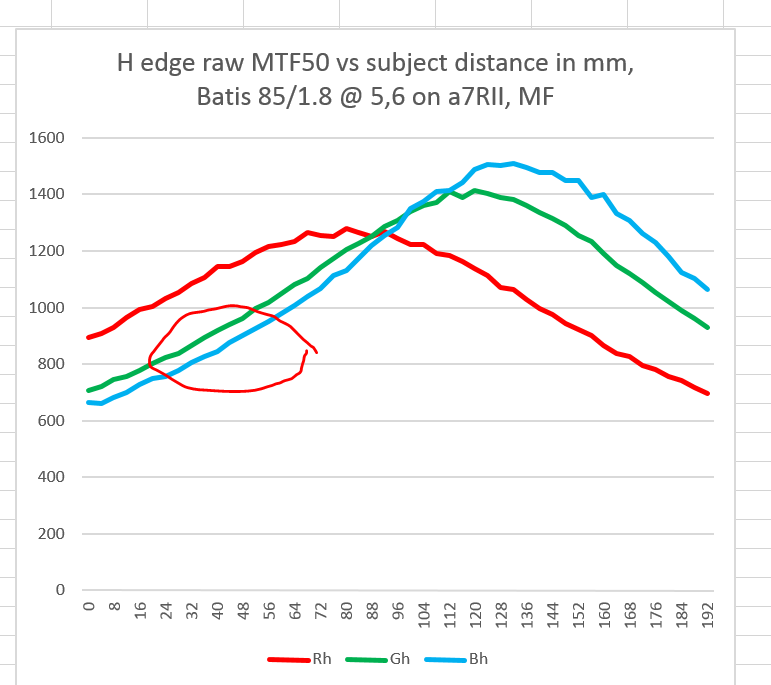
The focus is very consistent, more so than I could do manually. The red channel is much better focused than the other two, however. Let’s look at the MF curves to see where the camera is focusing.

Batis 18 MF circle

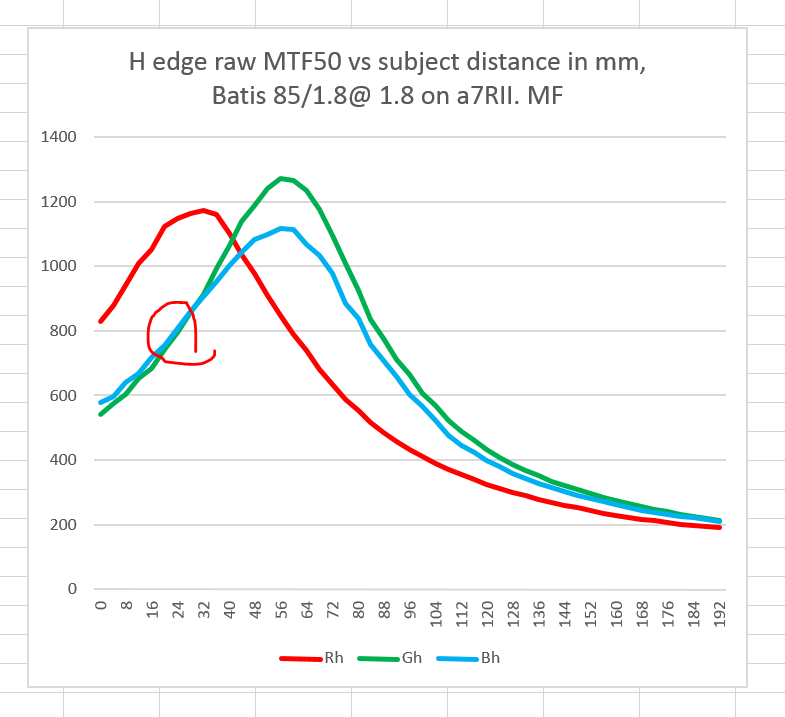
It looks like it’s focusing about where the red circle is, which is a little bit off the red peak, and in the wrong direction.

Manual focusing at f/5.6:

Batis 56 MF sub

AF with the small spot size:

Batis 56 PDAFm sub

AF with medium spot size:

Batis 18 PDAFm sub

The medium spot size produces more consistent results, but it’s not focysing on the right color plane to about the same degree.

Looking at the MF curves again:

Batis 56 MF circle sub

It is apparent that it’s focusing on the wrong side of the red channel peak.


The Last Word

← Another medium tele test — Batis AF Another medium tele test — Sony 90 macro PDAF →

Comments

  1. N/A says

    February 27, 2016 at 6:42 pm

    so it does not look like PDAF is followed by a single CDAF step then ?

    Reply
    • David Braddon-Mitchell says

      February 27, 2016 at 9:01 pm

      Don’t think there’s evidence either way here; the tendency to focus for the red channel seems to be there regardless of whether the camera is set for CDAF or PDAF, which is compatible with PDAF meaning PDAF and a CD optimisation pass, but equally compatible with not such pass.

      Reply
    • Andrew Dodd says

      July 7, 2016 at 6:29 am

      This is going back quite a way in time – but in AF-C it typically prioritizes PDAF without a CDAF followup.

      Jim only specifies spot size but doesn’t mention AF-C vs. AF-S – however since he says PDAF I am assuming AF-C

      Reply
  2. Erik Kaffehr says

    February 28, 2016 at 4:21 am

    Hi Jim,

    Could it be the case that the camera is using the focus assist light?

    It is red, so it may be the reason it uses the red pixels. Just a long fetched idea…

    Best regards
    Erik

    Reply
    • Jim says

      February 28, 2016 at 6:13 am

      Focus assist is off.

      Reply
  3. Bumpy says

    February 28, 2016 at 4:36 am

    I’m out of my depth here, but don’t I recall that a given CoC is distributed around point of ideal focus 1/3rd front and 2/3 away? Perhaps the slight front focus bias is a hedge against most users expecting focus falloff to be balanced around point of ideal focus vs. 1/3 front. I guess also I am assuming the focus tracks red channel for some technical reason and front focus relative to red is intentional bias.

    Reply
    • Jim says

      February 28, 2016 at 7:28 am

      The fact that the red rays focus on objects closer to the camera than the blue and green ones as a function of the LoCA in the Batis. As we’ve seen in other lens tests in this series, LoCA can order the focal planes of the three raw layers in other ways depending on the lens design. I suppose, if the engineers dliberately wanted to bias the AF mechanism for front focusing, they could have the lens report its most front focusing plane to the camera when the lens is mounted, so what you are proposing is technically possible.

      But would the engineers deliberately design an AF system that delivers less than the best sharpness at the chosen focal point?

      Jim

      Reply

Trackbacks

  1. Another medium tele test — Batis AF | The Last Word says:
    February 29, 2016 at 11:14 am

    […] [Edit: when I first posted this, I thought you could turn off PDAF for native lenses with the a7RII. Turns out you can’t.; what I though turned it off only turns off the display of the PDAF point. So this test is basically the same as the one in the next post. I’m leaving it here because there are external l=inks to it, but I will probably remove it in a few months. Unless you’re an Internet historian,m it would probably be better if you just skipped to the next post.] […]

    Reply
  2. Chromatic Aberrations MTF Mapped | Strolls with my Dog says:
    March 19, 2016 at 10:31 am

    […] you do not want to do it yourself, Jim Kasson has independently performed a marvellous series of tests documenting this effect for a number of mid-tele primes, I highly recommend the read.  He […]

    Reply

Leave a Reply Cancel reply

Your email address will not be published. Required fields are marked *

May 2025
S M T W T F S
 123
45678910
11121314151617
18192021222324
25262728293031
« Apr    

Articles

  • About
    • Patents and papers about color
    • Who am I?
  • How to…
    • Backing up photographic images
    • How to change email providers
    • How to shoot slanted edge images for me
  • Lens screening testing
    • Equipment and Software
    • Examples
      • Bad and OK 200-600 at 600
      • Excellent 180-400 zoom
      • Fair 14-30mm zoom
      • Good 100-200 mm MF zoom
      • Good 100-400 zoom
      • Good 100mm lens on P1 P45+
      • Good 120mm MF lens
      • Good 18mm FF lens
      • Good 24-105 mm FF lens
      • Good 24-70 FF zoom
      • Good 35 mm FF lens
      • Good 35-70 MF lens
      • Good 60 mm lens on IQ3-100
      • Good 63 mm MF lens
      • Good 65 mm FF lens
      • Good 85 mm FF lens
      • Good and bad 25mm FF lenses
      • Good zoom at 24 mm
      • Marginal 18mm lens
      • Marginal 35mm FF lens
      • Mildly problematic 55 mm FF lens
      • OK 16-35mm zoom
      • OK 60mm lens on P1 P45+
      • OK Sony 600mm f/4
      • Pretty good 16-35 FF zoom
      • Pretty good 90mm FF lens
      • Problematic 400 mm FF lens
      • Tilted 20 mm f/1.8 FF lens
      • Tilted 30 mm MF lens
      • Tilted 50 mm FF lens
      • Two 15mm FF lenses
    • Found a problem – now what?
    • Goals for this test
    • Minimum target distances
      • MFT
      • APS-C
      • Full frame
      • Small medium format
    • Printable Siemens Star targets
    • Target size on sensor
      • MFT
      • APS-C
      • Full frame
      • Small medium format
    • Test instructions — postproduction
    • Test instructions — reading the images
    • Test instructions – capture
    • Theory of the test
    • What’s wrong with conventional lens screening?
  • Previsualization heresy
  • Privacy Policy
  • Recommended photographic web sites
  • Using in-camera histograms for ETTR
    • Acknowledgments
    • Why ETTR?
    • Normal in-camera histograms
    • Image processing for in-camera histograms
    • Making the in-camera histogram closely represent the raw histogram
    • Shortcuts to UniWB
    • Preparing for monitor-based UniWB
    • A one-step UniWB procedure
    • The math behind the one-step method
    • Iteration using Newton’s Method

Category List

Recent Comments

  • JimK on Goldilocks and the three flashes
  • DC Wedding Photographer on Goldilocks and the three flashes
  • Wedding Photographer in DC on The 16-Bit Fallacy: Why More Isn’t Always Better in Medium Format Cameras
  • JimK on Fujifilm GFX 100S II precision
  • Renjie Zhu on Fujifilm GFX 100S II precision
  • JimK on Fuji 20-35/4 landscape field curvature at 23mm vs 23/4 GF
  • Ivo de Man on Fuji 20-35/4 landscape field curvature at 23mm vs 23/4 GF
  • JimK on Fuji 20-35/4 landscape field curvature at 23mm vs 23/4 GF
  • JimK on Fuji 20-35/4 landscape field curvature at 23mm vs 23/4 GF
  • Ivo de Man on Fuji 20-35/4 landscape field curvature at 23mm vs 23/4 GF

Archives

Copyright © 2025 · Daily Dish Pro On Genesis Framework · WordPress · Log in

Unless otherwise noted, all images copyright Jim Kasson.