We’ve seen that the a7R is affected by shutter shock. We’ve seen ways to ameliorate those effects. We’ve seen that the a7 is essentially free of shutter shock effects by virtue of its electronic first curtain shutter. What if we put all that together and consider the question, “At its worst shutter speed, is the a7R’s sharpness better than the a7’s?” I thought I’d find out. I set up an a7R with the 135mm f/2 Zeiss APO Sonnar ZF.2 on a Novoflex adapter. Using the tricks that we’ve learned so far, I mounted it like this:
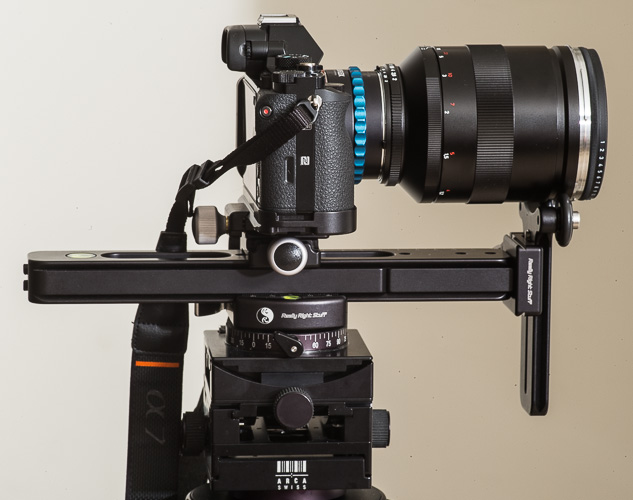
Support for the lens barrel? Check. Shutter over the tripod head? Check. A little extra mass? Check.
Taking advantage of the fact that the only a7 shutter motion that can cause blur is that associated with the closing of the second curtain, and that is hardly ever problematic, I mounted the lens to that camera in a much more convenient way:

You’d never mount the lens this way with the a7R. It’s an invitation for the shutter to make the camera/adapter/lens assembly act like a teeter-totter with the fulcrum at the adapter foot, and you’ve got no protection against adapter slop, either. However, you can get away with it with the a7. Using the Novoflex ASTAT-NEX foot is also a good way to spare the a7 lens mount from the task of supporting the big Zeiss lens, as long as you’re careful about how you handle the camera.
I supported the above setups with an Arca Swiss C1 Cube and RRS TVC-44 legs. I put a Heliopan 77mm variable neutral density filter on the lens. Release was with the 2 second self-timer. ISO 400, lens focused wide open and then stopped down to f/5.6. ISO 12233 target with the camera at a distance to yield an active area 647 pixels high for the a7R images, and 527 for a7 ones. Thus, the lines labeled “6” represent slightly more than 1 line pair per pixel pair in the a7R images, and the lines labeled “5” represent slightly more than 1 line pair per pixel pair in the a7R ones.
Target illumination for the continuous lighting images was provided by a single Fotodiox LED-200WA-56 lamp set to full output, using the supplied reflector. I set the camera to aperture priority, and, with the ND filter set to minimum attenuation, adjusted the exposure compensation to give a shutter speed of 1/640 second. I made an exposure. Then I added sufficient light attenuation to get the shutter to 1/3 stop slower speed, and made another exposure. I continued all the way to a shutter speed of ¼ second. Then I did the whole thing again with the other camera.
I brought the images into Lightroom, tweaked exposure and set white balance by eyedropper on the paper white of the target. I left all the other settings at default. I found the sharpest a7R image (1/640 second), and opened it in Photoshop. Then I found the fuzziest (1/60 second) and did the same. I enlarged both images to 300% using bilinear interpolation. This isn’t the sharpest way to scale up an image, but it’s the about the least likely to introduce artifacts. I checked the a7 images, and saw that they were all about the same sharpness. I opened the 1/640 second one in Photoshop, and scaled it up to 368% using bilinear interpolation, so that the target features were the same size in pixels as in the a7R images.
Here’s the sharpest a7R image cropped to the upper right cross:

Here’s the worst a7R image cropped to the upper right cross:

Here’s the a7 image cropped to the upper right cross:

My conclusion is that even at the camera’s worst shutter speed, the a7R images have higher resolution and micro-contrast than the a7 images. Therefore if you’re shooting in landscape orientation at focal lengths of 135 mm and shorter, and are willing to go to a little trouble to mount your gear carefully, then you’ll get better IQ with the a7R than with the a7 at all shutter speeds. The difference is great enough that it probably extends out to focal lengths significantly longer than 135mm. I leave the testing of that to anyone who has access to both cameras and an ISO 12233 chart.
Lloyd Chambers has stopped using the a7R for lens testing because of shutter shock. I can see why he did it; it makes it hard to sort out what’s the shutter and what’s the lens. However, his needs are different than photographers who don’t test gear for a living, and you shouldn’t interpret that to mean that you’ll get sharper images with the a7.
> My conclusion is that [b] even at the camera’s worst shutter speed, the a7R images have higher resolution and micro-contrast than the a7 images[/b]
shouldn’t the bold part including wording in bold too about the mounting in the same line ?
Good catch. I decided to unbold (if that’s a word) the specific comment and bold the general one.
Jim
I would be interested in seeing a comparison of the A7 and A7R in both landscape and portrait orientations when using the 135mm Zeiss lens mounted in the “conventional” manner, eg. without the RRS Support System. How bad the shutter vibration problem when the tripod attachment point is at the camera body? The shorter focal lenses like the 55mm f/1.8 can only be tripod attached at the camera body. Does the A7R show more shutter vibration issues than the A7 under these conditions?
I am trying to decide between the A7 and A7R. One of the attractions of the mirror-less cameras is small size and low weight. So far it seems that the A7R requires complicated tripod mounting systems such as the RRS in order to function free of shutter vibration and the A7 does not.
Thanks for your work on this issue.
Phil,
Were the Zeiss 135mm f/2 to be mounted in the “conventional” manner, I think the performance would be slightly worse than the way it was mounted for the tests. However, I don’t really know, because the lens is so big and heavy that I’m afraid I will damage the little Sonys by making the lens mount support the weight of the lens, especially when its lever arm is increased by the adapter.
The a7R definitely shows more shutter vibration effects with conventional mounting than the a7, which is remarkably free of those thanks to the electronic first curtain.
In trying to decide between the two cameras, the first question to ask yourself is, “Will 24 megapixels with an anti-aliasing filter provide sufficient resolution for what I want to do?” If the answer to that question is yes, then ask yourself if you need to use third-party normal and wide angle lenses. If the answer to the first question is yes, and the answer to the second question is no, buy the a7. If the answer to the first question is no, then you have to ask yourself if you’re willing to go to the trouble of taming the a7R shutter shock. If you’re not, you might be better off with a D800 or D800E.
Also, remember that you need good lenses used at nearly optimum apertures to see the shutter shock in most circumstances. If you’re going to be using run-of-the-mill zooms, you may never see it. But if that’s the case, you may not need 36 MP, either.
Jim
Hi Jim:
Thanks for your reply.
If the Zeiss 135mm Lens were mounted on the tripod using the foot on the adapter (or using a lens collar such as found on many of the DSLR lenses) for both the A7 and A7R, I assume that the A7R shutter vibration problem would be visible but wouldn’t the resulting worse case A7R image still be sharper than that from the A7?
Your analysis of the situation is very refreshing and puts the A7R Shutter Issue in a clearer perspective. When using either of the Sony A7 Cameras on a tripod I would like to avoid having to use the elaborate RRS Mounting System and simply use the camera mounting for small light weight lenses and a lens collar foot or adapter foot for the heavier lenses such as the new Zeiss-Sony 70 – 200 zoom lens. Although I can appreciate the mechanical improvement offered by the RRS System, it adds a level of additional weight and complexity to field photography.
Assuming that I use only the Zeiss-Sony lenses such as 35mm f/2.8, 55mm f/1.8 and the new 70-200f/4 lens, will I be better off with the A7R for sharpness?
Thanks for help
Phil
If the Zeiss 135mm Lens were mounted on the tripod using the foot on the adapter (or using a lens collar such as found on many of the DSLR lenses) for both the A7 and A7R, I assume that the A7R shutter vibration problem would be visible but wouldn’t the resulting worse case A7R image still be sharper than that from the A7?
Vibration would be worse using the collar or the foot on the adapter. I don’t know how much worse, so I don’t know if it would be better than the a7.
Assuming that I use only the Zeiss-Sony lenses such as 35mm f/2.8, 55mm f/1.8 and the new 70-200f/4 lens, will I be better off with the A7R for sharpness?
Certainly with the 35 and the 55 on a good tripod and head in landscape mode. I don’t know about the zoom.
Thanks for the comparison, interesting!
Sorry for the elementary question but I am confused on why you chose to scale the A7R to 300% and the A7 to 368%. I realize that you wanted the images to be relatively the same size for comparison and you had to do this because the difference in image sizes (A7R 7360X4912 and A7 6000X4000) but wouldn’t the higher magnification of 368% automatically make the images less sharp?
If I view an image at 300% and then magnify it to 368%, to my eye, the image looks less sharp.
I would think the comparison would have to be done at the same magnification which would make the A7R images larger unless you moved closer to shot the A7 images which I believe you did when you, “target with the camera at a distance to yield an active area 647 pixels high for the a7R images, and 527 for a7 ones.”
Where am I going wrong on the 300 vs 368 scaling?
Thanks
Distance was the same for the two sets of images, hence the need for scaling. I did not move closer for the a7 images. Here’s a quote form the original post that explains it:
“ISO 12233 target with the camera at a distance to yield an active area 647 pixels high for the a7R images, and 527 for a7 ones. Thus, the lines labeled “6” represent slightly more than 1 line pair per pixel pair in the a7R images, and the lines labeled “5” represent slightly more than 1 line pair per pixel pair in the a7R ones.”
Does that help?
Hi.
Thank you for your nice report. But I have a question: Which RRS components have you used (image 1) to holde the cam and the lese?
BR Tom
If you look here:
http://www.reallyrightstuff.com/s.nl/sc.26/category.618/it.C/.f
I think you;ll find what you need.
Jim