• site home
  • blog home
  • galleries
  • contact
  • underwater
  • the bleeding edge

the last word

Photography meets digital computer technology. Photography wins -- most of the time.

You are here: Home / GFX 100S / DOF calculators and pixel peeking, 80/1.7 on GFX 100S

DOF calculators and pixel peeking, 80/1.7 on GFX 100S

May 8, 2021 JimK 3 Comments

Ever since the GFX cameras first shipped, there has been a vocal minority claiming that DOF calculators don’t work with them, and that they have far less DOF that the calculators say. I have steadfastly maintained that thinking is wrong, and results from misuse of the DOF calculators, specifically picking an inappropriate circle of confusion diameter, which I’ll call CoC in this post. Old fashioned DOF tables were most often computed with CoCs in the 30 to 40 micrometer (um) range, which may have been OK in the film days, but is very tolerant of blur.

I’ve talked a lot about misfocus blur in the past, and how to relate it to modulation transfer function (MTF), how to trade it off against diffraction, pixel aperture blur, and lens aberrations. I’m not going to do that in this post. I often have a lot of math in my posts. Not in this one. We’ll just use a widely available DOF calculator, a simple one that doesn’t take diffraction into account, and we’ll relate what the calculator says the DOF is with various CoCs to what we see with our eyes at pixel-peeking magnifications. In this post, the magnifications are at slightly over 100%.

We’ll use the Fujifilm 80 mm f/17 lens on the GFX 100S, which has a pixel pitch of 3.76 um.

The scene I’ve chosen has two trees in it. The far one, where I focused, is 101 meters away. The near one is 55 meters distant. The near tree will show varying amounts of blur as the CoC changes.

f/1.7

Test conditions:

  • RRS carbon fiber legs
  • C1 head
  • Target distance 101 and 55 meters
  • ISO 100
  • Electronic shutter
  • 2-second self timer
  • f/1.7 through F/11
  • Shutter speed changed to approximate same exposure
  • Develop in Lightroom 10.2
  • Sharpening amount 20, radius 1, detail 25
  • Daylight white balance
  • Same minor exposure adjustment
  • Rest of settings at default


My first shot is wide open. The DOF calculator predicts a CoC of 30 um, which as I said before, is quite blurry, especially if pixel peeping in this way.


f/1.7

You can see that the near tree, on the bottom, is quite blurry.

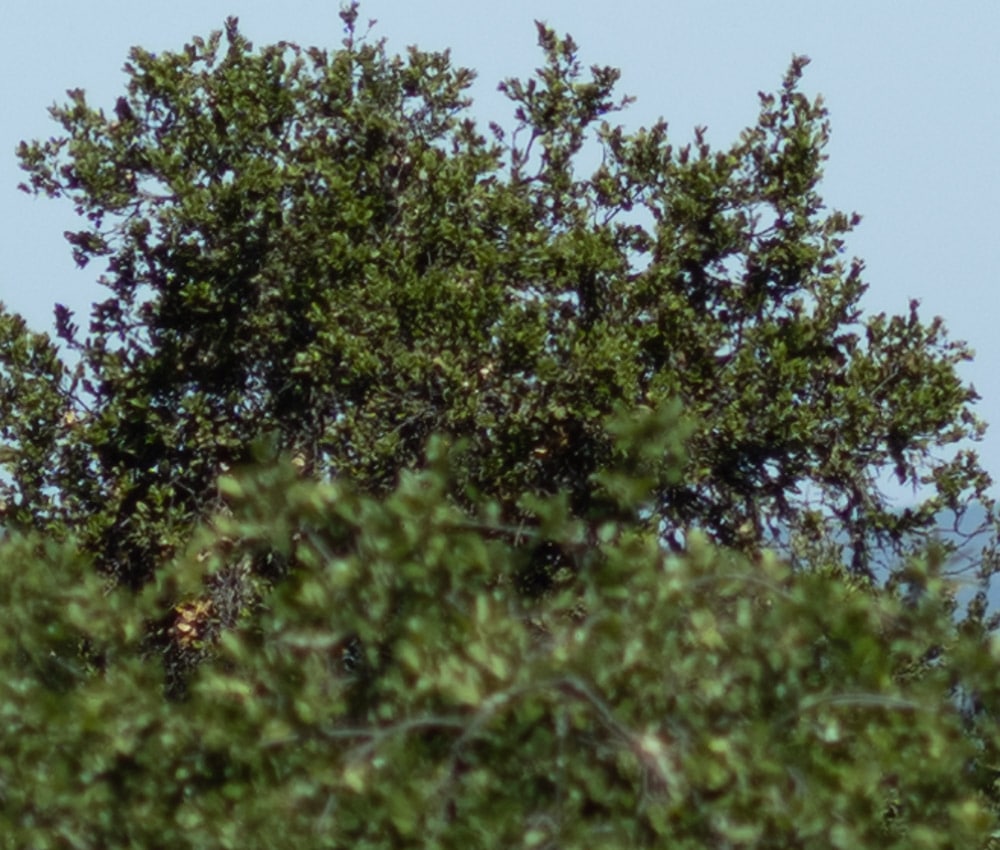
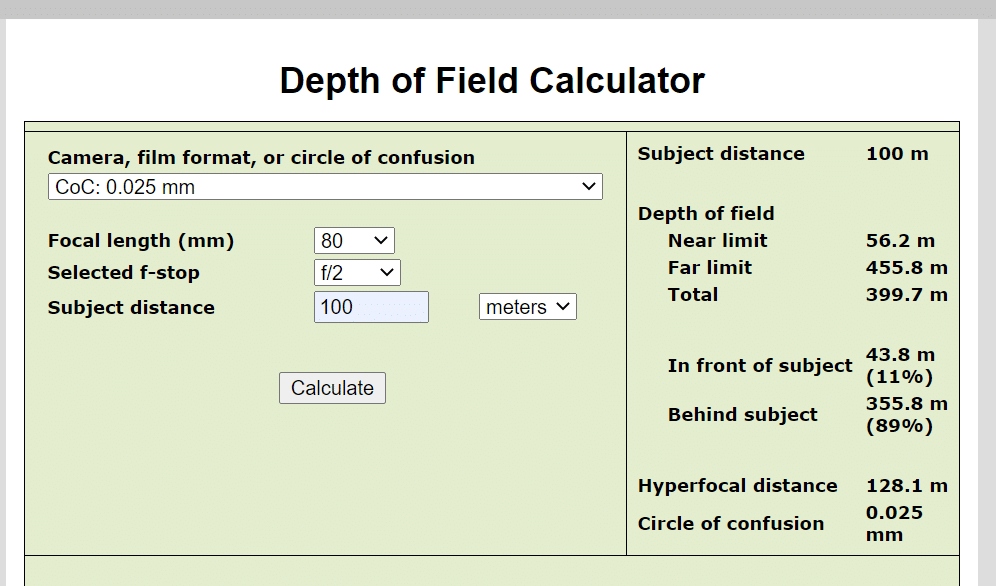
We get more DOF as we stop down. Let’s look at f/2. The DOF calculator predicts a CoC of 25 um.


f/2

Marginally less blurry, right?

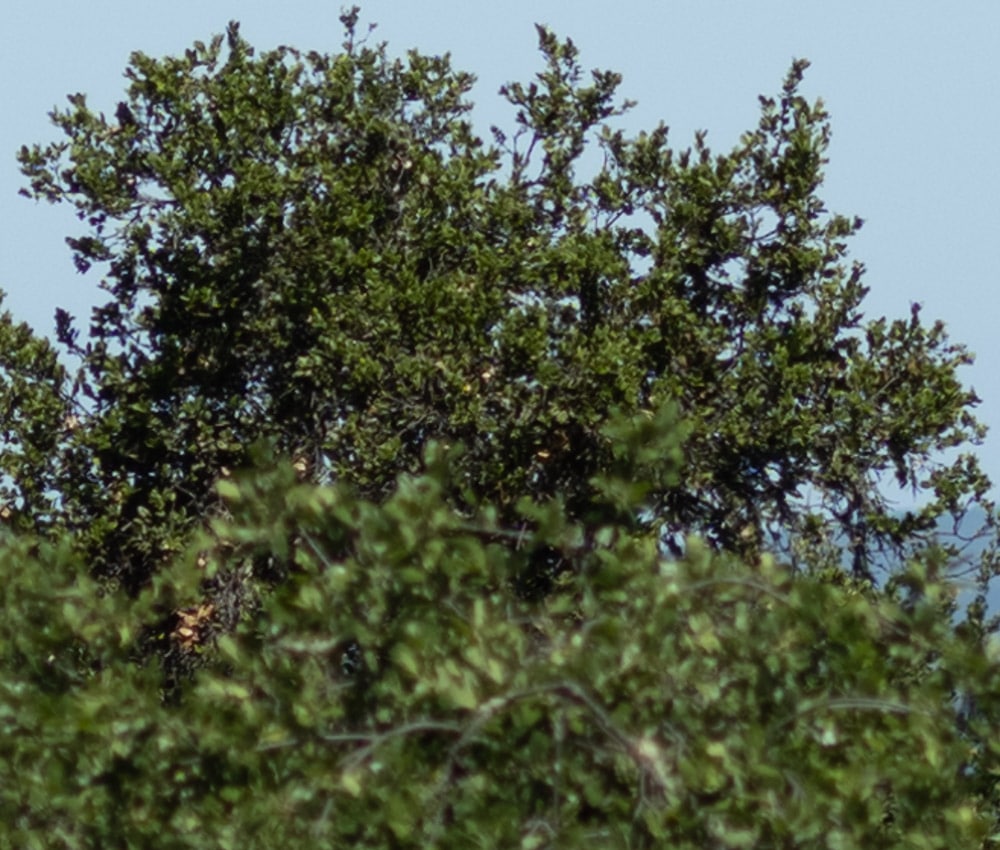
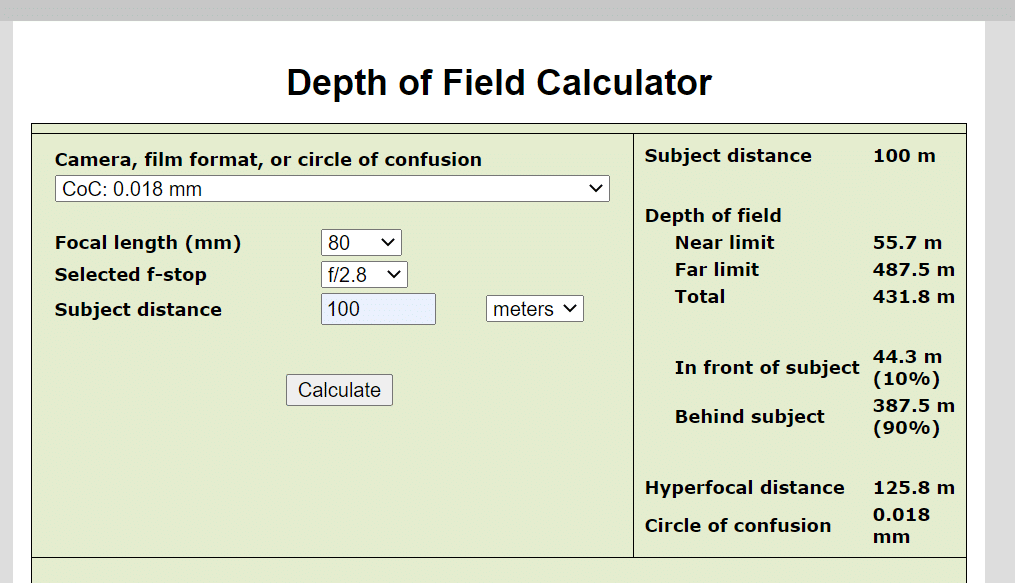
At f/2.8, the CoC will be 18 um.


f/2.8

Better, but still not crisp.

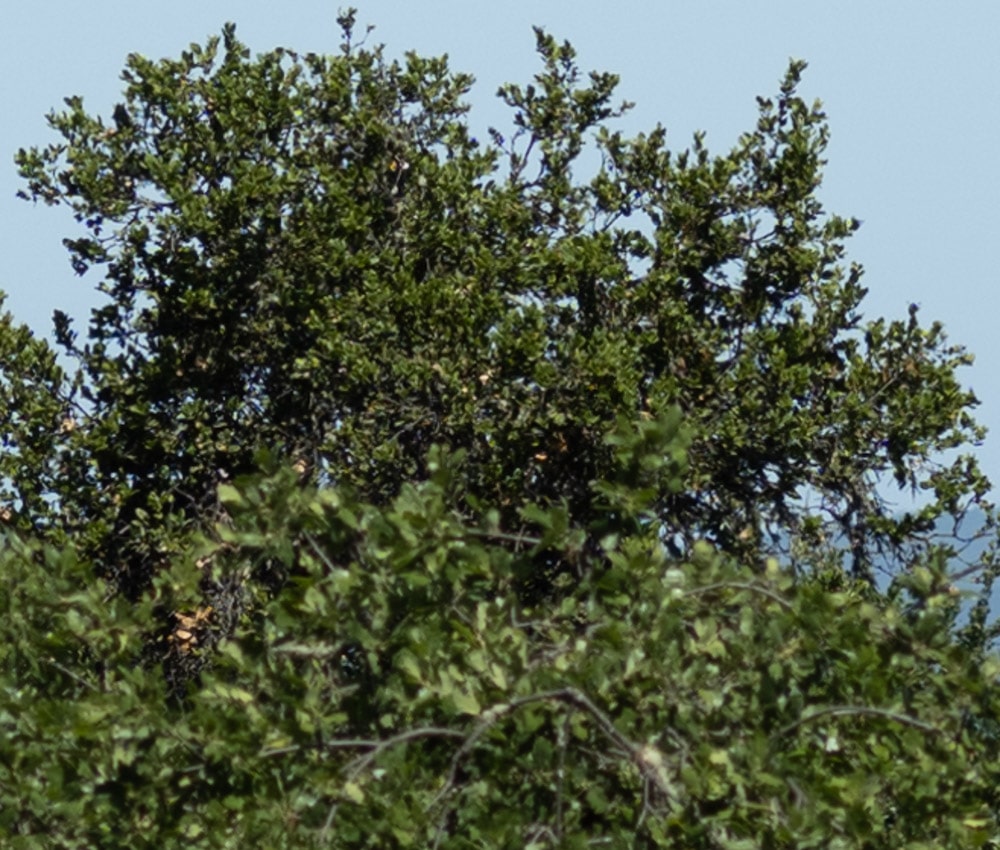
At f/4, we’ll see a 12 um CoC.


f/4

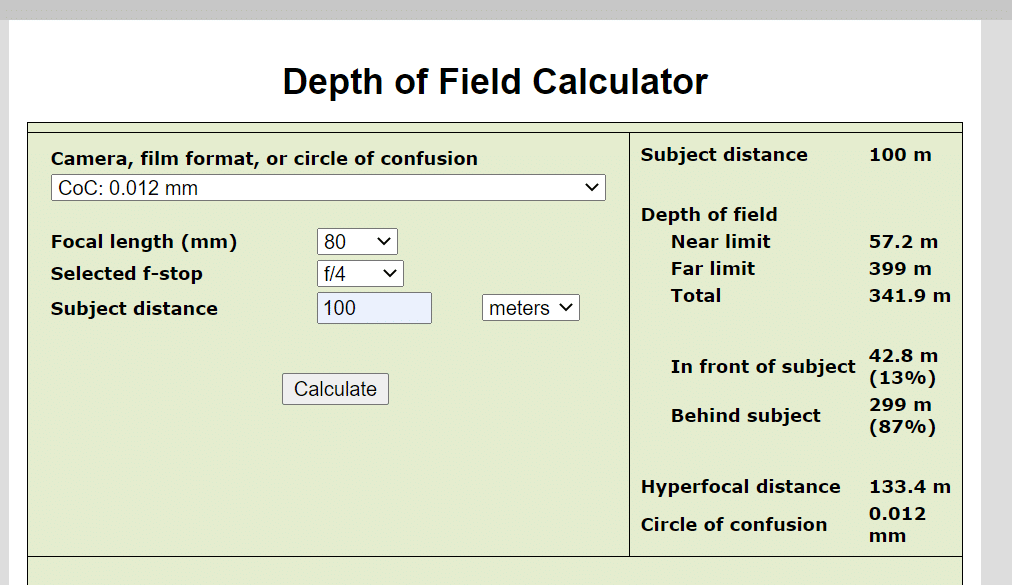
There are situations in which this would be acceptable, but it’s clearly unsharp.

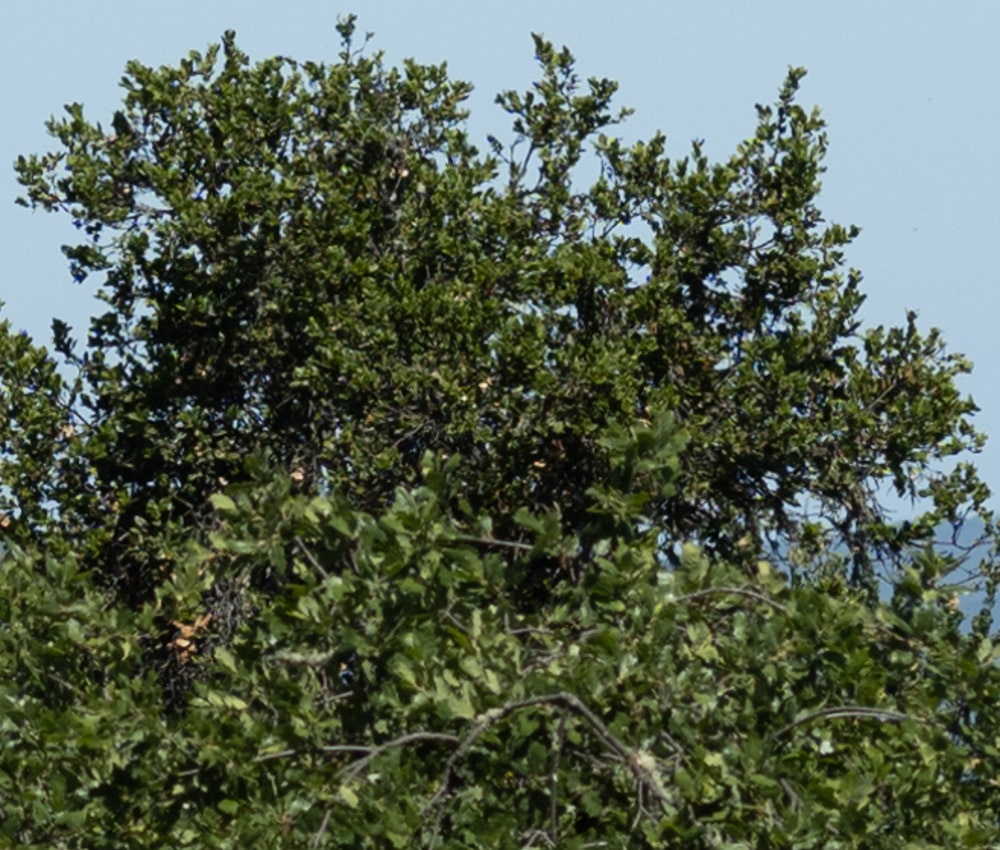
At f/5.6, we’ll get a CoC of 8 um, which is about 2 pixel pitches.


f/5.6

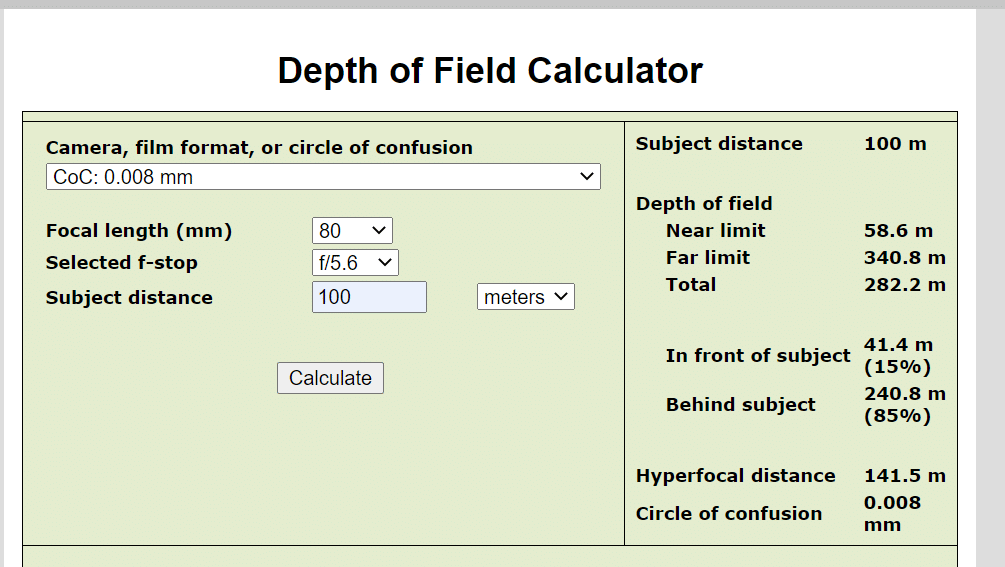
That’s looking good enough for some purposes, but isn’t critically sharp.

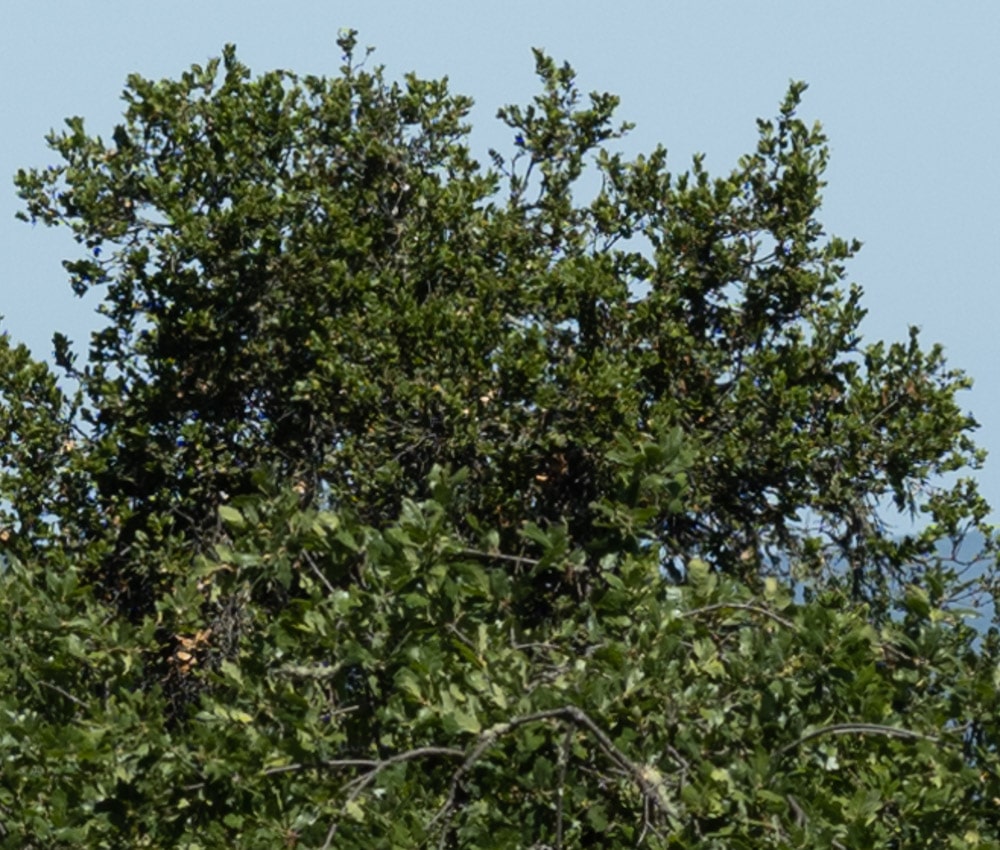
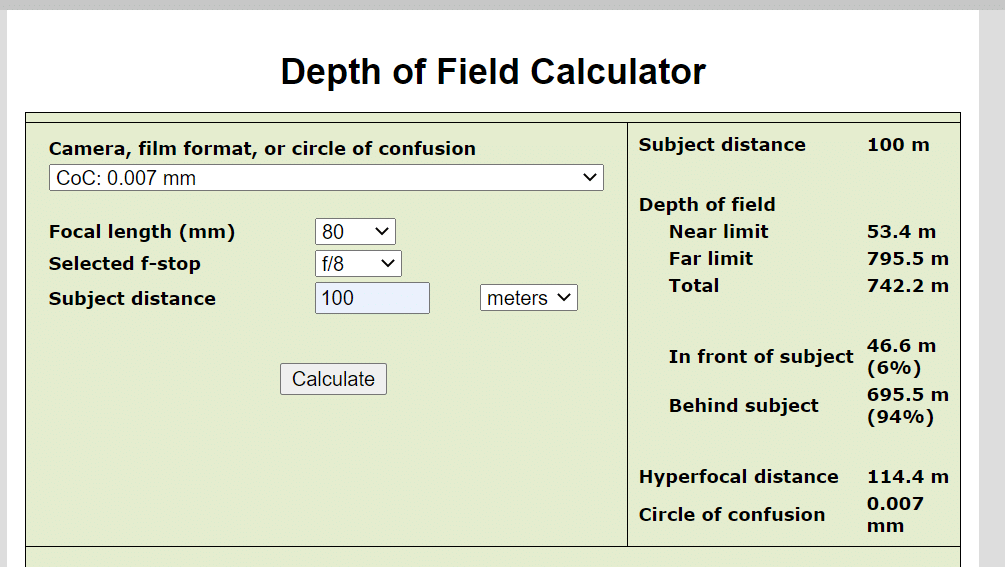
At f/8, we’ll have some diffraction affecting the in-focus part of the image, but the 55 m tree should crisp up a hair, since the CoC is 7 um.


f/8

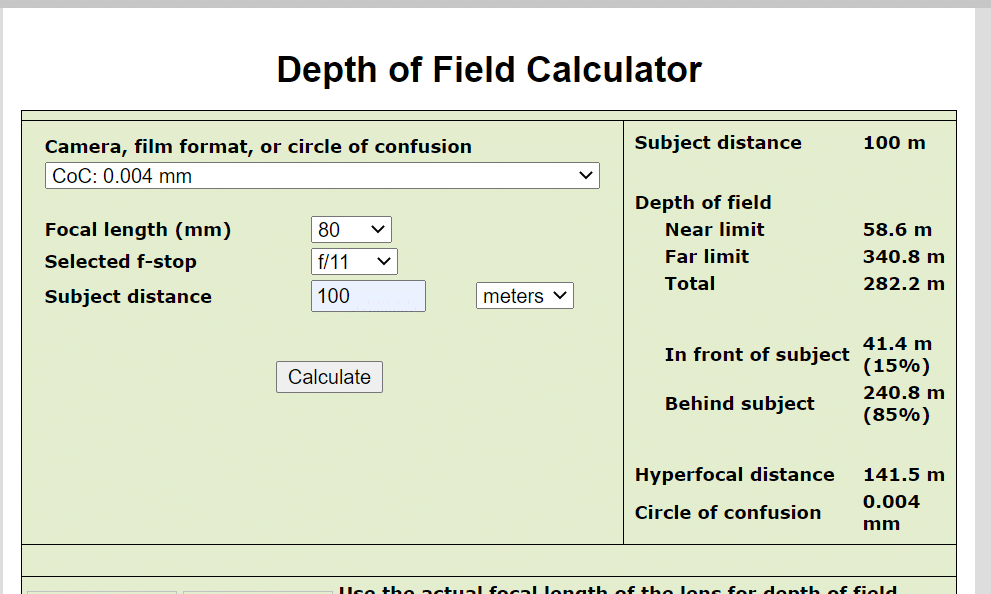
At f/11, we’ll have more diffraction, and a CoC of about the pixel pitch, so the foreground tree should look pretty close to the background one.
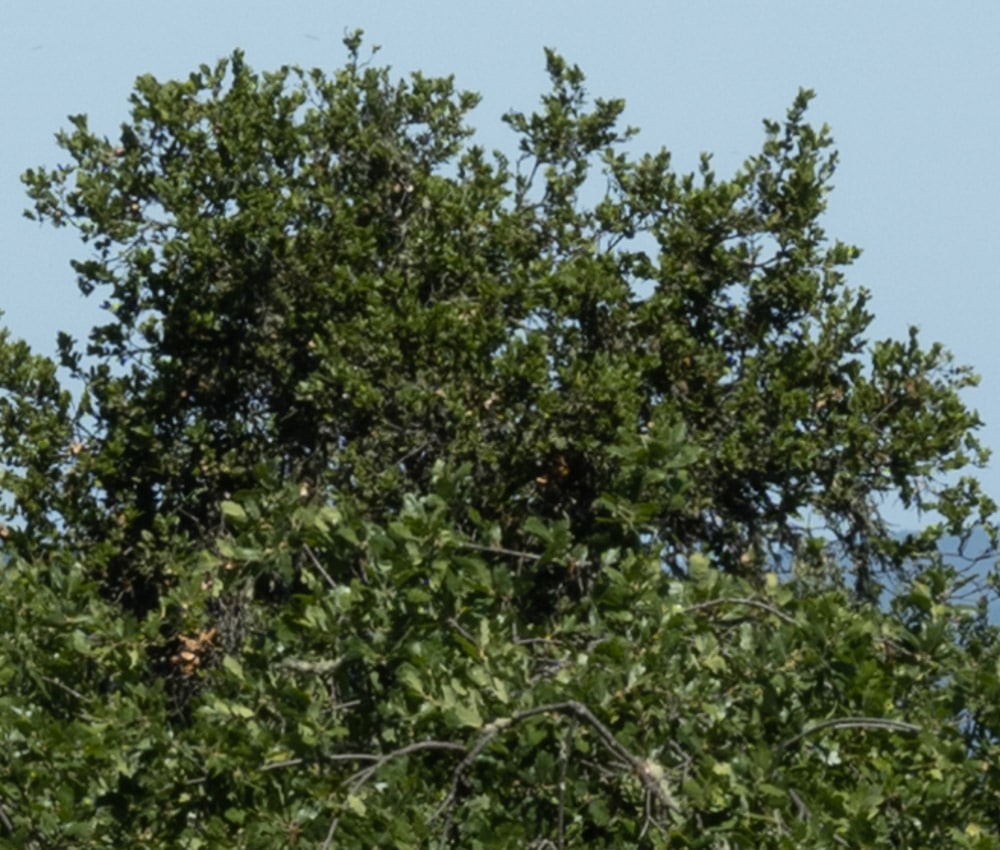
 

f/11

And it does.

GFX 100S, The Last Word

← Rodenstock 180/5.6 Digaron MTFs compared FF and MF DOF compared visually →

Comments

  1. Erik Kaffehr says

    May 9, 2021 at 2:25 am

    Good stuff!

    It is a reminder how short DoF can be. A good reason to carry a laser range finder and a cell phone with LumaRiver DoF calculator.

    Reply
  2. Farzaan Kassam says

    May 10, 2021 at 6:53 pm

    Jim, I really appreciate posts like this. You took something very complicated and made it simple. I had an aha moment in realizing that when pixel pitch equals CoC, then we have the ideal depth of field for that subject at that distance. Please let me know if I’ve gotten this wrong. Thanks!

    Reply
    • JimK says

      May 10, 2021 at 9:12 pm

      It ain’t that simple. Blur management means dealing with four kinds of blur: pixel aperture blur, lens aberrations, diffraction, and DOF in such a way that the result is the purest expression of the artist’s intent. There is no right answer, though there may be a right answer for each image made by a given photographer.

      https://blog.kasson.com/?s=blur+management

      Reply

Leave a Reply Cancel reply

Your email address will not be published. Required fields are marked *

May 2025
S M T W T F S
 123
45678910
11121314151617
18192021222324
25262728293031
« Apr    

Articles

  • About
    • Patents and papers about color
    • Who am I?
  • How to…
    • Backing up photographic images
    • How to change email providers
    • How to shoot slanted edge images for me
  • Lens screening testing
    • Equipment and Software
    • Examples
      • Bad and OK 200-600 at 600
      • Excellent 180-400 zoom
      • Fair 14-30mm zoom
      • Good 100-200 mm MF zoom
      • Good 100-400 zoom
      • Good 100mm lens on P1 P45+
      • Good 120mm MF lens
      • Good 18mm FF lens
      • Good 24-105 mm FF lens
      • Good 24-70 FF zoom
      • Good 35 mm FF lens
      • Good 35-70 MF lens
      • Good 60 mm lens on IQ3-100
      • Good 63 mm MF lens
      • Good 65 mm FF lens
      • Good 85 mm FF lens
      • Good and bad 25mm FF lenses
      • Good zoom at 24 mm
      • Marginal 18mm lens
      • Marginal 35mm FF lens
      • Mildly problematic 55 mm FF lens
      • OK 16-35mm zoom
      • OK 60mm lens on P1 P45+
      • OK Sony 600mm f/4
      • Pretty good 16-35 FF zoom
      • Pretty good 90mm FF lens
      • Problematic 400 mm FF lens
      • Tilted 20 mm f/1.8 FF lens
      • Tilted 30 mm MF lens
      • Tilted 50 mm FF lens
      • Two 15mm FF lenses
    • Found a problem – now what?
    • Goals for this test
    • Minimum target distances
      • MFT
      • APS-C
      • Full frame
      • Small medium format
    • Printable Siemens Star targets
    • Target size on sensor
      • MFT
      • APS-C
      • Full frame
      • Small medium format
    • Test instructions — postproduction
    • Test instructions — reading the images
    • Test instructions – capture
    • Theory of the test
    • What’s wrong with conventional lens screening?
  • Previsualization heresy
  • Privacy Policy
  • Recommended photographic web sites
  • Using in-camera histograms for ETTR
    • Acknowledgments
    • Why ETTR?
    • Normal in-camera histograms
    • Image processing for in-camera histograms
    • Making the in-camera histogram closely represent the raw histogram
    • Shortcuts to UniWB
    • Preparing for monitor-based UniWB
    • A one-step UniWB procedure
    • The math behind the one-step method
    • Iteration using Newton’s Method

Category List

Recent Comments

  • JimK on Goldilocks and the three flashes
  • DC Wedding Photographer on Goldilocks and the three flashes
  • Wedding Photographer in DC on The 16-Bit Fallacy: Why More Isn’t Always Better in Medium Format Cameras
  • JimK on Fujifilm GFX 100S II precision
  • Renjie Zhu on Fujifilm GFX 100S II precision
  • JimK on Fuji 20-35/4 landscape field curvature at 23mm vs 23/4 GF
  • Ivo de Man on Fuji 20-35/4 landscape field curvature at 23mm vs 23/4 GF
  • JimK on Fuji 20-35/4 landscape field curvature at 23mm vs 23/4 GF
  • JimK on Fuji 20-35/4 landscape field curvature at 23mm vs 23/4 GF
  • Ivo de Man on Fuji 20-35/4 landscape field curvature at 23mm vs 23/4 GF

Archives

Copyright © 2025 · Daily Dish Pro On Genesis Framework · WordPress · Log in

Unless otherwise noted, all images copyright Jim Kasson.