These days I’m as likely to reduce resolution when printing as I am to increase it. The slit scan files come out of the camera at up to 9000×64000 pixels. The sweep panos are typically 8000×24000. Even if you’re not using such extreme file sizes, you may be downsampling too. If you’ve got a D800 and you’re printing uncropped images that are less than 20.4 inches wide, you’re downsampling. With a D3x, the number is 16.8 inches.
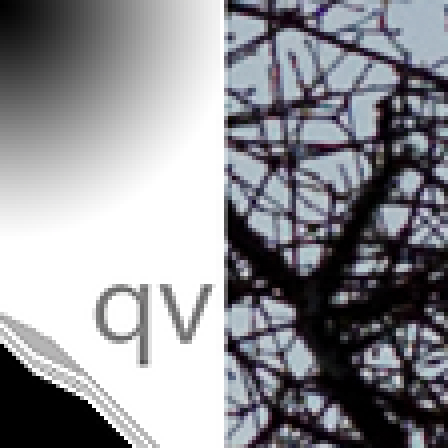
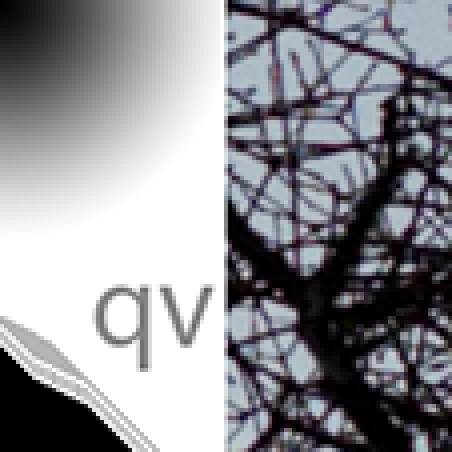
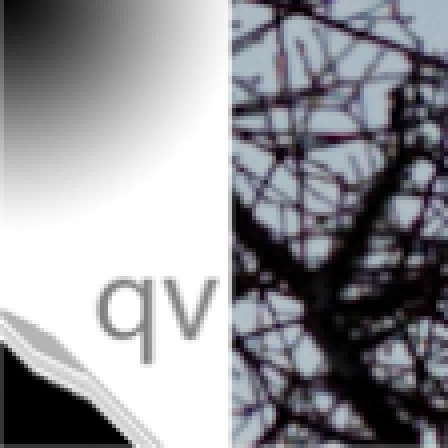
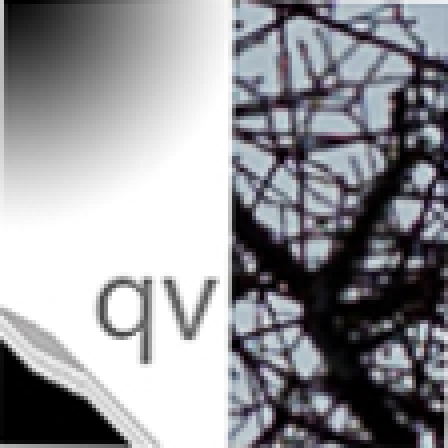
I’ve not been able to see much difference in the printed outputs of images downsampled for printing with Lightroom 4 with and without sharpening, bicubic sharper, or Perfect Resize, but I thought I’d apply the methods of the preceding post to resampling that reduces the number of pixels. I started with a 480 ppi version of the target, and resampled it to 360 ppi using all four methods. The Lightroom resampling was a little tricky because you can’t set printing dimensions in thousandths of an inch in LR, so there may be some small differences in scaling. The resulting images are all pretty small, so I resampled them up to 1440 ppi using nearest neighbor, thus getting a 4×4 pixel block for each pixel in the image. I converted them into JPEG’s with the minimum possible compression. The LR images have a slight disadvantage in that they were JPEG’d twice: once on export from LR, and once for web display, where the other images were only JPEG’d for web display. Still, I think the testing is worth looking at.
First, Perfect Resize:
Next, bicubic sharper, which loses a little crispness compared to PR:
Now for the two Lightroom images. This one has no sharpening, and is fairly soft:
And this one has the standard sharpening for glossy paper, and is pretty close to bicubic sharper except in the diagonal lines:
This kind of pixel peeping often shows differences that are completely invisible in the real world. My take away is that, when I’m downresing for printing, I will probably leave standard sharpening on in LR, and that I won’t worry about having to go to PR unless it’s a really special print of a subject that has a lot of detail.


John says
Assuming an Epson (or Canon) pro printer, why would you not use 720ppi (or 600)?
Jim says
I don’t know about Canon, but when you check the “Finest Detail” box in the Epson driver, you get no visible improvement (to my eyes) on photographs, and not much on artificial targets. See http://blog.kasson.com/?p=574
Jim
John says
Lot depends. Even ol’ Jeff Schewe is now (finally) convinced that upsizing to 720 is better than downsizing to 360….or, for gosh sakes, the prior recommendation to let the printer take care of it and it didn’t matter as long as you had at least 180-200ppi.
Whether you can see it or not depends on the image and printing material. Generally speaking, the difference is easier to see on gloss….less easy on matte.
My few is….the difference is mostly time….and maybe ~10% more ink, so I will generally default to 720….even if it means up rezzing past 360. As I have mentioned before….Qimage manages the rezzing for te size print I select….totally transparent to me. (Of course, I tested earlier for he correct settings for the material…but after that…automatic).
Jim says
John,
I’m not the kind to take others advice on something this easy to test. I realize that many are not like me. If you send me a 1×1 inch image with between 360 and 720 ppi resolution, I’ll be happy to resample it both ways, print it both ways, scan it and post the results. I’ll print it on Epson Glossy Photo. Pick an image that you think is good at showing that 720 ppi upsampling is better than 360 ppi downsampling. I’d be happy to have the opportunity to learn something.
Jim
John says
Jim, I am not trying to convince you. I am just stating my observations….and, hopefully, give some info so others can make their own decisions.
If you do not see a difference with your images, printer, workflow and software, resample method, media, and eyes…well…OK. I do….who knows what the difference is….could be any of the above. Sending you a clip….and processing it your way rather than mine is just an uncontrolled experiment…and would prove nothing either way.
I am not the only person who sees a difference.
Just as an aside, you mention a 1×1 image between 360 and 720 ppi. My workflow is essentially never concerned with these details. As I said, Qimage “worries” about that….whatever size (in xy pixels) I send it, it resamples and smart sharpens to the right size for what print size I set. I don’t want to worry about that. It is the same reason I said I used 720 all (well, most) of the time….no matter the media. I am not a volume print house and a little more time on the 4900 and a bit more ink is not gonna effect me….and, I am assure of getting the best print….not worry if I coulda, shoulda done it different.
Eric Chan (now Adobe guru), stated the following in his 3800 FAQ
http://people.csail.mit.edu/ericchan/dp/Epson3800/faq.html
What is the difference between printing at 1440 dpi and 2880 dpi?
—-
When you print at 1440 dpi, the 3800 lays down ink using two different ink droplet sizes, leading to a dot pattern containing both large dots and small dots. When you print at 2880 dpi, the 3800 uses only the small ink droplets.
Printing at 2880 dpi takes about 1.9x as much time as printing at 1440 dpi. For example, an image that takes 3 minutes to print at 1440 dpi will take about 5:40 minutes to print at 2880 dpi.
Printing at 2880 dpi uses roughly 10% more ink than printing at 1440 dpi (not twice as much, as incorrectly suggested elsewhere on the web).
The differences in print quality between 1440 dpi printing vs. 2880 dpi may or may not be visible, depending on several factors, including the paper surface, the lighting and viewing conditions, and the eyeballs of the person in question. (See this question for more details.)
+++++++++++++++++
Will I see any differences in print quality between 1440 vs. 2880 dpi and bidirectional vs. unidirectional printing?
—
That depends on many factors, including the paper surface, the lighting and viewing conditions, and of course, your eyeballs!
There are four combinations here:
1440 dpi, bidirectional (fastest printing)
1440 dpi, unidirectional
2880 dpi, bidirectional
2880 dpi, unidirectional (slowest printing)
Some users have reported that they cannot see ANY differences whatsoever in print quality between the four printing modes, even on close inspection. Giorgio Trucco reports that he cannot see any differences in his synthetic tests, but in real-world images he can see very slight differences on close inspection.
My personal experience is somewhat different.
I can clearly see the differences between bidirectional vs. unidirectional printing on most papers; the rougher halftoning algorithm of the bidirectional printing leads to rougher tonal transitions and more edge artifacts. Furthermore, I have found that bidirectional printing leads to some dark bands in areas of the print with heavier ink coverage. One solution is to increase the Drying Time, but then again, unidirectional printing effectively accomplishes the same thing.
I find that the differences in print quality between 1440 dpi and 2880 dpi are highly paper-dependent. On some papers, such as Epson Premium Luster, I find the differences to be extremely minimal, even on close inspection. There are differences, but they are so slight as to be meaningless — hard to put into words. On other papers such as Moab Kokopelli Studio Semi-Gloss, I can easily see the differences between 1440 dpi and 2880 dpi, even at a viewing distance of over 12″; 2880 dpi is noticeably smoother and shows a much finer dot pattern.
Ink tends to “bleed” more on MK papers (such as Epson Velvet Fine Art) than on PK papers such as the previous two papers mentioned, so I find it very difficult to distinguish between 1440 dpi and 2880 dpi printing on MK papers.
Based on my own tests, I personally print my images at 2880 dpi unidirectional on PK papers and at 1440 dpi unidirectional on MK papers. I have a low-volume, easy-going printing schedule, so the slower printing time is not an issue. Also, 2880 dpi printing appears to use only 10% more ink than 1440 dpi printing.
My view on the matter is that differences between these four printing modes may exist, but it depends on a lot of things. There’s really no substitute for judging the results for yourself with your own eyeballs!
Jim says
John,
You have been talking about printing at 360 vs 720 ppi, and now you’re talking about 1440 vs 2880 dpi printing. They are orthogonal.
Let me be clear:
If you set the printer driver for 1440 dpi, and leave the “Finest Detail” box clear, the printer driver will resample to 360 ppi.
If you set the printer driver for 1440 dpi, and check the “Finest Detail” box, the printer driver will resample to 720 ppi.
If you set the printer driver for 2880 dpi, and leave the “Finest Detail” box clear, the printer driver will resample to 360 ppi.
If you set the printer driver for 2880 dpi, and check the “Finest Detail” box, the printer driver will resample to 720 ppi.
Jim
John says
Jim,
The terms 1440 and 2880 were from Eric’s write up. I haven’t had a 3800 for some time, but I believe the driver did not use the term finest detail…at least the first driver…so each of those expected or resampled to 360 and 720, respectively.
Either way, you know what was meant. Let’s not slice the baloney too thin.
Jim says
John,
First off, the 3800 has always used the “Finest Detail” checkbox to control the contone resampling, and the 1440/2880 control to control the halftoning algorithm. I was an early (too early) 3800 user, and I can personally attest to that. Eric reports on the “Finest Detail” checkbox on the very same 3800 FAQ that you pointed me to as follows:
“When you uncheck/disable the “Finest Detail” driver setting, the 3800’s native input resolution is 360 pixels per inch (ppi). If you submit an image that has a different resolution (e.g., 180, 240, 300, 400, 600, or 720 ppi) the driver will interpolate the image to 360 ppi before printing. To prevent any interpolation from being done by the driver when “Finest Detail” is unchecked, prepare and print your final images at 360 ppi.
When you check/enable the “Finest Detail” driver setting, the 3800’s native input resolution is 720 ppi. If you submit an image that has a different resolution (e.g., 180, 240, 300, 360, 600, or 1200 ppi) the driver will interpolate the image to 720 ppi before printing. To prevent any interpolation from being done by the driver when “Finest Detail” is checked, prepare and print your final images at 720 ppi.”
Since you’re using Qimage, the resampling is automatically done for you. QImage looks at the “Finest Detail” checkbox setting to decide whether to resample to 360 ppi or 720 ppi.
I thought maybe when you were talking about the driver’s resampling options in your “Lot depends…” comment you might have meant something else, ie the halftoning switch that allows fewer variable size drops or all drops being the smallest size. The tipoff was that you said “My few [view] is….the difference is mostly time….and maybe ~10% more ink…” since checking or unchecking the “Finest Detail” box and thus changing the resampling does not affect the print time. I’ve just verified that with the 4900.
Eric’s comments about 1440/2880 dpi halftoning don’t say a thing about what happens when you set the printer driver for 360 or 720 ppi contone resolution, which is what I think we’ve been talking about.
Jim
John says
BTW….I do not like Epson Gloss….but that is neither here not there 🙂
Jim says
I don’t like it either, at least for saleable prints, but there’s nothing wrong with its resolving power. It’s very smooth and has low scanning artifacts, costs a lot less than my favorite papers, is thin enough to feed from the hopper, and it’s fine for this test.
Jim
John says
Jim…
In http://blog.kasson.com/?p=574
I am not sure what you were sending to the printer. We’re you letting the Epson driver resample to 720 and 360 ppi?
I can’t imagine you would as we know that that is bad workflow practice.
Jim says
John,
The images sent to the printer driver were resampled to the printer driver’s resolution first. When the printer driver was set to 360 ppi it got an image of that resolution. When the printer driver was set to 720 ppi it got an image of that resolution.
Jim
John says
Not to beat a horse to death….
I alluded to it with my Qimage comments, but it is worth enforcing the point.
If I set my print size and tell Qimage to up or down rez the image to print at 360 ppi, Qimage will resize it and apply the appropriate sharpening. If I set the print output to 720, Qimage will do the resizing and will apply DIFFERENT sharpening to that image. Just as we are told to do in photoshop….apply the sharpening AFTER the resizing.
I am sure you do this with your individual images, but I did not get the sense that you are doing that with your test strips.
Jim says
The only time I applied sharpening was in LR and PR. They do it as part of the resize, and you can’t tell whether it’s first, last, or, as I suspect in the PR case, partway thru and several times.
Jim