I’ve been asked to compare a7R handheld sharpness to that of the Nikon D800E. Here goes, although this is adding one more imponderable to the mix. In the previous testing, the lens was the same for the images made with both cameras. Not just the same model, the very same lens. Since handheld testing requires autofocus, at least the way I do it, I can’t use the same lens on the s7R and the D800E. Since the lens affects the sharpness of the image, and the vibration of the camera affects the sharpness of the image, we’ve got two variables changing, but only a one-dimensional output space, the MTF50. Well, that’s not entirely true; there’s the way the MTF50 behaves with shutter speed. That may prove to be instructive.
The cameras: the Sony a7R and the Nikon D800E. The lenses: the Sony/Zeiss (aka Zony) 55mm f/1.8 Sonnar FE, and the AF-S Nikkor 58mm f/1.4G. I calibrated the D800E’s autofocus for the 58mm lens carefully. The a7R has no such adjustment, nor does it need it, by virtue of its contrast-maximization autofocus method. The lighting: a single Fotodiox LED-200WA-56 daylight balanced variable-power flood. ISO set to 400, f-stop set to 5.6, focusing in single shot AF mode with the small focus area setting, drive set to single, the exposure mode set to A. I used the self-timer on the Nikon and the Sony, set to 2 seconds in both cases. In addition, on the Nikon, I programmed in a 3-second shutter delay after the mirror went up. The protocol: light on full, adjust exposure compensation for 1/500 second, make 12 exposures with new focusing for each, light down a stop, make 12 exposures… until you get to 1/30 of a second or so.
Develop in Lightroom 5.3 with settings as in the previous post. Crop, export as TIFFs, analyze for horizontal edge MTF50 in Imatest. Export the results to Excel, crunch the stats, and graph. No correction of the MTF50 data is necessary in this case, since both sensors have virtually the same resolution. Thus the a7R numbers are different than what you saw in the previous post.
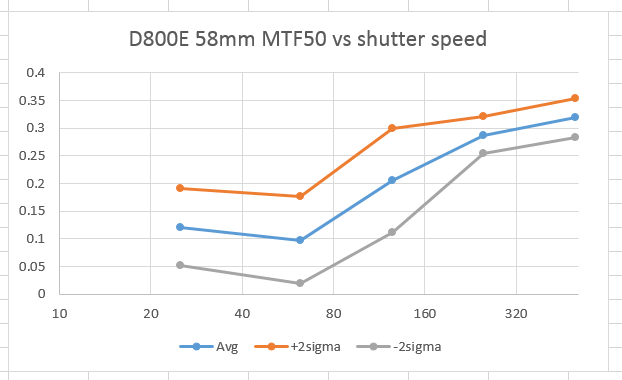
The Nikon data, with average, average plus two standard deviations, and average minus two standard deviations plotted:
The data for both cameras and lenses:
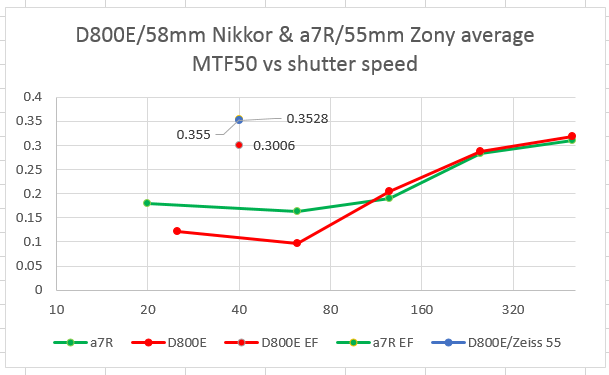
You’ll note that the 58mm Nikkor isn’t as sharp a lens as the 55mm Zony, as indicated by the isolated circles above 1/40 second, which are the MTF50’s for both lenses using electronic flash. Just to make sure there wasn’t some part of the Nikon body that was causing this difference, I made an electronic flash test with the Zeiss 55mm f/1.4 Apo Distagon on the D800E. It is plotted as well, and it comes out right on top of the Zony 55 MTF50, indicating one more time what a spectacular lens the Zony is.
My interpretation of the curves is that the mirror slap of the D800E induces a lower frequency forcing function than that of the shutter winding operation and first curtain motion of the a7R, when combined with the slightly higher mass of the Nikon, allows the D800E to reach the full resolution potential of the lens at 1/500 second handheld. However, the D800E’s mirror and shutter system delivers a larger shock to the camera body than the shutter system of the a7R, causing the D800E to fare worse at the slower shutter speeds.
It would be nice to redo the test with an autofocus lens on the D800E that is the equal in sharpness of the Zony 55. Unfortunately, I don’t have such a lens available to me.
Raoul says
Once again: Bravo Jim !
Now what would those measurement do in horizontal/vertical with tripod ? OK, I know, more work…
… but then you could push the comparison down to very slow speeds… which is also interesting for most tripod users 😉
Have a good day !
Raoul