For the past few days, I’ve been doing tests of image sharpness with the Sony 70-200 f/4 OSS FE lens mounted on a Sony a7R and a a7II camera. I’ve been using a really sturdy tripod — the RRS TVC-43 — and head — the Arca Swiss C1 Cube — for the testing when I’ve not been handholding.
I wondered what would happen if I used a much lighter weight tripod and head. I dug up a Gitzo 6X carbon fiber travel tripod with a light RRS ball head. Here are the two tripods next to one another:
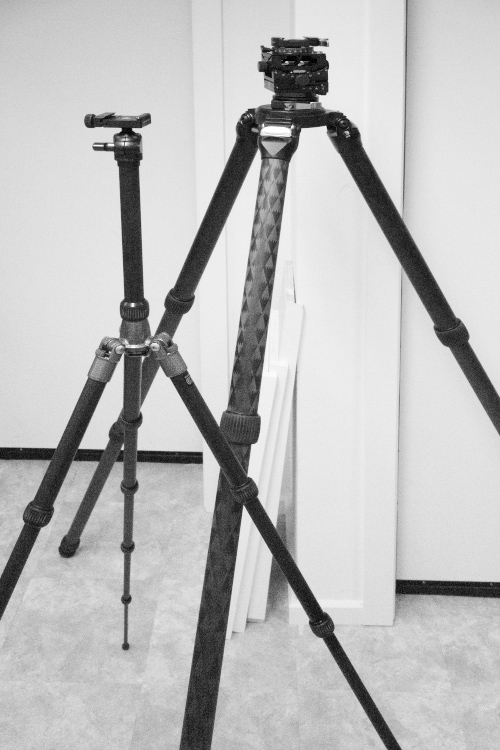
You can see that the legs of the travel tripod get pretty skinny towards the floor. You can also see that I extended the column nearly all the way. Yeah, I know that’s not a good idea, but I wanted to create a pretty flexible camera mounting device. You’ll note that the RRS monster tripod doesn’t even have a center column; RRS probably figures that, if you want a tripod this big, you’re not going to want to take any chances with a center column detracting from the stiffness that you paid all that money for.
I used my usual protocol:
- RRS L-plate on camera base. This is not the usual way to mount the 70-200, which has its own collar mount, but it produces less image-blur from shutter shock with the a8R than the conventional mounting method using the collar, so I used it for both cameras.
- Landscape orientation.
- Lens zoomed to 200mm.
- No filter.
- The lighting: a single Fotodiox LED-200WA-56 daylight balanced variable-output flood.
- ISO set to 1000, f-stop set to f/8.
- Focusing using single shot autofocus. The focus point is a Siemens star on the target.
- Drive set to single
- EFCS on, in the case of the a7II
- Manual exposure mode.
- Self-timer set to 2 seconds
- OSS set to off. On the a7II, this turns off IBIS.
- Lamp to full, shutter to 1/1000 second, make 16 exposures with new focusing for each, turn the light down a stop, turn the shutter speed down a stop, make 16 exposures… until you get to 1/60 of a second.
- OSS to on. On the a7II, this turns on IBIS.
- Repeat exposure sequence.
- Develop in Lightroom 5.7.1 with standard settings.
- Crop, export as TIFFs, analyze for horizontal edge MTF50 in Imatest.
- Export the results to Excel, crunch the stats, and graph.
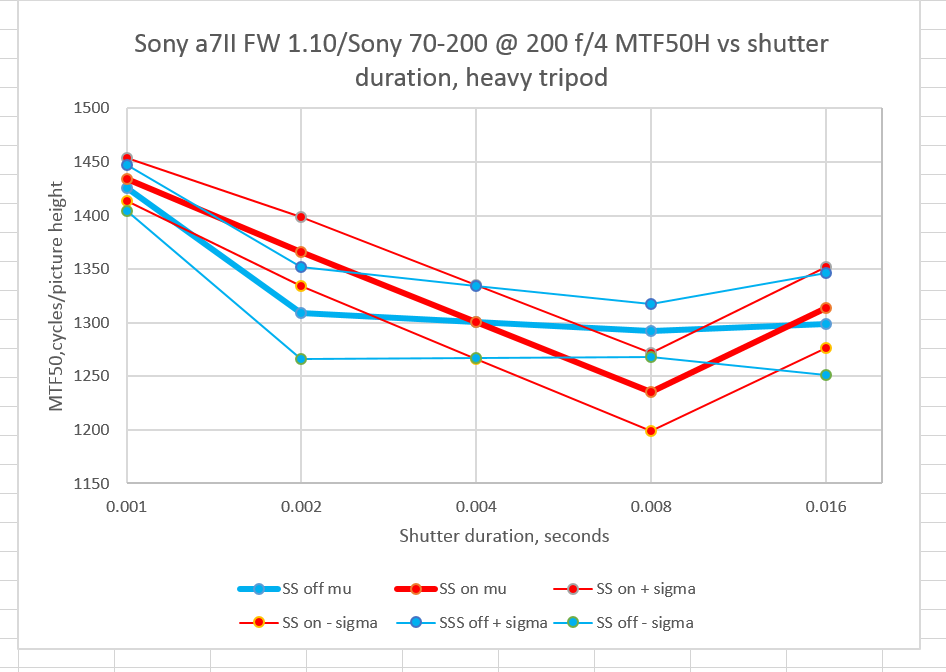
Here’s what happens with the a7R on the heavy tripod:

The bold lines are the average (aka mean, aka mu) values. The lighter lines are the average value plus and minus the standard deviations (aka sigma). If the statistics are Gaussian, about two thirds of the expected results will lie between the two pair of lighter lines. Orange is OSS on, and blue is OSS off.
And here are the results on the light one:

You can see that the camera’s vibration affects the lighter tripod much more than the heavier one. Now let’s zoom in a bit:
Heavy tripod: Light tripod:

You can see that leaving the OSS on on the heavy tripod doesn’t make much difference, but it produces materially worse results with the light tripod than leaving it off.
Here’s what the a7II — with EFCS on — looks like on the heavy tripod:
On the light tripod:
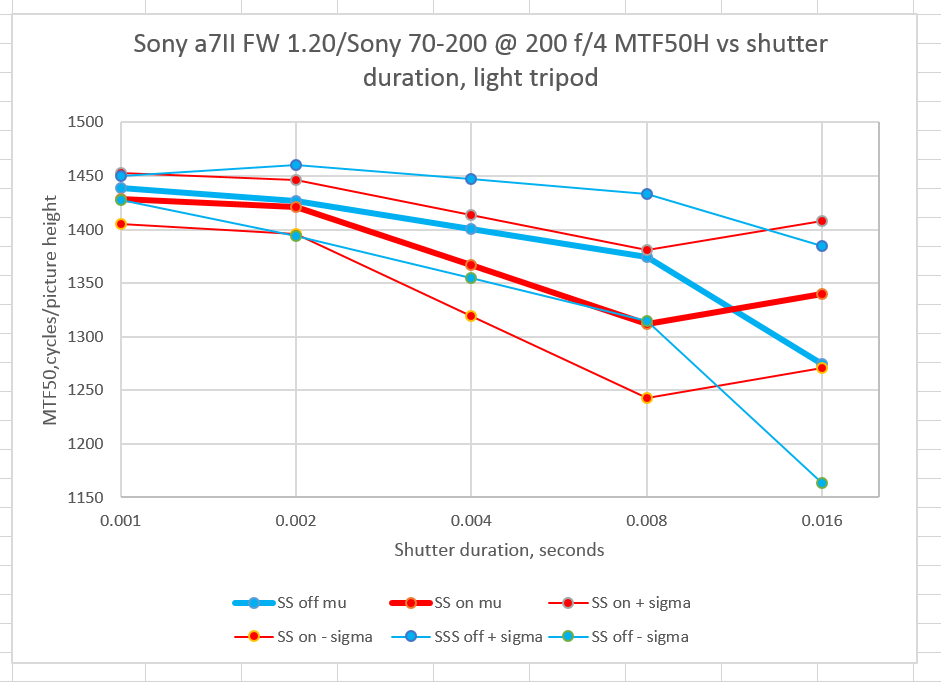
The light tripod is a little worse with OSS on at moderate shutter speeds, but the difference is not dramatic at all. At 1/60, OSS on is actually a tad better.
Our test situation was a bit special. It was indoors. There was no wind. The footing was vinyl tile over concrete. Therefore, almost all the camera motion can be expected to be the result of the camera’s internal motions. Under those circumstances, a camera with large and violent internal motions like the a7R needs a much heavier tripod than one with not much internal motions that affect the exposure, like an a7II with EFCS enabled.
I probably could have guessed that, couldn’t I? Still, it’s nice to have it quantified.
Really useful set of posts, Jim. Shows how important the heft of the camera is, both on a tripod and hand held.
Jack, I think in the case of the tripod, it’s more stiffness than mass that’s making the difference, but I take your point.
Makes me wish I had not sold my Reis. (large format, maple, used in the movie biz as well)
I gave away my wooden Zone VI tripod to Kim Weston a year or so ago. And I’m not sorry at all.
Why, with the A7ii, might the light tripod perform significantly better at the middle shutter speeds?
You mean better than the heavy tripod, right? I dunno; I’ll have to think on it. With EFCS, the biggest source of blur-inducing vibration is the second curtain acceleration. The differences are small. I made the light tripod series with a single focus operation, rather than one per shot, which I’ve recently found gives more consistent results. Maybe there were small focus errors in the heavy-tripod images? Hmm…
Weeeyyeeelllll…..
I’m not so sure about the “utility” of this test. Here’s why: essentially, you have tested the heavier/more massive tripod combo at its best (most stable configuration) against the lighter one at its worst possible configuration, and with 2 different heads to boot, one of which is the uber stable and expensive “Cube”. I’m not sure you have to run a test to project which one will “win”. So, for all the sophistication of the measurements, I’m not certain they are being put to the best use here.
The point of lightweight tripods is to be able to carry/take them places it is impractical to manage with the larger and heavier tripod combo. It’s a compromise from the get-go. There is no reason to use one in any other situation. In fact, in a studio situation even the heavy tripod might be replaced by a stand.
But that compromise can be ameliorated in the field, by not extending the center column all the way up (or at all), and by weighting the tripod with a camera bag, daypack, water or sand bag. And indeed the better lightweight ones come with a hook to help with that.
So, I think to make this more of an apples to apples test regimen, both tripods should be tested column down, same head, and weighted.
Tex, this wasn’t a tripod test. It was to see what happened to image quality with an EFCS camera and a non-EFCS camera as tripod stiffness (and, inevitably, mass) varied greatly. In addition, I wanted to get a handle on the issue that I had found turning SteadyShot on an off on a heavy, stiff tripod-mounted camera to not make that much difference, and others have found that leaving SteadyShot on when the camera was on a tripod to ruin their images. My supposition was that their tripods were whippier than mine, and that was the cause of the discrepancy. I think the test showed that to be a likely hypothesis.
On the EFCS (or not) front, I think I showed that you do need a reaaly solid tripod if you’re gonna use an a7R with a long lens, and, even then, there are shutter speed ranges to be avoided. The big surprise for me was that the whippy tripod did so well with EFCS on the a7II. That has implications for how I’ll pack in the future.
I learned a lot from the test, even though I wouldn’t use the travel tripod in anger in such a configuration.
Always nice to hear from you.
Jim
Ahhh, my bad. See, that’s the subtlety of your mind at work—a test of EFCS/non EFCS attributes masquerading as a tripod test. Fooled me!
Informative test as usual. On the front of weight vs. stiffness making the difference; I’ve made habit of always weighting down my travel tripod by putting my backpack (maybe 3-4 kilograms ) on the hook below center column. If you are ever to retest something with the light tripods it would be interesting to know if weighting down is just waste of time. Even though this was not a tripod test 😉
Personally I’ve always thought that weight is what matters, but I saw a test some time ago where lighter CF tripod was better in regards to vibration than a heavier one made of aluminium .