• site home
  • blog home
  • galleries
  • contact
  • underwater
  • the bleeding edge

the last word

Photography meets digital computer technology. Photography wins -- most of the time.

You are here: Home / The Last Word / Modeling the Otus 85/1.4

Modeling the Otus 85/1.4

June 24, 2016 JimK 1 Comment

This is a continuation of a report on new ways to look at depth of field. The series starts here:

A new way to look at depth of field

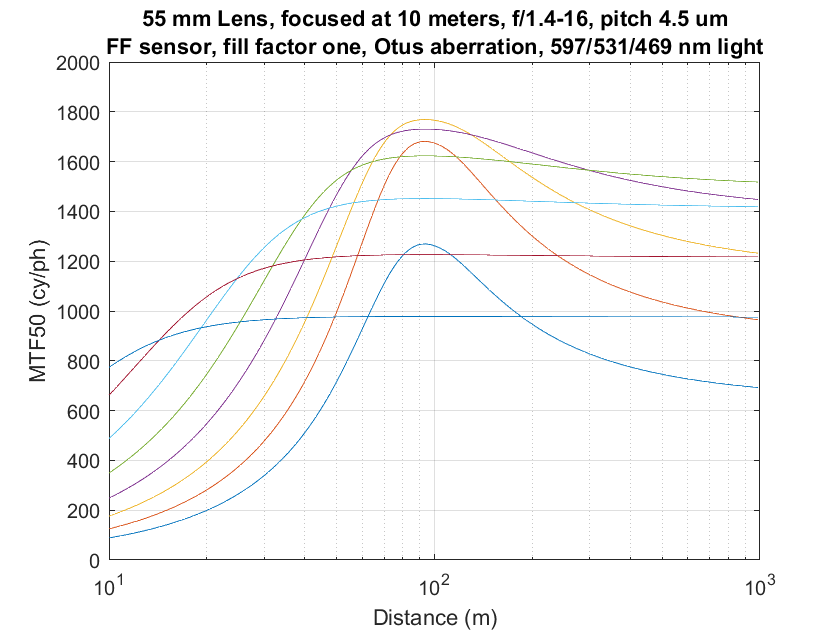
One of the things that I’ve been meaning to get to is better modeling of the on-axis performance of a really good lens. I’ve taken as my exemplar the Zeiss Otus 85mm f/1.4 ZF.2. My old model was pretty good from f/8 on down, but was too optimistic at wider apertures.

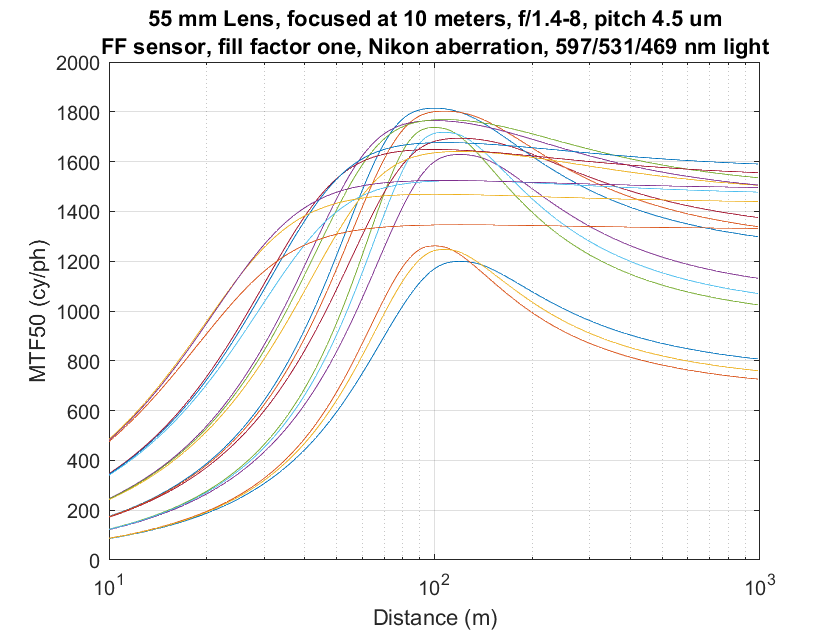
Now that I’ve got a pretty good defocusing/diffraction algorithm, it seemed like a good time to work on the rest of the lens. First, I added longitudinal chromatic aberration. That is not material for the Otus 85, but is for other lenses, so I modeled it while I was working on the code. After getting advice from Jack Hogan, I picked principle wavelengths of 597, 531, and 469 nanometers for the red, green, and blue planes respectively. After a little tweaking, here’s what I got wide open:

otus loca 1p4 1

Compare those to the curves here. Note the distance scale runs the other way on those curves.

Then, with a big, big assist from Alan Robinson, I modeled the aberration blur as a function of aperture, and ran a set of curves:

otus loca 1p4-8 1

It’s easier to see if we plot the combined MTF50s for each f-stop rather than each color plane. I used Jack Hogan’s formula for combining the color planes:

combined MTF50 = (Red MTF50 + 2 * Green MTF50 + Blue MTF50) / 4

otus aberr 2

And, for what it’s worth, in the object field:

otus aberr 2 obj

The model could be tweaked further, but that’s better than it has to be for the DOF management studies.


The Last Word

← A more accurate defocusing algorithm Modeling the Nikon 85/1.4 G →

Trackbacks

  1. Modeling the Nikon 85/1.4 G | The Last Word says:
    June 25, 2016 at 9:35 am

    […] Yesterday, I modeled a really great lens, the Zeiss Otus 85/1.4 ZF.2, and ran a set of depth of fiel…. […]

    Reply

Leave a Reply Cancel reply

Your email address will not be published. Required fields are marked *

May 2025
S M T W T F S
 123
45678910
11121314151617
18192021222324
25262728293031
« Apr    

Articles

  • About
    • Patents and papers about color
    • Who am I?
  • How to…
    • Backing up photographic images
    • How to change email providers
    • How to shoot slanted edge images for me
  • Lens screening testing
    • Equipment and Software
    • Examples
      • Bad and OK 200-600 at 600
      • Excellent 180-400 zoom
      • Fair 14-30mm zoom
      • Good 100-200 mm MF zoom
      • Good 100-400 zoom
      • Good 100mm lens on P1 P45+
      • Good 120mm MF lens
      • Good 18mm FF lens
      • Good 24-105 mm FF lens
      • Good 24-70 FF zoom
      • Good 35 mm FF lens
      • Good 35-70 MF lens
      • Good 60 mm lens on IQ3-100
      • Good 63 mm MF lens
      • Good 65 mm FF lens
      • Good 85 mm FF lens
      • Good and bad 25mm FF lenses
      • Good zoom at 24 mm
      • Marginal 18mm lens
      • Marginal 35mm FF lens
      • Mildly problematic 55 mm FF lens
      • OK 16-35mm zoom
      • OK 60mm lens on P1 P45+
      • OK Sony 600mm f/4
      • Pretty good 16-35 FF zoom
      • Pretty good 90mm FF lens
      • Problematic 400 mm FF lens
      • Tilted 20 mm f/1.8 FF lens
      • Tilted 30 mm MF lens
      • Tilted 50 mm FF lens
      • Two 15mm FF lenses
    • Found a problem – now what?
    • Goals for this test
    • Minimum target distances
      • MFT
      • APS-C
      • Full frame
      • Small medium format
    • Printable Siemens Star targets
    • Target size on sensor
      • MFT
      • APS-C
      • Full frame
      • Small medium format
    • Test instructions — postproduction
    • Test instructions — reading the images
    • Test instructions – capture
    • Theory of the test
    • What’s wrong with conventional lens screening?
  • Previsualization heresy
  • Privacy Policy
  • Recommended photographic web sites
  • Using in-camera histograms for ETTR
    • Acknowledgments
    • Why ETTR?
    • Normal in-camera histograms
    • Image processing for in-camera histograms
    • Making the in-camera histogram closely represent the raw histogram
    • Shortcuts to UniWB
    • Preparing for monitor-based UniWB
    • A one-step UniWB procedure
    • The math behind the one-step method
    • Iteration using Newton’s Method

Category List

Recent Comments

  • JimK on Goldilocks and the three flashes
  • DC Wedding Photographer on Goldilocks and the three flashes
  • Wedding Photographer in DC on The 16-Bit Fallacy: Why More Isn’t Always Better in Medium Format Cameras
  • JimK on Fujifilm GFX 100S II precision
  • Renjie Zhu on Fujifilm GFX 100S II precision
  • JimK on Fuji 20-35/4 landscape field curvature at 23mm vs 23/4 GF
  • Ivo de Man on Fuji 20-35/4 landscape field curvature at 23mm vs 23/4 GF
  • JimK on Fuji 20-35/4 landscape field curvature at 23mm vs 23/4 GF
  • JimK on Fuji 20-35/4 landscape field curvature at 23mm vs 23/4 GF
  • Ivo de Man on Fuji 20-35/4 landscape field curvature at 23mm vs 23/4 GF

Archives

Copyright © 2025 · Daily Dish Pro On Genesis Framework · WordPress · Log in

Unless otherwise noted, all images copyright Jim Kasson.