Imatest, the company who makes the software that I use to measure the modulation transfer function (MTF) of camera/lens combinations, expects you to fill the frame with one of their test charts, carefully align the camera so that the lens axis in perpendicular to the chart plane (or, equivalently, so the chart and sensor planes are parallel), focus accurately and make one exposure for each test condition (usually, for the kind of testing they envision, an aperture setting). The software then analyzes sharpness at several points in the image, producing a map of image sharpness across the sensor, and also measuring other lens qualities.
That’s not how I use the software. If I did use it that way, some aspects of my life as a photographic tester would be much simpler.
Why don’t I toe the line? The first, and, I am forced to admit, the most significant, reason is that I’ve got no place to make test shots that way. In order to use reflective targets with high resolution sensors such as found in the D810 and the a7RII, you need them to measure at least 44×74 inches. That’s necessary to make sure the detail on the chart isn’t limiting the measured results.
Where do you put a target that big? The obvious answer is outdoors. But then your lighting won’t be repeatable, and lighting conditions affects the results. So not only do you have to find a place for it indoors, you have to figure out a way to light it evenly, which means either a really big room and two lights, or a pretty big room and more lights.
I don’t have that kind of space.
What to do? One option is to use transmissive targets and a light box. Imatest makes photographically reproduced transmissive targets and resells lightboxes, one of which allows the illumination level to be controlled by a computer. I may end up using one of those, not the fancy computer controlled one, because its imaging area is too small, but one with a 10×18 inch imaging area. The biggest reason I’m scared of plunking down more than a thousand bucks on a lightbox and a target for it is that I’m afraid that testing lenses at distances close enough that a 10×18 inch target fills the frame will yield results that don’t apply when the lens is focused at typically distant subjects. That target size is small enough that with some wide angle lenses, you won’t be able to fill the frame with the lens set to its nearest focusing distance.
In addition, in spite of its attractiveness as a (relatively) quick and easy way to test lens/sensor systems, the “fill the frame with the test chart” method has some side effects that I consider to be drawbacks.
- If the camera isn’t square to the target, it will look like the lens is soft in places where it may not be.
- If you’re using an adapter, and the two faces of that adapter aren’t quite parallel, it will look like the lens is soft in places where it may not be.
- If the lens has field curvature, it will look like the lens is soft in places where it may not be.
Shouldn’t we penalize adapters with faces that aren’t parallel? Maybe so, but I don’t use this kind of testing to test adapters, and in any event a slight bit of tilt to an adapter will almost never be a problem in the field.
Shouldn’t we penalize a lens for having field curvature? Maybe so, but we shouldn’t conflate field curvature and general fuzziness, and besides, a small amount of field curvature won’t be much of a problem in the field, and even might be an asset if the photographer understands it.
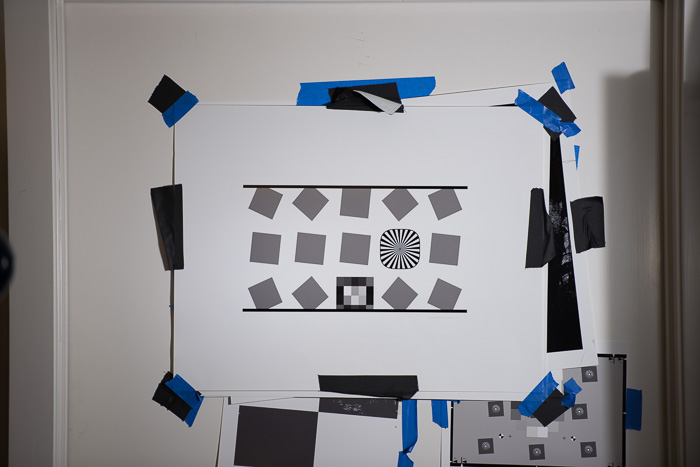
How do I do captures for MTF testing? I use a target printed on C-sized (17×22 inch) paper, and make no attempt to fill the frame with the target. In fact, I back up far enough that the target is pretty small in the image:
I focus on the Siemens star. Then, after demosaicing, I feed Imatest a cropped version:
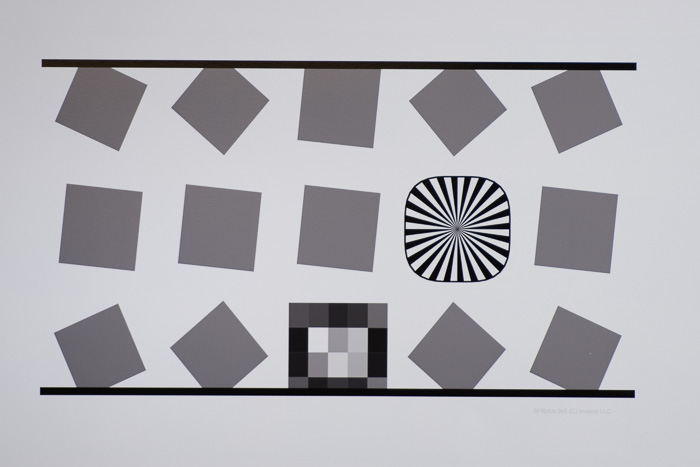
I tell the program to analyze the edges just to the left of the star. That means that it doesn’t matter if the camera isn’t quite square to the target, because the place where I focused and the place where I measured the sharpness are so close together.
To measure the corner sharpness, I point the camera differently:
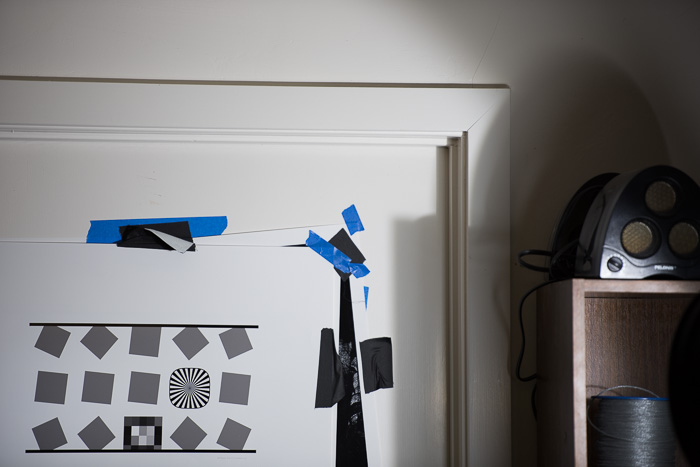
Now the sensor and the target planes are no longer nearly parallel. They’re close enough to get accurate MTF measurements, since the Siemens star and the slanted edge used for measurement are so close to each other. With a really wide angle lens, I’d move teh camera to keep the sensor planes close to parallel, but with a 70-200 mm lens at 200 mm. I don’t need to do that — I’ve tried it both ways.
This approach “calibrates out” adapter non-parallelism and curvature of field issues.
I’ve been trying to learn MtfMapper, but the same issues arise. I do have a (hopefully) flat 32″ x 40″ foam board, but that still isn’t really big enough (especially with 3:2 aspect ratio).
Frans van den Bergh has provided a synthetic target, and I may see what happens to have a laser printer split up the target to 9 (3×3) pieces.
I ran into similar issues making an Adobe Lens Profile for a Samyang 14mm manual lens.
I’m just thinking out loud here, but what about using a wall in your garage and light the 44″x74″ target with a pair of 8′ long fluorescent light fixtures, placed horizontally above and below the camera position and a few feet out from the wall, so the camera shoots between them?
The lights shouldn’t be too expensive and it wouldn’t be too difficult to rig some sort of framework for them so they can be stored flush against the ceiling when not in use (and/or do double-duty as garage lights), then be lowered when needed for lens testing.
Or did you mean an even larger room than (I presume) your multi-car garage?