• site home
  • blog home
  • galleries
  • contact
  • underwater
  • the bleeding edge

the last word

Photography meets digital computer technology. Photography wins -- most of the time.

You are here: Home / The Last Word / Off-axis MTF results with the Sony 90/2.8

Off-axis MTF results with the Sony 90/2.8

May 25, 2016 JimK Leave a Comment

This is a continuation in a discussion of spatial frequency response (SFR) and modulation transfer function (MTF) testing reproduciblity. The series starts here:

Towards a reproducible MTF testing protocol

This post is a continuation of the last one in this series:

Off-axis MTF testing

The thrust of that post was that moving the target rather than the camera had the potential of making practical off-axis LoCA and focus shift testing by changing object distance.

A problem that I ran into in trying to turn theory into practice was that small alignment errors made the razor blade’s position in the frame not constant throughout the series. One way to deal with that is to black out the perforations in the razor blade with tape so that the region of interest (ROI) can be larger and MTF Mapper won’t get confused by edges other than the one I want it to look at. I will do that in future tests, but I didn’t for the work reported here, figuring that If I could programmatically deal with a moving razor blade with holes in it, blacking out the holes would only make things simpler.

The way I dealt with the target’s motion in the frame has a long tradition in engineering: even if you know something is nonlinear, assume it is linear and see how far you can get.

I set up the program so that it knows how many images there are in one series, a series being defined as a sequence of images in which only the target position changes. It presents the first image and the last image in the series to the user (moi), and asks him to pick the location of the ROI. Then it runs the whole series, linearly interpolating the location of the ROI between the two end points.

Why did it take me several days to make a change like that? While I was at it, I took the opportunity to reorganize the program, to report its progress in a way that I don’t waste a lot of time getting an incorrect result, and make it more tolerant of cases where MTF Mapper can’t make sense of a particular image. I consider that time well spent, since it will make future modifications to the program easier. In this context, let me express my thanks one more time to Jack Hogan, who wrote the Matlab code that I started with.

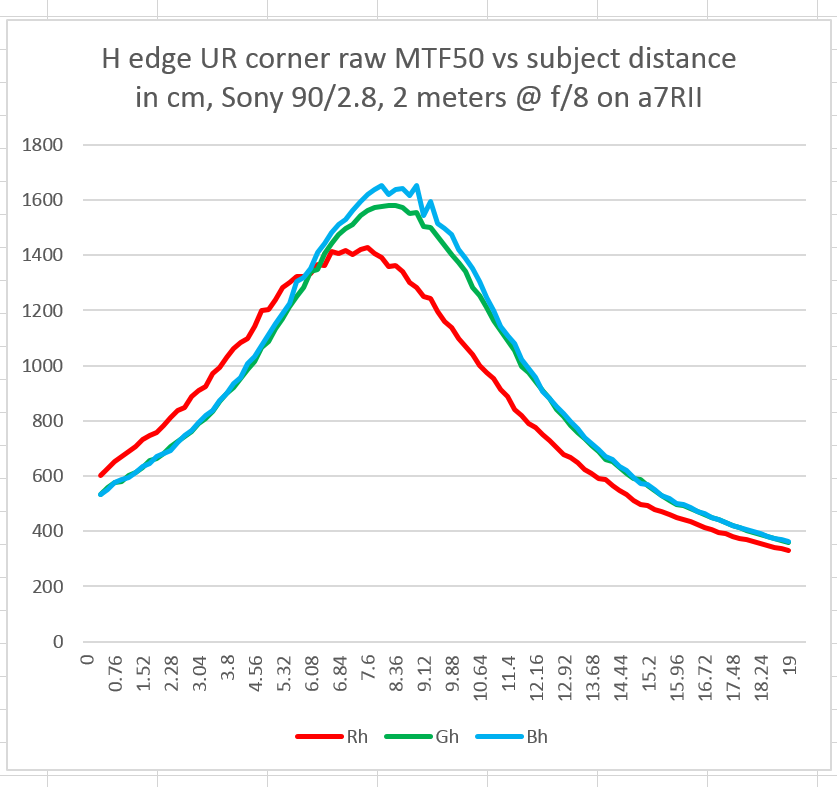
Let’s look at the longitudinal chromatic aberration (LoCA) in the upper right corner of the frame, with the Sony 90mm f/2.8 FE macro lens at f/2.8 with the target nominal (center of the horizontal axis of the graph) at approximately 2 meters:


loca sony 90 ur 28

Distance is the horizontal axis, with the left hand size having the subject farther from the camera than the right hand side (The camera moves closer to the subject by 1.9 mm after each exposure).  There were 101 exposures in the series, and thus the total travel was 190mm. The vertical axis is MTF50, measured in cycles per picture height, assuming the entire sensor is used.

Now the other whole stops through f/11:

loca sony 90 ur 4

loca sony 90 ur 56

loca sony 90 ur 8

loca sony 90 ur 11

This is pretty spectacular performance, and compares favorably to the results on-axis.

Let’s look at focus shift in each raw plane:

focus shift sony 90 ur red

focus shift sony 90 ur green

focus shift sony 90 ur Blue

Especially in the green plane, there is enough focus shift that you’ll want to focus at taking aperture. There is slightly more focus shift than in the on-axis graphs, indicating that field curvature changes very slightly with aperture setting. I don’t measure field curvature directly in these tests; in fact, I do all I can to calibrate it out.

For completeness, here are the focus shift graphs for a white balanced image:

focus shift sony 90 ur WB

Compare those to the corresponding  on-axis graph:

sony 90 2 meters WB focus shift

The bottom curve has 51 samples per aperture, and the top one 101 samples. The bottom one also has f/16 and f/22 data.

There’s not much loss in sharpness at the corner.  Good job, Sony!

The Last Word

← IR hills with a 400 Bad copy of the CO 60/4? →

Leave a Reply Cancel reply

Your email address will not be published. Required fields are marked *

May 2025
S M T W T F S
 123
45678910
11121314151617
18192021222324
25262728293031
« Apr    

Articles

  • About
    • Patents and papers about color
    • Who am I?
  • How to…
    • Backing up photographic images
    • How to change email providers
    • How to shoot slanted edge images for me
  • Lens screening testing
    • Equipment and Software
    • Examples
      • Bad and OK 200-600 at 600
      • Excellent 180-400 zoom
      • Fair 14-30mm zoom
      • Good 100-200 mm MF zoom
      • Good 100-400 zoom
      • Good 100mm lens on P1 P45+
      • Good 120mm MF lens
      • Good 18mm FF lens
      • Good 24-105 mm FF lens
      • Good 24-70 FF zoom
      • Good 35 mm FF lens
      • Good 35-70 MF lens
      • Good 60 mm lens on IQ3-100
      • Good 63 mm MF lens
      • Good 65 mm FF lens
      • Good 85 mm FF lens
      • Good and bad 25mm FF lenses
      • Good zoom at 24 mm
      • Marginal 18mm lens
      • Marginal 35mm FF lens
      • Mildly problematic 55 mm FF lens
      • OK 16-35mm zoom
      • OK 60mm lens on P1 P45+
      • OK Sony 600mm f/4
      • Pretty good 16-35 FF zoom
      • Pretty good 90mm FF lens
      • Problematic 400 mm FF lens
      • Tilted 20 mm f/1.8 FF lens
      • Tilted 30 mm MF lens
      • Tilted 50 mm FF lens
      • Two 15mm FF lenses
    • Found a problem – now what?
    • Goals for this test
    • Minimum target distances
      • MFT
      • APS-C
      • Full frame
      • Small medium format
    • Printable Siemens Star targets
    • Target size on sensor
      • MFT
      • APS-C
      • Full frame
      • Small medium format
    • Test instructions — postproduction
    • Test instructions — reading the images
    • Test instructions – capture
    • Theory of the test
    • What’s wrong with conventional lens screening?
  • Previsualization heresy
  • Privacy Policy
  • Recommended photographic web sites
  • Using in-camera histograms for ETTR
    • Acknowledgments
    • Why ETTR?
    • Normal in-camera histograms
    • Image processing for in-camera histograms
    • Making the in-camera histogram closely represent the raw histogram
    • Shortcuts to UniWB
    • Preparing for monitor-based UniWB
    • A one-step UniWB procedure
    • The math behind the one-step method
    • Iteration using Newton’s Method

Category List

Recent Comments

  • bob lozano on The 16-Bit Fallacy: Why More Isn’t Always Better in Medium Format Cameras
  • JimK on Goldilocks and the three flashes
  • DC Wedding Photographer on Goldilocks and the three flashes
  • Wedding Photographer in DC on The 16-Bit Fallacy: Why More Isn’t Always Better in Medium Format Cameras
  • JimK on Fujifilm GFX 100S II precision
  • Renjie Zhu on Fujifilm GFX 100S II precision
  • JimK on Fuji 20-35/4 landscape field curvature at 23mm vs 23/4 GF
  • Ivo de Man on Fuji 20-35/4 landscape field curvature at 23mm vs 23/4 GF
  • JimK on Fuji 20-35/4 landscape field curvature at 23mm vs 23/4 GF
  • JimK on Fuji 20-35/4 landscape field curvature at 23mm vs 23/4 GF

Archives

Copyright © 2025 · Daily Dish Pro On Genesis Framework · WordPress · Log in

Unless otherwise noted, all images copyright Jim Kasson.