• site home
  • blog home
  • galleries
  • contact
  • underwater
  • the bleeding edge

the last word

Photography meets digital computer technology. Photography wins -- most of the time.

You are here: Home / The Last Word / Screen resolution for print simulation

Screen resolution for print simulation

February 21, 2015 JimK 1 Comment

We saw a couple of days ago that viewing 36MP images on-screen at 2:1 exposed flaws that were invisible in 19×12.67 inch prints from an Epson 4900 on Exhibition Fiber paper, even upon close inspection with reading glasses, but not with a loupe. I need to add one more specification into the mix: the monitor that I’m using for this test is the NEC PA301W, which has 2560×1600 pixels in a display that’s just shy of 16 inches high, for a pixel pitch of just under 100/inch.

Caveat: to really do this thing right would require multiple subjects, careful experiment design, rigid control of lighting and viewing distance, and lots of other things that you’re not going to find here. If you’re looking for good science, move on. If you’re looking for a rough idea and maybe some ideas for doing your own experiments, than you may get something out of this post.

The experiment of the previous post brings two questions to mind:

  • What is the right screen resolution to use on my monitor with my eyes to simulate the sharpness of a 36 MP image as a 19×12.67 inch print?
  • How would that resolution scale to other camera resolutions and print sizes?

Here are screen shots of comparisons at 1:1 (using PNG file format):
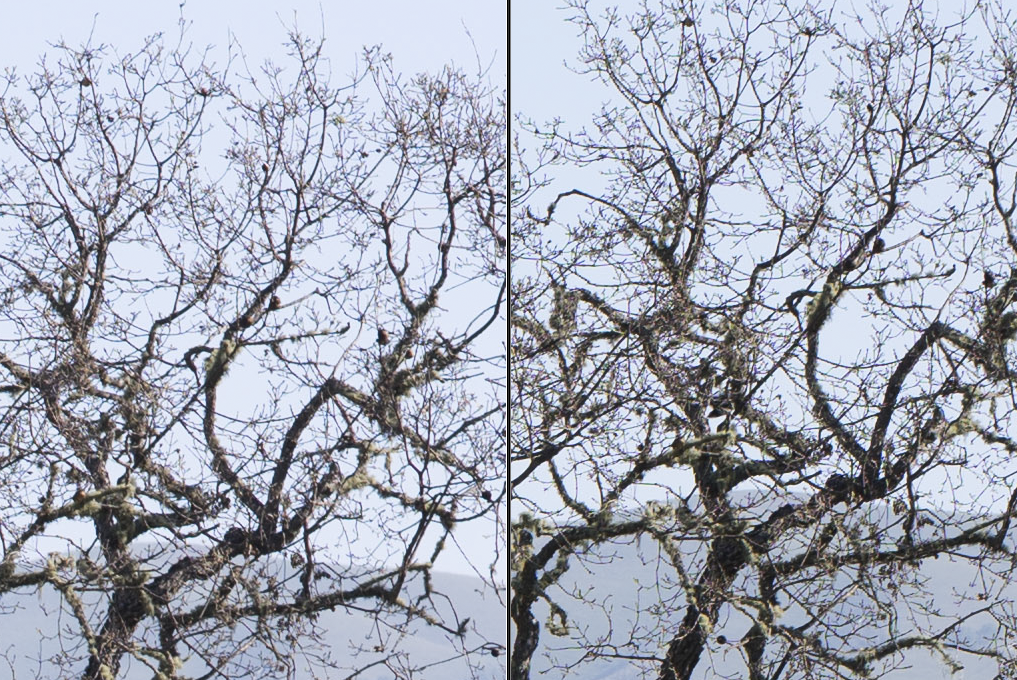
f/2.8 1:1
f/2.8 1:1
f/5.6 1:1
f/5.6 1:1

And at 1:2:

f/2.8 1:2
f/2.8 1:2
f/5.6 1:2
f/5.6 1:2

The left image in each pair is the one from the AF-S 85mm f/1.4 G, and the right one is from the Zeiss Otus 85mm f/1.4.  Nikon Click the images and set your browser to 1:1 to see them properly.

For reference, here are the scans from the prints:

f/2.8
f/2.8
f/5.6
f/5.6

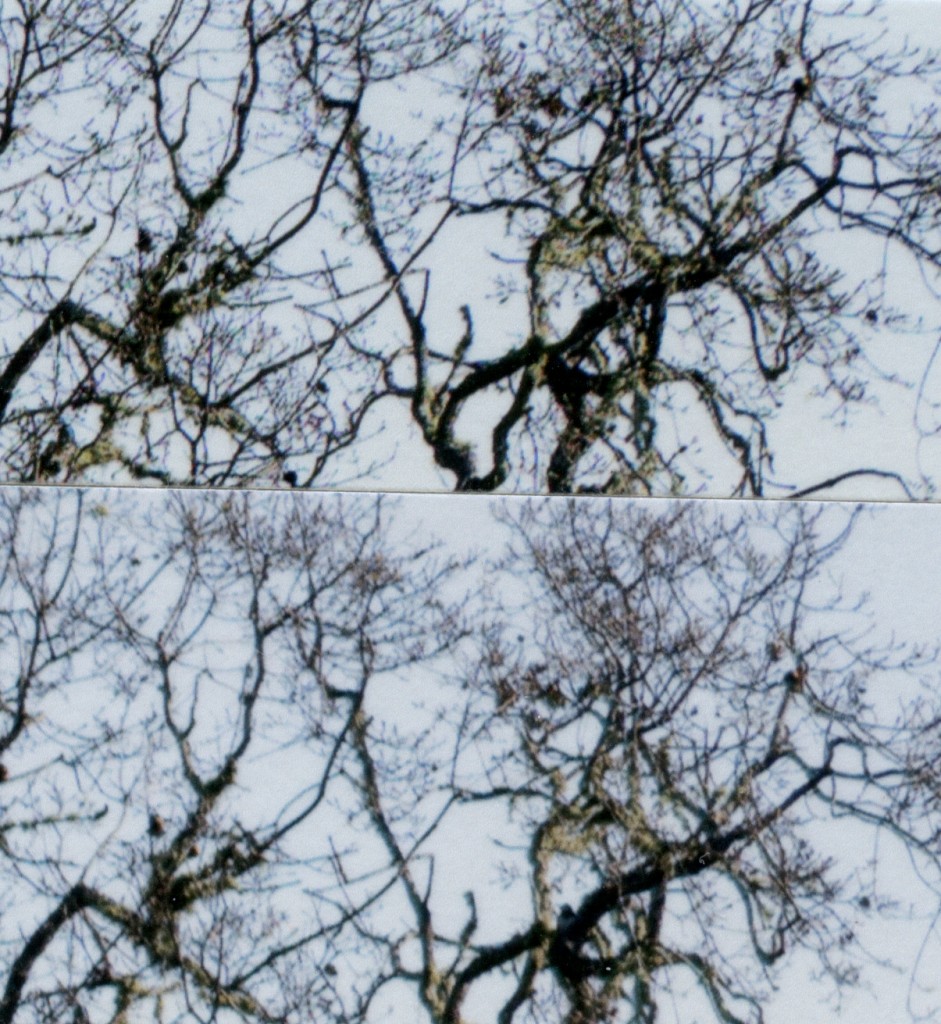
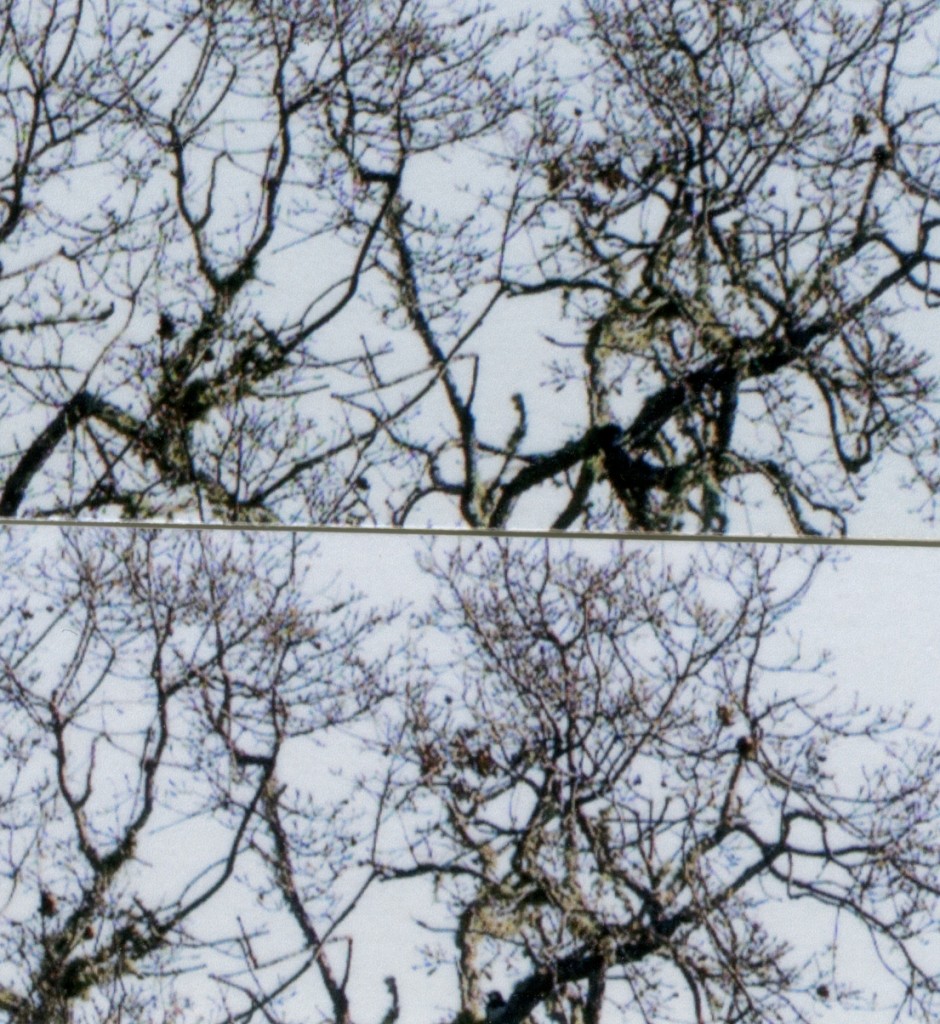
The Zeiss image is the top one and the Nikon the bottom one.

My take is that the right screen magnification is between the two examples I posted about, say about 1:1.5. Lr doesn’t offer that magnification. I have the advantage that I am looking at actual printer output and uncompressed images, but I hope that you conclude something similar.

The right screen resolution should scale with print size, assuming that all prints are closely inspected. That means that 1:2 would be a good screen resolution to simulate what you’ll see in a 13 inch wide print, and 1:1 would simulate a 26 inch wide print fairly well.

The right screen resolution should also scale with camera resolution. That means that, for our 19-inch wide print, 1:1 would simulate what you’d see with an 18 megapixel camera, and 1:2 would give you an idea of what the print would be like if you have a 72 MP camera.

With matte paper, you won’t see as much detail in the print as with Epson Exhibition Fiber or another glossy paper, so you’d want a coarser screen resolution to simulate what you’d see on the printer. I haven’t done any testing on matte paper, but I’d start with screen resolutions a factor of two coarser than the ones above, or 1:3 for a 14 inch wide print from a 36 MP camera.

If your monitor is coarser or finer than my 100 ppi one, you’ll want to make some adjustments.

This is all a bit of guesswork, but I hope what you’ve read above may provide a good starting point for your own experiments.


The Last Word

← Tribalism and Internet photo forums Learning on the job →

Comments

  1. CarVac says

    February 23, 2015 at 4:49 am

    I’m not exactly sure what you’re asking, but for me, with an UHD 24″ screen (20.5×11.75 inches, 3840×2160), the 1:2 is clearly in favor of the Zeiss at f/2.8, and it’s a toss-up at f/5.6. That’d be just about fitting to the screen from a 36mp camera.

    Once the aberrations shrink smaller than the display pixel size, only color and contrast remain as differentiating features.

    Reply

Leave a Reply Cancel reply

Your email address will not be published. Required fields are marked *

May 2025
S M T W T F S
 123
45678910
11121314151617
18192021222324
25262728293031
« Apr    

Articles

  • About
    • Patents and papers about color
    • Who am I?
  • How to…
    • Backing up photographic images
    • How to change email providers
    • How to shoot slanted edge images for me
  • Lens screening testing
    • Equipment and Software
    • Examples
      • Bad and OK 200-600 at 600
      • Excellent 180-400 zoom
      • Fair 14-30mm zoom
      • Good 100-200 mm MF zoom
      • Good 100-400 zoom
      • Good 100mm lens on P1 P45+
      • Good 120mm MF lens
      • Good 18mm FF lens
      • Good 24-105 mm FF lens
      • Good 24-70 FF zoom
      • Good 35 mm FF lens
      • Good 35-70 MF lens
      • Good 60 mm lens on IQ3-100
      • Good 63 mm MF lens
      • Good 65 mm FF lens
      • Good 85 mm FF lens
      • Good and bad 25mm FF lenses
      • Good zoom at 24 mm
      • Marginal 18mm lens
      • Marginal 35mm FF lens
      • Mildly problematic 55 mm FF lens
      • OK 16-35mm zoom
      • OK 60mm lens on P1 P45+
      • OK Sony 600mm f/4
      • Pretty good 16-35 FF zoom
      • Pretty good 90mm FF lens
      • Problematic 400 mm FF lens
      • Tilted 20 mm f/1.8 FF lens
      • Tilted 30 mm MF lens
      • Tilted 50 mm FF lens
      • Two 15mm FF lenses
    • Found a problem – now what?
    • Goals for this test
    • Minimum target distances
      • MFT
      • APS-C
      • Full frame
      • Small medium format
    • Printable Siemens Star targets
    • Target size on sensor
      • MFT
      • APS-C
      • Full frame
      • Small medium format
    • Test instructions — postproduction
    • Test instructions — reading the images
    • Test instructions – capture
    • Theory of the test
    • What’s wrong with conventional lens screening?
  • Previsualization heresy
  • Privacy Policy
  • Recommended photographic web sites
  • Using in-camera histograms for ETTR
    • Acknowledgments
    • Why ETTR?
    • Normal in-camera histograms
    • Image processing for in-camera histograms
    • Making the in-camera histogram closely represent the raw histogram
    • Shortcuts to UniWB
    • Preparing for monitor-based UniWB
    • A one-step UniWB procedure
    • The math behind the one-step method
    • Iteration using Newton’s Method

Category List

Recent Comments

  • JimK on Goldilocks and the three flashes
  • DC Wedding Photographer on Goldilocks and the three flashes
  • Wedding Photographer in DC on The 16-Bit Fallacy: Why More Isn’t Always Better in Medium Format Cameras
  • JimK on Fujifilm GFX 100S II precision
  • Renjie Zhu on Fujifilm GFX 100S II precision
  • JimK on Fuji 20-35/4 landscape field curvature at 23mm vs 23/4 GF
  • Ivo de Man on Fuji 20-35/4 landscape field curvature at 23mm vs 23/4 GF
  • JimK on Fuji 20-35/4 landscape field curvature at 23mm vs 23/4 GF
  • JimK on Fuji 20-35/4 landscape field curvature at 23mm vs 23/4 GF
  • Ivo de Man on Fuji 20-35/4 landscape field curvature at 23mm vs 23/4 GF

Archives

Copyright © 2025 · Daily Dish Pro On Genesis Framework · WordPress · Log in

Unless otherwise noted, all images copyright Jim Kasson.