• site home
  • blog home
  • galleries
  • contact
  • underwater
  • the bleeding edge

the last word

Photography meets digital computer technology. Photography wins -- most of the time.

You are here: Home / The Last Word / Shutter slap simulation with ISO 12233, part 1

Shutter slap simulation with ISO 12233, part 1

January 2, 2014 JimK 1 Comment

I can’t measure sub-pixel camera movement at the sensor, so I have to look for indirect ways to get at it. Are there ways to glean such information from photographs of the ISO 12233 target? I turned to a simulation study to find out.

Using Matlab, I created a nearly-ideal camera with a resolution of 1500×1000 pixels, which is very close to the target size measured in pixels in the photographs with the Nikon D800E and Sony a7R in the last post. This camera defies the law of physics, since it exhibits zero photon noise and its lens is unaffected by diffraction. In other respects, it is merely perfect: no pixel response non-uniformity, read noise at the resolution of double precision floating point numbers. The camera has an RGGB Bayer color filter array, which is the same choice as the Nikon D800E. The camera digitizes images with 64-bit floating point resolution. Its native color space is Adobe 1998 RGB. Its lens has no distortion, and no aberrations of any kind. Sounds like a great camera, huh? You can’t build such an instrument, although, through the magic of software, it’s easier to code up a camera like this than one that suffers from the maladies of real photographic devices.

Adobe Lightroom, and many other raw processors, use proprietary algorithms for demosaicing. I used the most bog-standard one: bilinear interpolation. The advantage of that method is that anyone who can write a demosaicing routine can code it. The disadvantage is that it doesn’t do as good a job as some of the “special sauce” algorithms. After demosaicing, I converted the images to 16-bit gamma 2.2 integer representation to write the output TIFF files.

I created a rasterized version of the encapsulated PostScript (vector) target at about 10000×6700 pixels, so that it would have roughly 36 times the number of pixels as the camera image.

The first series of tests that I ran looked at the effect of various pixel fill factors on resolution, aliasing, and false color. The pixel fill factor is the ratio of the light sensitive area of a sensor pixel, aka a sensel, to the total area of the pixel. A perfect classical point sampler has a fill factor of zero. Modern cameras with micro lenses approach fill factors of 100%. People don’t talk about fill factors of over 100%, but in a simulated camera, it’s easy to code one up. A camera with a fill factor of 400% would take light from an area surrounding the sensel with four times the actual sensel area. This describes an anti-aliasing filter such as the one used on the Nikon D800 and the Sony a7, but not on the Nikon D800E and the Sony a7R.

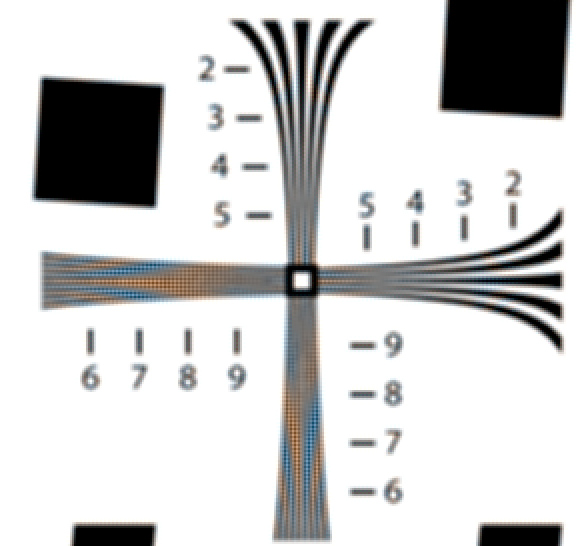
Here’s the portion of the target that we looked at with real cameras in the precious post (presented at 2x magnification, just like the real pictures in the previous post), as seen by my simulated camera with a fill factor of 1% (which is pushing things a bit, since that’s finer resolution than the target:

1pct fill

Going to 100% fill costs us some resolution and contrast, but calms down the false color a bit and smooths over the stair-stepping:

100pct fill

At 400% fill – a reasonable anti-aliasing filter – false color is reduced to about the level of the sharpest real-camera pictures in the preceding post (which were made with cameras with no AA filter):

400pct fill

Even at 1600% fill, which is more AA than a real camera and enough to cause some serious blurriness, there’s still some false color:

1600pct fill

Next, we’ll look at other things that can affect ISO 12233 images.

The Last Word

← a7R and D800E shutter slap testing with ISO 12233 Shutter slap simulation with ISO 12233, part 2 →

Trackbacks

  1. Sony a7R testing, part 1 | The Last Word says:
    January 3, 2015 at 3:59 pm

    […] you want to see a simulation study on the effects of anti-aliasing and fill factor on sharpness, here it is. A similar study on camera motion is here. A study showing how vibration blur affects […]

    Reply

Leave a Reply Cancel reply

Your email address will not be published. Required fields are marked *

May 2025
S M T W T F S
 123
45678910
11121314151617
18192021222324
25262728293031
« Apr    

Articles

  • About
    • Patents and papers about color
    • Who am I?
  • How to…
    • Backing up photographic images
    • How to change email providers
    • How to shoot slanted edge images for me
  • Lens screening testing
    • Equipment and Software
    • Examples
      • Bad and OK 200-600 at 600
      • Excellent 180-400 zoom
      • Fair 14-30mm zoom
      • Good 100-200 mm MF zoom
      • Good 100-400 zoom
      • Good 100mm lens on P1 P45+
      • Good 120mm MF lens
      • Good 18mm FF lens
      • Good 24-105 mm FF lens
      • Good 24-70 FF zoom
      • Good 35 mm FF lens
      • Good 35-70 MF lens
      • Good 60 mm lens on IQ3-100
      • Good 63 mm MF lens
      • Good 65 mm FF lens
      • Good 85 mm FF lens
      • Good and bad 25mm FF lenses
      • Good zoom at 24 mm
      • Marginal 18mm lens
      • Marginal 35mm FF lens
      • Mildly problematic 55 mm FF lens
      • OK 16-35mm zoom
      • OK 60mm lens on P1 P45+
      • OK Sony 600mm f/4
      • Pretty good 16-35 FF zoom
      • Pretty good 90mm FF lens
      • Problematic 400 mm FF lens
      • Tilted 20 mm f/1.8 FF lens
      • Tilted 30 mm MF lens
      • Tilted 50 mm FF lens
      • Two 15mm FF lenses
    • Found a problem – now what?
    • Goals for this test
    • Minimum target distances
      • MFT
      • APS-C
      • Full frame
      • Small medium format
    • Printable Siemens Star targets
    • Target size on sensor
      • MFT
      • APS-C
      • Full frame
      • Small medium format
    • Test instructions — postproduction
    • Test instructions — reading the images
    • Test instructions – capture
    • Theory of the test
    • What’s wrong with conventional lens screening?
  • Previsualization heresy
  • Privacy Policy
  • Recommended photographic web sites
  • Using in-camera histograms for ETTR
    • Acknowledgments
    • Why ETTR?
    • Normal in-camera histograms
    • Image processing for in-camera histograms
    • Making the in-camera histogram closely represent the raw histogram
    • Shortcuts to UniWB
    • Preparing for monitor-based UniWB
    • A one-step UniWB procedure
    • The math behind the one-step method
    • Iteration using Newton’s Method

Category List

Recent Comments

  • bob lozano on The 16-Bit Fallacy: Why More Isn’t Always Better in Medium Format Cameras
  • JimK on Goldilocks and the three flashes
  • DC Wedding Photographer on Goldilocks and the three flashes
  • Wedding Photographer in DC on The 16-Bit Fallacy: Why More Isn’t Always Better in Medium Format Cameras
  • JimK on Fujifilm GFX 100S II precision
  • Renjie Zhu on Fujifilm GFX 100S II precision
  • JimK on Fuji 20-35/4 landscape field curvature at 23mm vs 23/4 GF
  • Ivo de Man on Fuji 20-35/4 landscape field curvature at 23mm vs 23/4 GF
  • JimK on Fuji 20-35/4 landscape field curvature at 23mm vs 23/4 GF
  • JimK on Fuji 20-35/4 landscape field curvature at 23mm vs 23/4 GF

Archives

Copyright © 2025 · Daily Dish Pro On Genesis Framework · WordPress · Log in

Unless otherwise noted, all images copyright Jim Kasson.