• site home
  • blog home
  • galleries
  • contact
  • underwater
  • the bleeding edge

the last word

Photography meets digital computer technology. Photography wins -- most of the time.

You are here: Home / The Last Word / Sony a7II IBIS with 28mm lens

Sony a7II IBIS with 28mm lens

January 26, 2015 JimK 11 Comments

A reader asked if I’d test the in-body image stabilization (IBIS) on the Sony alpha 7II with a shortish lens, to bookend the testing I’ve done previously with a 180mm Apo-Telyt and the Zony 55mm FE. I picked the Leica 28mm f/2.8 Elmarit-R, which has shown strong sharpness in previous testing. You won’t find the acronym IBIS in and Sony literature; they call the feature SteadyShot.

I employed the following protocol:

  • The camera: the Sony a7II.
  • The lens: the Leica 28mm f/2.8 Elmarit-R, with a Novaflex R to E adapter.
  • The target: Imatest slanted edge with Siemans star for focusing.
  • No filter.
  • The lighting: a single Fotodiox LED-200WA-56 daylight balanced variable-output flood.
  • ISO set to 400, f-stop set to 8, to minimize the effect of manual focusing errors.
  • Focusing manually at f/2.8, using the magnifier with IBIS on (even at 28mm, this makes a difference). The focus point as a Siemens star on the target.
  • Drive set to single
  • EFCS on
  • Manual exposure mode.
  • Hold the camera in the “Pete Souza” grip: left palm under base, left fingers bracing the underside of the front part of the lens, elbows against chest.
  • Exposure protocol: LED light to full, shutter to 1/125 second, make 16 exposures, turn the light down a stop, make 16 exposures… until you get to 1/8 of a second.
  • Develop in Lightroom 5.7.1 with standard settings.
  • Crop, export as TIFFs, analyze for horizontal edge and vertical edge MTF50 in Imatest.
  • Export the results to Excel, crunch the stats, and graph.

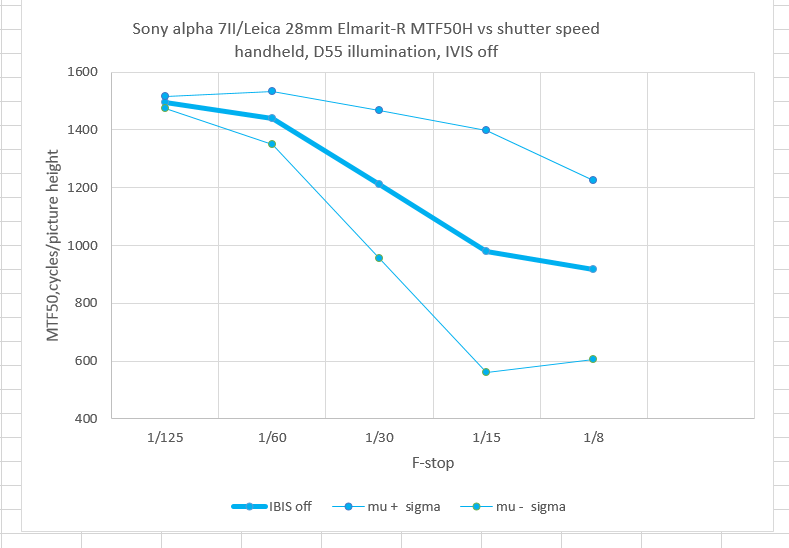
First, with IBIS off, looking at the horizontal edges:

a7ii28IBIS offa

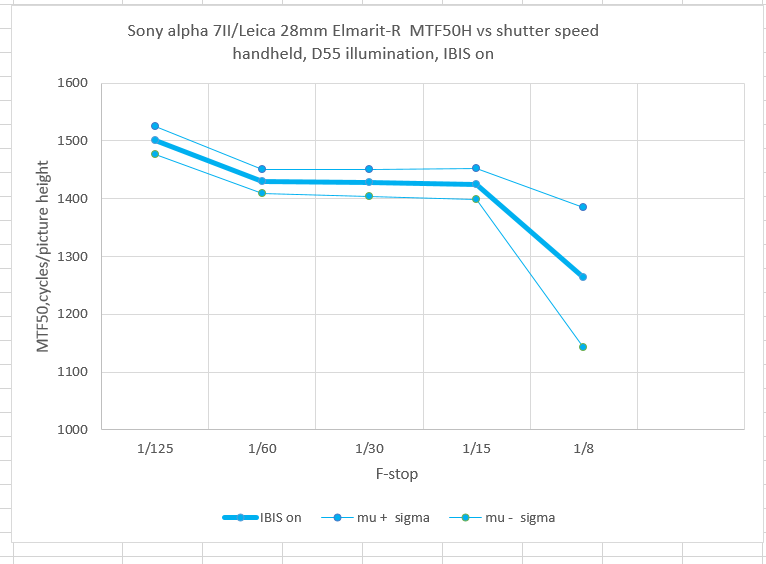
Then, with IBIS on (note the vertical axis is different):

a7ii28IBIS ona

And, finally, with both of the results on the same graph:

a7ii28IBIS botha

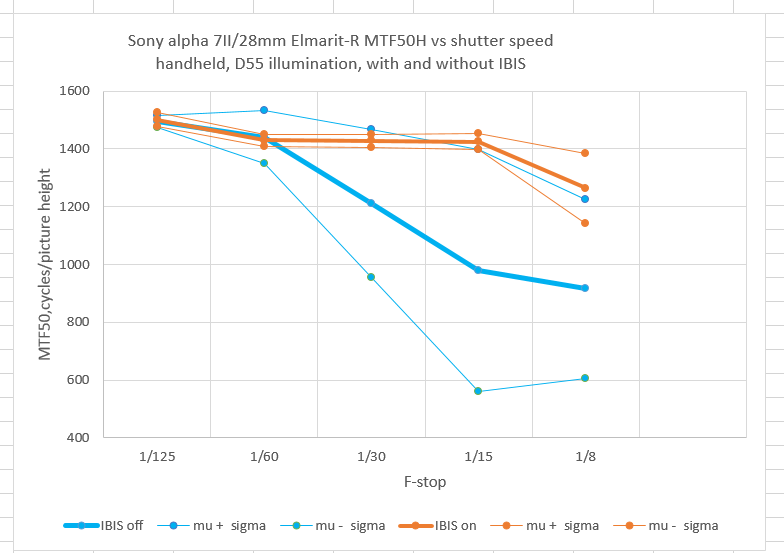
The heavy lines are the average,, or mean, values, for which the mathematical symbol is mu. The light lines are the mean plus and minus the standard deviation, or sigma, of the measurement set, and provide an estimate of repeatability.

In the graph with both sets of curves on it, the blue lines are with IBIS off, and the orange ones are with it on. The thick lines are the average ofthe MTF50s for each set of 16 images, and the thin lines are the average plus and minus one standard deviation. My take is that IBIS is at least as effective for short lenses than for long ones.

A few specifics:

  • As with the longer lenses, the most confidence-inspiring thing about IBIS is not how much it helps the average image, but the huge improvement in the spread of the results.
  • The average image is improved by about two stops.
  • The average minus one sigma image is improved by about two and a half stops.
  • With IBIS on, the tightness of the standard deviation is almost as good at 1/15 second as it is at 1/125.
  • There is no statistically significant difference in the performance with and without IBIS at 1/125 second.
  • Although the average sharpness at 1/60 second is the same with IBIS on or off, the variance is much less with it on.
  • 1/half the focal length appears to work well with the 28mm with IBIS on.

Color me impressed.


The Last Word

← Nikon 28mm f/1.4 D on Sony a7 in infrared and mixed light 28mm f/1.4 Nikkor-D on Nikon D3x in deep IR →

Comments

  1. FAS says

    January 26, 2015 at 5:57 am

    Thank you very much, Jim.
    So it appears I need to try again, in my early testing I didn’t see much difference in “reasonably safe” shutter speed between 80mm and 35mm.

    Reply
  2. jean pierre says

    January 26, 2015 at 9:34 am

    Thanks Jim
    On the graph you write “tripod-mounted”!? But, on the protocol you write “Hold the camera in the “Pete Souza” grip”!
    Is the test with or whithout tripod?

    Reply
    • Jim says

      January 26, 2015 at 9:51 am

      Without. I’ll fix it.

      Thanks,

      Jim

      Reply
  3. jean pierre says

    January 26, 2015 at 11:16 am

    Ok, without tripod it looks great till 1/15s! impressed…..

    Reply
  4. NicoG says

    January 26, 2015 at 10:29 pm

    Thanks a lot for all this work!

    Your evaluation is pretty nice!
    To sum-up, IBIS thus allows to have GOOD shots with a shutter at 1/focal lens whatever the focal lens (tele, standard and wide), and OK to GOOD shot at 1/half focal lens. It is also interesting to see how the spread is notably reduced thanks to IBIS .

    To close the loop, the last step would be to test an ultra wide angle, ie 16mm 😉 … very curious if it will still be OK to GOOD at 1/half focal lens. It would also be interesting to see what happend without IBIS.

    thanks

    Reply
  5. jean pierre says

    January 26, 2015 at 11:28 pm

    Hi Jim,
    Do you have tryed “e-Front Curtain Shutter” ON?
    In the manual of a7II: “Sets whether to use the electronic front curtain shutter function. (On/Off).”
    Maybe the electronic Curtain Shutter can reduce shutter till 1/8s?

    Reply
    • NicoG says

      January 27, 2015 at 7:20 am

      Hi Jean Pierre,

      Jim says “EFCS on” in the protocol, so the test were done with “e-Front Curtain Shutter” to ON.

      Reply
      • Jim says

        January 27, 2015 at 7:59 am

        Just so, Nico.

        Reply
      • jean pierre says

        January 27, 2015 at 8:20 am

        Thanks Nico, there is such a thing with these abbreviations…, sorry.

        Reply
  6. christer says

    February 9, 2015 at 2:34 am

    Your findings (“The average image is improved by about two stops.”) agree with my findings. I tested with the 16-35mm f/4 lens with built in OSS set to 30mm on an A7r. My findings are:

    – to get consistent good results without OSS on the A7r one should use a shutter speed of twice the focal length (shutter speed = 1/n where n is the focal length in mm).

    – with OSS the longest shutter speed for consistent good results is one half of the focal length.

    Reply

Trackbacks

  1. Rules of thumb for handheld shutter speed | The Last Word says:
    April 8, 2015 at 8:38 am

    […] while back, I tested 16, 28, 55, and 180 mm lenses handheld on a Sony alpha 7 Mark II (a7II), both with and without the in-body […]

    Reply

Leave a Reply Cancel reply

Your email address will not be published. Required fields are marked *

May 2025
S M T W T F S
 123
45678910
11121314151617
18192021222324
25262728293031
« Apr    

Articles

  • About
    • Patents and papers about color
    • Who am I?
  • How to…
    • Backing up photographic images
    • How to change email providers
    • How to shoot slanted edge images for me
  • Lens screening testing
    • Equipment and Software
    • Examples
      • Bad and OK 200-600 at 600
      • Excellent 180-400 zoom
      • Fair 14-30mm zoom
      • Good 100-200 mm MF zoom
      • Good 100-400 zoom
      • Good 100mm lens on P1 P45+
      • Good 120mm MF lens
      • Good 18mm FF lens
      • Good 24-105 mm FF lens
      • Good 24-70 FF zoom
      • Good 35 mm FF lens
      • Good 35-70 MF lens
      • Good 60 mm lens on IQ3-100
      • Good 63 mm MF lens
      • Good 65 mm FF lens
      • Good 85 mm FF lens
      • Good and bad 25mm FF lenses
      • Good zoom at 24 mm
      • Marginal 18mm lens
      • Marginal 35mm FF lens
      • Mildly problematic 55 mm FF lens
      • OK 16-35mm zoom
      • OK 60mm lens on P1 P45+
      • OK Sony 600mm f/4
      • Pretty good 16-35 FF zoom
      • Pretty good 90mm FF lens
      • Problematic 400 mm FF lens
      • Tilted 20 mm f/1.8 FF lens
      • Tilted 30 mm MF lens
      • Tilted 50 mm FF lens
      • Two 15mm FF lenses
    • Found a problem – now what?
    • Goals for this test
    • Minimum target distances
      • MFT
      • APS-C
      • Full frame
      • Small medium format
    • Printable Siemens Star targets
    • Target size on sensor
      • MFT
      • APS-C
      • Full frame
      • Small medium format
    • Test instructions — postproduction
    • Test instructions — reading the images
    • Test instructions – capture
    • Theory of the test
    • What’s wrong with conventional lens screening?
  • Previsualization heresy
  • Privacy Policy
  • Recommended photographic web sites
  • Using in-camera histograms for ETTR
    • Acknowledgments
    • Why ETTR?
    • Normal in-camera histograms
    • Image processing for in-camera histograms
    • Making the in-camera histogram closely represent the raw histogram
    • Shortcuts to UniWB
    • Preparing for monitor-based UniWB
    • A one-step UniWB procedure
    • The math behind the one-step method
    • Iteration using Newton’s Method

Category List

Recent Comments

  • JimK on Goldilocks and the three flashes
  • DC Wedding Photographer on Goldilocks and the three flashes
  • Wedding Photographer in DC on The 16-Bit Fallacy: Why More Isn’t Always Better in Medium Format Cameras
  • JimK on Fujifilm GFX 100S II precision
  • Renjie Zhu on Fujifilm GFX 100S II precision
  • JimK on Fuji 20-35/4 landscape field curvature at 23mm vs 23/4 GF
  • Ivo de Man on Fuji 20-35/4 landscape field curvature at 23mm vs 23/4 GF
  • JimK on Fuji 20-35/4 landscape field curvature at 23mm vs 23/4 GF
  • JimK on Fuji 20-35/4 landscape field curvature at 23mm vs 23/4 GF
  • Ivo de Man on Fuji 20-35/4 landscape field curvature at 23mm vs 23/4 GF

Archives

Copyright © 2025 · Daily Dish Pro On Genesis Framework · WordPress · Log in

Unless otherwise noted, all images copyright Jim Kasson.