When I tested the NEX-7 with M-Mount lenses, I noticed a lot of color shifts in the corners with some lenses. All else being equal, the errors seemed to get worse the closer the exit pupil of the lens was to the sensor, and the wider the aperture. M-mount lenses, being made for a body with a short flange distance – but not as short as the a7R’s – and being designed with an emphasis on small size, tend to have the exit pupil closer to the sensor plane than lenses designed for SLR’s, which can’t get in the way of the swinging mirror.
Also, all else being equal, the higher the pixel density the worse the problem; the NEX-7 at 24 megapixels, showed far greater corner color errors than the NEX-5, which had the same APS-C size sensor but with 16 megapixels.
The a7R doesn’t have quite the NEX-7’s pixel density, but it has a bigger sensor so that the corners are at more extreme angles, so I expected it to show a lot of corner color shift.
With the NEX-7, I used a fairly labor-intensive technique to measure corner color shift. That is entirely appropriate if you’re going to correct it with something like CornerFix or Adobe Flat Field. I reported the errors at each corner in tabular form. I never integrated Corner Fix into my workflow with the NEX-7, and therefore never made real photographs with the calibration images that I carefully created for testing.
Here’s the reason why I find CornerFix cumbersome. The correcting image depends on the lens and the f-stop. The NEX-7 and the a7R don’t record either in the EXIF metadata, since they have no way of telling either the lens type of the f-stop. Therefore, to figure out which correcting image to use requires some kind of record keeping, or a photographic style that doesn’t have much variety. I figured that life’s too short, and used the testing that I had done simply to pick lenses that wouldn’t need CornerFix to produce acceptable prints. If that’s the goal of the testing, then the testing protocol can be simplified from what I used with the NEX-7.
I originally wanted to be able to make a set of test images that simultaneously tested for corner color shift and corner color smearing. I used the multi-frequency sharpness target that I developed for lens sharpness testing. I hoped to be able to make images of the target, and filter then with a high-pass filter to look at smearing, and with a low-pass filter to look at color shift. However, at wide – or even wideish – apertures, the corners were blurry when I focused on the center, with almost every lens I tested. I realized that the color smearing test for a camera was turning into a field flatness test for the lenses, and I was forced to set aside the smearing, and concentrate on the color shift.
Here’s what I did with the a7R to measure corner color shift. I set up a C-size piece of Exhibition Fiber with the printed side facing the wall. I lit it with two studio strobes at 46-degree angles. I moved the lens to a point where the paper filled the frame, and set the focusing ring to infinity. I set the ISO to 100 and the lens to f/16. I adjusted the strobe’s output to give a middle gray sensor response. I made a test image. I then opened the lens up a stop and cut the strobe’s output by a stop and made another image. I continued that way until the lens was wide open or the strobe wouldn’t go any lower. Then I mounted the next lens and repeated the sequence.
I tested the following lenses:
- Leica Super-Elmar 18mm f/3.8 ASPH
- Leica Elmar 24mm f/3.8 ASPH
- Leica Elmarit 24mm f/2.8 ASPH
- Leica Elmarit 28 mm f/2.8 ASPH
- Zeiss Biogon 35mm f/2
- Leica Summilux ASPH 50mm f/1.4
- Coastal Optical 60mm f/4 APO
I brought all the images into Lightroom 5.3 RC, evened out the center levels with the Exposure control, exported them as 16-bit TIFFs, and brought them into Photoshop stacked by aperture. I applied a low-pass filter to get rid of any anomalies and reduce photon noise. I measured the Lab values of the center and all four corners. I didn’t go all the way to the corner, but cam in about 300 pixels horizontally and vertically. There was a little systemic variation because the lighting wasn’t completely even, but I didn’t care since I was going to average all four corners.
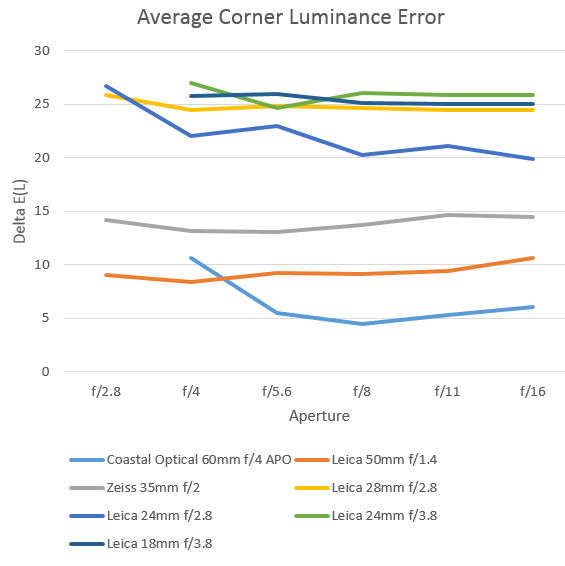
I corrected the Lab values so the exposure and lighting variations at the center would be compensated for. Then I computed the luminance changes from the center to each of the four corners, and averaged all four together.
Here’s what the corner luminance errors for all the lenses look like:
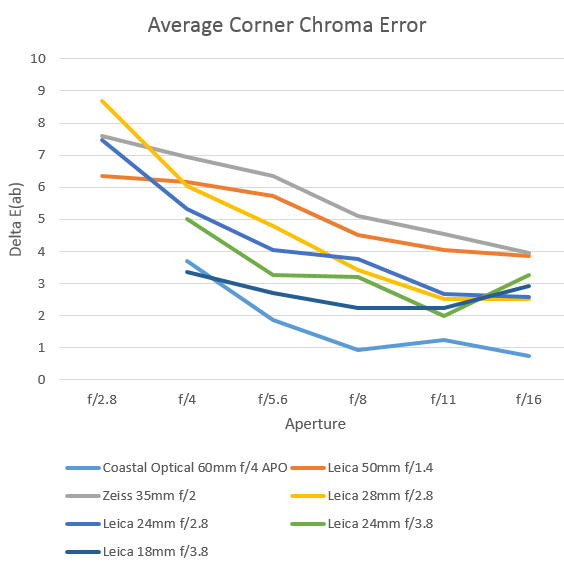
Then I corrected the Lab values of the four corners of all the images so they’d have the same luminance as the center. This increased the a* and b* differences. I computed the chroma differences (there was no longer any luminance difference) between the center and the corners, and averaged the chroma differences (the square roots of the sum of the squares for the a* and b* differences) for all four corners.
Here’s what the corner chroma errors for all the lenses look like:
What to make of all this?
- The biggest errors are the luminance errors. However, they’re also the errors for which the eye is the most forgiving, so I wouldn’t worry about them as much.
- The luminance errors vary with focal length pretty much the way you’d expect them to.
- The chroma errors don’t all follow the script. The one F-mount lens in the test did the best, as expected, but the Leica 50mm f/1.4 doesn’t do nearly as well as it did with the NEX-7. The 18mm lens didn’t do half bad.
- The Zeiss 35mm, f/2 which fared poorly, considering its focal length, in the NEX-7 testing, also didn’t do well here. It’s quite a compact lens. I suspect that the design of the lens is such that the exit pupil is quite close to the sensor plane.
- The Leica 28mm f/2.8, also a compact design, did not do well.
- As expected, a wider aperture makes things worse. One thing that’s a surprise, and may be an effect of the small sample size, is that the f/4 and f/3.8 lenses do better than the ones that can open to f/2.8 and wider.
I didn’t test the longer Leica M-mount lenses because I was pretty sure they’d all do fine, but the performance of the 50mm f/1.4 has me reconsidering that. I did test the 16/18/21 Tri-Elmar, which turned in a respectable performance on the NEX-7, and I’ll report on the results later.
I didn’t test the shorter F-mount lenses like the 14mm f/2.8, but I will if there’s sufficient interest. It would be nice to be able to focus that lens; you’d be able to on a a7R, and you certainly can’t on the D800E.
I know that the numbers are not very satisfying to some of you. I’ll post some pictures soon.
[…] […]