I’m going to repeat some of the explanatory material from my Leica M240 review. Those of you who are familiar with my analytical techniques, feel free to skim this post.
With the noise floor and self-heating testing out of the way, we’re ready to tackle the question, “Is the a7R ISOless?” If that question makes no sense to you, hang in there. Explanations follow.
Let’s talk a bit about how your camera works. First, there are the photosites, or sensels, which are little features (usually one per pixel of the demosaiced image) on the sensor that collect photons and produce electrons. Those electrons create a voltage that can be measured by an analog-to-digital converter (ADC), and thus the output of the ADC is more-or-less proportional (with today’s sensors, it’s almost perfectly proportional) to the number of photons collected by the photosite. There’s an amplifier between the sensels and the ADC whose gain is controlled by the ISO setting on the back of the camera. Higher ISO means more gain.
That’s fine up to a point. With a perfect ADC and no other noise associated with reading the data out of the photosite, it doesn’t improve the signal-to-noise ratio (SNR) to crank up the gain of that amplifier past the point where one photon captured results in one least-significant-bit (LSB) change in the ADC output. If you’re a digital photography maven, you call this gain the Unity Gain. This terminology is a big step away from the way we engineers usually use the word “gain”, and it makes me cringe, but it’s the language of the art, and I will explain it here. To an engineer, gain is almost always dimensionless: volts out over volts in, or milliamps out divided by milliamps in. This Unity Gain manages to be dimensionless only if we call the units of the input counts (number of photons) and the unit of the output counts (steps in the ADC output). Unity gain occurs when one photon creates one step.
If we step away from the ideal world, it doesn’t help the signal to noise ratio to increase the gain over that that results in a two or three LSB change. That occurs at depressingly low ISOs, and there’s a way to test your camera to see what it is. Even better, there’s a test I’ve developed to figure out when turning up the ISO stops helping you increase the SNR that doesn’t even directly measure the Unity Gain point.
I used a different technique than before. I set up the camera aimed at a white card, and defocussed the lens. The light source was a studio flash unit, so that I was able to precisely control the light level and make series at various sensor averages. There’s no PC receptacle on the a7R, so I used a Nikon hotshoe flash to trigger the slave sensor on the studio flash. I used the Leica 135mm f/3.4 APO; the range from f/4 to f/22 is enough to encompass the ISO range from 200 to 3200). I set the camera to ISO 3200, adjusted the brightness of the strobe so that the green channel of the raw file was about five stops down from full scale. I made 16 exposures. Then I turned the ISO down to half of what it was, opened up a stop, and make another 16 exposures. I continued until I got to ISO 100.
As I said, I make 16 exposures for each data point, averaging the results from those exposures. As a side benefit of that approach, I can compute the standard deviation of the underlying single-exposure data for each data point, and plot that information on the graphs to give an idea of the possible sampling errors involved.
I brought one of the images into RawDigger, selected a square in the middle that’s 200 pixels on a side, weasured the mean and standard deviation of all four sets of pixels. I left the selection where it was, and measure the same statistics for all the rest of the images. For each image, I computed the SNR; the mean is the signal, the standard deviation is the noise.
I normalized all of the data so that they were corrected for the actual exposure of the test images, as measured by the mean value of the pixels in the selection box. This calibrates out exposure variations caused by inaccuracies in the shutter and the aperture, gain of the amplifiers in the camera, and variations in strobe brightness caused by power line variation and recycling interval.
I plotted the data, with the log (base 2) of the SNRs as the vertical axis, and the log (base 2) of the film speed as the horizontal axis.
Here’s the plot for the a7R, gives red counts of about 200, blue counts of about 400, and green counts of about 500. The mean, mean-plus-two-standard-deviations, and mean-minus-two-standard-deviations lines are plotted. If the data is Gaussian, for a large sample, less than five percent of the results lie outside of the two lighter lines.
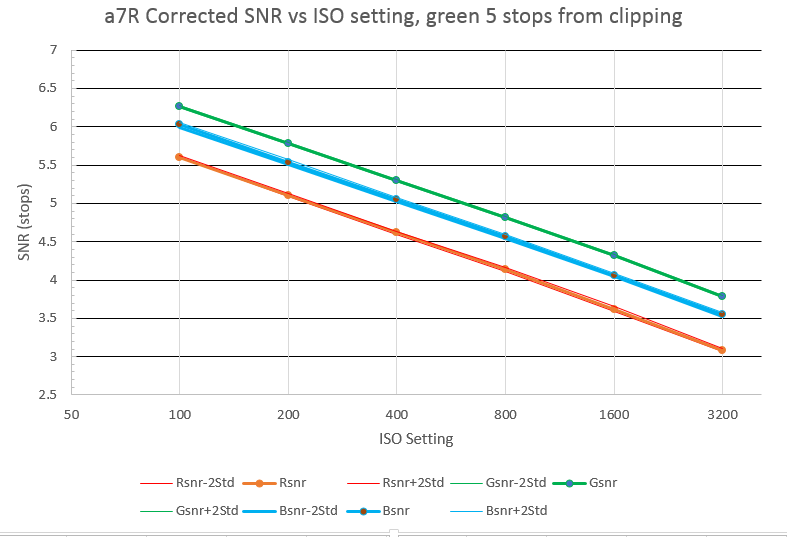
This shows the SNR decreasing as the ISO goes up. That’s what you’d expect, since for the same ADC count, every time you double the ISO setting on the camera, you’re allowing only half as many photons to fall on the sensor
If the log (base 2) SNR falls by 0.5 every time you double the film speed, you are gaining no improvement in SNR at all by increasing the ISO. If it falls faster than that, you are actually losing ground by turning up the ISO; you’d be better off cranking up the exposure control in Lightroom.
Here’s what the a7R data looks like if we subtract out the half-stop-per-stop effect of having fewer photons as the ISO setting goes up:

You can see that you don’t gain anything by turning up the ISO past the base value of 100. If the position of the ISO control has no effect on the SNR after Exposure corrections have been made in your favorite raw converter, some people say that that camera is ISO-less. That looks to be the case with the a7R.
Dear Jim,
Have you looked at the Sony lossy compression curve?