From the mailbag:
I told [name] that the ISO values below 100 on the A7R2 are “fake” and that the dynamic range measurements you provided for those ISO values are spurious. I tried to find where you discussed that and was not able to.
[name] was asking for a link. Do you have anywhere on your blog where you discuss ISO 50 and how the dynamic range there is actually 1 stop lower than ISO 100?
I realized that I’d never addressed the fake ISO issue in any detail, contenting myself by referring to it with ill-concealed, but unexplained, disdain. I also realized that I’d never looked at the way the alpha seven cameras implemented the fake ISOs.
If you’re a camera manufacturer, there are at least two approaches possible for providing ISOs below the base ISO.
The zeroth is for the engineers to say to the product managers: “No, we’re not going to do fake ISOs on this camera. If you want it done, get somebody else to design this sucker.” That’s what I wish would happen with every camera.
The first is manipulating the raw data so that the images exposed at the fake ISOs are darker than they would otherwise be. This lowers the saturation point of the resultant raw file, and causes the dynamic range calculations to be wrong if this is not compensated for.
The second is to set the ISO to a higher value than indicated by the knob, record the result in the raw file, but change the processing of the JPEG preview image to make it darker than it would be if it were a straight rendition of the raw file. This is what the a7RII does.
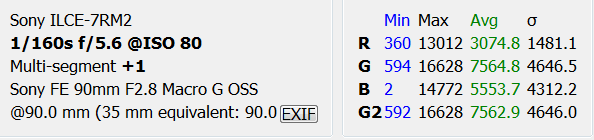
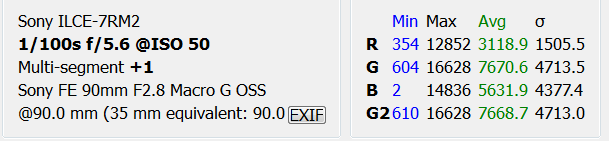
You can prove this to yourself by making a set of raw and JPEG images of the same subject at ISOs 100, 80, 64, and 50, opening up the lens a third of a stop each time. If you look at the JPEG images, you’ll see that they look like the all have the same brightness. However, if you look at the raw images in RawDigger, you’ll see that the ISO 80, 64, and 50 images are all almost a stop overexposed from the ISO 100 image.
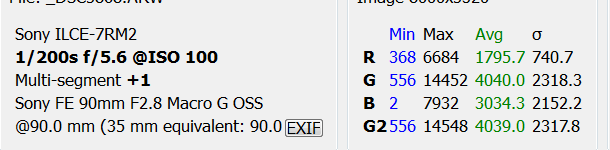

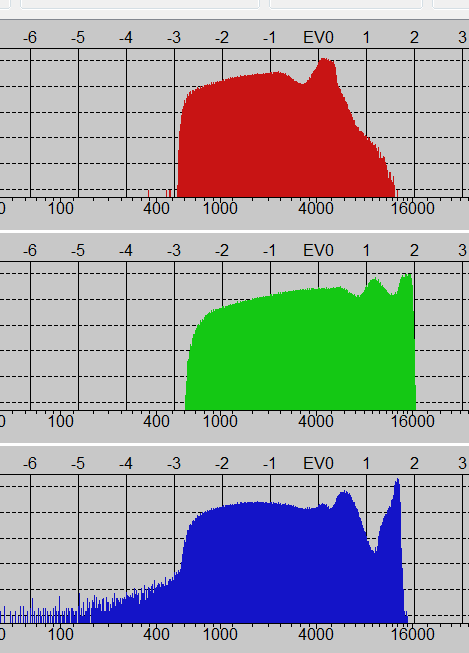
If you look at the log histogram of the ISO 100 image, you’ll see that all raw channels are short of clipping.
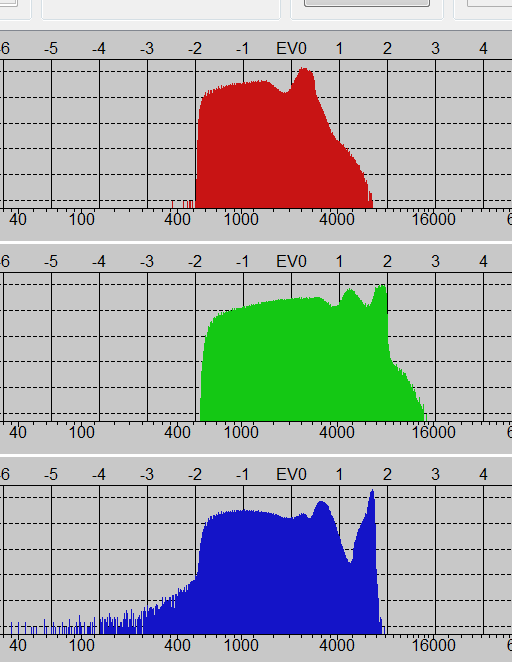
If you look at the log histogram of the ISO 50 image, you can see that the green channel is clipped.
But here’s something passing strange. When you import the four images into Lightroom, they look like they are all exposed more-or-less to the same brightness:

Apparently, the camera passes enough information to the raw developer that, in the absence of a program like RawDigger, it’s not possible to see that the ISOs other than 100 are overexposed. The effect is that the photographer who is foolhardy enough to use the ISOs below 100 will suffer a stop loss in headroom — the avoidance of which was presumably the reason for venturing into the land of sub-base ISOs in the first place. To make the plot thicker, Lr and Sony conspire to hide the loss of headroom.
Now let’s look at two things and how they behave at ISOs of 100, 80, 64, and 50: dark-field noise and saturation level. I’ll walk you through how I make the measurements in sufficient detail that anyone can follow along in the comfort of their home or office, and can do so without resorting to charts, special lighting, or any software beyond RawDigger and the spreadsheet of your choice.
Ready?
Take an a7RII, or any other Sony alpha 7 camera in hand. Set the ISO to 100, the shutter speed to 1/125, the lens aperture to as narrow as it will go, and make an exposure of the back of the lens cap. Make three more exposures at ISOs of 80, 64, and 50.
Now, take the lens cap off, open the lens up all the way, set the ISO back to 100, and the shutter to some speed that will give a five or six stop overexposure. Make three more exposures at ISOs of 80, 64, and 50.
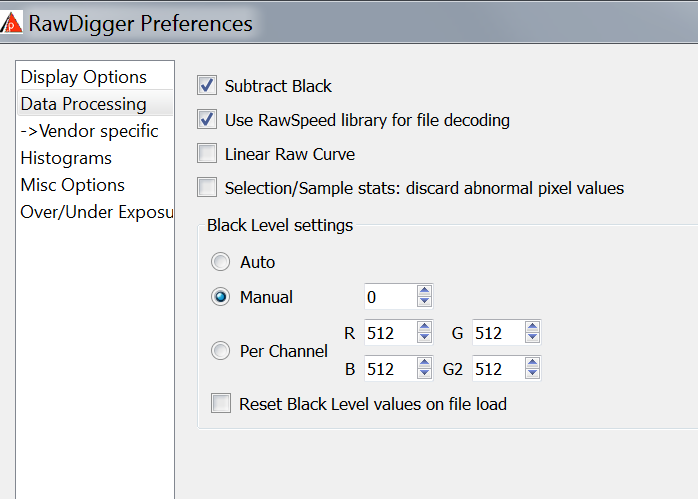
Upload the images to your computer, and put them in a folder of their own. Take the first one and drop it on the RawDigger icon on your desktop. When RawDigger opens, make sure that black point subtraction is disabled.
Now go the the Set Selection by Numbers Dialog and set up a 400×400 central sample:

Convert the selection to a sample. <Ctrl>M will get you the dialog on a PC.
Open the samples window:

Click on Save Samples. Accept the default file name.
Click the Append File box. Hit <Ctrl> right arrow to get the next file, and then Save Samples to append the data to the CSV file. Keep doing that until you have saved the data from all 8 files.
Close RawDigger. Double-click on the CSV file to open it in a spreadsheet program. For dark-field noise, the data you care about are the standard deviations; they’re in the columns Rdev, Gdev, and Bdev. For saturation, the data you care about are in the columns Rmax, Gmax, and Bmax. If you delete the other columns, your spreadsheet will look like this:
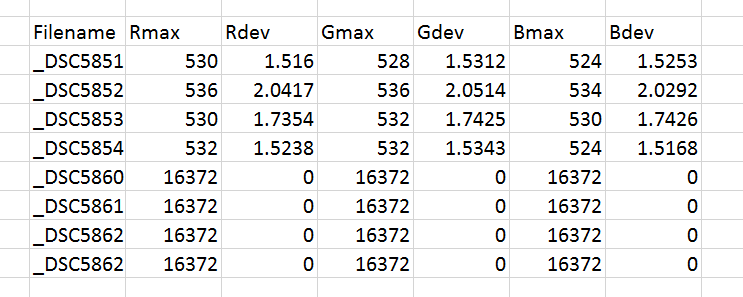
You can see that the ISO 50 dark field standard deviations in the fourth row are the same as the ISO 100 standard deviations in the first row. You can also see that the ISO 80 standard deviations in the second row and the ISO 64 standard deviations in the third row are worse. In fact, if you’d have done dark field exposures at ISO 125 and 160, you would have found that the ISO 80 and ISO 160 standard deviations are the same, and that the ISO 64 and ISO 125 standard deviations are the same.
If you look at the overexposed images in the last four rows, you can see that the saturation values are the same no matter where you set the ISO knob.
So, the graphs I presented earlier for the engineering dynamic range of the fake ISOs were indeed accurate; the raw file saturation level is not any lower at those ISOs. However, if you want to take advantage of the lower ISOs by taking a properly exposed, just-short-of-clipping image at base ISO, dial down the ISO and give more exposure, you’re going to clip the highlights.
So the fake ISOs are, for raw shooters, a complete shuck, and a misleading one at that. If you’re using the in-camera histogram to get ETTR exposure, you’re in danger of blowing the highlights at less than base ISO, since the in-camera histogram is derived from the JPEG preview image, which is artificially darkened at ISO settings below the base ISO.
The take home lesson from many of my photographic tests is sometimes complicated and difficult to explain. This one is not: if you shoot raw, don’t ever use the fake ISO settings.
Thanks.
I’ve used “fill-in” flash with a Canon 6d at ISO 50 to be able to use 1/180 sync speed. I’m unclear if this was a good or bad idea.
Also, I’ve wondered about the “intermediate ISO’s” like 250/320, 500/640, etc. On Canon DSLR’s, my impression was those should be avoided, but that doesn’t seem to be the case with the a7 family. Are ISO’s like 250, 320, 500, 640 “real” on the a7 family?
I don’t know how Canon’s below base ISOs work. On the a7x, I’d recommend adding a stop to the exposure compensation dial instead. That will provide the same effect on shutter speeds,and still allow the histogram to be useful and the preview image to not be deceiving.
Jim
“make sure that black point subtraction is disabled.”
Does this mean to uncheck “Reset Black Values on file load” and leave the “Subtract Black” checked?
Are the dark field standard deviations lower the better? (1.0 is the ideal case?) The lower values mean a higher dynamic range/lower noise floor?
Thanks
Denny
When I try the dark field test for my Fujifilm X-E1 for ISO200-ISO6400, the standard deviations are from 0.5-2.7. Is it possible to compare these values on different cameras?
Yes, but doing it right requires some care and a knowledge of how cameras work. I recommend you go to Bill Claff’s web site if you wan to compare cameras from a noise perspective.
http://www.photonstophotos.net/
Jim
Uncheck “Subtract black”. Now the peaks in the dark field histogram will be about 512.
Lower standard deviation means lower noise, a higher EDR, and more camera goodness.
Jim
What about “Reset Black Values on file load”, should I have it checked or unchecked?
Could you tell me what aperture did you use for the dark field test for A7RII and D810? I want to reproduce your results before proceeding. Did you also use 400×400 Center selection on image for the sampling on D810?
Are the standard deviations from your A7RII and D810 comparable?
Thanks
Denny