• site home
  • blog home
  • galleries
  • contact
  • underwater
  • the bleeding edge

the last word

Photography meets digital computer technology. Photography wins -- most of the time.

You are here: Home / The Last Word / Sony a7RIII pixel shift red sharpness

Sony a7RIII pixel shift red sharpness

December 13, 2017 JimK 6 Comments

This is a continuation of a series of posts on the Sony a7RIII.  You should be able to find all the posts about that camera in the Category List on the right sidebar, below the Articles widget. There’s a drop-down menu there that you can use to get to all the posts in this series. You can also click on the “a7RIII” link in the “You are here” line at the top of this page.

In this post, I showed you how the a7RIII pixel shift feature dramatically reduced false color, and seemed to increase sharpness, although it was hard to tell because the Sony software than converted the four raw files to one combined file changed both the tone curve and the sharpening. Since I wrote that ost, I have supplied the files to some people who write software that decodes raw files, and it appears that once the processing of the single and combined images has been put on a level playing field, the false color advantages of the shifted images remain, but the sharpness improvements largely vanish.

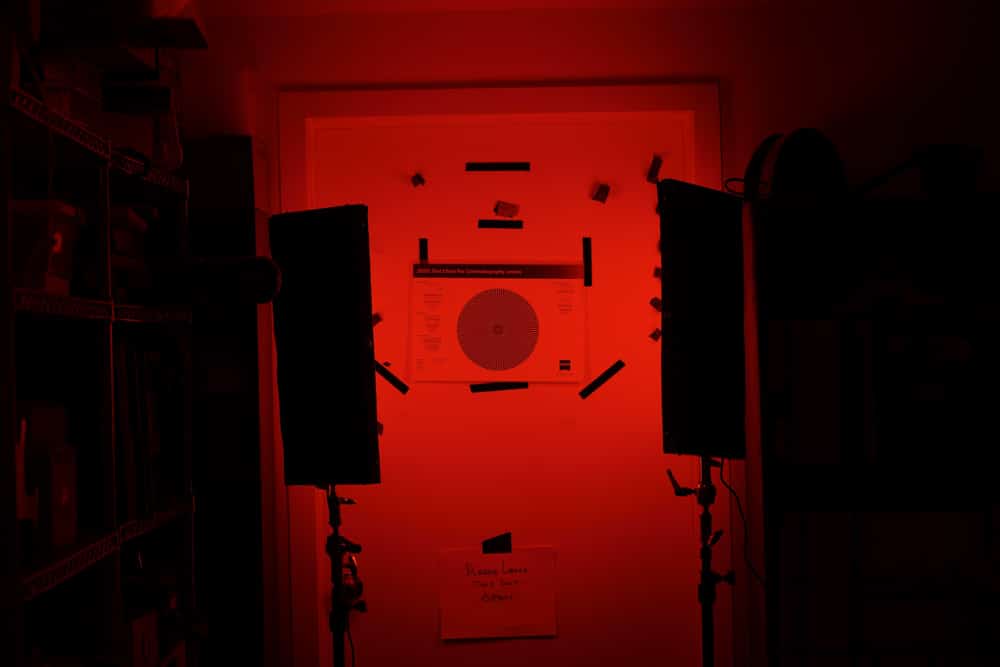
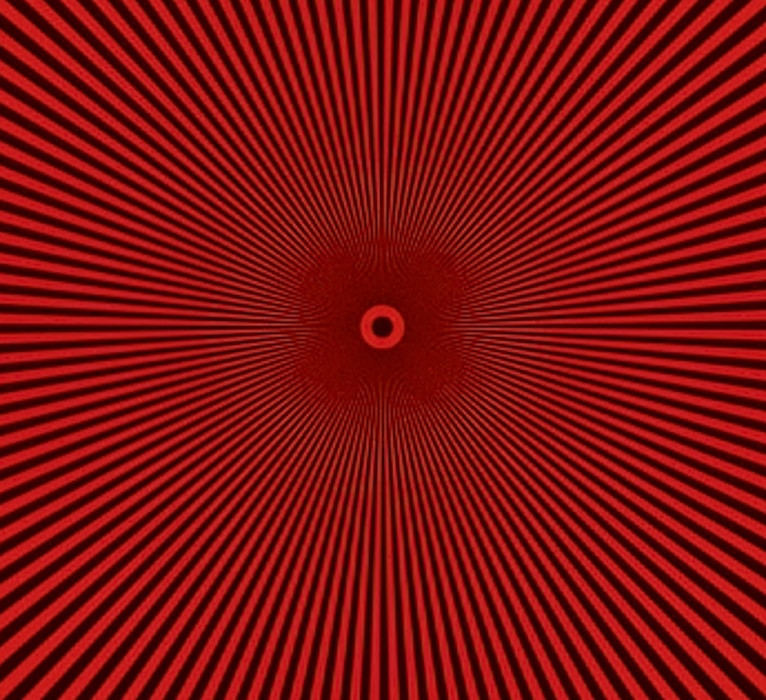
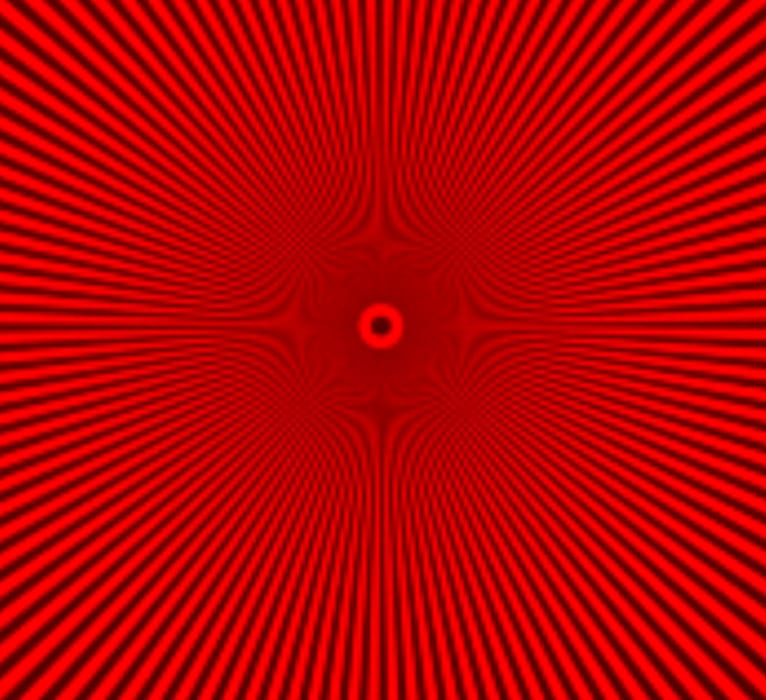
I speculated that there would be a greater sharpness advantage for deep red and deep blue subjects, due to the relative paucity of those colors in the Bayer color filter array. Iliah Borg (of RawDigger and libraw fame) had an idea: shoot the Siemens Star chart through a filter. I dug out the deepest red filter that I could find and put it on a Sony 90 mm f/2.8 macro lens, set it to f/5.6, and aimed it at a well-lit star:

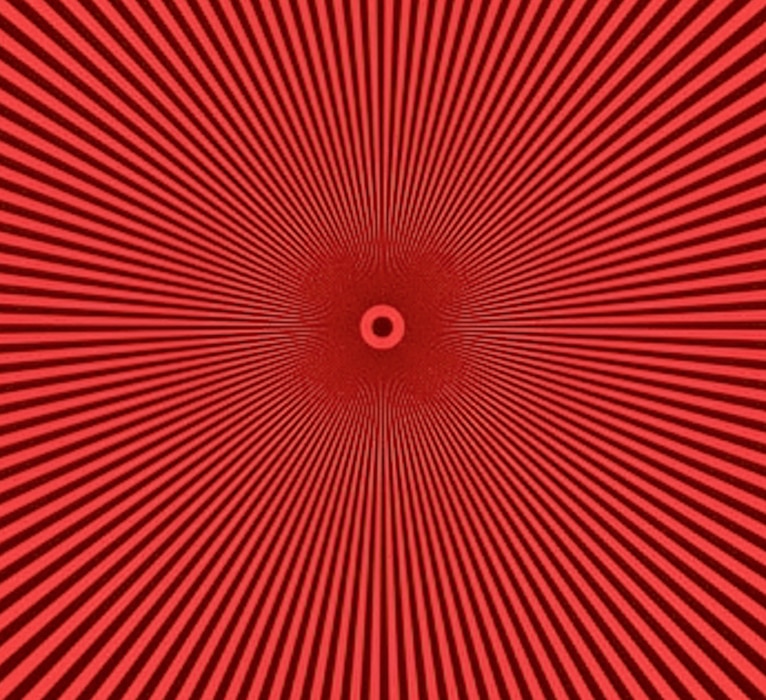
Here are loose crops of the star itself, first a single shot developed in Sony Imaging Edge with default settings, and second a four-shot combination performed by the same software. Both were exported as TIFFs:
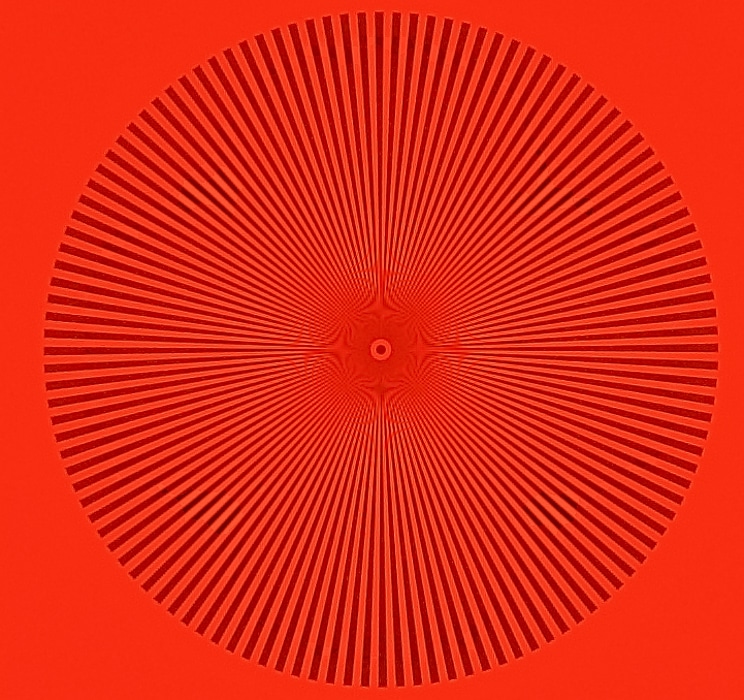
One shot

Four shots combined

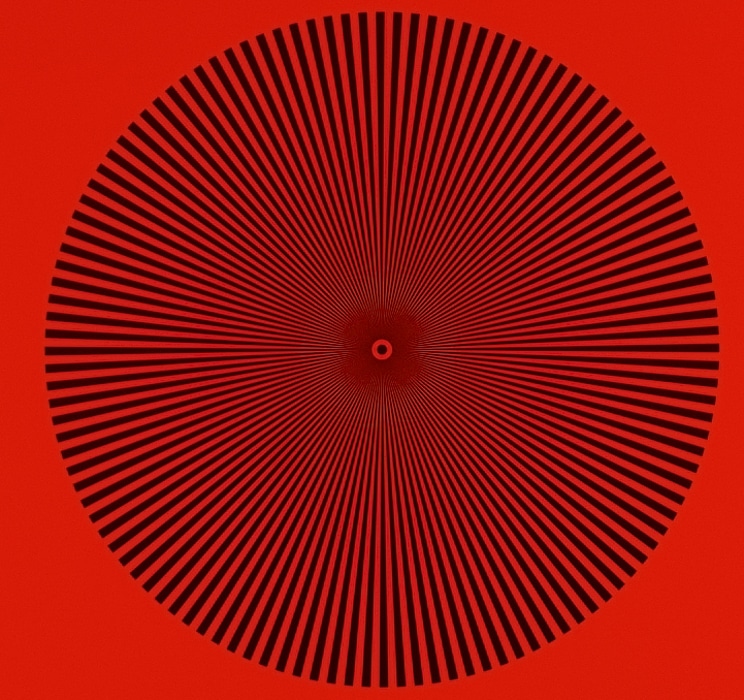
The tone curve is quite different (darker and more contrasty), and there appears to be more sharpening than in the single shot, but the sharpness improvements still look promising.

Here is an attempt to lighten and lower the contrast of the four-shot image above:

Four shots lowered contrast

Taking a closer look:


One shot


Four shot


Four shot lowered contrast

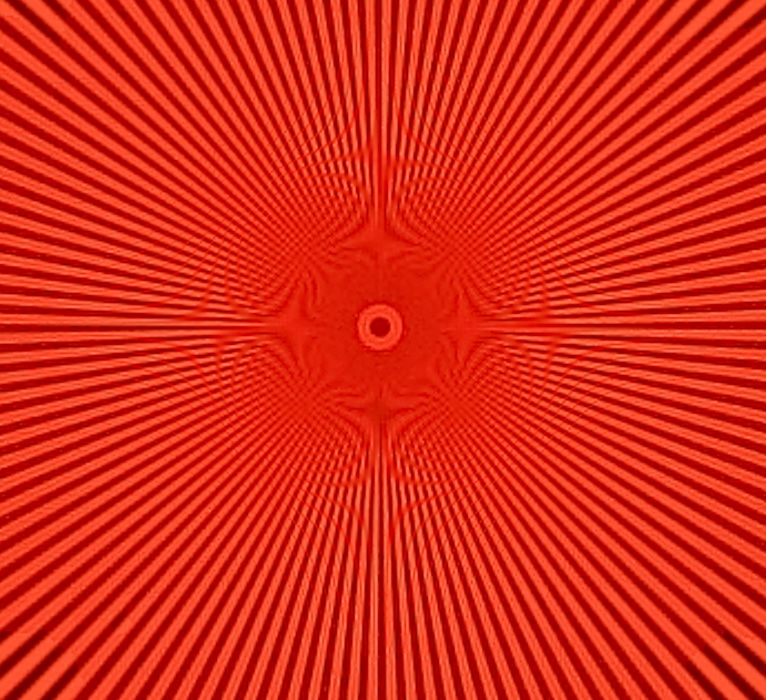
I don’t think we can put all this improvement down to sharpening differences. There is clearly aliasing in the single shot at half the frequency of the aliasing in the combined shots.

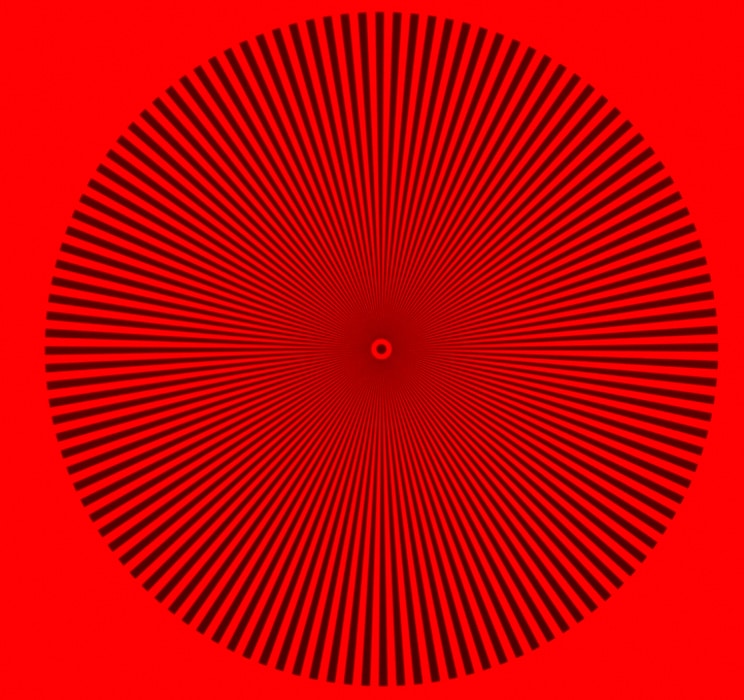
There is a beta version of RawDigger out that can handle ARQ files. I loaded one shot and the ARQ of a four-shot series into that program and exported them as rendered TIFFs.
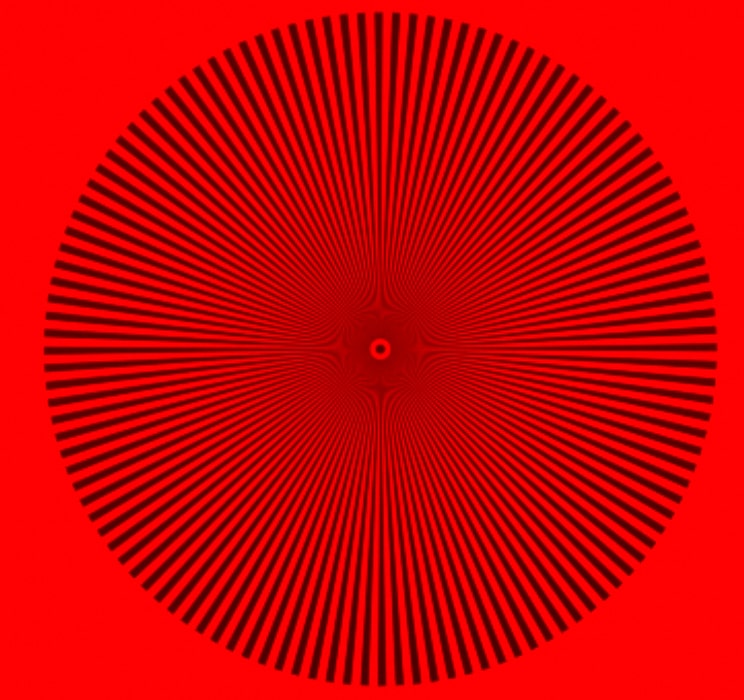
One shot

Four shots

One shot


Four shots

The reduction in aliasing is real.

The Last Word

← Sony a7RIII star spreading — raw composites More on Sony a7RIII pixel shift →

Comments

  1. Jack Hogan says

    December 13, 2017 at 11:14 pm

    Yes, it appears that in practice the advantage of a fully populated RGB capture is mainly reduced aliasing. Which should however benefit lower spatial frequencies also – because, again in practice, it would allow for stronger sharpenening while keeping undesired effects under control.

    Reply
    • Erik Kaffehr says

      December 15, 2017 at 12:33 am

      Hi,

      What I think we see is that using red illumination we remove 75% of the pixels. So, in essence we get 10.5 MP sensor with 0.25 (or so) fill factor.

      With multishot, we still have 0.25 (or so) as fill factor, but we now have 42 MP as the red pixels now sample all sites.

      We could say that with multishot the resolution will be restored, but MTF is only dependent on pixel aperture, so that is not really affected. The single shot image has significant moiré while the multishot image has very little.

      Reply
  2. Edna says

    December 14, 2017 at 2:00 pm

    CY/PH # s ?

    TY

    Reply
    • JimK says

      December 14, 2017 at 2:23 pm

      The problems that have with computing MTF50 slanted edge numbers is that the results are dependent on the pixel aperture and not the pixel pitch at the raw level, so the demosaicing algorithm won’t change the MTF50 curves. If done after demosaicing, the results are hugely dependent on the demosaicing algorithm and the post-demosaicing sharpening, which is hard to control for.

      Reply

Trackbacks

  1. More on Sony a7RIII pixel shift says:
    December 15, 2017 at 10:45 am

    […] already written two posts on the Sony a7RIII pixel shift feature. They are here and here. This post talks about how the feature does with various ways of demosaicing. For the purpose of […]

    Reply
  2. The Sony a7RIII and a7RII Explored by The Last Word | Sony Addict says:
    December 21, 2017 at 10:11 am

    […] Pixel Shift Sony a7RIII pixel shift Sony a7RIII pixel shift red sharpness Sony a7RIII pixel shift real world false colors and dynamic […]

    Reply

Leave a Reply Cancel reply

Your email address will not be published. Required fields are marked *

May 2025
S M T W T F S
 123
45678910
11121314151617
18192021222324
25262728293031
« Apr    

Articles

  • About
    • Patents and papers about color
    • Who am I?
  • How to…
    • Backing up photographic images
    • How to change email providers
    • How to shoot slanted edge images for me
  • Lens screening testing
    • Equipment and Software
    • Examples
      • Bad and OK 200-600 at 600
      • Excellent 180-400 zoom
      • Fair 14-30mm zoom
      • Good 100-200 mm MF zoom
      • Good 100-400 zoom
      • Good 100mm lens on P1 P45+
      • Good 120mm MF lens
      • Good 18mm FF lens
      • Good 24-105 mm FF lens
      • Good 24-70 FF zoom
      • Good 35 mm FF lens
      • Good 35-70 MF lens
      • Good 60 mm lens on IQ3-100
      • Good 63 mm MF lens
      • Good 65 mm FF lens
      • Good 85 mm FF lens
      • Good and bad 25mm FF lenses
      • Good zoom at 24 mm
      • Marginal 18mm lens
      • Marginal 35mm FF lens
      • Mildly problematic 55 mm FF lens
      • OK 16-35mm zoom
      • OK 60mm lens on P1 P45+
      • OK Sony 600mm f/4
      • Pretty good 16-35 FF zoom
      • Pretty good 90mm FF lens
      • Problematic 400 mm FF lens
      • Tilted 20 mm f/1.8 FF lens
      • Tilted 30 mm MF lens
      • Tilted 50 mm FF lens
      • Two 15mm FF lenses
    • Found a problem – now what?
    • Goals for this test
    • Minimum target distances
      • MFT
      • APS-C
      • Full frame
      • Small medium format
    • Printable Siemens Star targets
    • Target size on sensor
      • MFT
      • APS-C
      • Full frame
      • Small medium format
    • Test instructions — postproduction
    • Test instructions — reading the images
    • Test instructions – capture
    • Theory of the test
    • What’s wrong with conventional lens screening?
  • Previsualization heresy
  • Privacy Policy
  • Recommended photographic web sites
  • Using in-camera histograms for ETTR
    • Acknowledgments
    • Why ETTR?
    • Normal in-camera histograms
    • Image processing for in-camera histograms
    • Making the in-camera histogram closely represent the raw histogram
    • Shortcuts to UniWB
    • Preparing for monitor-based UniWB
    • A one-step UniWB procedure
    • The math behind the one-step method
    • Iteration using Newton’s Method

Category List

Recent Comments

  • JimK on Goldilocks and the three flashes
  • DC Wedding Photographer on Goldilocks and the three flashes
  • Wedding Photographer in DC on The 16-Bit Fallacy: Why More Isn’t Always Better in Medium Format Cameras
  • JimK on Fujifilm GFX 100S II precision
  • Renjie Zhu on Fujifilm GFX 100S II precision
  • JimK on Fuji 20-35/4 landscape field curvature at 23mm vs 23/4 GF
  • Ivo de Man on Fuji 20-35/4 landscape field curvature at 23mm vs 23/4 GF
  • JimK on Fuji 20-35/4 landscape field curvature at 23mm vs 23/4 GF
  • JimK on Fuji 20-35/4 landscape field curvature at 23mm vs 23/4 GF
  • Ivo de Man on Fuji 20-35/4 landscape field curvature at 23mm vs 23/4 GF

Archives

Copyright © 2025 · Daily Dish Pro On Genesis Framework · WordPress · Log in

Unless otherwise noted, all images copyright Jim Kasson.