• site home
  • blog home
  • galleries
  • contact
  • underwater
  • the bleeding edge

the last word

Photography meets digital computer technology. Photography wins -- most of the time.

You are here: Home / a9 / Sony a9 ES vs EFCS reset details

Sony a9 ES vs EFCS reset details

June 6, 2017 JimK 4 Comments

This is the 14th in a series of posts on the Sony a9. The series starts here.

In this post, I reported on the details of the Sony a9 electronic shutter (ES) read operations, and found that the columns were read in groups of 12, both in single shot and continuous modes. Today I’d like to look at the other side of the electronic shutter operation, the reset signal that effectively opens the virtual shutter. I’ll throw in the electronic first curtain shutter (EFCS) for comparison.

I’m refining my presentation of this data, and I’ve decided it’s cleaner to look at the raw planes one at a time rather than look at a demosaiced image. I’m going to show you one of the green raw planes in this post. I’ve colored the presentation to retain the green look of the scope trace. One thing to remember is, since we’re looking at only one raw plane, that these are 6 MP images, 2000×3000 pixels.

Here’s the whole frame for an capture with the ES set to 1/8000 second.

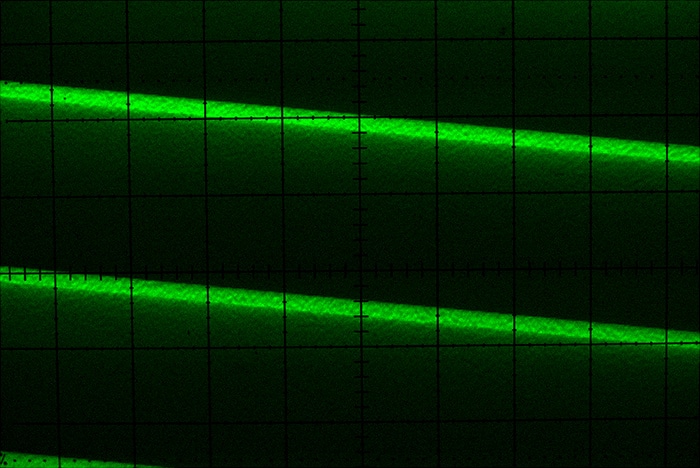
For comparison, here’s the entire image for the EFCS at the same shutter speed:

The slope is greater and the band is wider because the mechanical shutter on the a9 is about twice as fast as the electronic one. 

The reset edge of the traces are the earlier, or leftmost ones.

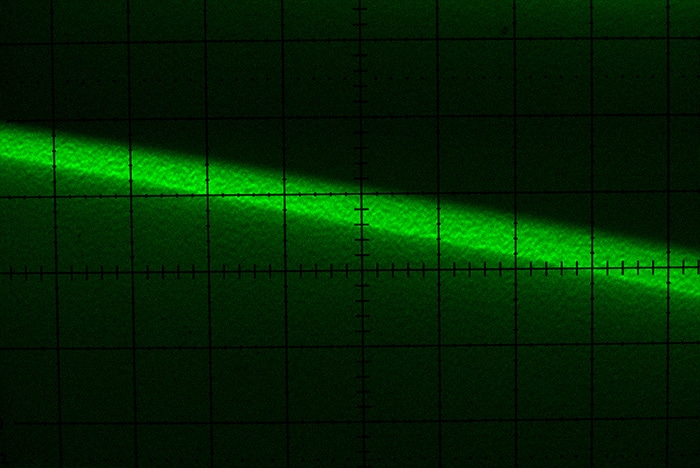
Here’s a closeup of the rest edge of the ES image:

It’s a bit hard to see because of the phosphor persistence, but the reset appears to take place in groups of 6 rows. Since we’re just looking at one raw plane, that would mean that the rest is occurring in groups of 12 rows on the entire sensor. 

Here’s the leading edge of the EFCS trace:

There is no banding, indicating that the reset is proceeding one row at a time. That’s the right way to do things, since the exposure will be ended by the mechanical shutter curtain, which moves steadily.

For completeness, we’ll look at the read operations. First with the ES:

And with the mechanical shutter:

Does the a7RII read multiple rows simultaneously in Silent Shutter mode? No, it does not:

1/8000 second


1/1000 second


a9, The Last Word

← Horshack on a9 read noise anomalies Sweep panos with the Sony a9 →

Comments

  1. HF says

    June 6, 2017 at 11:08 am

    Great. So resorting to EFCS in case silent shutter or large fps are not needed gives you no banding and even (B. Claff) minimally higher DR.

    Reply
    • JimK says

      June 6, 2017 at 11:59 am

      No, because although the reset is continuous, I’m almost certain that the readout isn’t (No smoking gun because the readout happens in EFCS after the mechanical curtain is closed). And the way I measure EDR, ES in single shot mode gets you the highest at base ISO.

      Reply
      • HF says

        June 7, 2017 at 5:56 am

        So this would influence B. Claffs results, would they? He relies on images by people like you. If he used images for the ES curve based on AF-S or AF-C or mixed, should make a difference then. His non ES results show higher DR according to his site. I thought these to be mechanical shutter or EFCS.

        Reply
        • JimK says

          June 7, 2017 at 7:55 am

          I supply images to Bill. He uses completely different methodology, and you might expect our results to differ. Bill shows the RN of the a9 at base ISO on his site as 12.042 electrons. In this post:

          http://blog.kasson.com/the-last-word/sony-a9-multiple-acd-operations/

          I measured about 13 electrons for ES single shot.

          I don’t consider that difference material if Bill’s posted numbers are for ES SS. It’s not clear from his site exactly the mode he used for the input-referred RN data.

          By the way, I have seen no evidence that AF mode affects read noise. Drive mode does, though.

          Reply

Leave a Reply Cancel reply

Your email address will not be published. Required fields are marked *

May 2025
S M T W T F S
 123
45678910
11121314151617
18192021222324
25262728293031
« Apr    

Articles

  • About
    • Patents and papers about color
    • Who am I?
  • How to…
    • Backing up photographic images
    • How to change email providers
    • How to shoot slanted edge images for me
  • Lens screening testing
    • Equipment and Software
    • Examples
      • Bad and OK 200-600 at 600
      • Excellent 180-400 zoom
      • Fair 14-30mm zoom
      • Good 100-200 mm MF zoom
      • Good 100-400 zoom
      • Good 100mm lens on P1 P45+
      • Good 120mm MF lens
      • Good 18mm FF lens
      • Good 24-105 mm FF lens
      • Good 24-70 FF zoom
      • Good 35 mm FF lens
      • Good 35-70 MF lens
      • Good 60 mm lens on IQ3-100
      • Good 63 mm MF lens
      • Good 65 mm FF lens
      • Good 85 mm FF lens
      • Good and bad 25mm FF lenses
      • Good zoom at 24 mm
      • Marginal 18mm lens
      • Marginal 35mm FF lens
      • Mildly problematic 55 mm FF lens
      • OK 16-35mm zoom
      • OK 60mm lens on P1 P45+
      • OK Sony 600mm f/4
      • Pretty good 16-35 FF zoom
      • Pretty good 90mm FF lens
      • Problematic 400 mm FF lens
      • Tilted 20 mm f/1.8 FF lens
      • Tilted 30 mm MF lens
      • Tilted 50 mm FF lens
      • Two 15mm FF lenses
    • Found a problem – now what?
    • Goals for this test
    • Minimum target distances
      • MFT
      • APS-C
      • Full frame
      • Small medium format
    • Printable Siemens Star targets
    • Target size on sensor
      • MFT
      • APS-C
      • Full frame
      • Small medium format
    • Test instructions — postproduction
    • Test instructions — reading the images
    • Test instructions – capture
    • Theory of the test
    • What’s wrong with conventional lens screening?
  • Previsualization heresy
  • Privacy Policy
  • Recommended photographic web sites
  • Using in-camera histograms for ETTR
    • Acknowledgments
    • Why ETTR?
    • Normal in-camera histograms
    • Image processing for in-camera histograms
    • Making the in-camera histogram closely represent the raw histogram
    • Shortcuts to UniWB
    • Preparing for monitor-based UniWB
    • A one-step UniWB procedure
    • The math behind the one-step method
    • Iteration using Newton’s Method

Category List

Recent Comments

  • JimK on Goldilocks and the three flashes
  • DC Wedding Photographer on Goldilocks and the three flashes
  • Wedding Photographer in DC on The 16-Bit Fallacy: Why More Isn’t Always Better in Medium Format Cameras
  • JimK on Fujifilm GFX 100S II precision
  • Renjie Zhu on Fujifilm GFX 100S II precision
  • JimK on Fuji 20-35/4 landscape field curvature at 23mm vs 23/4 GF
  • Ivo de Man on Fuji 20-35/4 landscape field curvature at 23mm vs 23/4 GF
  • JimK on Fuji 20-35/4 landscape field curvature at 23mm vs 23/4 GF
  • JimK on Fuji 20-35/4 landscape field curvature at 23mm vs 23/4 GF
  • Ivo de Man on Fuji 20-35/4 landscape field curvature at 23mm vs 23/4 GF

Archives

Copyright © 2025 · Daily Dish Pro On Genesis Framework · WordPress · Log in

Unless otherwise noted, all images copyright Jim Kasson.