• site home
  • blog home
  • galleries
  • contact
  • underwater
  • the bleeding edge

the last word

Photography meets digital computer technology. Photography wins -- most of the time.

You are here: Home / a9 / Sweep panos with the Sony a9

Sweep panos with the Sony a9

June 6, 2017 JimK 1 Comment

This is the 15th in a series of posts on the Sony a9. The series starts here.

Unlike the Sony a7x cameras, the a9 has no built-in sweep panorama mode. Good riddance, say I. 

Not because I don’t like sweep panos. I like them a lot. But because the Sony process-the-pano-in-the camera scheme produced low-res JPEG-only panos that were full of artifacts, and couldn’t be easily fixed up in post. 

For those of you who overlooked the brain-dead a7x feature and haven’t used the sweep pano mode on an iPhone, here’s the deal. In a regular panorama, you hold the camera still while making each exposure, sometimes going to great lengths to make sure the camera is rotated about the right place inside the lens. With a sweep pano, you wave the camera around while it’s snapping off exposures, and count on a high shutter speed to keep the blur in each shot down to a tolerable level, so the picture looks sharp when it’s stitched. 

One of the disadvantages of regular panoramas is that they don’t work well if the subject is moving around. That makes the stitching dodgy. The great advantage of a sweep pano is that it can tolerate some subject motion, since all the pictures are taken at about the same time. Think of it as a focal-plane shutter with a really strange curtain.

I figured the 20 fps capture ability of the a9 would make it a fantastic sweep pano camera. I did a quick proof of concept test. I put a Loxia 31/2.8 on the camera, set the ISO to 1000, the f-stop to f/5.6, the shutter speed to 1/8000 second, the drive mode to CH, held the camera in portrait orientation, and swept it from left to right for about a second. The camera made 22 exposures. I brought the images into Lightroom, and used the built-in, quite unsophisticated, stitching software to assemble a 16000×6000 pixel pano. I put a black border around it in Photoshop, and I’ll show it to you uncropped so you can see the edges of the captures:

If you zoom into this at 1:2,  it is sharp, sharp, sharp. Lightroom had not trouble stitching it. Of course, there was little if any movement in this scene, but The speed of the capture was fast enough that it would have tolerated quite a lot. 

I next held the camera in landscape orientation, and made a three-column set of captures: 33 images in about a second and a half. The resultant stitch was 11,500×7500 pixels before the border was added. here’s what it looks like with a border:

This one stitched just fine, too, even though Lr is far from the sharpest knife in the drawer for stitchery. 

A close look at 200% magnification:


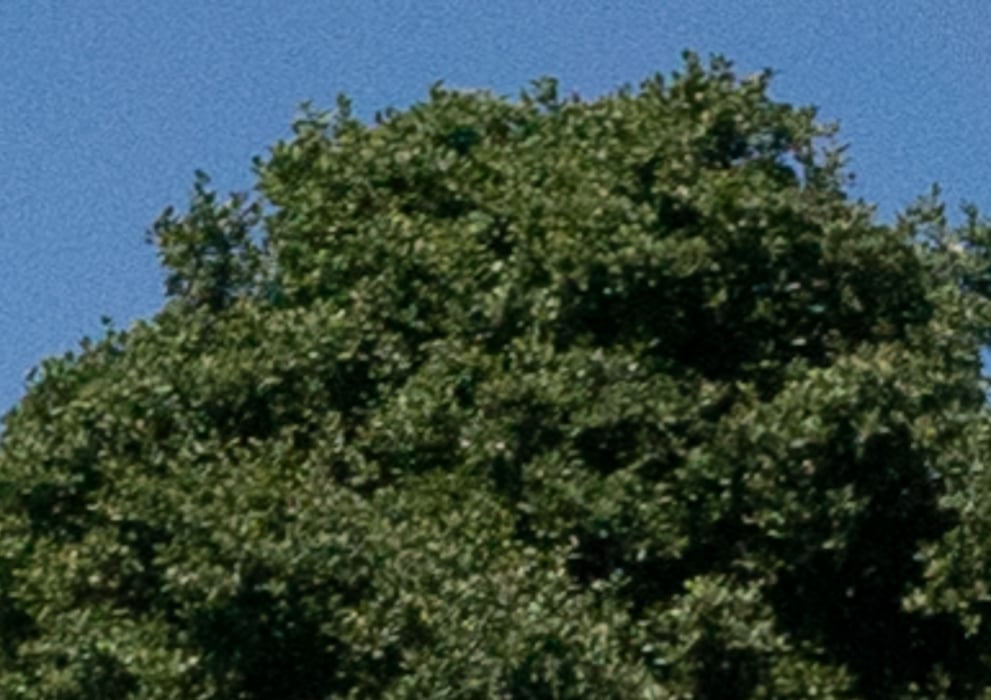
That’s with the Lr default noise reduction, which is not quite enough at ISO 1000. I have no doubt that I could have gotten away with a slower shutter speed than 1/8000. That means I could have probably used a lower ISO. There’s a tradeoff between speed of capture, lens focal length, and IOS setting that needs some experimentation to work out. One thing to remember is that panos are usually res’ed down to print, and that will get rid of a lot of the noise that you see in the sky above.

But it’s clear that the a9 makes the sweep pano envelop much larger than it ever has been.

a9, The Last Word

← Sony a9 ES vs EFCS reset details Instrumenting the Sony a9 battery draw →

Trackbacks

  1. Sony a9 Weekend Roundup and Some Impressions | Sony Addict says:
    June 10, 2017 at 11:45 am

    […] The Last Word – Sweep panos with the Sony a9 […]

    Reply

Leave a Reply Cancel reply

Your email address will not be published. Required fields are marked *

May 2025
S M T W T F S
 123
45678910
11121314151617
18192021222324
25262728293031
« Apr    

Articles

  • About
    • Patents and papers about color
    • Who am I?
  • How to…
    • Backing up photographic images
    • How to change email providers
    • How to shoot slanted edge images for me
  • Lens screening testing
    • Equipment and Software
    • Examples
      • Bad and OK 200-600 at 600
      • Excellent 180-400 zoom
      • Fair 14-30mm zoom
      • Good 100-200 mm MF zoom
      • Good 100-400 zoom
      • Good 100mm lens on P1 P45+
      • Good 120mm MF lens
      • Good 18mm FF lens
      • Good 24-105 mm FF lens
      • Good 24-70 FF zoom
      • Good 35 mm FF lens
      • Good 35-70 MF lens
      • Good 60 mm lens on IQ3-100
      • Good 63 mm MF lens
      • Good 65 mm FF lens
      • Good 85 mm FF lens
      • Good and bad 25mm FF lenses
      • Good zoom at 24 mm
      • Marginal 18mm lens
      • Marginal 35mm FF lens
      • Mildly problematic 55 mm FF lens
      • OK 16-35mm zoom
      • OK 60mm lens on P1 P45+
      • OK Sony 600mm f/4
      • Pretty good 16-35 FF zoom
      • Pretty good 90mm FF lens
      • Problematic 400 mm FF lens
      • Tilted 20 mm f/1.8 FF lens
      • Tilted 30 mm MF lens
      • Tilted 50 mm FF lens
      • Two 15mm FF lenses
    • Found a problem – now what?
    • Goals for this test
    • Minimum target distances
      • MFT
      • APS-C
      • Full frame
      • Small medium format
    • Printable Siemens Star targets
    • Target size on sensor
      • MFT
      • APS-C
      • Full frame
      • Small medium format
    • Test instructions — postproduction
    • Test instructions — reading the images
    • Test instructions – capture
    • Theory of the test
    • What’s wrong with conventional lens screening?
  • Previsualization heresy
  • Privacy Policy
  • Recommended photographic web sites
  • Using in-camera histograms for ETTR
    • Acknowledgments
    • Why ETTR?
    • Normal in-camera histograms
    • Image processing for in-camera histograms
    • Making the in-camera histogram closely represent the raw histogram
    • Shortcuts to UniWB
    • Preparing for monitor-based UniWB
    • A one-step UniWB procedure
    • The math behind the one-step method
    • Iteration using Newton’s Method

Category List

Recent Comments

  • JimK on Goldilocks and the three flashes
  • DC Wedding Photographer on Goldilocks and the three flashes
  • Wedding Photographer in DC on The 16-Bit Fallacy: Why More Isn’t Always Better in Medium Format Cameras
  • JimK on Fujifilm GFX 100S II precision
  • Renjie Zhu on Fujifilm GFX 100S II precision
  • JimK on Fuji 20-35/4 landscape field curvature at 23mm vs 23/4 GF
  • Ivo de Man on Fuji 20-35/4 landscape field curvature at 23mm vs 23/4 GF
  • JimK on Fuji 20-35/4 landscape field curvature at 23mm vs 23/4 GF
  • JimK on Fuji 20-35/4 landscape field curvature at 23mm vs 23/4 GF
  • Ivo de Man on Fuji 20-35/4 landscape field curvature at 23mm vs 23/4 GF

Archives

Copyright © 2025 · Daily Dish Pro On Genesis Framework · WordPress · Log in

Unless otherwise noted, all images copyright Jim Kasson.