The Sony alpha 7S is capable of 4K video (aka 2160p, aka 2160×3840) at a bit under 30 frames per second, which I will round to 30 fps. I thought I’d use that camera to do some slit scan photography. Actually, that’s why I bought it a year ago, but it’s taken me a while to get around to it.
What is slit scan photography? It’s a way to make pictures with distance along one axis (say up and down) and time along the other (say left to right). You’ve seen slit scan photographs if you’ve watched horse races or big time track and field meets on TV, even though you may not have known it. The finish line camera at those races are slit scan cameras, with time as the horizontal axis.
In the film era, slit scan cameras operated as follows. A mask with a think vertical slit was inserted between the lens and the focal plane, as close to the film as possible. The shutter was opened, and a motor drove the film at a constant speed until the event to be filmed was over. The shutter was then closed, and the strip of film developed.
I’ve been doing slit scan photography for several years with a Betterlight Super 6K scanning back in a Linhof Technika. You can see some images made with that setup here.
The normal mode of operation of the Betterlight back is for the linear sensor slit (actually three linear sensors, one for each color plane) to move under the control of a motor in the back from one side of the projected image to the other, making a normal photograph by assembling the one-pixel-wide images together the same way a desktop flat-bed scanner does. The camera does have a mode for making panoramas. In that mode it expects to be mounted on a rotating platform, and it positions the slit in the middle of the frame and sends commands to the platform to rotate.
When I use the Betterlight back to make slit scan photographs, I lie to the software. I tell it it’s on a rotating platform, but in reality it’s mounted to a tripod in the normal manner. The software has never caught on to my prevarication. It is happy to create slit scan images, even though it doesn’t know it is doing so.
There are some problems with the Betterlight setup. It is bulky, and only operates tethered to a computer. It takes a long time to set up. It can’t be operated handheld. It is subject to false color if the subject motion is rapid.
Seeking to solve some of those problems — actually, all of them — I decided to see if I could write a computer program to turn images from a video into slit scans, by extracting a one-pixel wide selection from each frame and assembling them together.
Thus the a7S.
The first problem is that the camera can make 4K videos, but it can’t store them internally. For that you need an external recorder. Last fall, the Atomos Shogun began shipping, and I bought one. The Shogun is both a recorder and a monitor. It takes video from the HDMI output of the camera and records it on 2.5 inch solid state disks (SSDs).
It took me a while to make friends with it, but we’re now doing fairly well. The biggest problem was attaching the camera and recorder together so they could be used in the field. I bought camera cages from several manufacturers. Most of then were useless to me, and several didn’t really fit the camera well, although they said they would. Finally the Movcam cage worked. I got little bits and pieces of hardware so that I could attach the recorder to the cage, and mount if on a tripod if I wanted to. It all works well if the camera is in the usual landscape orientation. However, most of the time I want the camera in the portrait position, so the synthetic slit can simultaneously be vertical and 3840 pixels long. I still don’t have a good answer for that.
I hooked the camera up and made a short 4K video. I transferred it to a desktop computer by pulling the SSD outof the recorder and putting it in a USB drive bay. Then I wrote a little Matlab program to read it in and show it in a window. It didn’t work. Turns out the Atomos puts out the video in ProRes format, which Matlab can’t read — or, more properly, Matlab on my computer can’t read it. Matlab depends on OS resources for decoding video.
I downloaded Adobe Premiere CC dragged and dropped the movie file onto it, and was pleased to see that it could recognize the format. I exported the movie as JPEGs, read the JPEGS into Matlab, and assembled them into a single slit scan image.
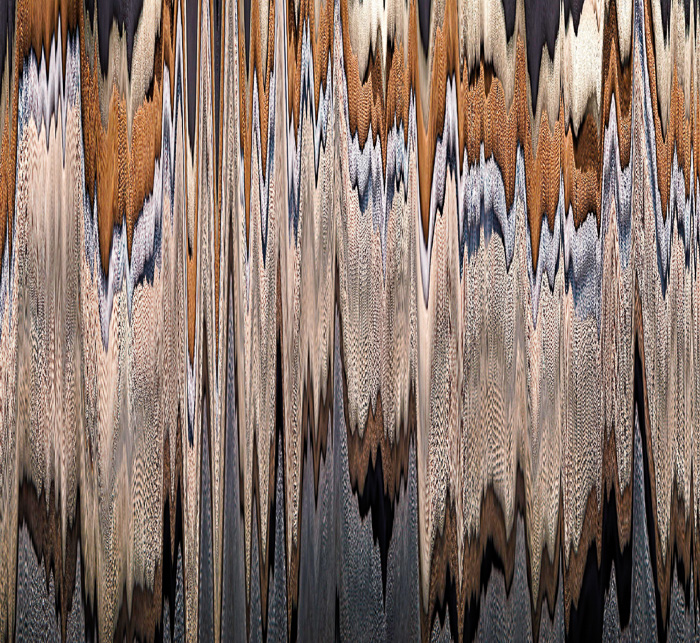
Then I walked around the house scanning things at random.
A few examples:


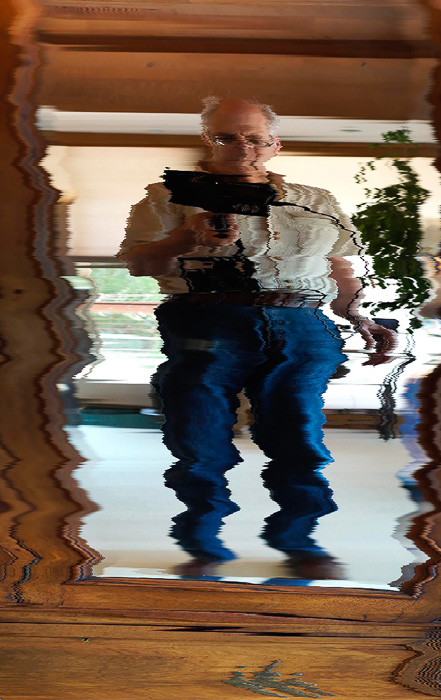
Here’s a self-portrait showing what the rig looks like:
Looking forward to your pictures with the new setup!
Here’s an interesting related technique as applied to moving images: https://vimeo.com/7878518