• site home
  • blog home
  • galleries
  • contact
  • underwater
  • the bleeding edge

the last word

Photography meets digital computer technology. Photography wins -- most of the time.

You are here: Home / The Last Word / 135 Telyt on M240, 135 APO-Sonnar on Sony a7

135 Telyt on M240, 135 APO-Sonnar on Sony a7

February 24, 2014 JimK 6 Comments

Looking for bargain camera/lens combinations that can produce great image quality is fun.  How about the Carl Zeiss 135mm f/2 APO-Sonnar ZF.2 on the a7 with the Novoflex adapter? Can it compare to the much more expensive (three times as much !) combination of the 135mm f/3.4 Leica APO-Telyt on the M240?

Here is the now-familiar scene (shown with the a7):

_DSC1794

Mounting such a heavy lens on the diminutive a7 safely was a challenge. Here’s how I handled it:

L1004571

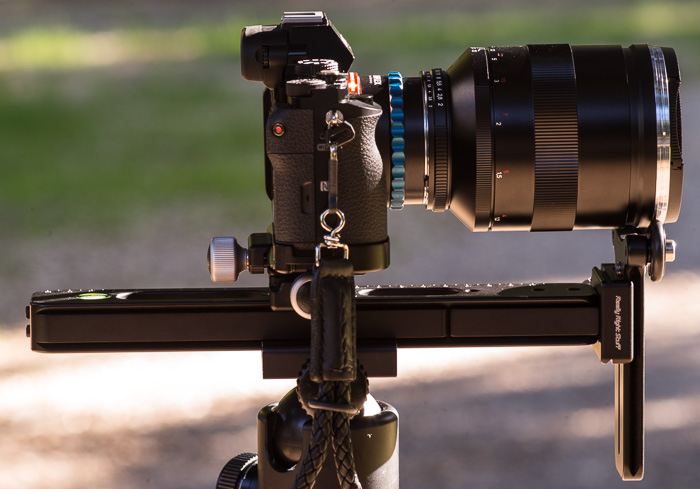
I mounted the cameras to a Gitzo GT3541XLS tripod, with a Arca-Swiss ball head and a RRS L-plate on the M240. I focused both cameras wide open. I set the Zeiss 135 to f/2, and the shutter to 1/8000, made an exposure using the 2-second self-timer delay, stopped down the camera one stop and slowed the shutter one stop and made another, continuing until I got to f/16 and 1/125. Then I turned off live view (to eliminate shutter wind shock) and did the same thing with the Leica, omitting the f/2 and f/2.8 exposures because the APO-Telyt doesn’t open up that far.

I “developed” the images in Lightroom with default settings except for selecting daylight white balance. I exported them all to Photoshop as layers, labeled the layers by camera and f-stop, and made a crop with the centers aligned and one with the upper left corner aligned.

The Leica sensor is somewhat less sensitive than the Sony’s when set to the same ISO. I corrected for that in post this time, giving a 1/3 stop Exposure boost to the Leica images and a 1/3 stop Exposure pull to the Sony ones. The color balance of the two sensors, as interpreted by Lr, is also different, with the a7 appearing greener. I left that alone this time.

I enlarged the crops that you’re seeing here by a factor of two using nearest neighbor, so that each pixel in the original images becomes a square of four identical pixels. I did that so that the pixel structure would survive the JPEG DCT compression that I must use for the web.

There is pronounced light falloff towards the corners with the Zeiss lens wide open. At f/2.8, there’s still noticeable darkening there.

However, even wide open, the center is crisp and nicely modeled:

zeiss f2

f/4 is about the same with the Zeiss:

zeiss f4

But that stop with the Leica lens, while almost as sharp, doesn’t have the close to the same micro-contrast:

leica f4

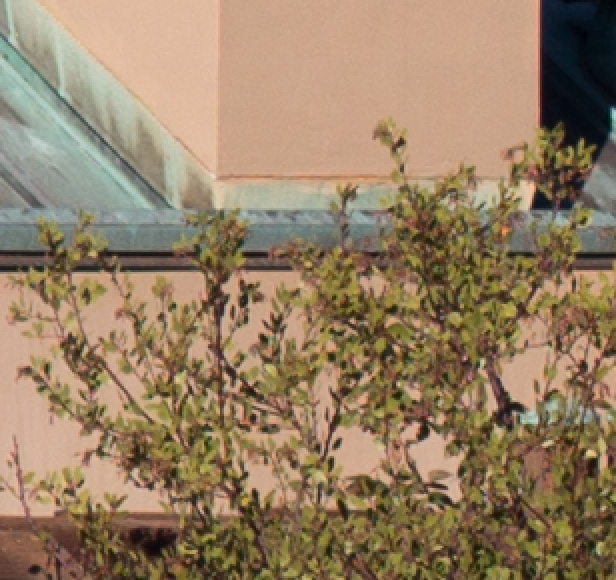
f/5.6 through f/11 is about the same on the Zeiss lens, indicating that it’s got a lot more resolving power than the a7’s sensor. f/16 is getting a little soft.

The Leica crisps up nicely at f/5.6, but still doesn’t have the snap that the Zeiss lens delivers:

leica f56

F/8 is about the same with the Leica, f/11 is softer, and f/16 fuzzier yet. It’s interesting that f/16 with the Zeiss lens is a bit sharper than f/16 with the Leica lens, although diffraction is affecting both.

When the Zeiss is used at f/2, the upper left corner is dark from the falloff, but still commendably sharp:

tree zeiss 2

At f/4 the Zeiss has brightened up considerably, and maybe picked up a little sharpness:

tree zeiss 4

At f/4 the Leica lens is soft by comparison, but it’s still sharp enough to show a little false color aliasing in one of the branches:

tree leica f4

At f/5.6 the Leica is crisping up:

tree leica 56

But the Zeiss still has more micro contrast:

tree zeiss 56

The Zeiss lens continues to outperform the Leica one at f/8, and they start to loose punch a bit at f/11, but at f/16, the Sonnar:

tree zeiss 16

is still doing better than the APO-Telyt:

tree leica 16

The Zeiss APO Sonnar costs slight more than half the APO-Telyt tariff, and it is a better performer. It’s actually an amazing performer, and it’s going to take a 50 or 60 megapixel full frame camera to find out how good it really is. However, it is big and heavy. The svelte 135mm Leica lens is a better fit for the a7 if you’re going to be hand holding most of the time.

The Last Word

← Leica 90 ‘cron on M240, Zeiss 100 Makro on a7 Max in-camera ISO for the Sony a7 →

Comments

  1. Jerry says

    July 15, 2014 at 7:38 pm

    Thanks so much for this review! It made a difference for me.

    Do you have a feeling as to how safe it is for me to order the ZE version? Can I safely assume that I’m as likely to enjoy the lens as if I bought the ZF.2? I’ll be using it on Sony Alpha A7/r/s cameras with a Metabones III or IV adapter.

    Reply
    • Jim says

      July 15, 2014 at 8:39 pm

      AFAIK, it’s the same lens in a slightly different mount. Lloyd Chambers says that, as well.

      So the answer is: yes!

      Good luck.

      Jim

      Reply
  2. David Panno says

    November 29, 2016 at 6:12 pm

    Hi Jim – Great review.

    Can you tell me the gear you have from RRS to support the 135? I am interested in the new Mivus version (for use on my Sony A7R II) and found your review in my travels.

    If you don’t remember the product(s) I can send your picture to RRS.

    Many thanks ! Dave Panno (DFPanno)

    Reply
    • JimK says

      June 2, 2018 at 7:43 am

      I should note that I no longer brace the Zeiss 135/2 on a7x cameras. The current versions have a lens mount that I consider strong enough to support the lens unassisted.

      Reply

Trackbacks

  1. Report: Zeiss Batis Apo Sonnar T* 135mm f2.8 - phillipreeve.net says:
    May 29, 2017 at 9:19 pm

    […] put me off. It’s small and light and mechanically superb. Stopped down it’s likely close to  the Batis (but perhaps lower in contrast). The first couple of apertures, while great, are not quite in the […]

    Reply
  2. Our E-mount Wishlist: Slower or Less Perfect Lenses - phillipreeve.net says:
    January 23, 2018 at 6:02 pm

    […] old design which is most notable in the lower contrast. Although it’s a good one, it’s not as good as the Apo Sonnar. A modern redesign, maybe even going to f4 to keep it compact, could be easily as good, while being […]

    Reply

Leave a Reply Cancel reply

Your email address will not be published. Required fields are marked *

May 2025
S M T W T F S
 123
45678910
11121314151617
18192021222324
25262728293031
« Apr    

Articles

  • About
    • Patents and papers about color
    • Who am I?
  • How to…
    • Backing up photographic images
    • How to change email providers
    • How to shoot slanted edge images for me
  • Lens screening testing
    • Equipment and Software
    • Examples
      • Bad and OK 200-600 at 600
      • Excellent 180-400 zoom
      • Fair 14-30mm zoom
      • Good 100-200 mm MF zoom
      • Good 100-400 zoom
      • Good 100mm lens on P1 P45+
      • Good 120mm MF lens
      • Good 18mm FF lens
      • Good 24-105 mm FF lens
      • Good 24-70 FF zoom
      • Good 35 mm FF lens
      • Good 35-70 MF lens
      • Good 60 mm lens on IQ3-100
      • Good 63 mm MF lens
      • Good 65 mm FF lens
      • Good 85 mm FF lens
      • Good and bad 25mm FF lenses
      • Good zoom at 24 mm
      • Marginal 18mm lens
      • Marginal 35mm FF lens
      • Mildly problematic 55 mm FF lens
      • OK 16-35mm zoom
      • OK 60mm lens on P1 P45+
      • OK Sony 600mm f/4
      • Pretty good 16-35 FF zoom
      • Pretty good 90mm FF lens
      • Problematic 400 mm FF lens
      • Tilted 20 mm f/1.8 FF lens
      • Tilted 30 mm MF lens
      • Tilted 50 mm FF lens
      • Two 15mm FF lenses
    • Found a problem – now what?
    • Goals for this test
    • Minimum target distances
      • MFT
      • APS-C
      • Full frame
      • Small medium format
    • Printable Siemens Star targets
    • Target size on sensor
      • MFT
      • APS-C
      • Full frame
      • Small medium format
    • Test instructions — postproduction
    • Test instructions — reading the images
    • Test instructions – capture
    • Theory of the test
    • What’s wrong with conventional lens screening?
  • Previsualization heresy
  • Privacy Policy
  • Recommended photographic web sites
  • Using in-camera histograms for ETTR
    • Acknowledgments
    • Why ETTR?
    • Normal in-camera histograms
    • Image processing for in-camera histograms
    • Making the in-camera histogram closely represent the raw histogram
    • Shortcuts to UniWB
    • Preparing for monitor-based UniWB
    • A one-step UniWB procedure
    • The math behind the one-step method
    • Iteration using Newton’s Method

Category List

Recent Comments

  • bob lozano on The 16-Bit Fallacy: Why More Isn’t Always Better in Medium Format Cameras
  • JimK on Goldilocks and the three flashes
  • DC Wedding Photographer on Goldilocks and the three flashes
  • Wedding Photographer in DC on The 16-Bit Fallacy: Why More Isn’t Always Better in Medium Format Cameras
  • JimK on Fujifilm GFX 100S II precision
  • Renjie Zhu on Fujifilm GFX 100S II precision
  • JimK on Fuji 20-35/4 landscape field curvature at 23mm vs 23/4 GF
  • Ivo de Man on Fuji 20-35/4 landscape field curvature at 23mm vs 23/4 GF
  • JimK on Fuji 20-35/4 landscape field curvature at 23mm vs 23/4 GF
  • JimK on Fuji 20-35/4 landscape field curvature at 23mm vs 23/4 GF

Archives

Copyright © 2025 · Daily Dish Pro On Genesis Framework · WordPress · Log in

Unless otherwise noted, all images copyright Jim Kasson.