I’ve had some interest in going back and looking at the Sony/Zeiss 55mm f/1.8 Sonnar (from now on called the Zony 55) on the Sony a7R. I am happy to oblige. I’ve changed the test regime a tiny bit. Rather than use a variable neutral density filter to adjust the light levels at the sensor so that I can use a constant f-stop and ISO setting across the range of shutter speeds, I’m using the variable output feature of the Fotodiox LED-200WA-56. The only downside is that the steps in brightness get fairly large when the lamp is dim, so that I can’t get 1/3 stop steps with long shutter speeds. That hasn’t been very useful anyway.
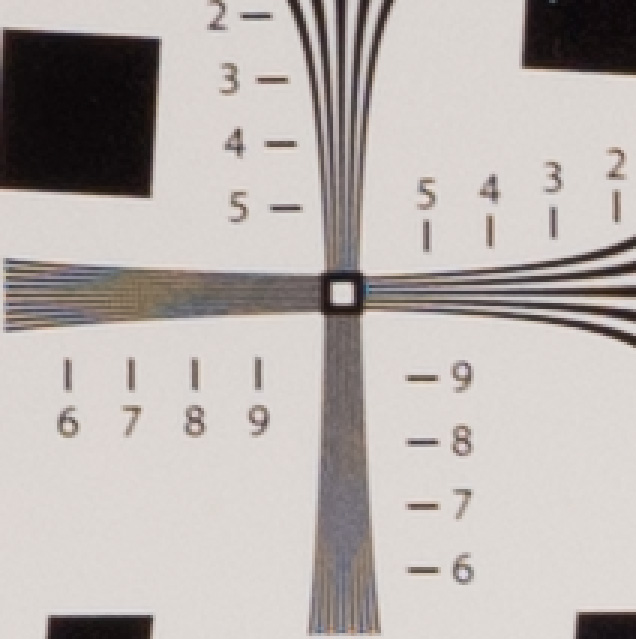
I set up this gear: Zony 55 on a Sony alpha 7R, RRS a7 L-bracket, Arca Swiss C1 Cube, RRS TVC-44 legs. Release was with the 2 second self-timer. ISO 100, lens set at f/5.6. ISO 12233 target with the camera at a distance to yield an active area 710 pixels high. Thus, the lines labeled “7” represent 1 line pair per pixel pair.
I focused manually, wide open using the a7R’s most magnified live view setting. I’ll say it one more time: the a7R’s live view is a joy to use, and the focus-by-wire capability of the Zony 55 provides for the most precise and accurate focusing I’ve experienced.
Target illumination for the continuous lighting images was provided by a single Fotodiox LED-200WA-56 lamp using the supplied reflector. Lighting for the strobe images came from a Paul Buff Einstein 640 watt-second flash set to 2.5 watt-seconds. At this power setting, the flash duration is about 1/13000 second. The camera was set to trailing curtain synch and the shutter to 3.2 seconds, allowing the camera to stabilize from the shock of the first curtain movement before the flash went off.
For the continuous-lighting pictures, the camera was set to 1/500 second with the Fotodiox at maximum output. An exposure was made. Then the shutter was set 1/3 stop slower, the light adjusted to give the same meter reading, and another exposure effected. That process was repeated all the way to a shutter speed of 1/5 second, with some gaps where the Fotodiox brightness steps were over 1/3 stop.
I processed the images in Lightroom with the default settings, corrected for (minor, as it turns out) exposure differences, and exported the files to Lightroom as layers. I labeled the layers with the exposure times and compared them. The images that I’m posting here are crops from the upper right-hand corner, enlarged 3x using nearest neighbor, and JPEG’d. Because of the way that Photoshop handles EXIF data from images composed of multiple layers, the EXIF data for the posted images is bogus. If anyone would like to see the Photoshop stack, please contact me.
The strobe image is the sharpest. Note the high contrast in the areas labeled with the 7, where there is one line pair per pixel pair. This is one sharp lens:

The 1/500 image is as sharp for the horizontal lines, but the vertical lines are slightly blurred:

1/400 is a little worse, but 1/320 is actually slightly better than 1/500. 1/250 is about the same as 1/500. 1/200 is about the same as 1/400.
At 1/160, things take a bad turn, and there’s degradation in the horizontal lines as well as the vertical ones:

Things remain about the same until 1/80, which is the worst performing shutter speed. Even at 1/80 there is enough contrast at the sensel pitch to cause false color artifacts:
As the shutter speeds get slower from 1/80, there is gradual improvement. It looks like this at 1/5.

Bottom line? Yes, there is shutter-shock degradation with the Sony 55 even on a sturdy set of carbon fiber legs and a good head. It’s not terrible, though. If the Zony weren’t such a sharp lens, it would be hard to see.
All these images were made in Landscape mode. In portrait orientation, things get quite a bit worse.
Excellent!
It looks like 1/80 – 1/160 sec. is good to avoid when the utmost sharpness is desired. Thank you for this work and many, many of the previous posts. Well done!