Warning: this post assumes at least a nodding familiarity with the Zone System, as described in Ansel Adams’ The Negative (do yourself a favor and get at least the 1981 edition), and in many other places.
I recently participated in a discussion about whether Ansel Adam’s Zone System applied to digital cameras. I said that, in AA’s formulation, it did not. As is often the case in such discussions, I came away with some analysis that I wanted to do.
The first — dubious, in my mind — claim to which I turned my attention was that one way to get the correct raw exposure in a digital camera was to meter an 18% gray object in the scene and place it on Zone V. Assuming that the meter is calibrated (probably using UniWB) so that an 18% reading produces a maximum raw value (with most lighting, in the two green channels) of 18% of full scale, here’s how the zones would map:
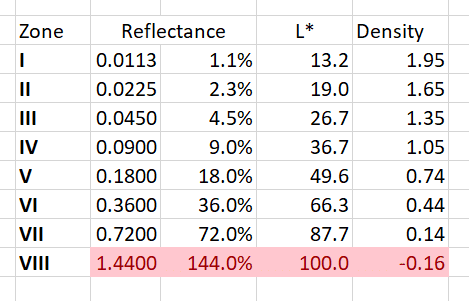
You can see that Zone VIII is well and truly blown.
I have read that modern exposure meters are adjusted to 12.5% reflectance, not 18%. This would be a departure from the Zone System already and would be calibrated out in the initial setup, but let’s see what happens in that case:
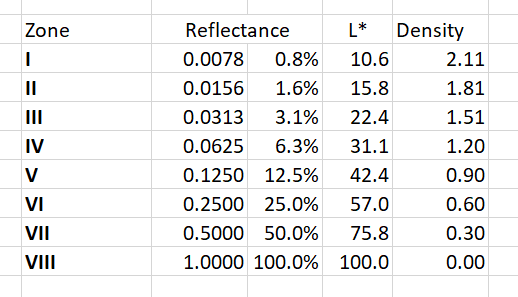
Well, we got Zone VIII back, but everything above that is still blown.
Why are Zones IX and X MIA? AA was counting on the “shoulder” portion of the H&D curve reducing contrast in the top two Zones (and figuring that the shoulder shape on all films was pretty much the same, which is a little iffy). There is no shoulder in a digital sensor; its response is virtually linear until clipping.
If we want Zone IX back, we’ve got to reduce exposure, and the chart looks like this:
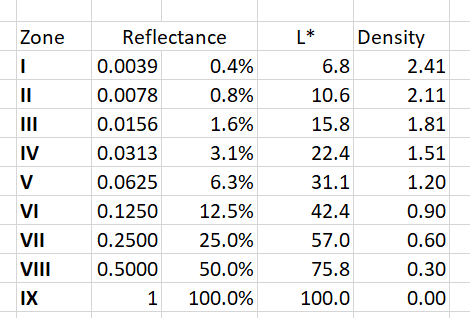
There are two concerns. First, Zone V has dropped to 6.3% reflectance, which is not what we photographers think of as middle gray. The second is that Zone I is only marginally printable — look at the density! It would not have been printable at all with the photographic papers of AA’s time. A digital camera, being linear, is more contrasty, especially in film’s toe and shoulder regions, than the photographic printing process envisioned by Adams.
If we want Zone X, and often we do, the table approaches ridiculousness.
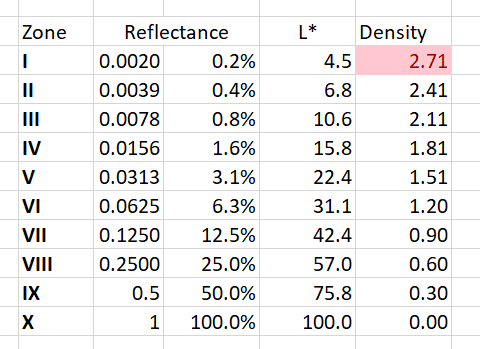
Zone V has sunk to 3% reflectance, and Zone I is unprintable. It is clear that we need to boost the shadows and introduce the shoulder in the development process. It turns out that Lightroom and ACR are very good at doing both those things. First, most (all?) of the Lr camera profiles include both a toe and a shoulder nonlinearity. Second, the positive settings of the Exposure control in Lr produce a shoulder-like nonlinearity that becomes more extreme as you increase the boost. Thus, a way to get Zone X in an image with a camera whose light meter is calibrated to 12.5% reflectance is to underexpose by two stops and push two stops using the Exposure control in Lr. If Zone IX were the highest value we cared about, we’d underexpose by one stop and push one stop in postproduction. Alternativly, we could place a 12.5% gray card on Zone V, expose normally, and get something like what would be in the Zone System N+2 development.
If your camera is calibrated to an 18% reflectance, then the best thing to do is set the Exposure Compensation to +1/3 stop and proceed as above.
If you are only moderately familiar with the Zone System, you may be asking yourself about the utility of recording light brighter than 100% reflectance. The 100% reflectance calibration assumes a matte subject with perfectly Lambertian reflectance. The higher light levels occur when the subject has some specularity or gloss to it. Water is a classic, and photographically-important example. Metals, glass, plastics, skin, stone and many paints are also often far from Lambertian. So we often need the headroom to accommodate those materials.
All of the above assumes that the camera is calibrated using UniWB, and that the UniWB hack works perfectly to predict raw file values. However, UniWB never achieved much penetration among digital camera users, and I think the number of users is waning today as cameras get more and more dynamic range, so it’s worthwhile looking at what happens with widely-used camera setups.
I took a Sony a7III, set the color space to Adobe RGB, the creative style to Standard, the white balance to AWB, the meter to spot, attached a Batis 135/2.8 lens, set the ISO to 100 and the aperture to f/16, and made exposures of a Wescott 1×2 foot LED panel set to full brightness behind a Wescott softbox. I used correlated color temperatures of 5500 and 3000 degrees Kelvin. The camera light meter gave the 5500-degree target 1/3 stop more exposure than the 3000-degree one.
Here’s what the raw averages of a 600×600 central region of interest look like with various placements of the target:
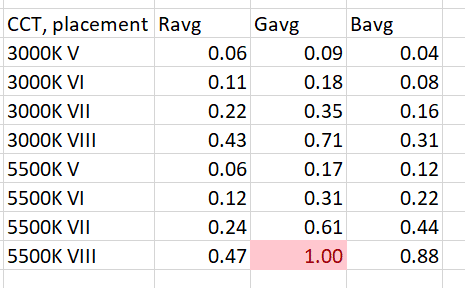
The above numbers are normalized to full scale, and the black point (512) has been subtracted.
With the warmer, 3000-degree setting, the Zone VIII placement is not clipped, but Zone IX will certainly be. In the 5500-degree case, clipping starts before Zone VIII placement.
Photon noise and photon response nonuniformity mean that we need to consider the tails of the probability density curves associated with each raw channel. Here’s what happens when we consider average (aka mu) plus three times the standard deviation (sigma).
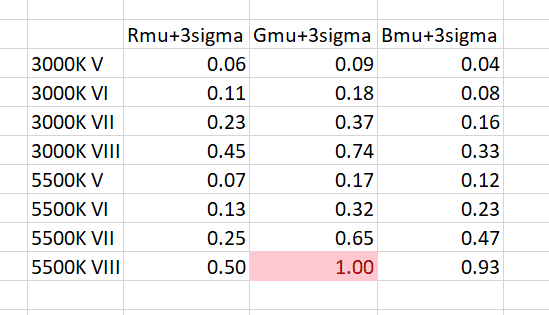
Clipping occurs slightly sooner, since we changed its definition.
Clearly, the sensor in the camera is not behaving at all like the film upon which the Zone System is based, and the Zone System rules are, in situations with bright important highlights, going to result in some really ugly files that will force Lightroom into digital guesswork in the form of highlight recovery.
It gets worse, but that will have to wait for another post.
I guess this is another reason to think in terms of exposing for the highlights, and relying on the DR of the camera to make the shadows printable.
I have recently been using the A7rIII’s highlight meter in conjunction with +2 stops exposure comensation to get some more photons.
The highlight metering looks for the brightest highlights and exposes them rather conservatively. The +2 compensation (or a little less) undoes that conservativeness and seems to pretty reliable give me exposures as high as possible without clipping.
Thanks to Fred Miranda for this method…
There are lots of ways of getting good exposures with digital cameras. In my opinion, AA’s Zone System is not one of them. His system was a codification of the old adage: “Expose for the shadows, develop for the highlights.” But if you had to sum up digital photography in a similarly pithy fashion, it would be “Expose for the highlights, develop for the shadows”. Of course, the word develop has different meanings in the two sentences.
Your statement: “in B&W negative film photography, you want to guard against underexposure, while in digital photography you want to avoid overexposure” sums it up nicely.
In my film days I used to do series of Zone System exposures of a gray card and then measure the densities of the negatives and plot the results for each and every one of my film developer combinations – all this mainly to make sure loss of shadow detail was minimized.
With digital cameras it is the other way round. I want to make sure there are no blown out highlights in my portraits. With my A7r2 that is easy; zebras and histograms are very helpful. As is the camera’s dynamic range and a good RAW converter/image editing program like Capture One.
I have enjoyed reading your discussion of the zone system and digital cameras. My testing to optimize digital capture has been limited to bracketing shots of hight contrast motives and reviewing the processed results against the background of the corresponding zebras and histograms. Now I know what zebras and histograms to look for in order to get the results I like. And I generally use a -1 exposure adjustment.
Great series, very helpful.
One tiny issue that is my pet peeve and probably no one else’s, but Kodak no longer tells you to shoot the gray card head on
Instead the instructions tell you to angle it vertically and horizontally 1/3 of the way between your subject and the light source.
From what I have been given to understand tilting it toward the light brings the card into harmony with the 12.5 percent expected by camera- and spot meters.
As one of your enthusiastic fans who has learned to spot meter the brightest important spot and add 2 EV (but often doesn’t understand your more technical explanations), can you explain what your investigations mean in practice for spot metering and the zone system? Many thanks for all you do!!
For me, it means forget the Zone System when you’re using digital cameras, except as a way to describe tones. Compared to the tools available on modern cameras, it’s crude and in accurate. That doesn’t mean that it wasn’t a great thing in the age of film, though. By the way, if you meter a highlight and open up two stops, you’re probably leaving something on the table (space to the right of the raw histogram). The people who I know who use this approach open up three stops.
Hi ,I am doing research about black and white film density, I wonder why the density is between 0.0 – 3.1? thank you