• site home
  • blog home
  • galleries
  • contact
  • underwater
  • the bleeding edge

the last word

Photography meets digital computer technology. Photography wins -- most of the time.

You are here: Home / X2D / Hasselblad XCD 38/2.5 on X2D 100C AF and MF accuracy

Hasselblad XCD 38/2.5 on X2D 100C AF and MF accuracy

September 28, 2022 JimK 1 Comment

This is the seventh in a series of posts on the Hasselblad X2D 100C camera and the XCD lenses. You will be able to find all the posts in this series by looking at the righthand column on this page and finding the Category “X2D”.

I ran a series of tests with my slanted edge target:
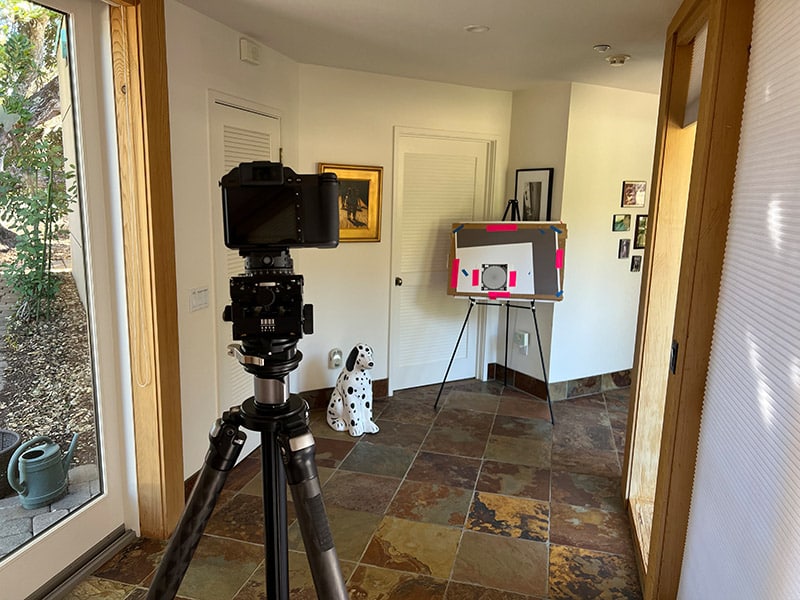
The setup:

  • X2D with 38 mm f/2.5 XCD lens
  • GFX 100S with 45 mm f/2.8 GF lens
  • RRS legs
  • Arca Swiss C1 head
  • Low contrast Siemens star for focusing and low contrast slanted edge target
  • Siemens star petitioned at the center of the image
  • F/2.8
  • Base ISO
  • Electronic shutter
  • 2-second self timer
  • 18 images per setup

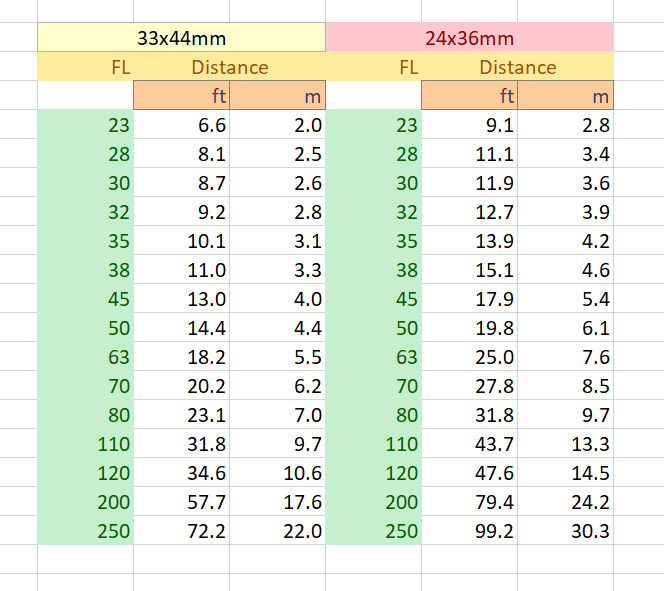
Camera distances as per this table:

For the GFX, I used manual focusing with maximum magnification and low sensitivity red peaking, and also AF-S with the next to smallest spot size. There is no peaking on the X2D, so I used magnified view for one run and Focus Indicator (aka the meatball) for another. I also did a run with the X2D an AF-S (there is no AF-C) and the small focusing area.

I analyzed the images with Imatest, and measured the MTF50 of both the vertical and horizontal edges. They weren’t the same, which I tentatively attribute to the way the target was printed. I averaged the horizontal and vertical edge results for the charts in this post.

Here are the results:

What I’ve plotted here is the average (mean) of the 18 shots for each test condition, and the average minus 2 standard deviations (aka sigmas). If the numbers had a normal distribution, 3 out of 100 shots would be worse than the average minus 2 sigma (in practice it’s a bit worse than that).

Using magnified focusing on the X2D produces much worse results than magnified focusing with peaking on the GFX. Using the Focus Indicator on the X2d produces better results than using magnified focusing on the same camera. Using automatic focusing on the X2D ties the GFX for the mean results, and beats the GFX for the mean minus two sigma results.

Using AF with the GFX doesn’t work as well as AF with the X2D. You’re better off with MF and peaking, if you can take the time.

Some caveats:

  • The Siemens star is pretty easy for most AF systems.
  • The Siemens star is too contrasty to work optimally with the GFX 100S peaking, even with the peaking set to low.
  • With a three dimensional subject, as opposed to the two-dimensional target I used, the AF system can focus on something other than you want it to focus on.

For now, I’m recommending using AF on the X2D rather than magnified manual focusing. When and if Hasselblad introduces peaking in a futture firmware release, I’ll do more testing.

X2D

← Hasselblad XCD 38/2.5 on X2D 100C, LaCA Otus 55/1.4 on X2D 100C, GFX 100S, MTF50 →

Comments

  1. Erik says

    October 28, 2022 at 1:16 am

    I was under the impression that the AF in the hassy doesn’t hit that well in real world application. This seems to say that with still and flat subjects, at least, it works very well.

    It is interesting to see the GFX MF tends to yield slightly better results. I like shooting with zoomed MF for landscapes.

    For people and auto-focus situations though, one thing that annoys me, is there is no way to make the focusing square smaller on the GFX 100s. Also, and equally annoying is, you have to go deep menu diving if, like me, you want to compose without the focus square present. The way Fuji only allows certain functionality to be assigned to certain buttons, seems like a poor design choice. Given the choice, I would love to be able to assign turning on/off the focus square to one my main buttons. I suppose I could set this up as a C1, C2 thing, but not ideal.

    Reply

Leave a Reply Cancel reply

Your email address will not be published. Required fields are marked *

May 2025
S M T W T F S
 123
45678910
11121314151617
18192021222324
25262728293031
« Apr    

Articles

  • About
    • Patents and papers about color
    • Who am I?
  • How to…
    • Backing up photographic images
    • How to change email providers
    • How to shoot slanted edge images for me
  • Lens screening testing
    • Equipment and Software
    • Examples
      • Bad and OK 200-600 at 600
      • Excellent 180-400 zoom
      • Fair 14-30mm zoom
      • Good 100-200 mm MF zoom
      • Good 100-400 zoom
      • Good 100mm lens on P1 P45+
      • Good 120mm MF lens
      • Good 18mm FF lens
      • Good 24-105 mm FF lens
      • Good 24-70 FF zoom
      • Good 35 mm FF lens
      • Good 35-70 MF lens
      • Good 60 mm lens on IQ3-100
      • Good 63 mm MF lens
      • Good 65 mm FF lens
      • Good 85 mm FF lens
      • Good and bad 25mm FF lenses
      • Good zoom at 24 mm
      • Marginal 18mm lens
      • Marginal 35mm FF lens
      • Mildly problematic 55 mm FF lens
      • OK 16-35mm zoom
      • OK 60mm lens on P1 P45+
      • OK Sony 600mm f/4
      • Pretty good 16-35 FF zoom
      • Pretty good 90mm FF lens
      • Problematic 400 mm FF lens
      • Tilted 20 mm f/1.8 FF lens
      • Tilted 30 mm MF lens
      • Tilted 50 mm FF lens
      • Two 15mm FF lenses
    • Found a problem – now what?
    • Goals for this test
    • Minimum target distances
      • MFT
      • APS-C
      • Full frame
      • Small medium format
    • Printable Siemens Star targets
    • Target size on sensor
      • MFT
      • APS-C
      • Full frame
      • Small medium format
    • Test instructions — postproduction
    • Test instructions — reading the images
    • Test instructions – capture
    • Theory of the test
    • What’s wrong with conventional lens screening?
  • Previsualization heresy
  • Privacy Policy
  • Recommended photographic web sites
  • Using in-camera histograms for ETTR
    • Acknowledgments
    • Why ETTR?
    • Normal in-camera histograms
    • Image processing for in-camera histograms
    • Making the in-camera histogram closely represent the raw histogram
    • Shortcuts to UniWB
    • Preparing for monitor-based UniWB
    • A one-step UniWB procedure
    • The math behind the one-step method
    • Iteration using Newton’s Method

Category List

Recent Comments

  • JimK on Goldilocks and the three flashes
  • DC Wedding Photographer on Goldilocks and the three flashes
  • Wedding Photographer in DC on The 16-Bit Fallacy: Why More Isn’t Always Better in Medium Format Cameras
  • JimK on Fujifilm GFX 100S II precision
  • Renjie Zhu on Fujifilm GFX 100S II precision
  • JimK on Fuji 20-35/4 landscape field curvature at 23mm vs 23/4 GF
  • Ivo de Man on Fuji 20-35/4 landscape field curvature at 23mm vs 23/4 GF
  • JimK on Fuji 20-35/4 landscape field curvature at 23mm vs 23/4 GF
  • JimK on Fuji 20-35/4 landscape field curvature at 23mm vs 23/4 GF
  • Ivo de Man on Fuji 20-35/4 landscape field curvature at 23mm vs 23/4 GF

Archives

Copyright © 2025 · Daily Dish Pro On Genesis Framework · WordPress · Log in

Unless otherwise noted, all images copyright Jim Kasson.