• site home
  • blog home
  • galleries
  • contact
  • underwater
  • the bleeding edge

the last word

Photography meets digital computer technology. Photography wins -- most of the time.

You are here: Home / X2D / Hasselblad XCD 38 mm f/2.5 distortion

Hasselblad XCD 38 mm f/2.5 distortion

October 2, 2022 JimK 1 Comment

This is the 15th in a series of posts on the Hasselblad X2D 100C camera and the XCD lenses. You will be able to find all the posts in this series by looking at the righthand column on this page and finding the Category “X2D”.

I decided to take a look at the distortion of the Hasselblad XCD 38 mm f/2.5 on the X2D. This being a thoroughly modern lens on an equally-modern camera, there are two kinds of distortion to consider. The first is the distortion the lens produces on the sensor, and the second is what you see after the distortion has been corrected automagically in your raw developer.

“Wait a minute!” I hear you saying, “If the distortion is corrected without my doing anything, how can we look at what it was before it was corrected?”

Good question.

The camera does not actually correct the distortion. It merely puts instructions in the metadata that tell the raw developer to correct the distortion. Some raw developers, like Lightroom (Lr) and Adobe Camera Raw, look at the metadata and silently perform the corrections. Then you never see what the lens is actually doing. But some raw developers either ignore the correction instructions entirely or allow the user to defeat them. I used RawDigger to evade the corrections — which Lightroom may or may not be performing for a lens this new.

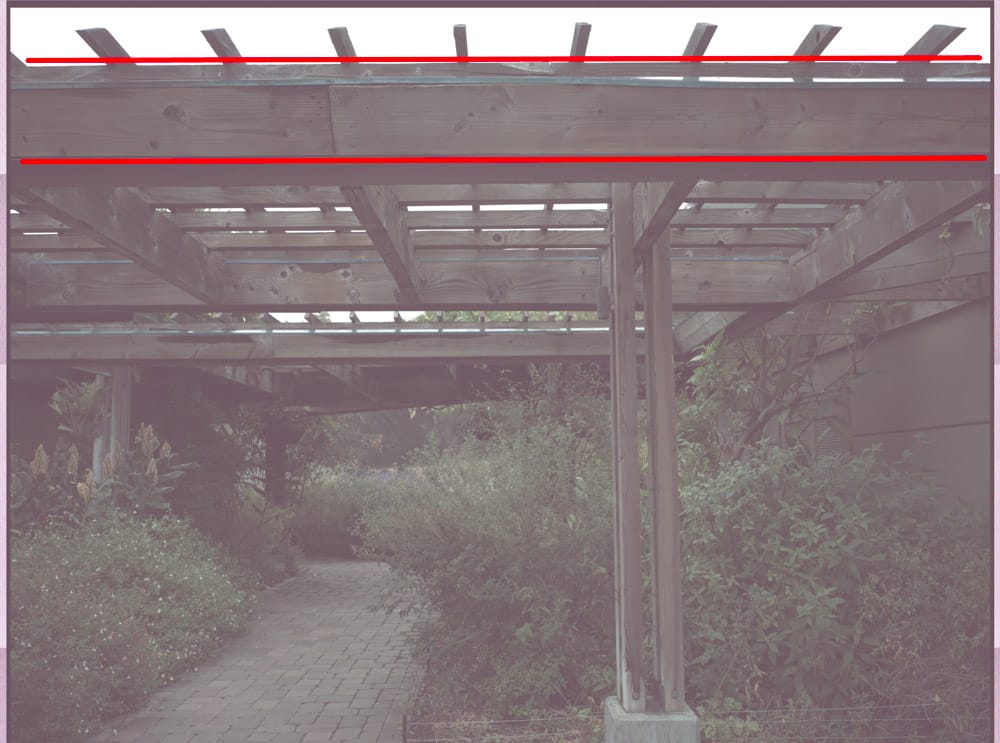
There is a tiny bit of pin cushion distortion.

Developed in Lightroom:

I looks like Lr isn’t performing any distortion corrections. But this lens really doesn’t need any such corrections, unless you’re fanatical about distortion.

I am surprised that this lens is so good uncorrected. Hasselblad was one of the first companies to embrace designing lenses to be smaller and simpler because they were meant to be used with software correction.

X2D

← Hasselblad XCD 38 mechanical shutter dynamics on X2D XCD 38 out of focus point spread functions at high shutter speed →

Comments

  1. Dennis Mecham says

    October 5, 2025 at 2:26 am

    I’ve found that using Phocus for RAW conversion creates a distortion free image. I’ve been in online discussions about issues other were having with their images from their Hasselblad cameras and lenses. Usually issues with color or vignetting. In every case the issues were resolved by using Phocus rather than any other program for the conversion. I only once tried to convert an image in Adobe RAW and the colors were not as good and highlight recovery was not as good as when I used Phocus.

    Reply

Leave a Reply Cancel reply

Your email address will not be published. Required fields are marked *

November 2025
S M T W T F S
 1
2345678
9101112131415
16171819202122
23242526272829
30  
« Oct    

Articles

  • About
    • Patents and papers about color
    • Who am I?
  • How to…
    • Backing up photographic images
    • How to change email providers
    • How to shoot slanted edge images for me
  • Lens screening testing
    • Equipment and Software
    • Examples
      • Bad and OK 200-600 at 600
      • Excellent 180-400 zoom
      • Fair 14-30mm zoom
      • Good 100-200 mm MF zoom
      • Good 100-400 zoom
      • Good 100mm lens on P1 P45+
      • Good 120mm MF lens
      • Good 18mm FF lens
      • Good 24-105 mm FF lens
      • Good 24-70 FF zoom
      • Good 35 mm FF lens
      • Good 35-70 MF lens
      • Good 60 mm lens on IQ3-100
      • Good 63 mm MF lens
      • Good 65 mm FF lens
      • Good 85 mm FF lens
      • Good and bad 25mm FF lenses
      • Good zoom at 24 mm
      • Marginal 18mm lens
      • Marginal 35mm FF lens
      • Mildly problematic 55 mm FF lens
      • OK 16-35mm zoom
      • OK 60mm lens on P1 P45+
      • OK Sony 600mm f/4
      • Pretty good 16-35 FF zoom
      • Pretty good 90mm FF lens
      • Problematic 400 mm FF lens
      • Tilted 20 mm f/1.8 FF lens
      • Tilted 30 mm MF lens
      • Tilted 50 mm FF lens
      • Two 15mm FF lenses
    • Found a problem – now what?
    • Goals for this test
    • Minimum target distances
      • MFT
      • APS-C
      • Full frame
      • Small medium format
    • Printable Siemens Star targets
    • Target size on sensor
      • MFT
      • APS-C
      • Full frame
      • Small medium format
    • Test instructions — postproduction
    • Test instructions — reading the images
    • Test instructions – capture
    • Theory of the test
    • What’s wrong with conventional lens screening?
  • Previsualization heresy
  • Privacy Policy
  • Recommended photographic web sites
  • Using in-camera histograms for ETTR
    • Acknowledgments
    • Why ETTR?
    • Normal in-camera histograms
    • Image processing for in-camera histograms
    • Making the in-camera histogram closely represent the raw histogram
    • Shortcuts to UniWB
    • Preparing for monitor-based UniWB
    • A one-step UniWB procedure
    • The math behind the one-step method
    • Iteration using Newton’s Method

Category List

Recent Comments

  • Pieter Kers on Using Curves adjustment layers in Photoshop
  • Paul R on Exposure metering
  • XUE on Dark Current in CMOS Sensors: Where It Comes From, and How Cooling Helps
  • Paul R on ISO setting for raw files
  • JimK on Pixel Response Non-Uniformity: Fixed Pattern Noise in the Light
  • Jared Bush on Pixel Response Non-Uniformity: Fixed Pattern Noise in the Light
  • JimK on Fujifilm GFX 100S pixel shift, visuals
  • Christopher Roberton on Fujifilm GFX 100S pixel shift, visuals
  • JimK on The 16-Bit Fallacy: Why More Isn’t Always Better in Medium Format Cameras
  • Colin Surprenant on Averaging captures, precision effects

Archives

Copyright © 2025 · Daily Dish Pro On Genesis Framework · WordPress · Log in

Unless otherwise noted, all images copyright Jim Kasson.