This is one in a series of posts on the Sony alpha 7 R Mark IV (aka a7RIV). You should be able to find all the posts about that camera in the Category List on the right sidebar, below the Articles widget. There’s a drop-down menu there that you can use to get to all the posts in this series; just look for “A7RIV”.
So far, I’ve tested the a7RIV IBIS using 85mm and 135 mm lenses, but both of those lenses were the Zeiss Batis optically stabilized ones. A legitimate question is “how long can the focal length of an unstabilized lens be before the IBIS travel in the a7RIV is too short to be effective?” Of course, the answer to that question depends heavily on how steady the photographer is, but I thought it was still worthy of some exploration. Using a Leica-R-to-E-mount adapter, I attached a Leica 180 mm f/3.4 Apo-Telyt R to an a7RIV, and aimed it at my IBIS test target.
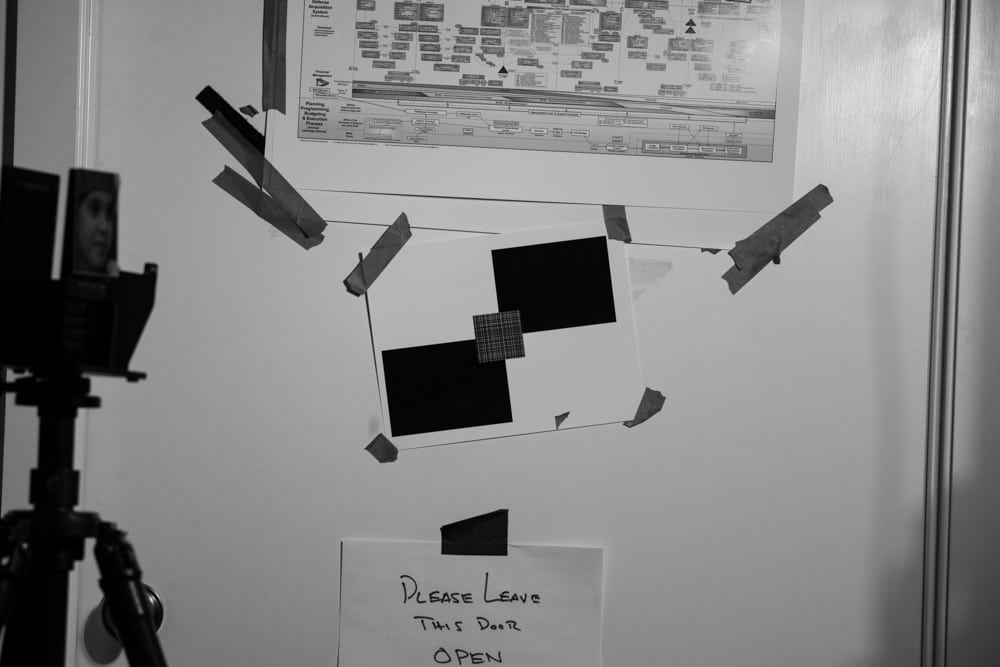
I sat on an armless rolling secretary’s chair for the captures. I held the camera in a modified Pete Turner grip: right hand on the camera grip, left palm on the bottom of the camera, and left fingers extended to just short of the focusing ring on the lens. Here’s what the camera saw:
I used the following test conditions:
- Manual focusing, once for the entire series
- Continuous low drive mode
- Electronic shutter
- Lossless compressed Raw
- ISO 400
- f/8
- Exposure mode A, center weighting
- Aputure 120d II LED, 12-inch parabolic reflector, remotely controlled
With IBIS on, I turned the light up all the way, which gave me a shutter speed of about 1/400 second. I made about 25 continuous-drive exposures, turned the light down about a stop, and did it again. I kept on doing that until the 1/25 second, then turned IBIS off and ran the series again.
I ended up with about 300 images. I developed them in Lightroom, with default settings except for the following:
- White balance set to flash
- Adobe monochrome profile
- Sharpening turned off
- Noise reduction turned off
Using my automatic registration program, I adjusted the cropping in Lightroom for each image so that they were centered. I computed the MTF50 — a proxy for sharpness — for all the images with Imatest with the region of interest being a horizontal edge (Just to make sure, I also looked at vertical edges, with about the same results, but those data aren’t presented here). Imatest spit out the data in cycles per pixel. With my new Matlab code, I converted that to cycles per picture height.
In analysing the images, I did something new. In addition to the mean and standard deviation computation on the whole data set, I performed those calculations on a data set from which the outliers had been removed. Here’s how I did that. For each shutter speed, I looked at the logarithm of the MTF50 values, computed the mean and standard deviation of the log values, and removed from the data set all points for which the distance to the log mean was two log sigmas or more. For this data set, it didn’t make much difference, but I’ve tried it on some of the data sets used in the previous posts, and it does provide smoother results. I’ve also added code to consolidate the shutter speeds a third of a stop apart, and use the weighted average of the shutter speeds thus consolidates as the shutter speed for the plot. This deals with the situation where the camera’s automatic exposure metering can’t decide what shutter speed to use.
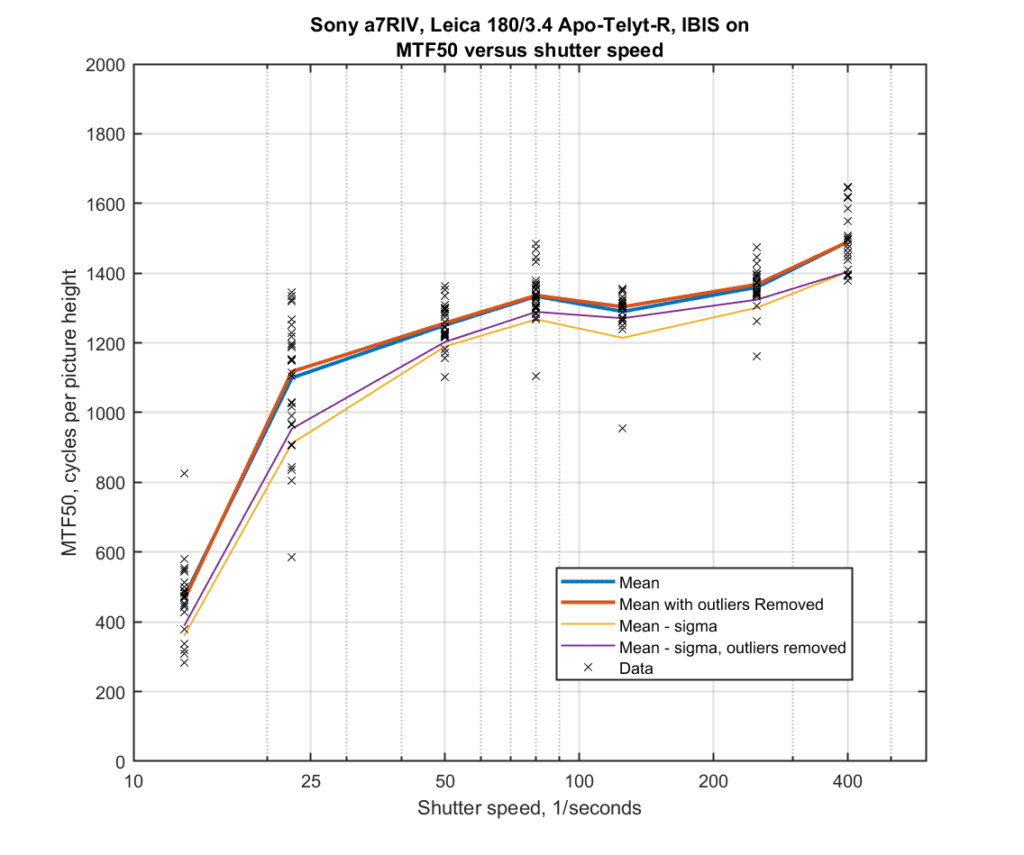
The vertical axis is the MTF50 in cycles per picture height. The horizontal axis is the denominator of the shutter speed — 1/100 second is plotted as 100. The heavy lines are the mean (aka mu, aka average) values. The thinner lines are the mean minus the standard deviation (aka sigma). The black x’s are the individual exposures.
WIth IBIS turned off:
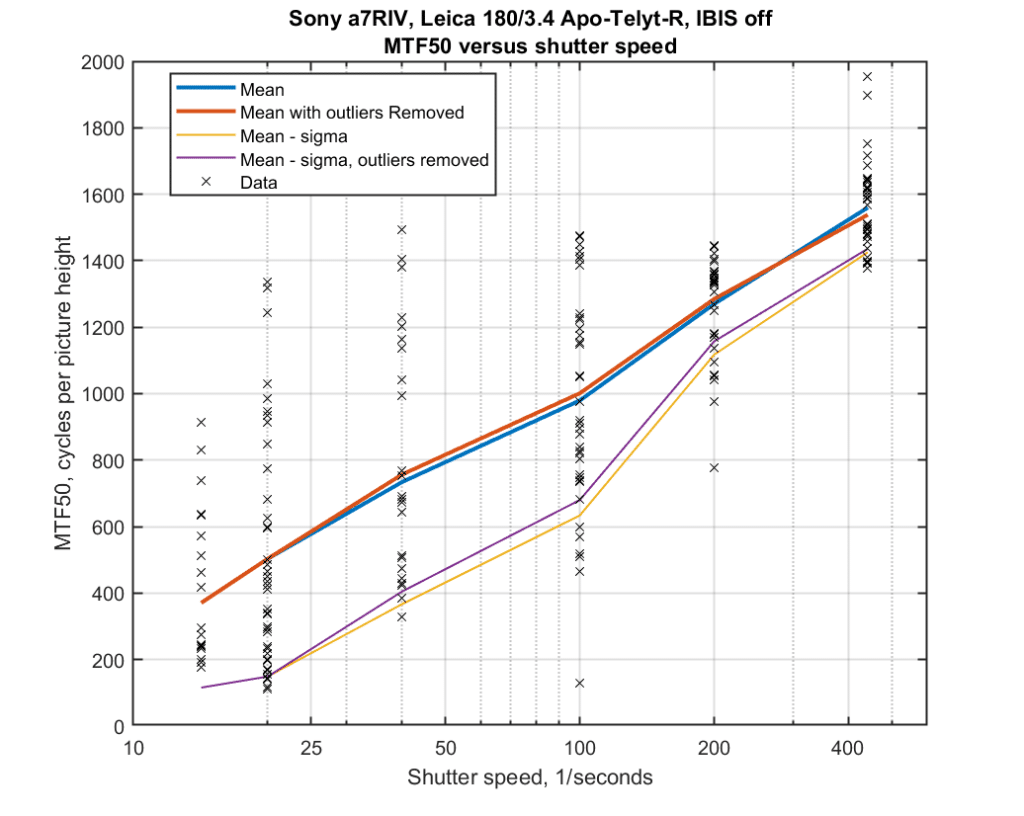
If you look at the data points for 1/40 and a/100 seconds, you’ll see that it is possible to get sharp shots at those speeds, but it isn’t likely. The scatter of the unstabilized series is a lot higher at 1/100 and slower.
Comparing the two sets of data to get an idea of what IBIS is doing for us:

There comes a time at 1/13 second, when IBIS isn’t helping. I think that’s because the sensor travel is to short to keep up with the necessary excursions, and the sensor is running into the stops.
I find it interesting, and (as a lover of IBIS) slightly alarming that the highest values recorded are unstabilized. Thom Hogan has talked about stabilization leading to small performance losses at higher shutter speeds–does IBIS gate the maximum performance?
By now I’m used to leaving it permanently on, a comforting presence in the EVF.
At those shutter speeds, probably a sampling issue.
To expand on what Jim wrote: the difference is 0.3Σ, here Σ is the sigma for his measurements. The sigma for “the expected difference” is (roughly speaking) Σ√2/√samples, so σ≈0.28Σ.
Conclusion: The observed difference is 1.07σ. Nothing to speak about.
Kind of off topic but I was watching Dustin Abbots video comparing the sensors of the A7RIII and IV. In his video the IV was softer than the III. Is there a problem with the IV?
No.
https://blog.kasson.com/a7riv/does-the-a7riii-resolve-better-than-the-a7riv/
https://blog.kasson.com/a7riv/sony-a7riii-vs-a7riv-resolution-part-2/