• site home
  • blog home
  • galleries
  • contact
  • underwater
  • the bleeding edge

the last word

Photography meets digital computer technology. Photography wins -- most of the time.

You are here: Home / GFX 100 / GFX 100 sharpening in Lightroom

GFX 100 sharpening in Lightroom

August 7, 2019 JimK 9 Comments

This is one in a series of posts on the Fujifilm GFX 100. You should be able to find all the posts about that camera in the Category List on the right sidebar, below the Articles widget. There’s a drop-down menu there that you can use to get to all the posts in this series; just look for “GFX 100”.

We saw in the previous two posts that the per-pixel sharpness of the GFX 100 is less than that of the GFX 50S. What should the base Lightroom sharpening settings be? By base settings I mean those that to some extent counteract the softening of the sampling aperture of the pixels in the sensor with an excellent lens, at an optimum aperture, in focus, and with no camera or subject movement. I’m going to look at that here, with a GFX 50S shot for comparison.

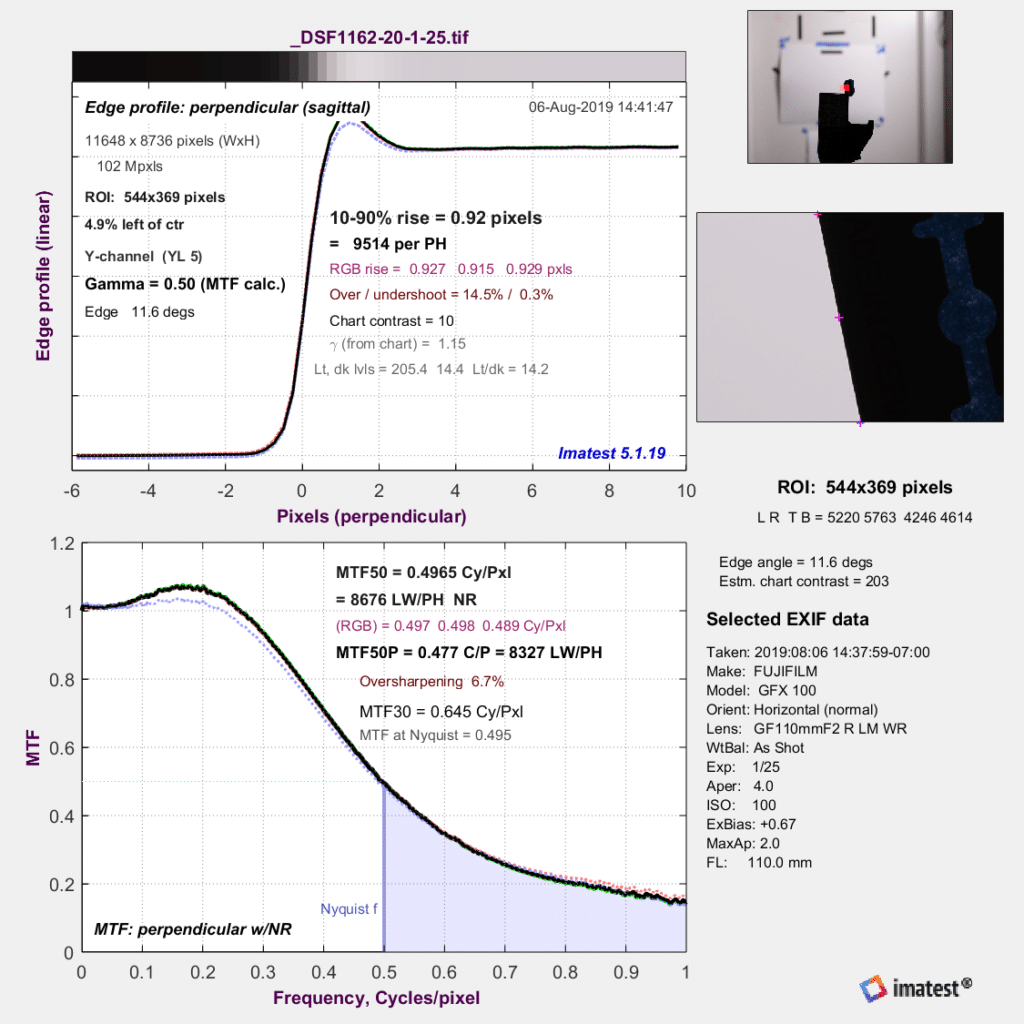
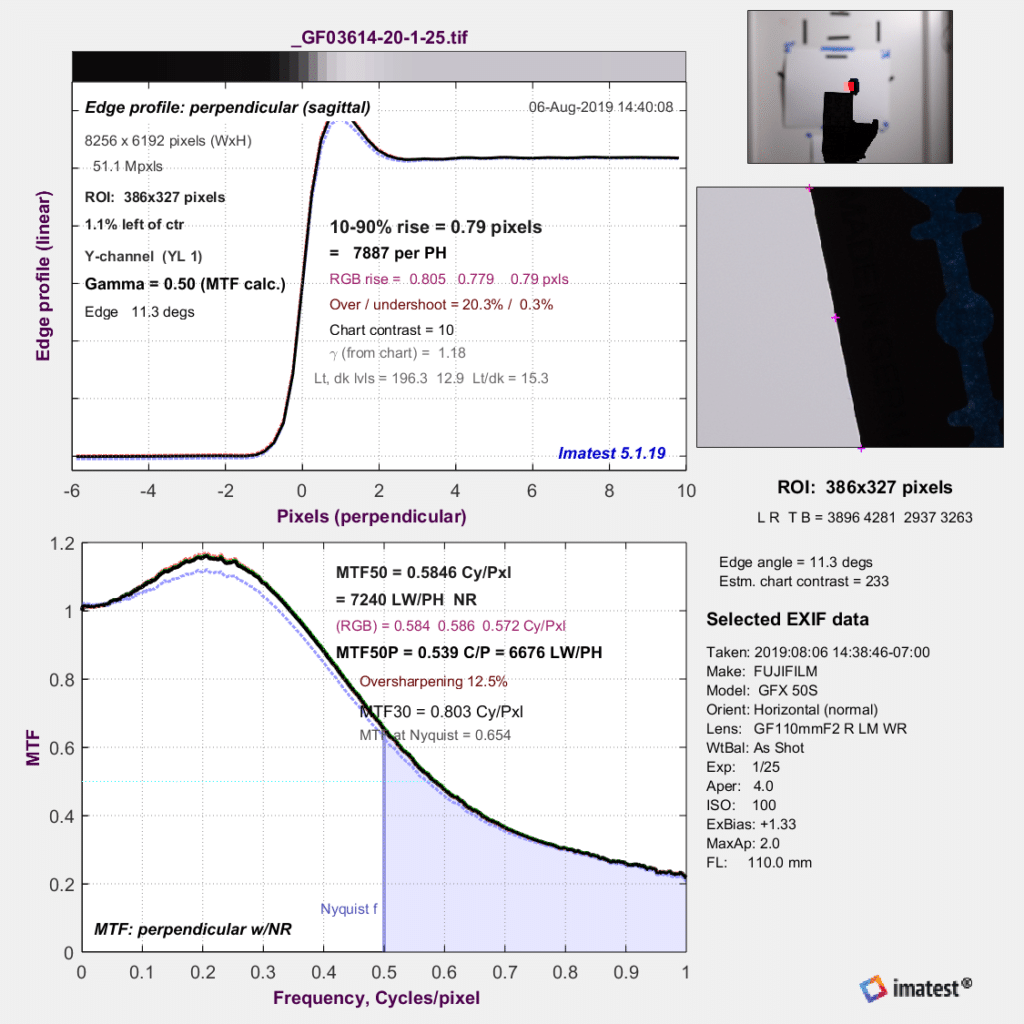
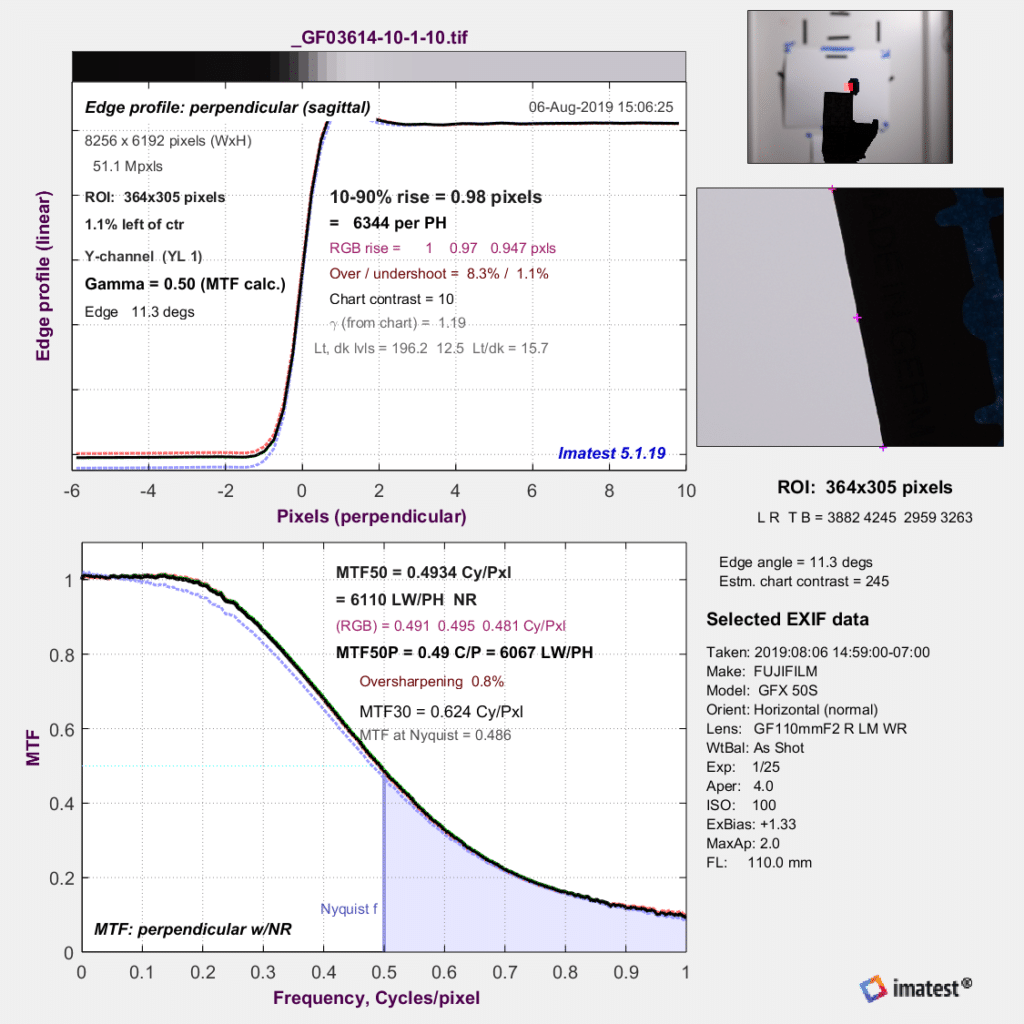
For the previous post, I had a very sharp image of a razor blade slanted edge with the Fuji 110/2 lens (which is itself very sharp) with both the GFX 100 and GFX 50S. I brought bought images into Adobe Camera Raw (ACR), zeroed out the sharpening, and looked at the modulation transfer function (MTF).


GFX 100 no sharpening


GFX 50S no sharpening


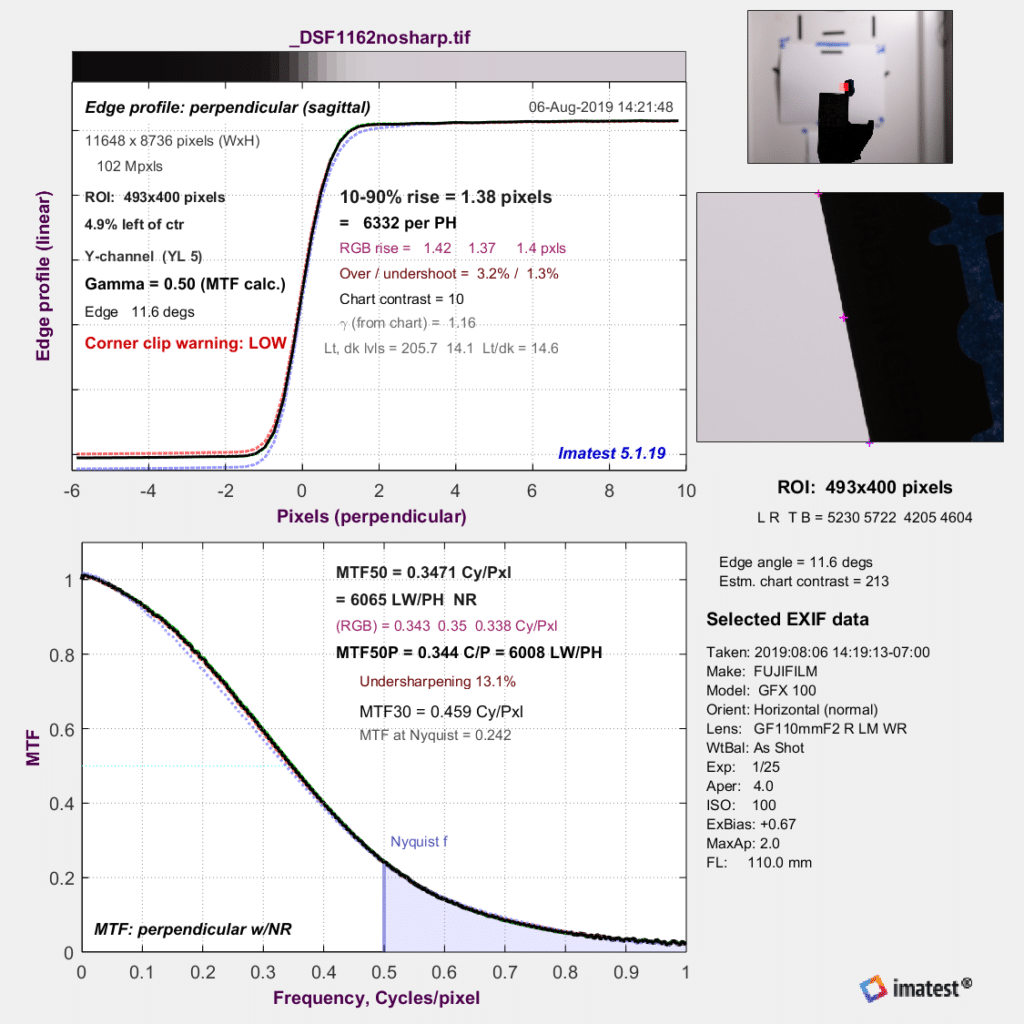
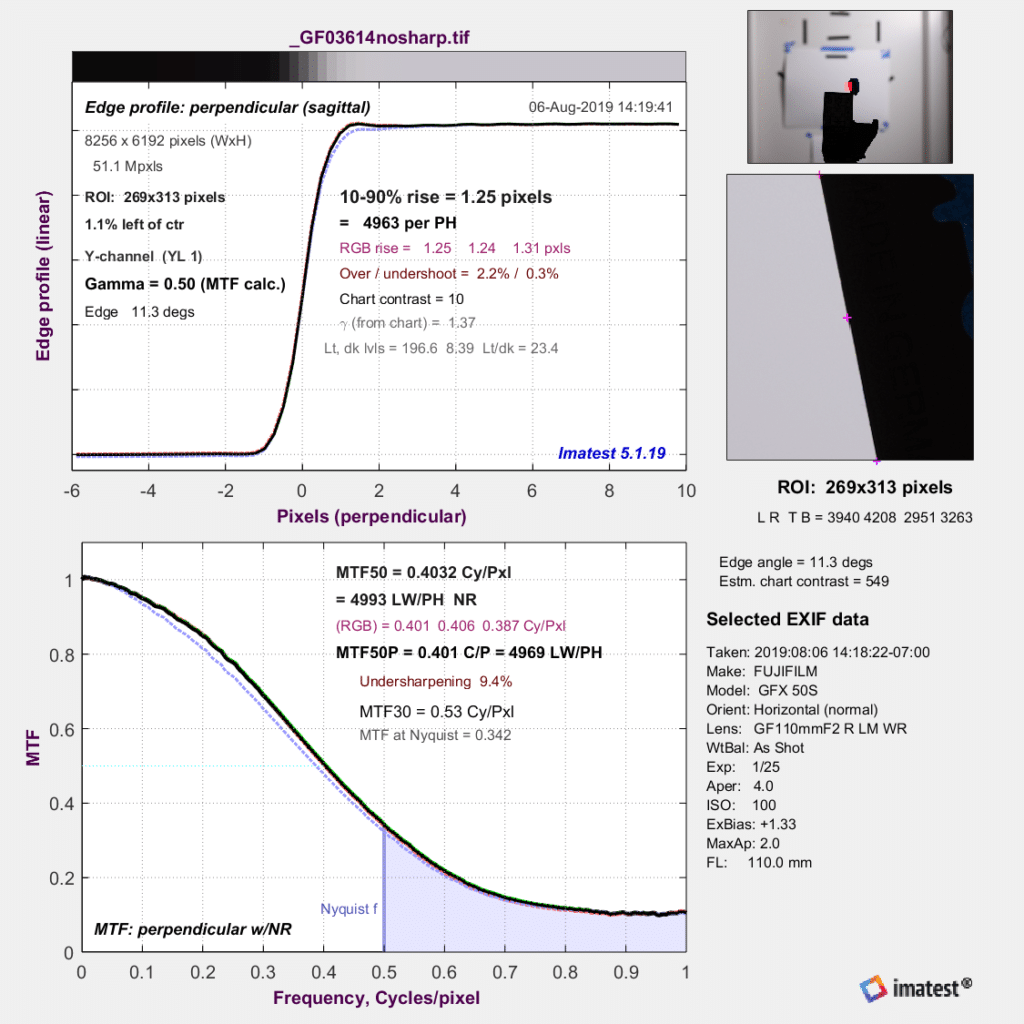
There’s already a bit of overshoot in the GFX 50S image, so you could argue that zeroing out the sharpness controls in ACR, or the similar ones in Lr, is the base setting.

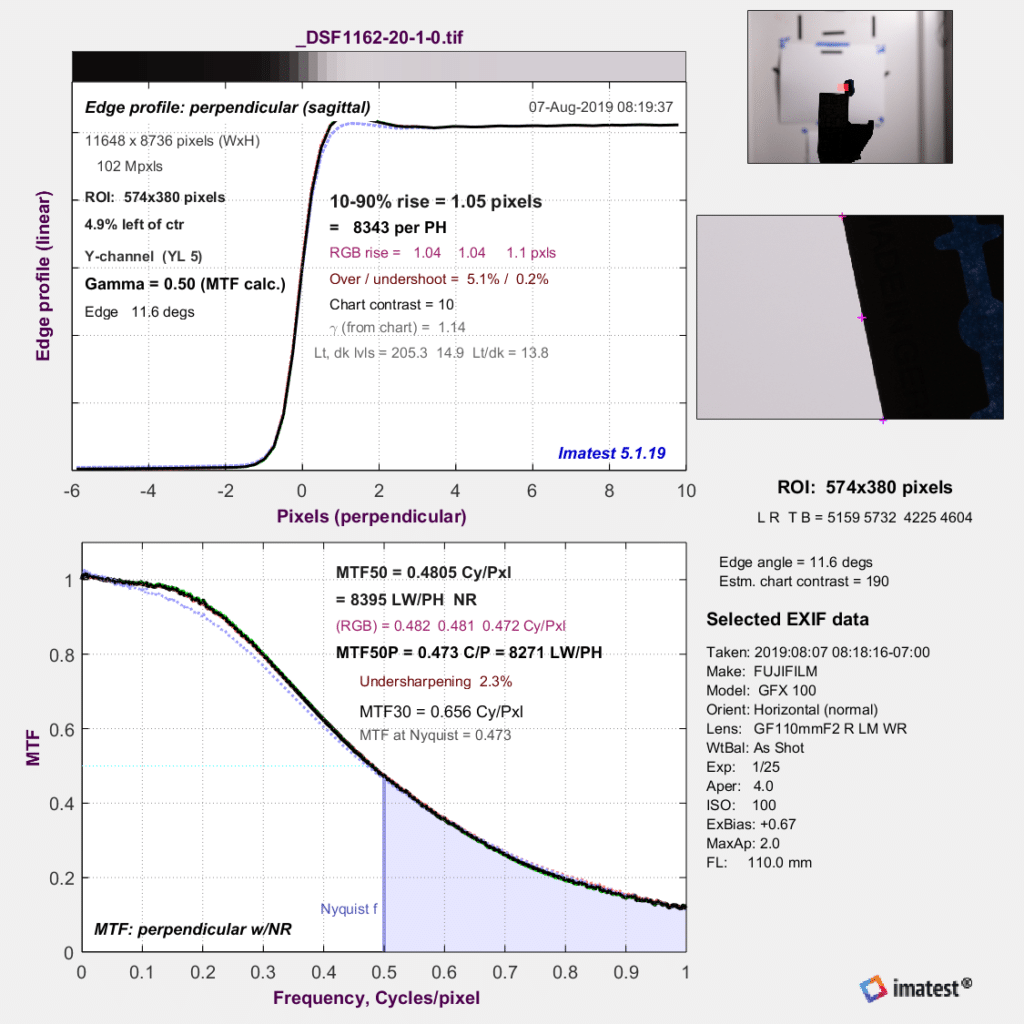
Before I start to tweak the sharpness settings, I’m going to show you something that’s truly ugly: the ACR and Lr default sharpness settings:

GFX 100, ACR default sharpening: 40-1-25


GFX 50S, ACR default sharpening: 40-1-25

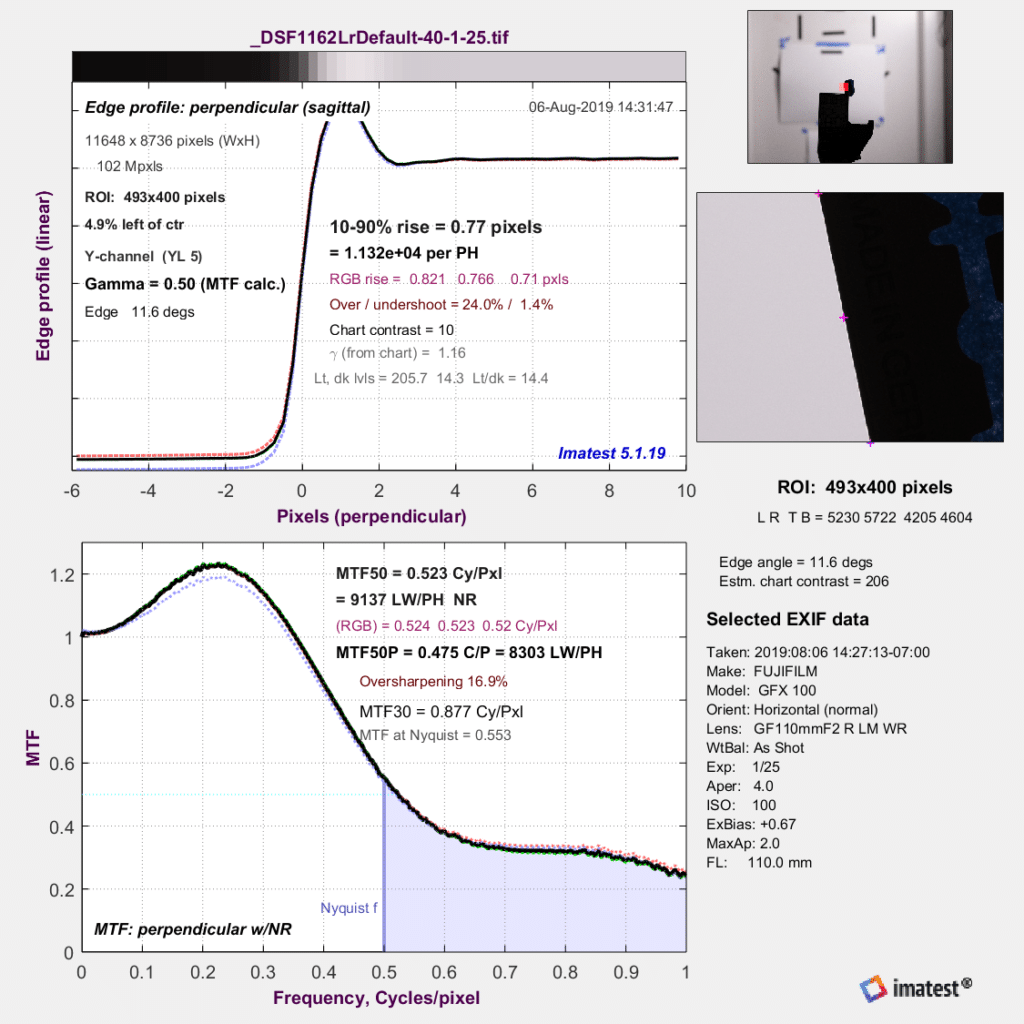
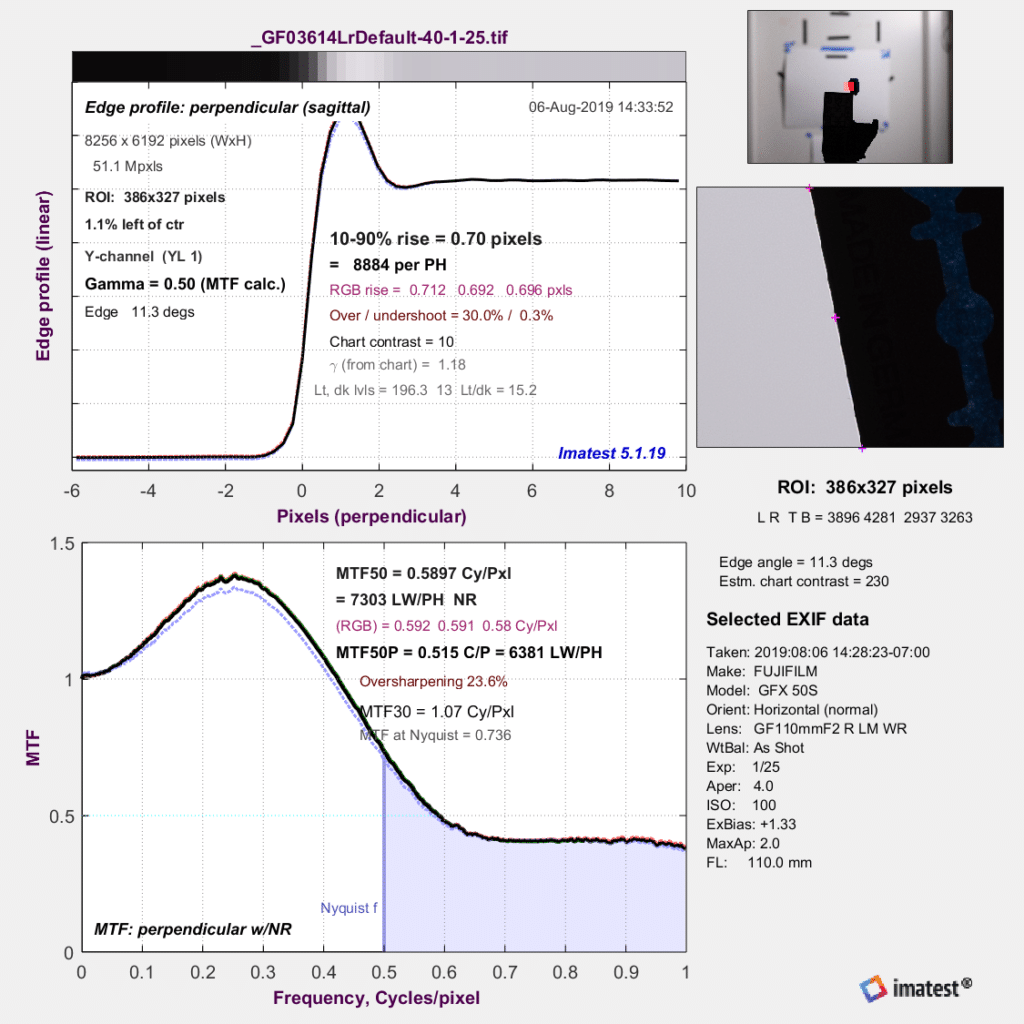
Both of these are grossly oversharpened, with dramatic overshoots in the edge profile, and huge humps in the MTF curve.

Let’s back off the sharpening amount to 20, and leave the radius at 1 and the detail at 25:

GFX 100 20-1-25

Still too much.


GFX 50S 20-1-25

This is a setting I’ve used successfully with the GFX 50S before, but with a subject this sharp, it’s clearly too much.

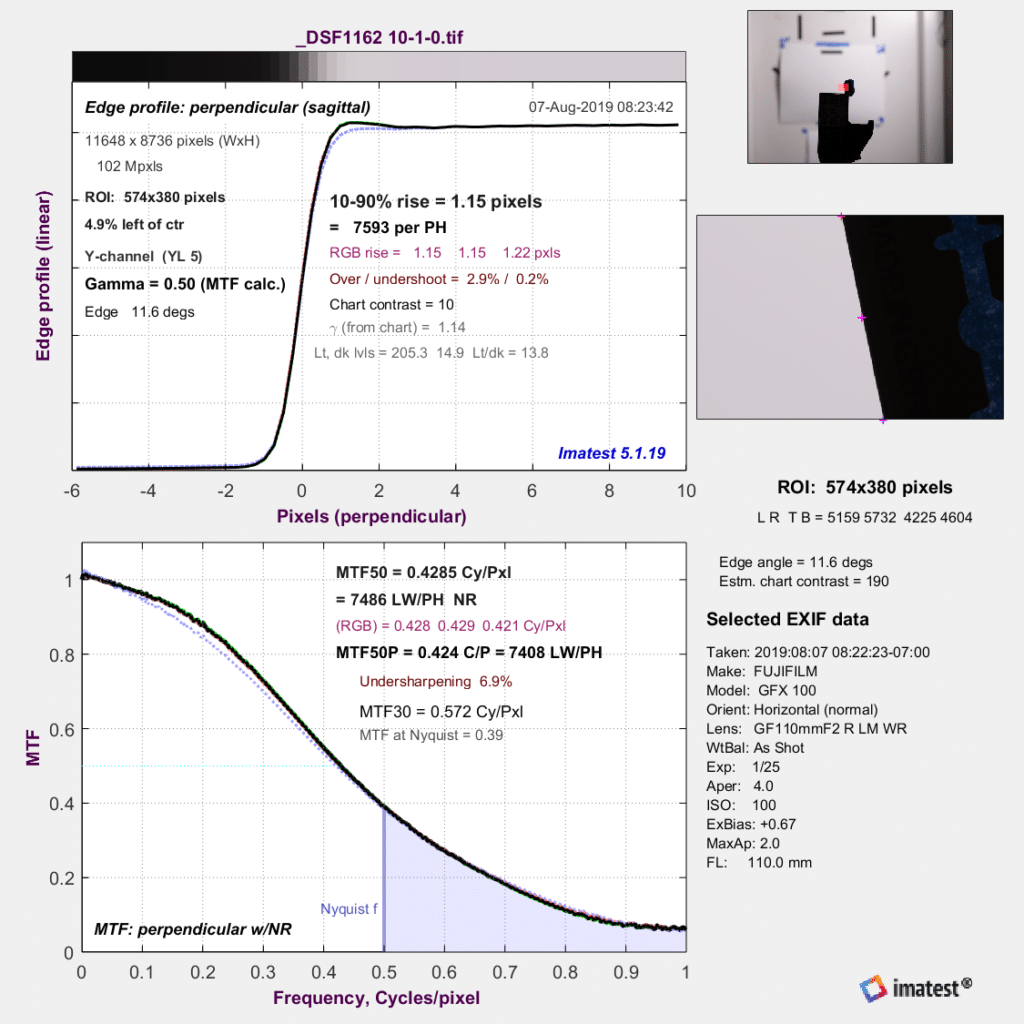
Halving the sharpness setting again, now to 10:

GFX 100 10-1-25

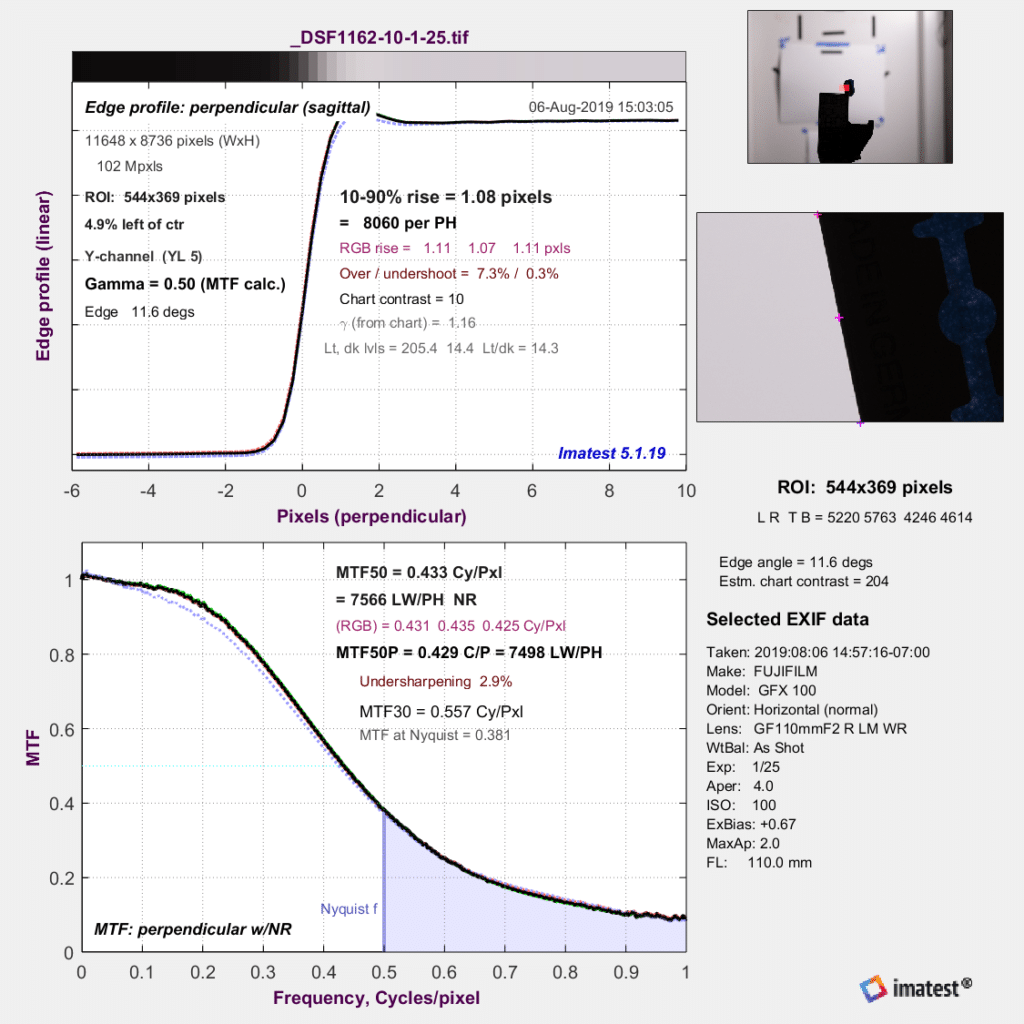
This is more reasonable.

GFX 50S 10-1-25

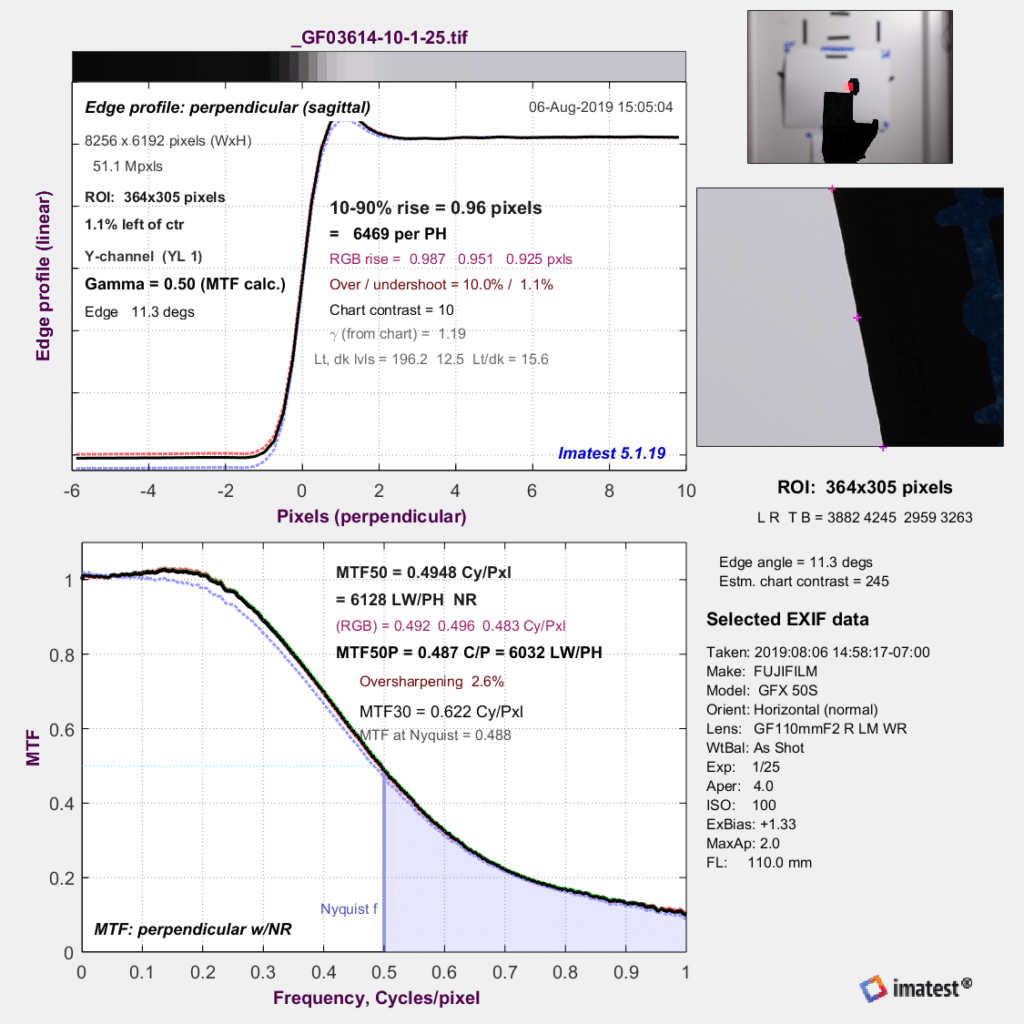
We can reduce the overshoot by cutting the detail setting back to 10:

GFX 100 10-1-10


GFX 50S 10-1-10

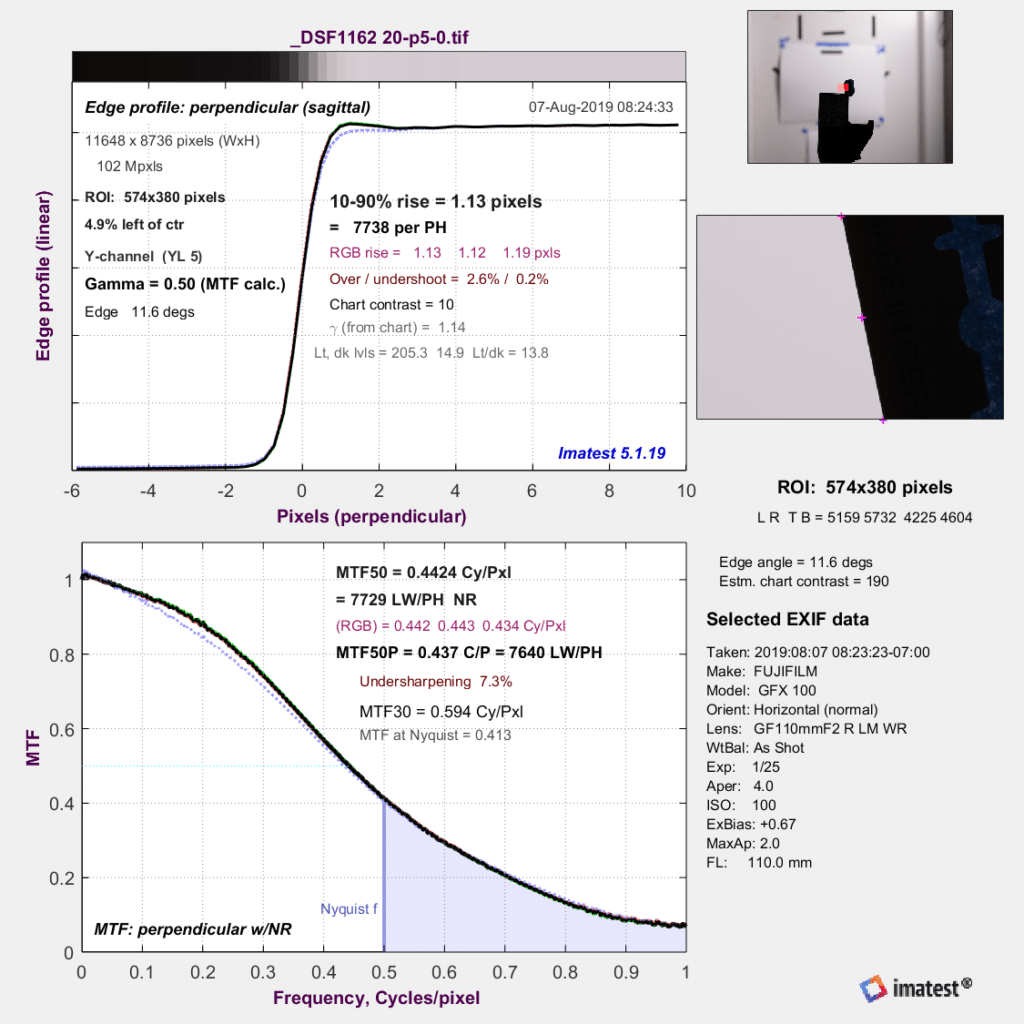
I’ll show you some other reasonable options for the GFX 100.

Strength = 20, radius = 0.5, detail = 0:

GFX 100 20-1-0

Strength = 10, radius = 1, detail = 0:

Strength = 10, radius = 0.5, detail = 0:

Looking at these curves, it seems like the decreased pixel-level sharpness of the GFX 100 compared to the GFX 50S is not as significant as what are usually considered moderate sharpness moves in Lr or ACR.

In the real world, subjects are hardly ever as sharp as razor blades, focus is rarely as precise as these focus-bracketed shots, subject motion is not usually as low as the test images, and camera motion is usually greater than what I got with a Foba camera stand on vinyl tile over 6-inch concrete on grade a mile from the nearest highway, so the amount of capture sharpening that is appropriate for actual photographs will probably be more than what’s right for these.


GFX 100

← Fujifilm GFX 100 sharpness compared to GFX 50s Fuji GFX 100 vs 50S sharpness with 3D subject →

Comments

  1. Ahmed Gencal says

    June 30, 2020 at 12:55 pm

    So for normal shooting subjects like landscapes what is a good sharpness setting for gfx 100 ?

    Reply
    • JimK says

      June 30, 2020 at 12:57 pm

      It’s lens, subject, f-stop, and image usage dependent, but 20 is a good place to start, with Radius 1 and Detail set to 0.

      Reply
  2. David Evans says

    September 13, 2021 at 9:34 am

    Hi Jim,
    Please can I ask how you set the Sharpness Develop Settings to 20-1-0 in LR CC Classic?
    Thank you.

    Reply
    • David Evans says

      September 13, 2021 at 9:36 am

      Sorry, I meant to add as a Default or Preset so that it is always the starting setting for the particular camera.

      Reply
      • JimK says

        September 13, 2021 at 9:38 am

        I didn’t do that.

        Reply
    • JimK says

      September 13, 2021 at 9:38 am

      Go into the Develop Module. Find the Detail Panel. Move the sliders.

      Reply
      • David Evans says

        September 13, 2021 at 1:43 pm

        Hi Jim,
        Thanks for your comment . Thanks also for the initial work and advice on this topic and also for the various other research and advice topics you publish.

        Reply
  3. Pier says

    July 20, 2022 at 11:12 pm

    It would be great if you could also investigate Q2M regarding sharpening in LRC. Thanks in advance!

    Reply
    • JimK says

      July 24, 2022 at 7:31 am

      Now done. See this:

      https://blog.kasson.com/leica-q2-monochrom/lightroom-sharpening-of-leica-q2-monochrom-files/

      Thanks for the suggestion.

      Reply

Leave a Reply Cancel reply

Your email address will not be published. Required fields are marked *

May 2025
S M T W T F S
 123
45678910
11121314151617
18192021222324
25262728293031
« Apr    

Articles

  • About
    • Patents and papers about color
    • Who am I?
  • How to…
    • Backing up photographic images
    • How to change email providers
    • How to shoot slanted edge images for me
  • Lens screening testing
    • Equipment and Software
    • Examples
      • Bad and OK 200-600 at 600
      • Excellent 180-400 zoom
      • Fair 14-30mm zoom
      • Good 100-200 mm MF zoom
      • Good 100-400 zoom
      • Good 100mm lens on P1 P45+
      • Good 120mm MF lens
      • Good 18mm FF lens
      • Good 24-105 mm FF lens
      • Good 24-70 FF zoom
      • Good 35 mm FF lens
      • Good 35-70 MF lens
      • Good 60 mm lens on IQ3-100
      • Good 63 mm MF lens
      • Good 65 mm FF lens
      • Good 85 mm FF lens
      • Good and bad 25mm FF lenses
      • Good zoom at 24 mm
      • Marginal 18mm lens
      • Marginal 35mm FF lens
      • Mildly problematic 55 mm FF lens
      • OK 16-35mm zoom
      • OK 60mm lens on P1 P45+
      • OK Sony 600mm f/4
      • Pretty good 16-35 FF zoom
      • Pretty good 90mm FF lens
      • Problematic 400 mm FF lens
      • Tilted 20 mm f/1.8 FF lens
      • Tilted 30 mm MF lens
      • Tilted 50 mm FF lens
      • Two 15mm FF lenses
    • Found a problem – now what?
    • Goals for this test
    • Minimum target distances
      • MFT
      • APS-C
      • Full frame
      • Small medium format
    • Printable Siemens Star targets
    • Target size on sensor
      • MFT
      • APS-C
      • Full frame
      • Small medium format
    • Test instructions — postproduction
    • Test instructions — reading the images
    • Test instructions – capture
    • Theory of the test
    • What’s wrong with conventional lens screening?
  • Previsualization heresy
  • Privacy Policy
  • Recommended photographic web sites
  • Using in-camera histograms for ETTR
    • Acknowledgments
    • Why ETTR?
    • Normal in-camera histograms
    • Image processing for in-camera histograms
    • Making the in-camera histogram closely represent the raw histogram
    • Shortcuts to UniWB
    • Preparing for monitor-based UniWB
    • A one-step UniWB procedure
    • The math behind the one-step method
    • Iteration using Newton’s Method

Category List

Recent Comments

  • JimK on Goldilocks and the three flashes
  • DC Wedding Photographer on Goldilocks and the three flashes
  • Wedding Photographer in DC on The 16-Bit Fallacy: Why More Isn’t Always Better in Medium Format Cameras
  • JimK on Fujifilm GFX 100S II precision
  • Renjie Zhu on Fujifilm GFX 100S II precision
  • JimK on Fuji 20-35/4 landscape field curvature at 23mm vs 23/4 GF
  • Ivo de Man on Fuji 20-35/4 landscape field curvature at 23mm vs 23/4 GF
  • JimK on Fuji 20-35/4 landscape field curvature at 23mm vs 23/4 GF
  • JimK on Fuji 20-35/4 landscape field curvature at 23mm vs 23/4 GF
  • Ivo de Man on Fuji 20-35/4 landscape field curvature at 23mm vs 23/4 GF

Archives

Copyright © 2025 · Daily Dish Pro On Genesis Framework · WordPress · Log in

Unless otherwise noted, all images copyright Jim Kasson.