This is the 31st in a series of posts on the Hasselblad X2D 100C camera and the XCD lenses. You will be able to find all the posts in this series by looking at the righthand column on this page and finding the Category “X2D”.
In this post, and this one, I reported on the fact that the Hasselblad X2D 100C is essentially ISOless above ISO 200. In this post, I recommended ways to take advantage of this behavior. Those techniques depend on the ability of the raw developer to push all or parts of images without introducing unacceptable color shifts.
So, in performing my testing of the X2D color accuracy, it makes sense to test raw developers under conditions where they are required to perform exposure pushes. I chose for these tests images of the Macbeth CC24 target made 5 stops down from the normal (ETTR) exposure. I made those images with the GFX 100S and the X2D 100C. I developed them in the following ways:
- GFX 100S in Lightroom Classic with a 5-stop exposure push using Adobe Standard Profile (ASP).
- GFX 100S in Lightroom Classic with a 5-stop exposure push using Adobe Color Profile (ACP).
- X2D in Lightroom Classic with a 5-stop exposure push using Adobe Standard Profile (ASP).
- X2D in Lightroom Classic with a 5-stop exposure push using Adobe Color Profile (ACP).
- X2D in Lightroom Classic with a 5-stop exposure push using Camera Standard Profile (CSP).
- X2D in Phocus (Standard profile) with a 2-stop exposure push, followed by Lightroom Classic with a 3-stop exposure push
The reasons for the convoluted pushing protocol in the last case is that Phocus doesn’t permit more than a 2-stop exposure push.
I’ll present my results in one very complicated chart. Be patient, I will explain.
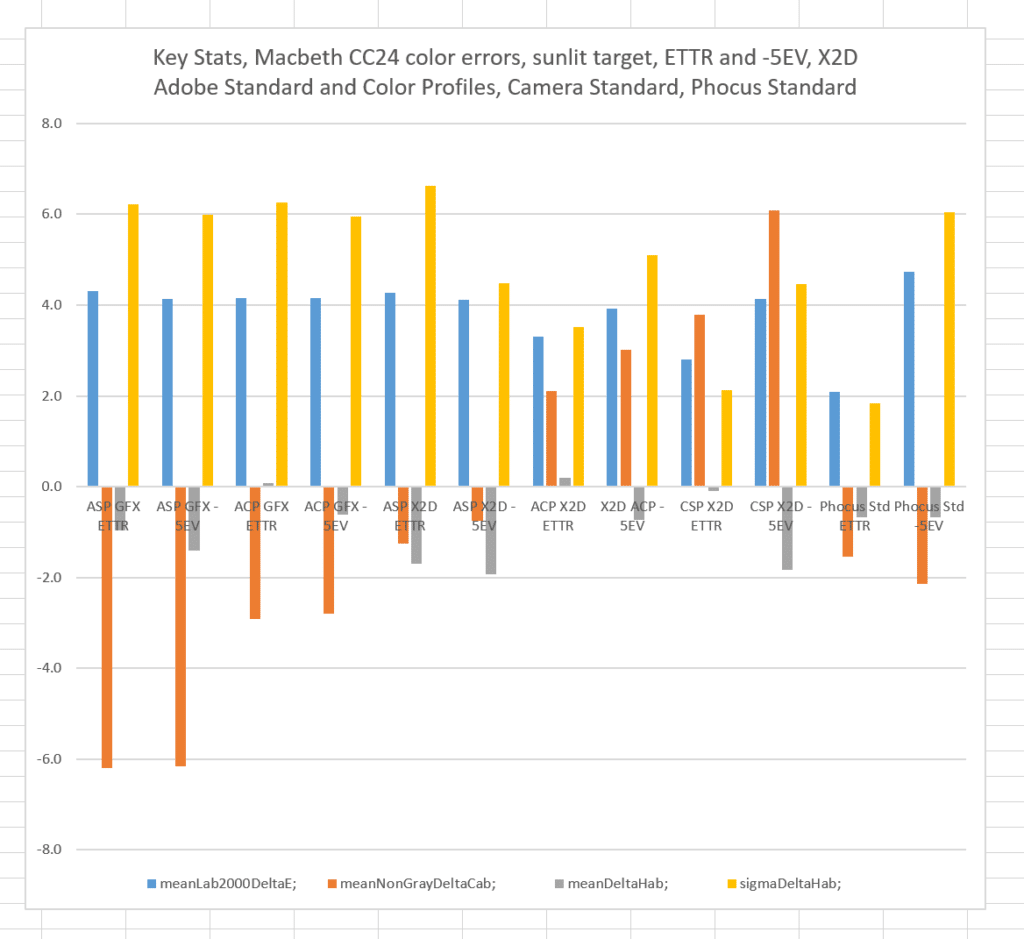
There are 12 groups of bars:
- GFX 100S in Lightroom Classic with an ETTR exposure using Adobe Standard Profile (ASP).
- GFX 100S in Lightroom Classic with a 5-stop exposure push using Adobe Standard Profile (ASP).
- GFX 100S in Lightroom Classic with an ETTR exposure using Adobe Color Profile (ACP).
- GFX 100S in Lightroom Classic with a 5-stop exposure push using Adobe Color Profile (ACP).
- X2D in Lightroom Classic with an ETTR exposure using Adobe Standard Profile (ASP).
- X2D in Lightroom Classic with a 5-stop exposure push using Adobe Standard Profile (ASP).
- X2D in Lightroom Classic with an ETTR exposure using Adobe Color Profile (ACP).
- X2D in Lightroom Classic with a 5-stop exposure push using Adobe Color Profile (ACP).
- X2D in Lightroom Classic with an ETTR exposure using Camera Standard Profile (CSP).
- X2D in Lightroom Classic with a 5-stop exposure push using Camera Standard Profile (CSP).
- X2D in Phocus with an ETTR exposure using Standard profile.
- X2D in Phocus (Standard profile) with a 2-stop exposure push, followed by Lightroom Classic with a 3-stop exposure push
For each group, there are four key metrics plotted:
The blue bars are the average color error for each of the 24 patches, measured in CIELab Delta E 2000. This is probably the most accurate color error metric we have right now. Lower numbers are better. Zero is perfect.
The orange bars are the average errors in CIELab chroma. Low absolute values are better. Positive values indicate that the average patch is more chromatic (loosely, more saturated) than it should be. Negative values indicate that the average patch is less chromatic (loosely, less saturated) than it should be.
The gray bars indicate the mean error in hue angle. Low absolute values are better. Positive numbers indicate that the mean hue angle is too large. Negative numbers indicate that the mean hue angle is too small. Hue angle errors are some of the most objectionable color errors. This metric tests for systematic hue errors.
The yellow bars indicate the standard deviation of the errors in hue angle. Low values are better. Zero is perfect. This metric tests for the scatter of the hue errors.
In the GFX images, the bad news is that accuracy is nothing to write home about, but the good news is that the heroic 5-stop push has almost no effect on the accuracy. That’s true with both the Adobe profiles. That is also true of the X2D with Adobe Standard Profile.
Developing the X2D images in Lr with Adobe Color profile improves the accuracy, and the accuracy doesn’t get much worse with a 5-stop push.
Developing the X2D images in Lr with Camera Standard Profile has a bit better accuracy than ACP, and but the accuracy gets a little worse with a 5-stop push.
Developing the X2D ETTR image in Phocus with the Standard produces the best — pretty amazing, for a general purpose profile — accuracy. There is significant accuracy loss with the 5-stop push, but the pushed Phocus image is about as accurate as the GFX images that don’t get worse when pushed.
Hi Jim,
I find your tests and investigations very remarkable!
As a GFX100s user, your results are very interesting for me. Unfortunately you work with Lightroom, which I understand for reasons of comparability between Hasselblad and Fuji RAW files. Lightroom is at most an average RAW developer in my experience, not only for Fuji GFX RAW files. That is why I have been working with Capture One software for years now.
It would now be very interesting for me to see, what results your investigations would come to with the combination of Fuji GFX and Capture One. And this also with the different film simulations, which can be used like different profiles already during shooting (ETTR). It is a pity that RAW development of Hasselblad files in Capture One will probably not be possible in the long run – but there is a (cumbersome) work around.
Unfortunately, image quality today is not only influenced by the camera sensor and the further, in-camera data processing. Of decisive importance is also the subsequent use of the optimal RAW developer for the corresponding RAW files. Only then can the full potential be extracted from the native sensor data.
I’ve used C1 in the past. I don’t currently use it. When I did use it, I did not find it any better than Lr. It was different, of course.
Hi Jim,
how the colours differed in LR and C1 would be a metrological task. What I can see is the much better sharpness reproduction of the RAW files from C1 compared to LR. This capture sharpening of C1 provides a much better basis for the output sharpening than the result of LR. Data output from LR has to be post-processed in PSD with some effort to achieve the same sharpness as C1. For me, this is a significant and visibly better difference. At least as far as the data from the Fuji GFX100s is concerned.
Regards, Dirk
I have to agree with Dirk. I have stopped using LR to process my GFX raw files. I still use it as part of various workflows from time to time, and I don’t know C1 nearly as well as Lightroom. However, comparing on-screen C1 for Fuji seemed to have a slight edge over Lightroom. But, what did it for me is when I printed the files. C1 produced significantly better results. I only did a handful of test, before deciding to drop Lightroom altogether from my RAW workflow. I found the resulting differences, especially when printing large, to be obvious.
There are a few other things I like better about C1. Probably #1 on the list, is that it has a separate luminance curve. This is a huge oversight in Lightroom imo. But, I’m guessing Adobe maybe doesn’t want to add it, because of the need to separate Lightroom and Photoshop as products. Idk.
A second benefit to C1, you can actually expand the curve section to take up a very large portion of your display. This allows for very minute changes. Lightroom allows you to use the arrow keys to adjust curve points, where C1 does not, as far as I know. I do like that feature.
There are a number of other things I think Lightroom does better. Most of them revolve around ease of use and it being a slicker-designed product. From a pure image quality perspective though, I can’t go back. I’m mostly interested in printing photos and Lightroom just can’t hang. Uploading for web, its hard to say there is a huge difference, minus the luma curve in C1 being a clear advantage.
Have you used C1 for Fuji Jim?
I like the colors produced with the C1 Fuji profiles better than the Lightroom Fuji profiles. Also, C1 allows for very very subtle changes in white balance tint that LR doesn’t even come close to touching.
I have used C1 for Fuji files, but don’t anymore.
https://blog.kasson.com/the-last-word/a7riilr-asp-c1-generic-auto-6000k-color-accuracy/
https://blog.kasson.com/the-last-word/capture-1-vs-lr-asp-default-color-processing/