This is one in a series of posts on the Fujifilm GFX 100S. You should be able to find all the posts about that camera in the Category List on the right sidebar, below the Articles widget. There’s a drop-down menu there that you can use to get to all the posts in this series; just look for “GFX 100S”. Since it’s more about the lenses than the camera, I’m also tagging it with the other Fuji GFX tags.
I’ve been posting a lot recently about the 120 mm f/4 GF macro lens for the GFX. I found it a good performer at 1:2, at minimum focusing distance (MFD) with no extension tubes, but that it had really soft edges and a lot of focus curvature at MFD with 36 mm of tubes. In this post, I tested it at 1:1 with a 45 mm tube,a and found it credible on-axis but soft on the right edge of the frame. I reported those results numerically and visually, using the time honored sharpness target of a banknote. The 120/4 GF was soft in the corners and edges at MFD with 18mm, 36mm, and 45mm of extension by tubes.
For copy applications at high magnifications, and for some 3D subjects that require extension tubes, the 120/4 GF just isn’t cutting it. I tried the CV 125/2.5 and it was a big improvement. I’d tried a Schneider 90 mm f/4.5 Apo Componon enlarging lens, and it was a disappointment at 1:1. I’d heard good things about the Pentax 645 120mm f/4 smc FA macro lens. It was almost as good as the CV 125/2.5 — and is substantially easier to find and less expensive. I also tried the Schneider 120/5.6 0058 Makro Symmar, and got very good results. I alos tried a Rodenstock 105mm f/5.6 HR Digaron Macro at 1:1. This lens has a ring on it that you can adjust to optimize it for any reproduction ratio between 1:3 and 3:1. It perfumed about as well as the Schneider 0058.
Now I’m turning my attention to an enlarger lens. I didn’t have good luck with the Schneider Apo Componon 90 mm f/4.5 at 1:1, but I had higher hopes for the Rodenstock 75mm f/4 Apo-Rodagon D, which is characterized by Rodenstock at 1:1.
Here’s the test procedure:
- GFX 100S
- Foba camera stand
- C1 head
- Lens focused to get to 1:1 magnification
- ISO 100
- Electronic shutter
- Indicated f/4 through f/8 in whole-stop steps
- Exposure time adjusted in M mode
- Cognisys rail, 100 exposures, 40 um step size
- Initial focus short of target
- Convert RAF to DNG using Adobe DNG Converter
- Extract raw mosaics with dcraw
- Extract slanted edge for each raw plane in a Matlab program that Jack Hogan originally wrote, and that I’ve been modifying for years.
- Analyze the slanted edges and produce MTF curves using MTF Mapper (great program; thanks, Frans)
- Fit curves to the MTF Mapper MTF50 values in Matlab
- Analyze and graph in Matlab
Here are the results:
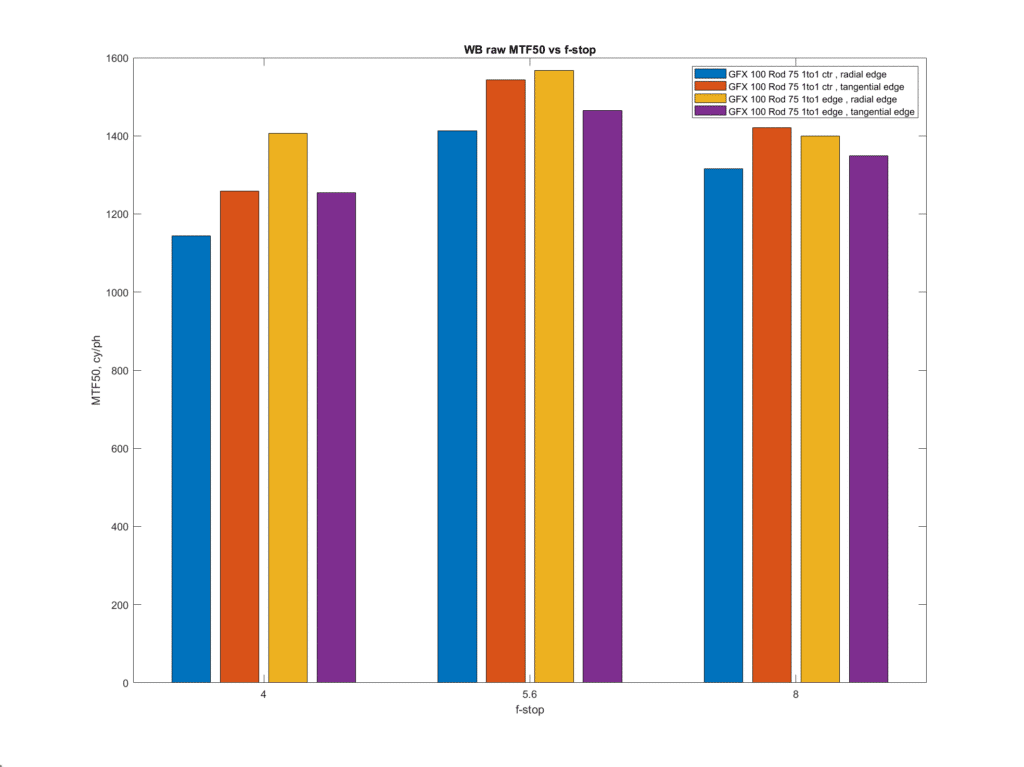
The vertical axis is MTF50 in cycles per picture height. Higher is sharper. The horizontal axis is f-stop.
- The blue and red columns are for the Rodenstock lens on axis, with, respectively, a horizontal and a vertical edge.
- The yellow and purple columns are for the Rodenstock lens at the right edge with, respectively, a horizontal and a vertical edge.
This is good performance. F/5.6 is the best f-stop.
Here are microcontrast results, with the contrast at a quarter of the pixel pitch being the definition of microcontrast.
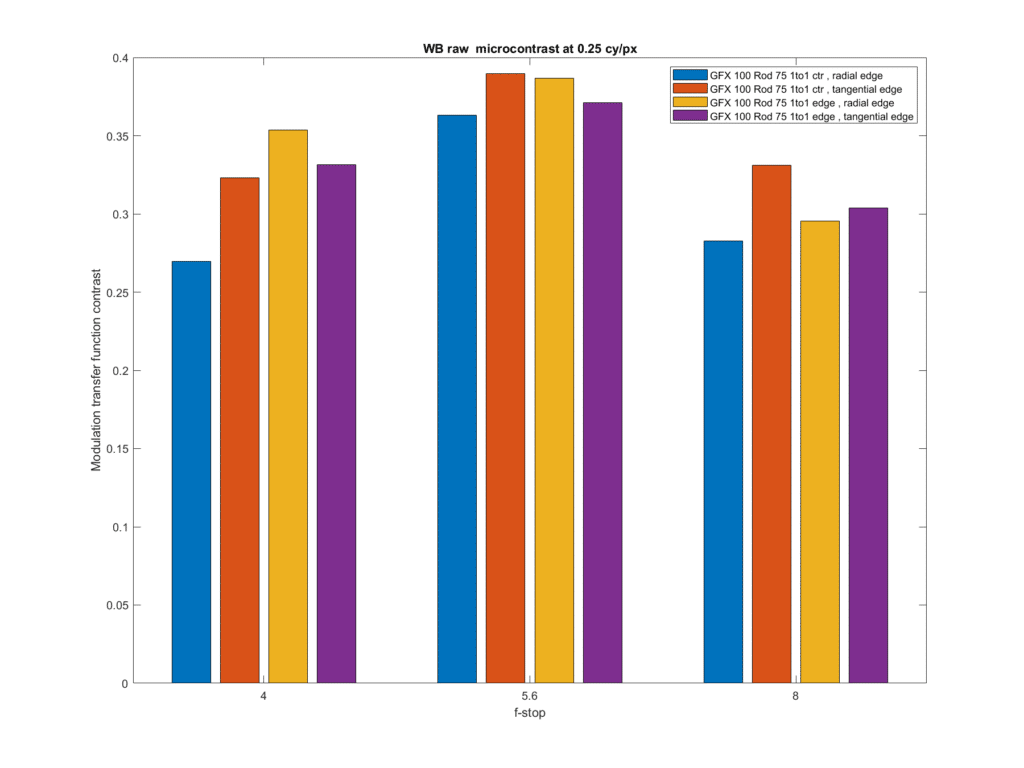
Also good performance for 1:1.
Comparing to the Rodenstock 105/5.6 HR Digaron Macro and the Schneider 120/5.6 0058 Makro Symmar:
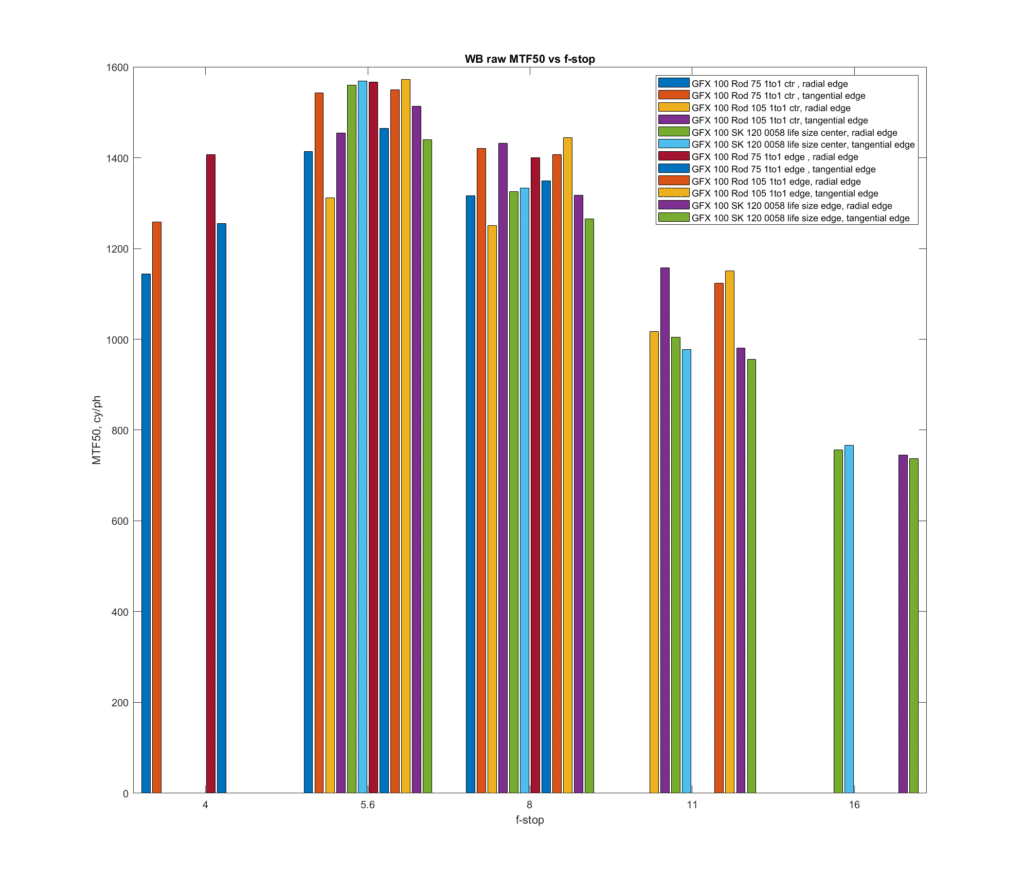
Pretty much a three way tie. I’m still suspicious of the Digaron center radial edge results. I will retest in the future.
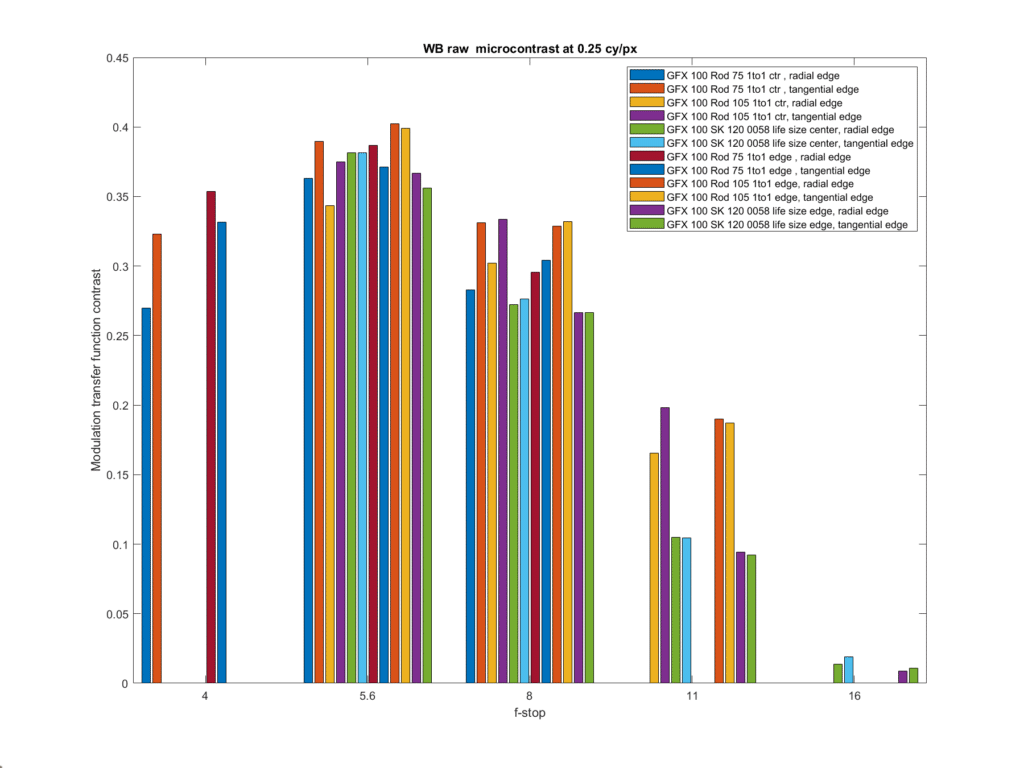
Microcontrast:
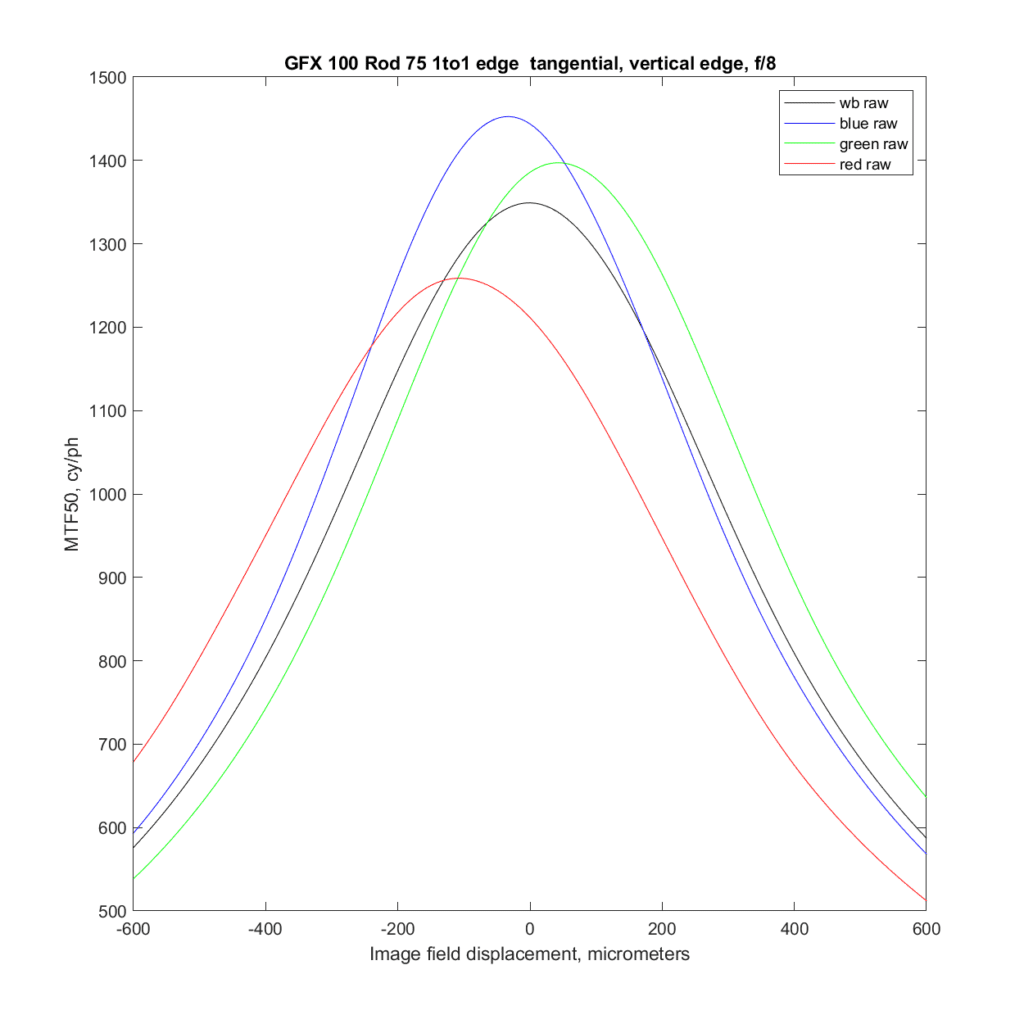
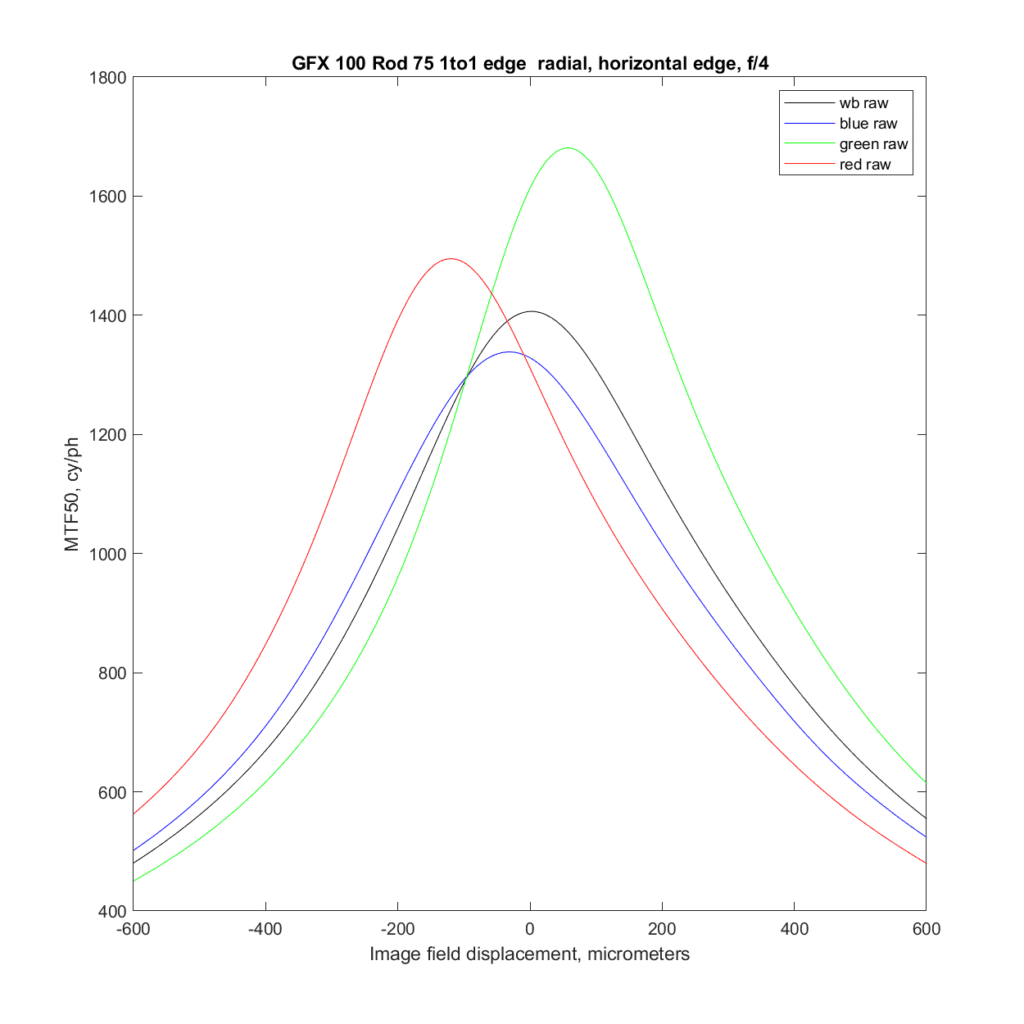
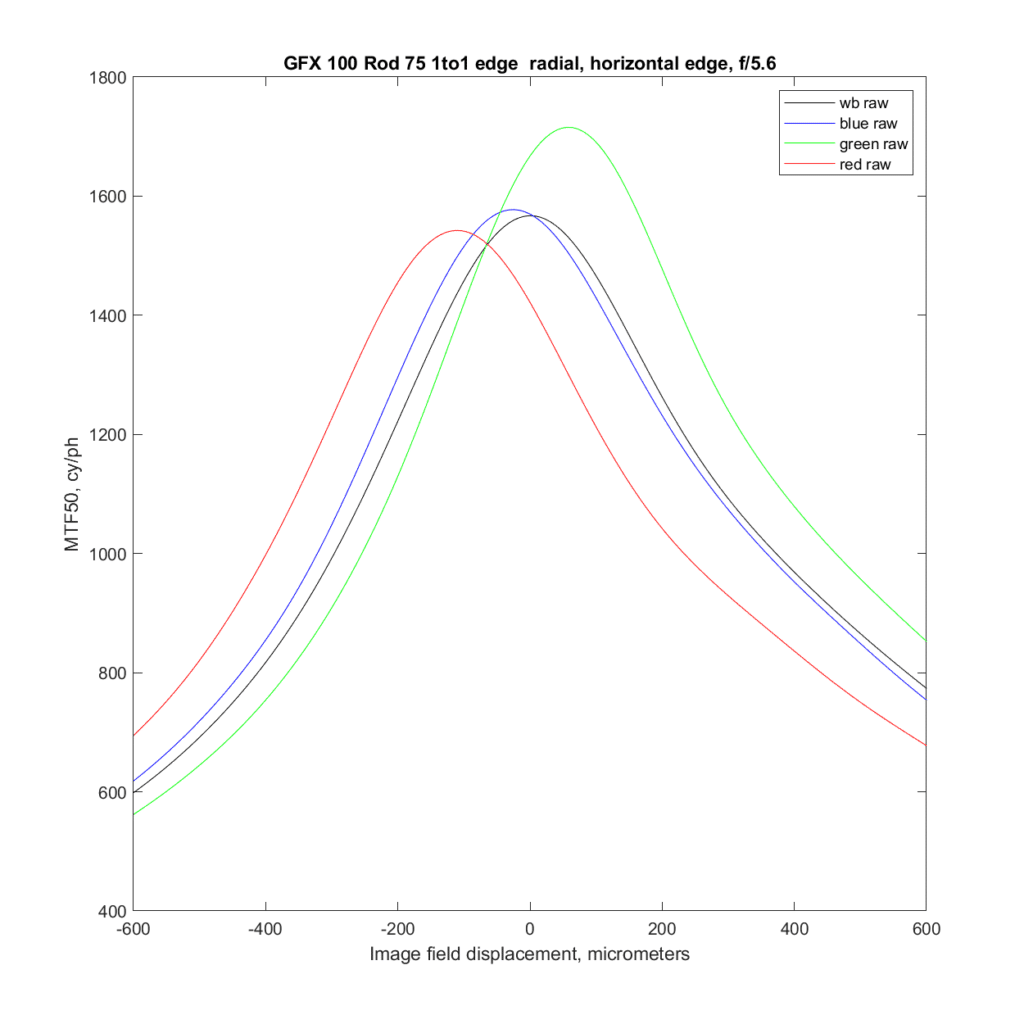
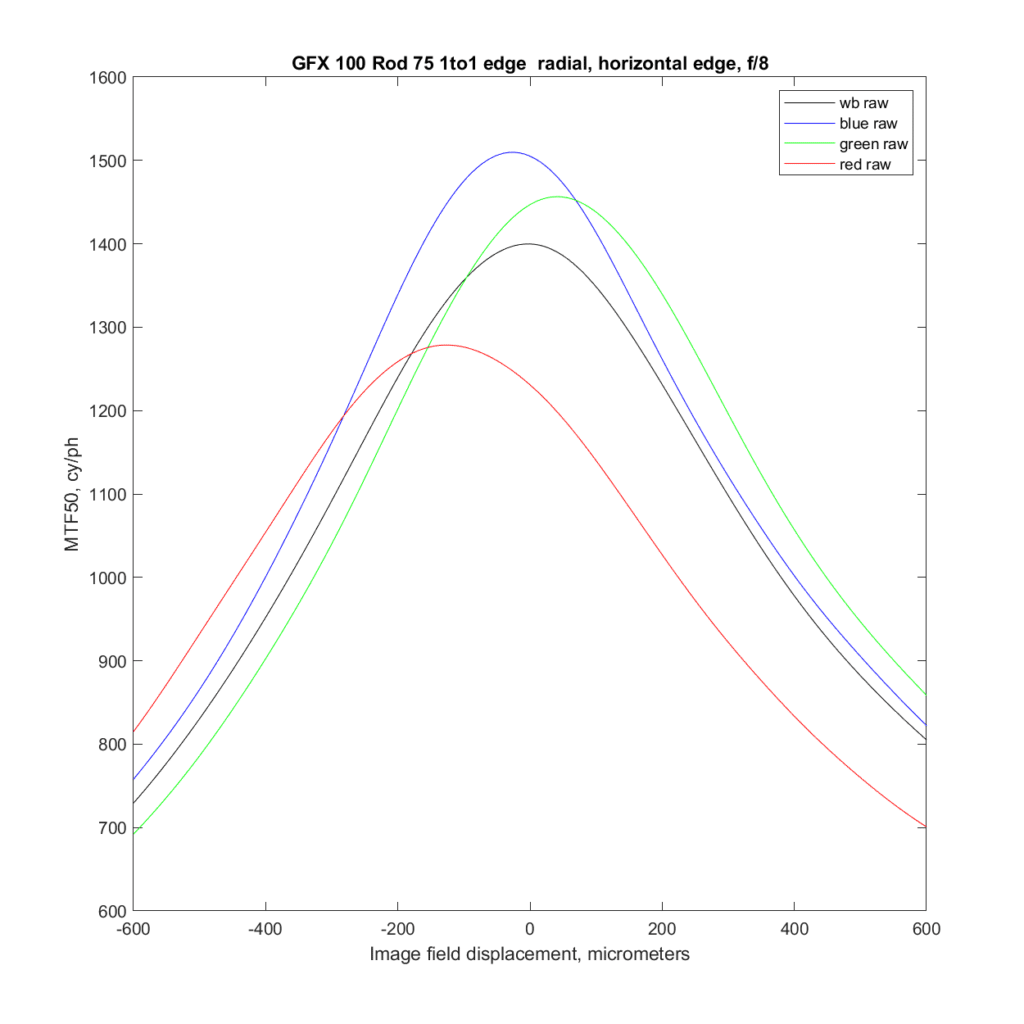
Transfocal MTF50 performance in the center:
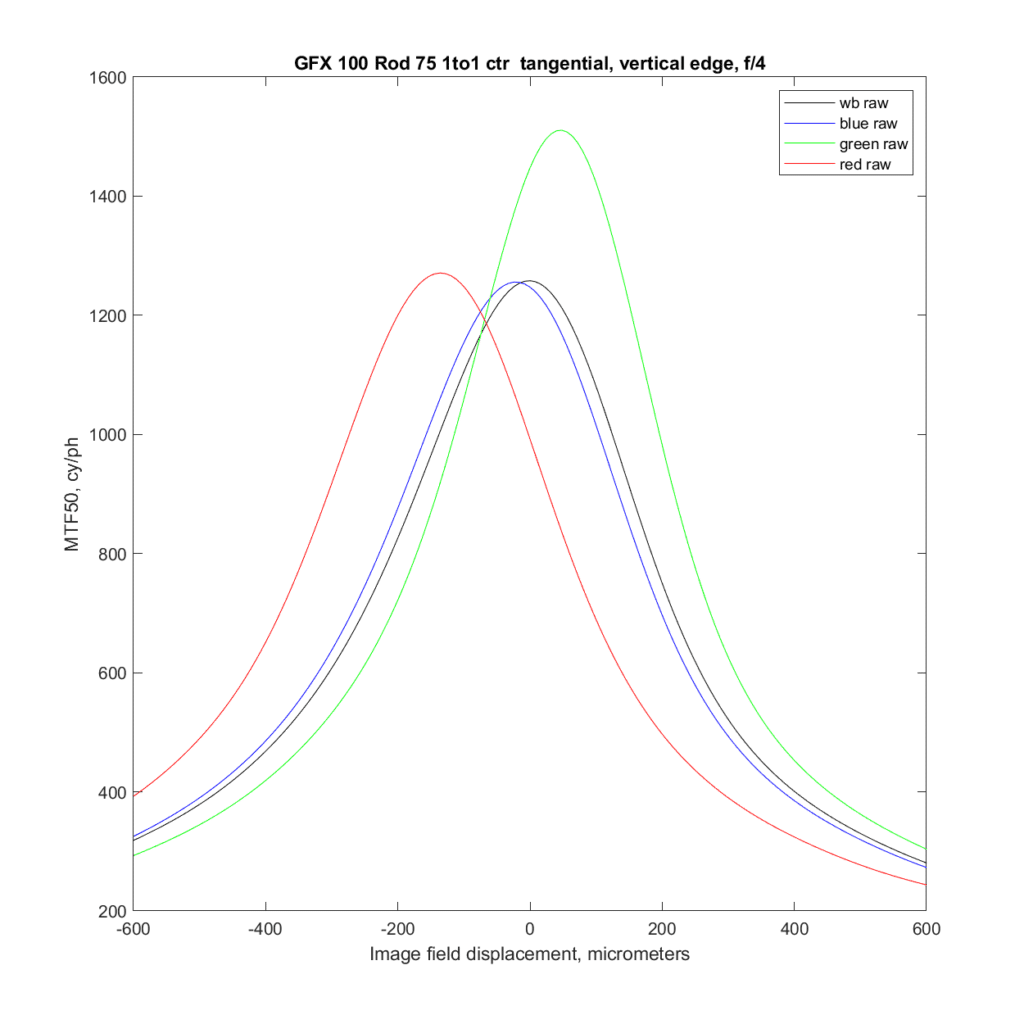
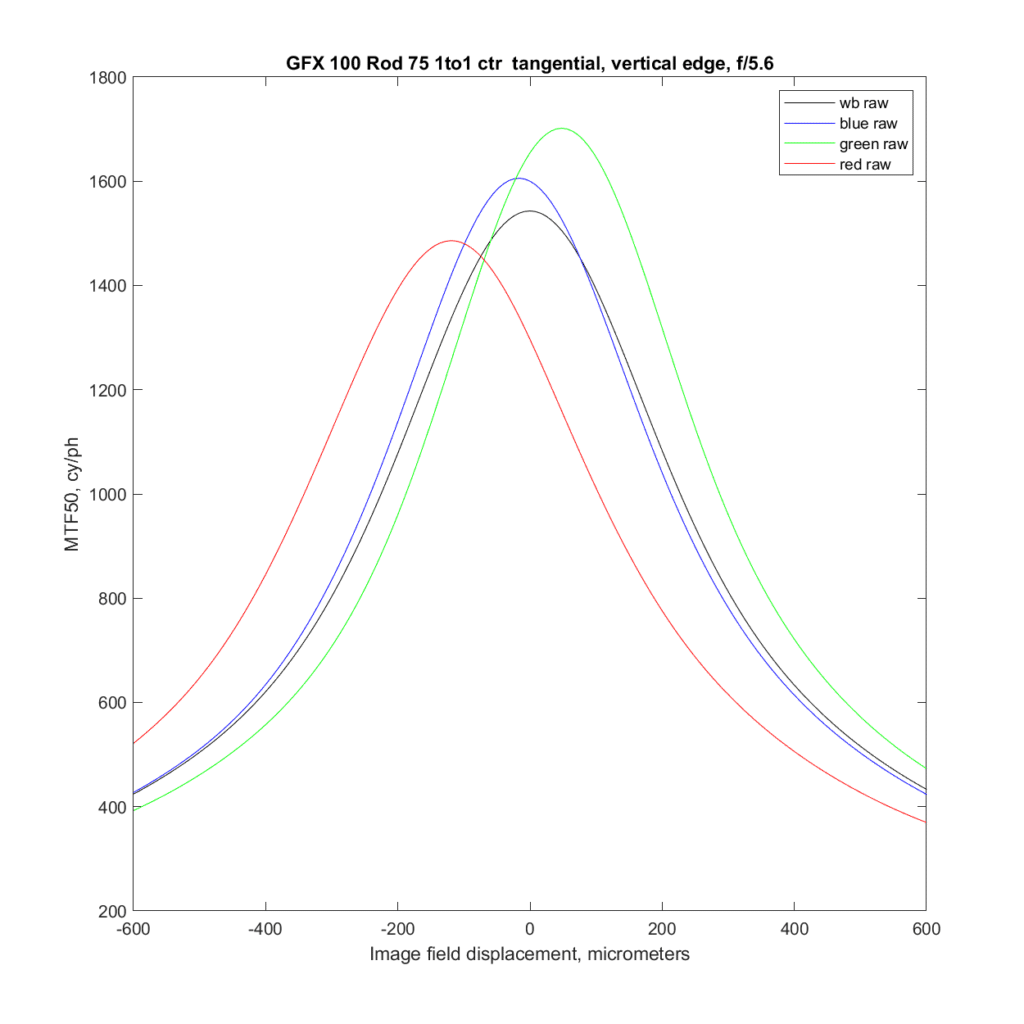

It looks like using a green filter at f/5.6 might be the plan for digitizing B&W negatives.
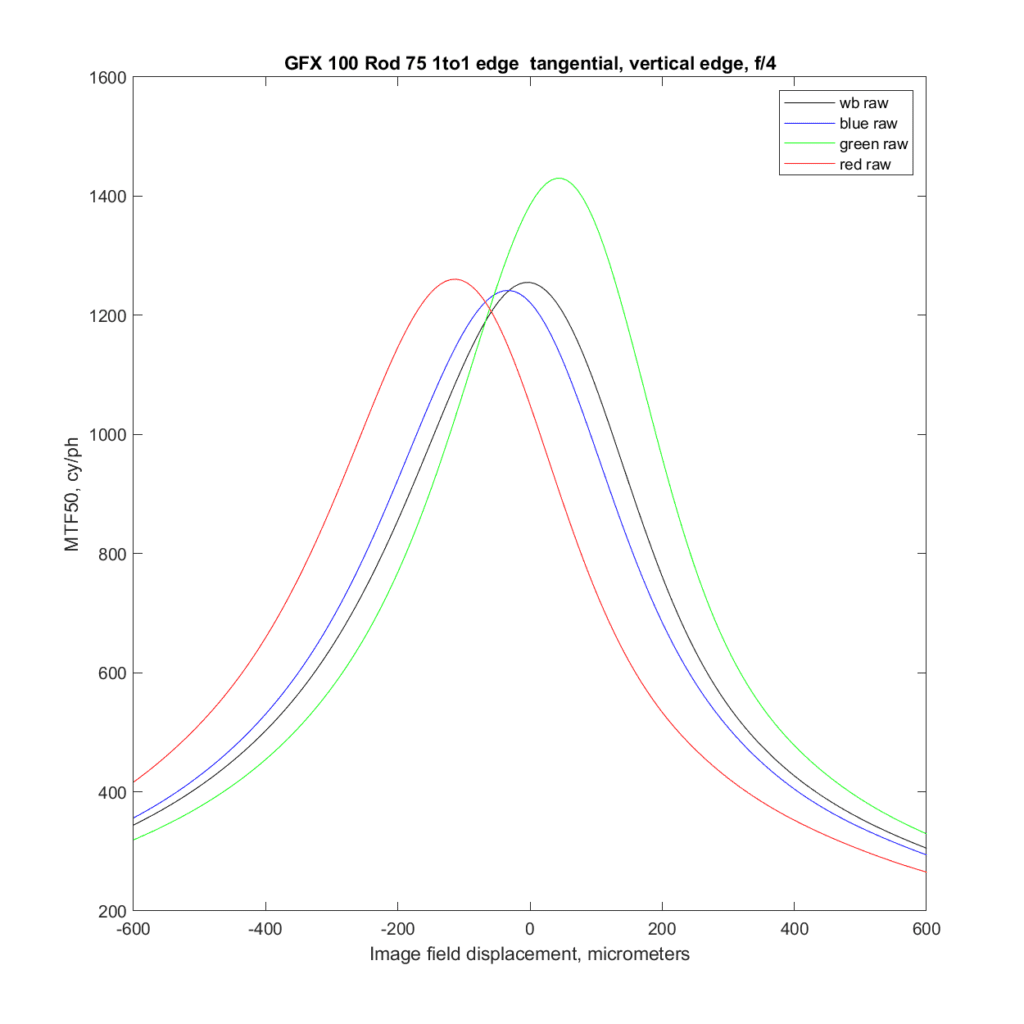
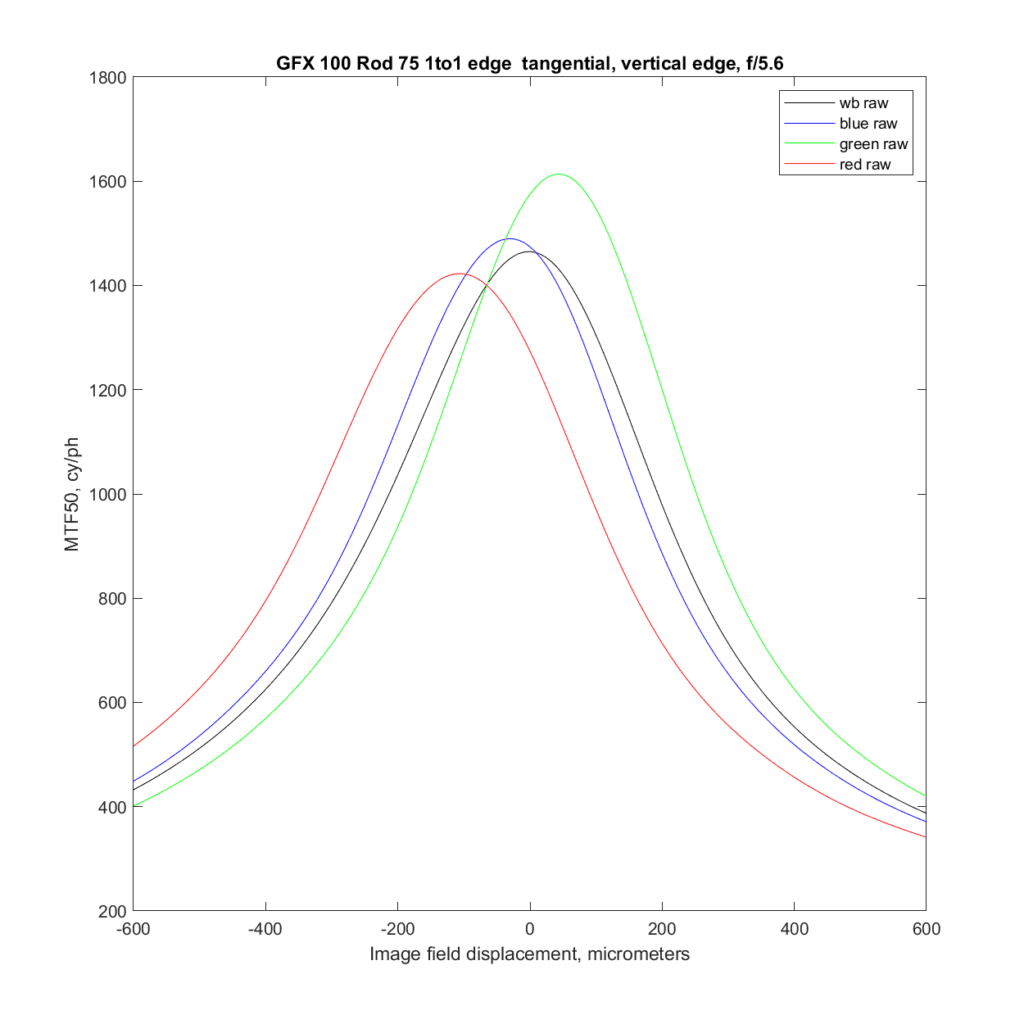
The right edge:
Dear Jim,
in the graph following: “Comparing to the Rodenstock 105/5.6 HR Digaron Macro and the Schneider 120/5.6 0058 Makro Symmar:”
you didn’t include the results of the Schneider lens. You have the numbers for the Schneider a few blog posts back. For comparison it would be great to have them in one graph.
-Dominique
Thanks. Fixed now.
I have a question, long time follower of your great work here on this blog. I am camera scanning transparency and BW negs (mostly provia velvia and tax). I have the Rodagon D 2x version of this lens and it looks quite sharp to me for fuji to 6×7 and 6×6. Though my Rodagon N enlarger lenses are damn close with Novoflex bellows, aligning with versalab and verifying all square. You mention BW scanning with green filter, is that to bypass the bayer array and use the luminance only green channel of sensor? is this still producing slightly sharper images like old scanners used to? which green filter do you recommend? also I have a new it8 target on the way to make a profile for setup I have to try and get colors closer out of the box so to speak. so far using icc of Flextight scanner and linear response seems to be giving me closest colors to transparencies. what are you using to tether these shots? and do you think the congas rail is a must have for dialing in focus if my eyes are still good (40 years old now haha). Thanks Jim. for all your contributions.
Using a green filter would increase sharpness, but also increase aliasing. It’d probably worth a try. If you’re using pixel shifting it would probably work better. I’d start with a Wratten 61.
The Cognisys rail’s main use is not to compensate for focusing errors, although it does that. It’s to deal with minor misalignments and departures in flatness of the film scanned.