This is one in a series of posts on the Fujifilm GFX 100S. You should be able to find all the posts about that camera in the Category List on the right sidebar, below the Articles widget. There’s a drop-down menu there that you can use to get to all the posts in this series; just look for “GFX 100S”. Since it’s more about the lenses than the camera, I’m also tagging it with the other Fuji GFX tags.
Yesterday, I tested the Rodenstock 75mm f/4 Apo-Rodagon D on a GFX 100S at 1:1, and found it to be an excellent performer. Today, I’m testing it at 1:2, where — spoiler alert — it doesn’t do nearly as well.
Here’s the test procedure:
- GFX 100S
- Foba camera stand
- C1 head
- Lens focused to get to 1:1 magnification
- ISO 100
- Electronic shutter
- Indicated f/4 through f/8 in whole-stop steps
- Exposure time adjusted in M mode
- Cognisys rail, 100 exposures, 80 um step size
- Initial focus short of target
- Convert RAF to DNG using Adobe DNG Converter
- Extract raw mosaics with dcraw
- Extract slanted edge for each raw plane in a Matlab program that Jack Hogan originally wrote, and that I’ve been modifying for years.
- Analyze the slanted edges and produce MTF curves using MTF Mapper (great program; thanks, Frans)
- Fit curves to the MTF Mapper MTF50 values in Matlab
- Analyze and graph in Matlab
Here are the results:
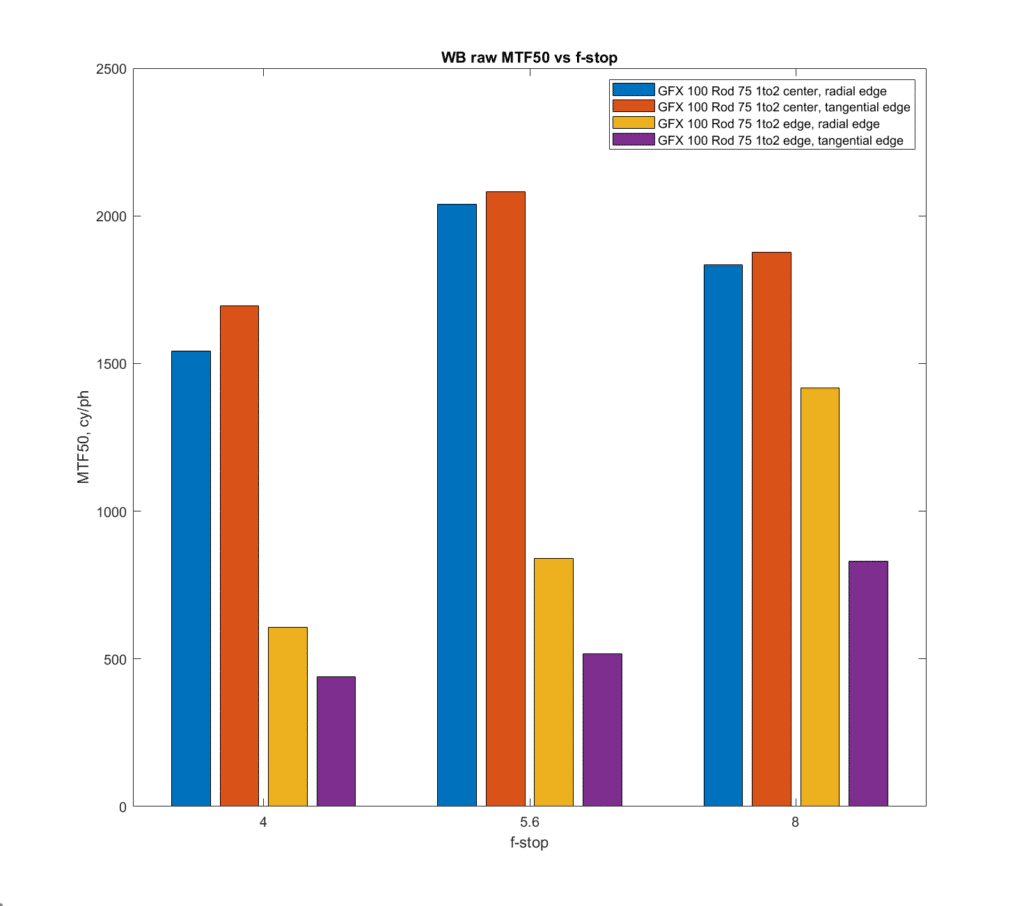
The vertical axis is MTF50 in cycles per picture height. Higher is sharper. The horizontal axis is f-stop.
- The blue and red columns are for the Rodenstock lens on axis, with, respectively, a horizontal and a vertical edge.
- The yellow and purple columns are for the Rodenstock lens at the right edge with, respectively, a horizontal and a vertical edge.
The edge performance is poor.
Here are microcontrast results, with the contrast at a quarter of the pixel pitch being the definition of microcontrast.
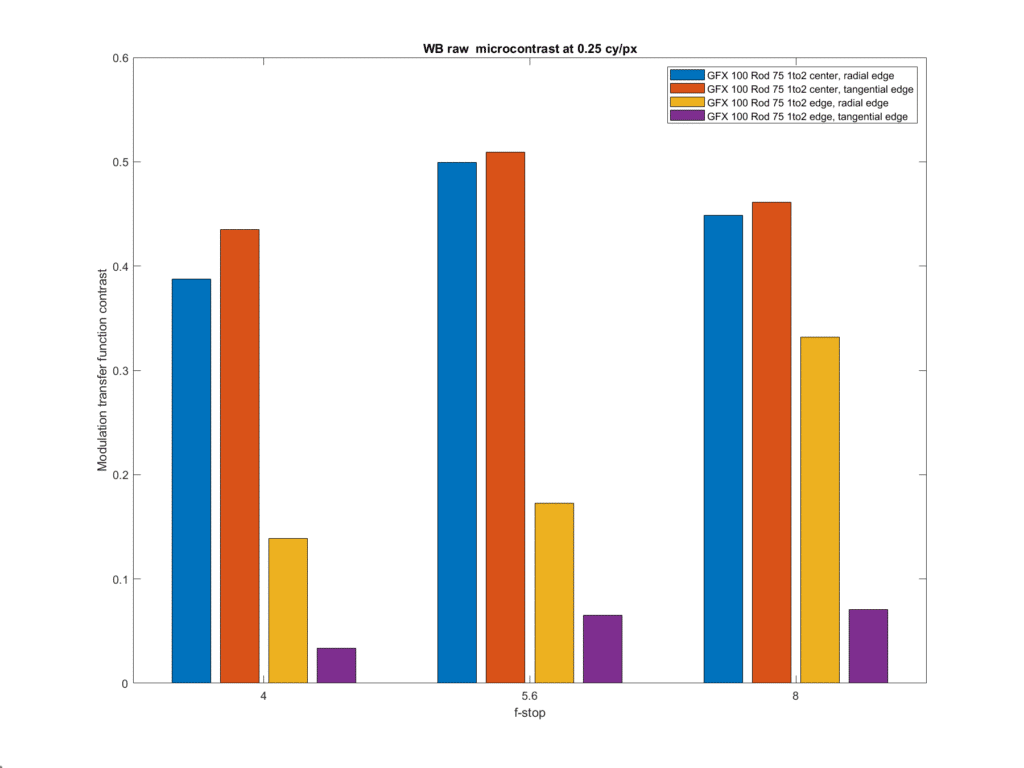
Well, you can’t win ’em all.
Dear Jim,
I am following your test with great interest.
With all lenses it is always very important to know the image scale for which they have been calculated. Otherwise, one quickly compares apples with pears. I am pleased to see that the Apo-Rodagon D 1: 4 75mm 1: 1 can hold its own against new, very expensive lenses. But it is only very good at 1: 1. The first version of the lens was so sensitive to scale that you could already notice a drop at 1: 1.1. The current version is a little less sensitive. At 1: 2 you should definitely prefer the Apo-Rodagon-D 2x 1: 4.5 75mm. As far as I know, 2x refers to projection, e.g. 35mm film on 6×7 cm. If necessary, you should use it in the retro position. For larger formats or larger working distances there is the Apo-Rodagon-D 1: 5.6 120mm, optimized for 1: 2/2: 1, recommended for the range 1: 5 to 2: 1. It is comparable / optically identical to the Apo-Macro-Sironar digital 1: 5.6 120mm.
If you are very critical, like you, it is definitely worth playing with the distances in the aperture air space – 0.1 mm more or less can be very noticeable in terms of edge sharpness or field curvature, especially in view of the filter packages in front of the Sensors.
The Leica Apo-Macro-Elmarit-R 1: 2.8 / 100 should only be used at 1: 1 – 1-2 with the Leica Elpro 1: 2 – 1-1 FOR R 2.8 / 100. A normal spacer ring only creates chaos due to the floating elements (as with the Fujinon GF 120mm F4 Macro and many other, similar lenses).
A very good 1: 1 lens is also the Nikkor AM ED 120mm 1: 5.6. Even old repro lenses such as an Apo-Ronar 1: 9 / 150mm, Apo-Tessar 1: 9/140, Apo-Saphir 1: 10/100 should not be forgotten if you also want to stop down a bit.
A Mamiya-Sekor Macro 80mm 1: 4 with matching the special Macro Spacer is not to be despised either. Likewise, of course, the Mamiya 140 macros for 6×7.
Best regards
Helmut Kunde
Thanks for the comments. The SK and Rodenstock 105 HR and 75 Rodagon lenses are so close to diffraction-limited at 1:1 that I can’t imagine an f/9 lens being an improvement, even if it is an excellent lens.
I used to have a Nikkor AM ED 120mm 1: 5.6. Now I’m sorry I sold it.
Jim, your tests are done with great care. I am aware of the labor-consumption and obtaining good repeatability. What is missing, not your fault, is the lack of micro resolution and color templates. Once, I talked about this with a microscopic professional and proposed to perform such tests in the form of a beam of glazes of different colors that can be relatively easily drawn into super-thin fibers In the era of lasers, electron beams or other nano tools, it should not be a technical problem. Costs are the deciding factor. I am not a macro specialist despite many years of work in museums as well as in forensic technology. Recently, after leaving me by the Museum of Photography in Krakow, I was hugged by the National Archives also in the same city. The building in which I work is very modern and has a view from the windows to the beautiful old cemetery, which for my age 71 creates great conditions for adaptation to my future place of stay But to the point, the digitization workshop is based on large-format scanners for A0 +. However, my task is to work unusual and rarer 3D objects. Unfortunately, the studio was pre-equipped without consulting me and this causes some problems. One of them were the limitations of the GFX100s in cooperation with the C1 (currently it is good) I usually work on a 2m Kaiser column with an electric one, which I mounted in an inverted position on the ceiling (3.8m), which gives me a lot of comfort and freedom of movement under the column. Additionally, I installed a 0.8m precision rail. For the 120 macro lens, it allows me to operate objects 0.2m above the floor in the 1.0 format. The problem is the macro in scales of about 1: 1. Even a simple comparison of images of small, flat details in the 1: 4 and 1: 2 scales are practically the same resolving. For a 1: 1 scale with rings, it is a disaster. So far I use Canon macro lenses with an adapter. It’s not bad but there are problems with chromatic aberration which can be partially corrected. I am in the process of preparing the apo rodagon D1 and D2 lenses for work. On the other hand, the shocking problem of the Fuji 120 macro with rings was dthe shocking problem of the Fuji 120 macro with rings was the dramatic decrease in image contrast, despite careful reduction of glare. The rings simply have terrible blackening, which is incredible with such professional equipment. Other problems include poor cable sockets and poor mounting of the body to the tripod !!! So much so that I had to mount the camera in the camera cage. I am sorry that I wrote about my problems, but it was nice to meet with such decent studies of yours (I am a physicist by education, but it was nearly 50 years ago).
Regards Wojciech Staszkiewicz