This is one in a series of posts on the Fujifilm GFX 100. You should be able to find all the posts about that camera in the Category List on the right sidebar, below the Articles widget. There’s a drop-down menu there that you can use to get to all the posts in this series; just look for “GFX 100”. Since it’s more about the lenses than the camera, I’m also tagging it with the other Fuji GFX tags.
I’ve been posting a lot recently about the 120 mm f/4 GF macro lens for the GFX. I found it a good performer at 1:2, at minimum focusing distance (MFD) with no extension tubes, but that it had really soft edges and a lot of focus curvature at MFD with 36 mm of tubes. But I didn’t test it at 1:1 because I couldn’t find my 45 mm extension tube.
The day before yesterday, I found it. So now you]ll see how the lens performs at 1:1 — MFD with the 45 mm tube.
But first, I had to change my target. I had been using two backlit industrial single-edged razor blades, the kind made to go in cutting instruments like box cutters, at right angles. But it turned out that at 1:1, the thickness of the blades meant that I had to make too many images to get both edges in focus. So I switched to blades meant for shaving.
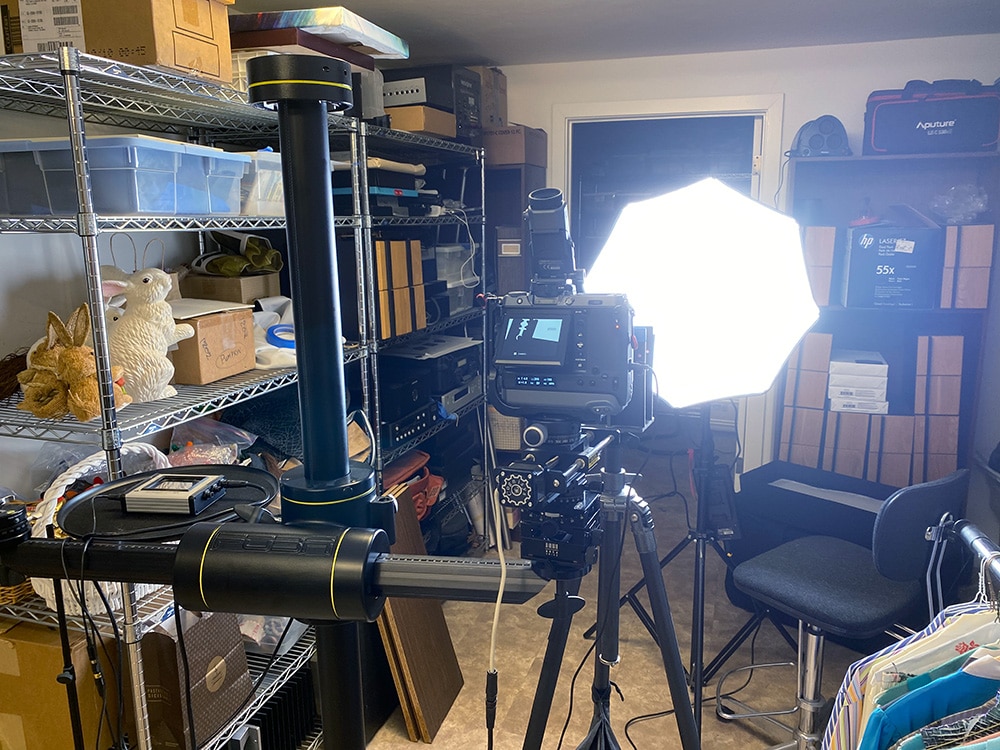
Here’s the setup.
Here’s the test procedure:
- GFX 100
- Foba camera stand
- C1 head
- 1 45mm Fuji extension tube
- Lens focused to close to as near as it would focus
- ISO 100
- Electronic shutter
- 10-second self timer
- f/4 through f/11 in whole-stop steps
- Exposure time set by camera in A mode
- Focus bracketing, step size 1, 150 exposures
- Initial focus short of target
- Convert RAF to DNG using Adobe DNG Converter
- Extract raw mosaics with dcraw
- Extract slanted edge for each raw plane in a Matlab program the Jack Hogan originally wrote, and that I’ve been modifying for years.
- Analyze the slanted edges and produce MTF curves using MTF Mapper (great program; thanks, Frans)
- Fit curves to the MTF Mapper MTF50 values in Matlab
- Correct for systematic GFX focus bracketing inconsistencies
- Analyze and graph in Matlab
The results:
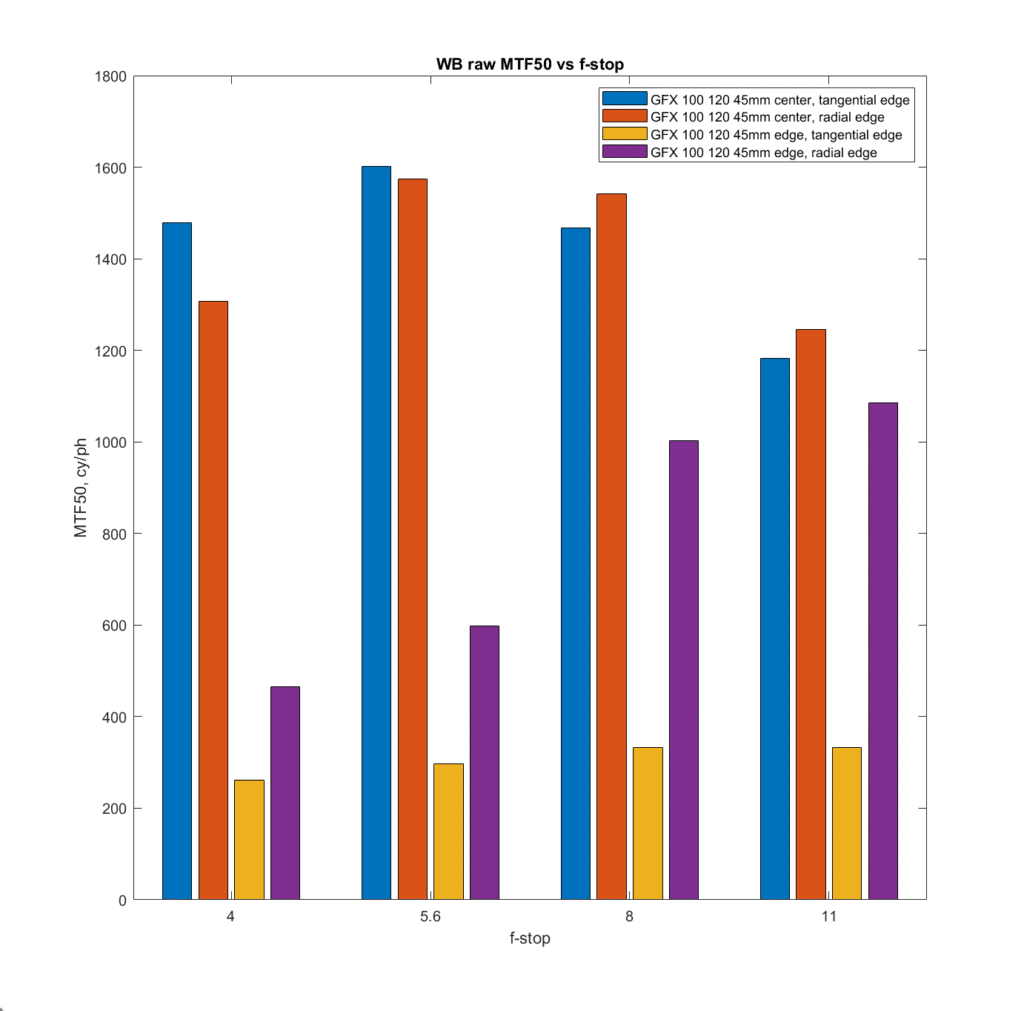
The vertical axis is MTF50 in cycles per picture height. Higher is sharper. The horizontal axis is f-stop.
- The leftmost blue columns are for the 120/4 at minimum focusing distance (MFD) with a 45 mm tube, in the center of the image, with a vertical edge.
- The red columns are for the 120/4 at minimum focusing distance (MFD) with a 45 mm tube, in the center of the image, with a horizontal edge. In a perfect world, these columns would be the same height as the corresponding blue columns.
- The yellow columns are for the 120/4 at minimum focusing distance (MFD) with a 45 mm tube, at the right edge of the image, with a vertical edge.
- The purple columns are for the 120/4 at minimum focusing distance (MFD) with a 45 mm tube, at the right edge of the image, with a horizontal edge.
It’s pretty obvious that the performance suffers greatly with the 45 mm tube at the edges, especially for the vertical, or tangential, edge.
This test does not include the effects of focus curvature, which are calibrated out by the test methodology.
Let’s compare those results with the ones for the same lens at MFD with no tubes, which gets us 1:2 magnification.
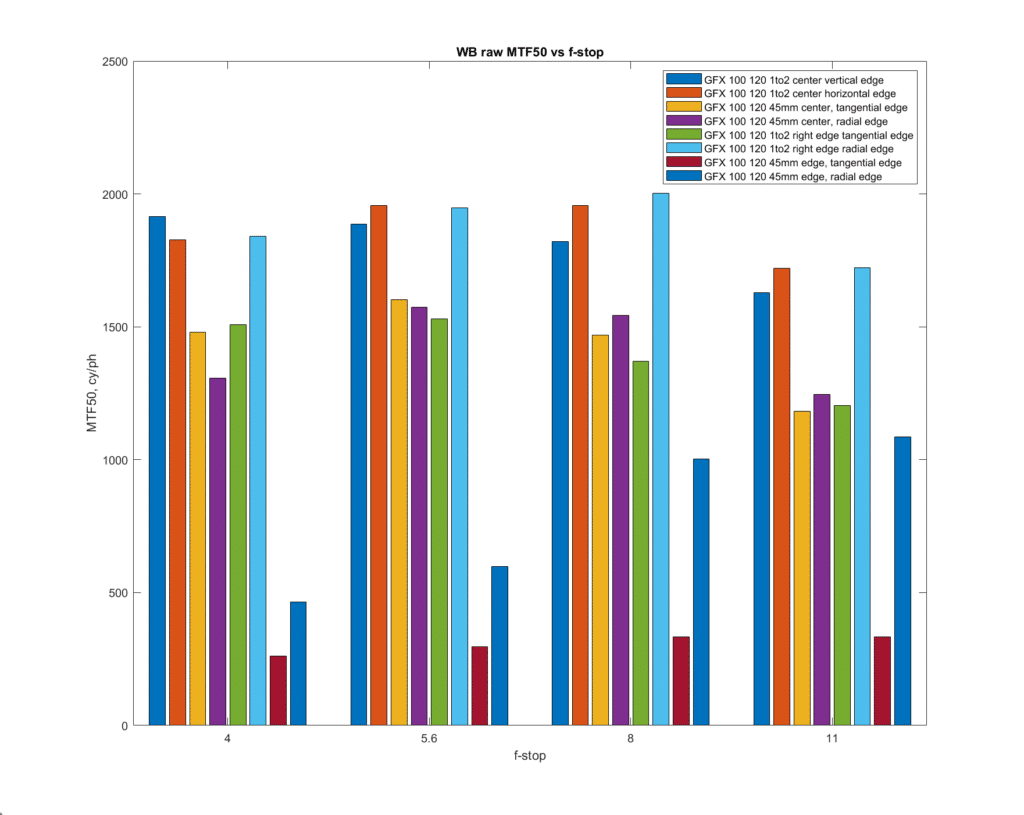
- The leftmost blue columns are for the 120/4 at minimum focusing distance (MFD) with no tube, in the center of the image, with a vertical edge.
- The red columns are for the 120/4 at minimum focusing distance (MFD) with no tube, in the center of the image, with a horizontal edge. In a perfect world, these columns would be the same height as the corresponding blue columns.
- The yellow columns are for the 120/4 at minimum focusing distance (MFD) with a 45 mm tube, in the center of the image, with a vertical edge.
- The purple columns are for the 120/4 at minimum focusing distance (MFD) with a 45 mm tube, in the center of the image, with a horizontal edge. In a perfect world, these columns would be the same height as the corresponding blue columns.
- The green columns are for the 120/4 at minimum focusing distance (MFD) with no tube, in the center of the image, with a vertical edge.
- The light blue columns are for the 120/4 at minimum focusing distance (MFD) with no tube, in the center of the image, with a horizontal edge. In a perfect world, these columns would be the same height as the corresponding blue columns.
- The brick red columns are for the 120/4 at minimum focusing distance (MFD) with a 45 mm tube, at the right edge of the image, with a vertical edge.
- The right blue columns are for the 120/4 at minimum focusing distance (MFD) with a 45 mm tube, at the right edge of the image, with a horizontal edge.
The edge performance at 1:1 is far worse than that at 1:2.
Some caveats:
The shaving blade may be a bit sharper than the industrial onoe, which would favor the 1:1 shots in this test. I will explore this.
The f-shots indicated are the indicated ones, not the effective ones. I’m guessing that the effective f-stops in the 1:2 case are half to two-thirds of a stop narrower than the indicated ones, and the effective f-stops in the 1:1 case are one and a half to to one and two-thirds of a stop narrower than the indicated ones.
One note: the Fuji focus bracketing feature does not pay any attention to the effective f-stop, even though it has enough information to compute it. Therefore, the steps are smaller than they have to be.
There appears to be significant lateral chromatic aberration (LaCA) at 1:1. Here’s a close look at a tangential edge in the sharpest image in the f/4 series:
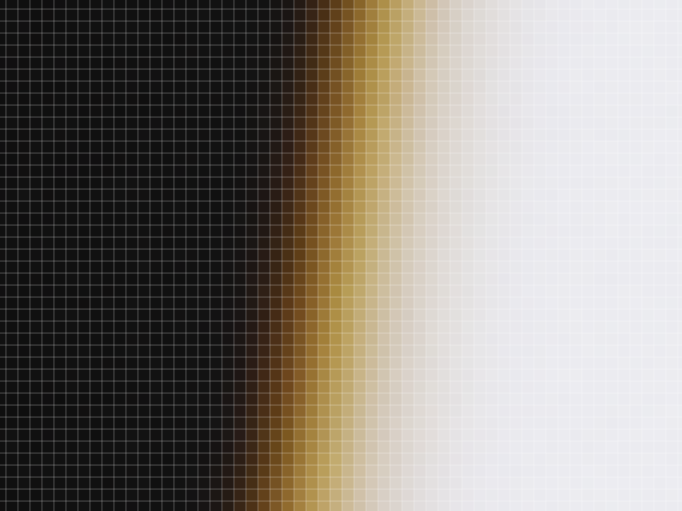
The radial edge is fuzzy, but doesn’t have the spectacular chromatic effects.
Leave a Reply