This is one in a series of posts on the Fujifilm GFX 100S. You should be able to find all the posts about that camera in the Category List on the right sidebar, below the Articles widget. There’s a drop-down menu there that you can use to get to all the posts in this series; just look for “GFX 100”. Since it’s more about the lenses than the camera, I’m also tagging it with the other Fuji GFX tags.
I’ve been posting a lot recently about the 120 mm f/4 GF macro lens for the GFX. I found it a good performer at 1:2, at minimum focusing distance (MFD) with no extension tubes, but that it had really soft edges and a lot of focus curvature at MFD with 36 mm of tubes. In this post, I tested it at 1:1 with a 45 mm tube,a and found it credible on-axis but soft on the right edge of the frame. I reported those results numerically and visually, using the time honored sharpness target of a banknote. The 120/4 GF was soft in the corners and edges at MFD with 18mm, 36mm, and 45mm of extension by tubes.
For copy applications, and for some 3D subjects that require extension tubes, the 120/4 GF just isn’t cutting it. I tried the CV 125/2.5 and it was a big improvement. I’d had a Schneider 90 mm f/4.5 Apo Componon enlarging lens lying around, so I decided to try it.
Here’s the setup:
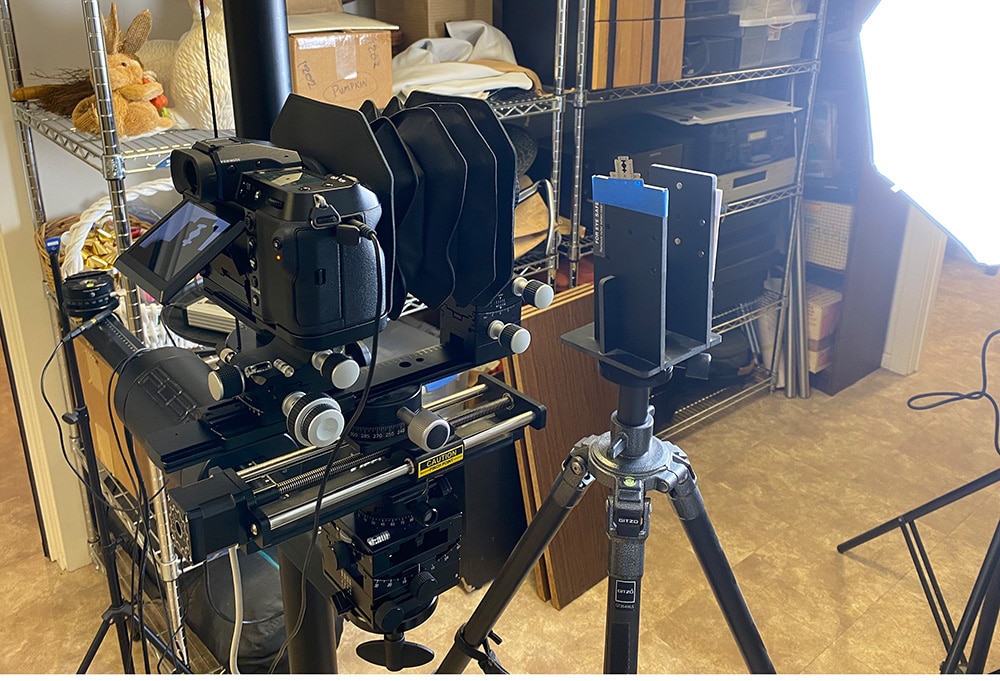
The lens is mounted on a Cambo Actus, which is in turn mounted on a GFX 100S. The whole thing is mounted on a Cognisys rail, and is aimed at a backlit rasor blade.
Here’s the test procedure:
- GFX 100S
- Foba camera stand
- C1 head
- Cambo Actus
- Lens focused to get to 1:1 magnification
- ISO 100
- Electronic shutter
- 10-second self timer
- Indicated f/4.5 through f/11
- Exposure time adjusted in M mode
- Cognisys rail 200 exposures, 20 um step size
- Initial focus short of target
- Convert RAF to DNG using Adobe DNG Converter
- Extract raw mosaics with dcraw
- Extract slanted edge for each raw plane in a Matlab program the Jack Hogan originally wrote, and that I’ve been modifying for years.
- Analyze the slanted edges and produce MTF curves using MTF Mapper (great program; thanks, Frans)
- Fit curves to the MTF Mapper MTF50 values in Matlab
- Correct for systematic GFX focus bracketing inconsistencies
- Analyze and graph in Matlab
The results:
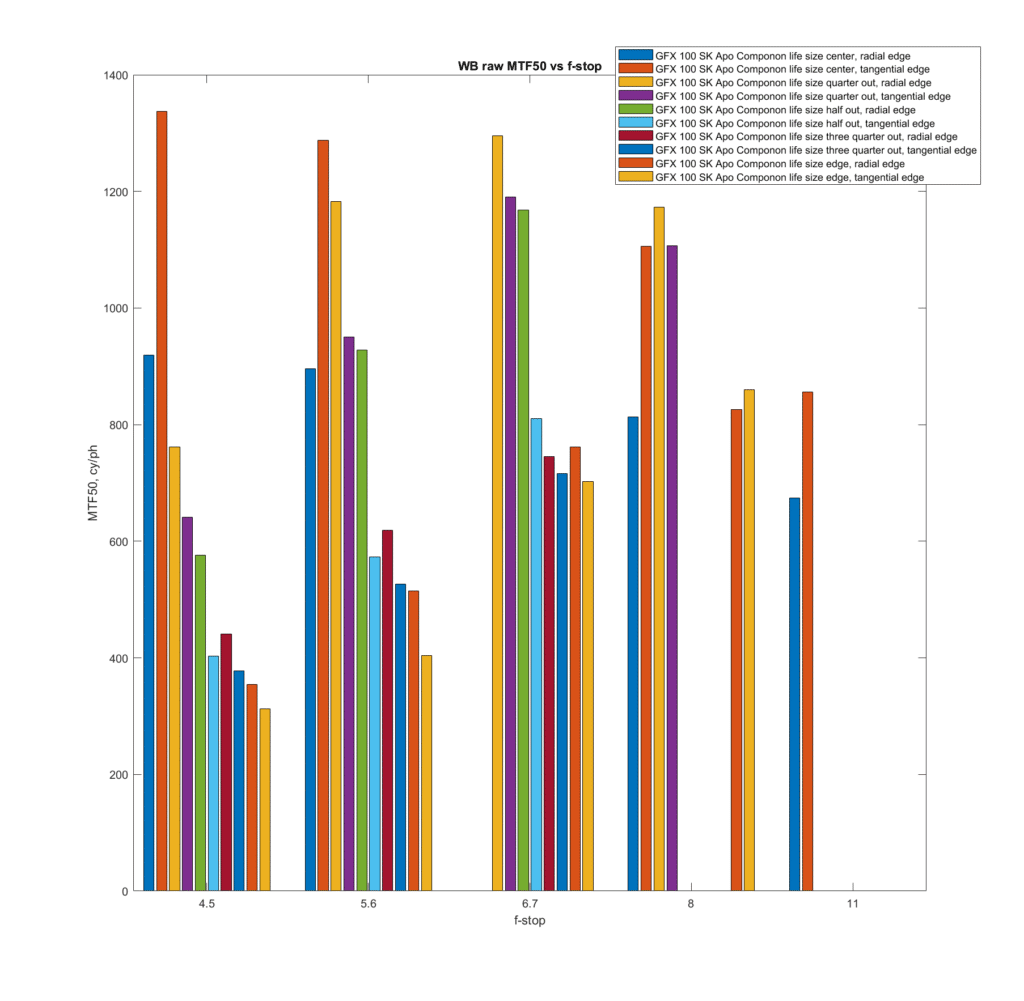
The f-stop setting of the lens was not visible with the Cambo setup, so I didn’t always get the f-stops I wanted. There are pairs of bars for five different locations on the sensor: in the center, 1/4 the way to the edge, halfway to the edge, 3/4 of the way to the edge, and near the edge. Unfortunately, not all locations are shown for all stops, but I think there’s enough data for you to get the idea of what’s going on. MTF50 in cycles per picture height is the y axis, and the x axis is f-stop. F/6.7 appears to be the optimum stop. One thing to remember: at 1:1, the effective f-stop is two stops narrower than the indicated f-stop, So f/5.6 is effectively f/11, f/8 is effectively f/16, and so on.
This is not great performance. It is not as good as the CV 125/2.5, for example. The lens was designed for a magnification of about 1:3.3, so it’s not to surprising that it doesn’t do well at 1:1, but I was still disappointed.
Here’s how the microcontrast looks:
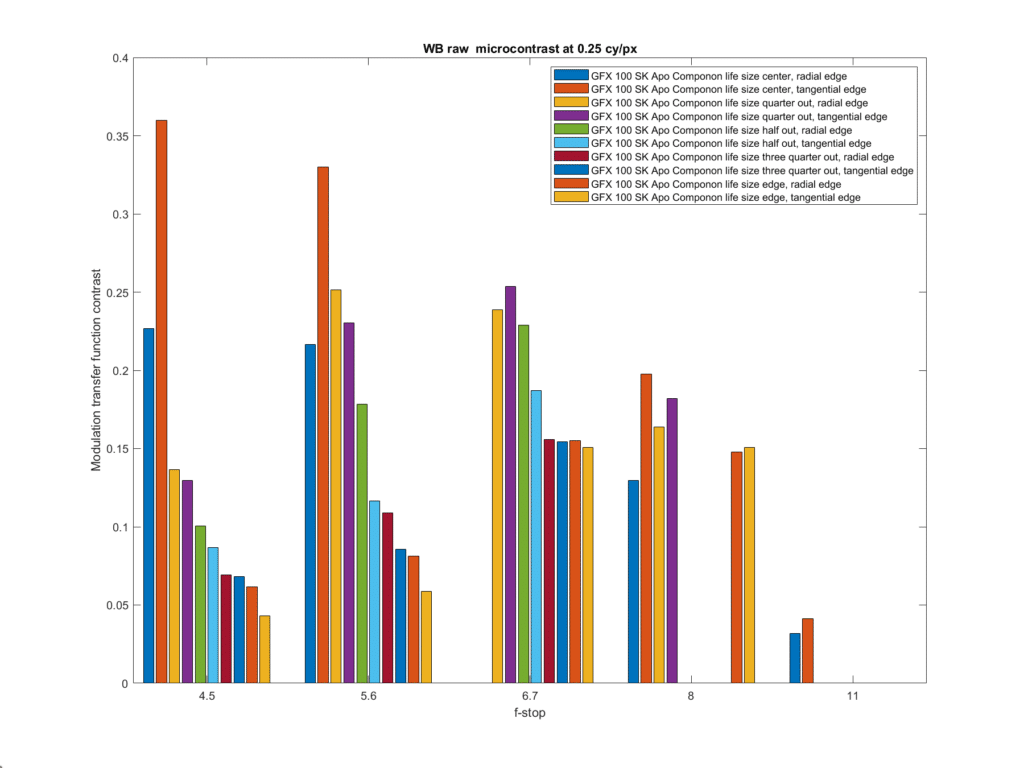
It’s the same idea.
Comparing the enlarging lens to the Fuji 120 GF in the center of the frame:
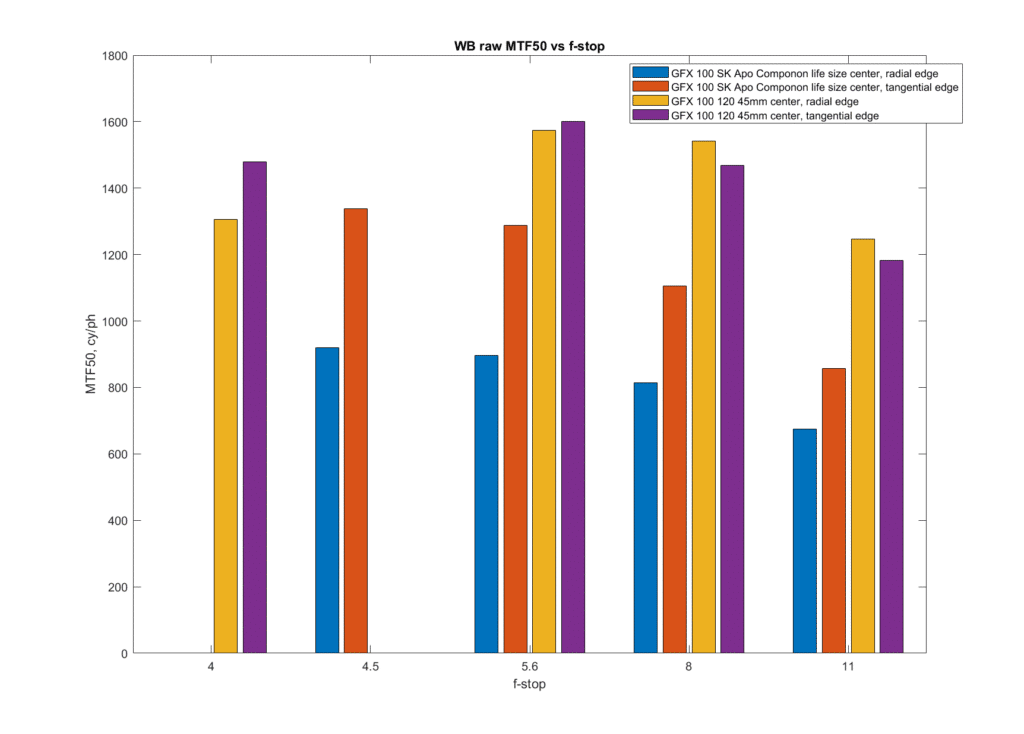
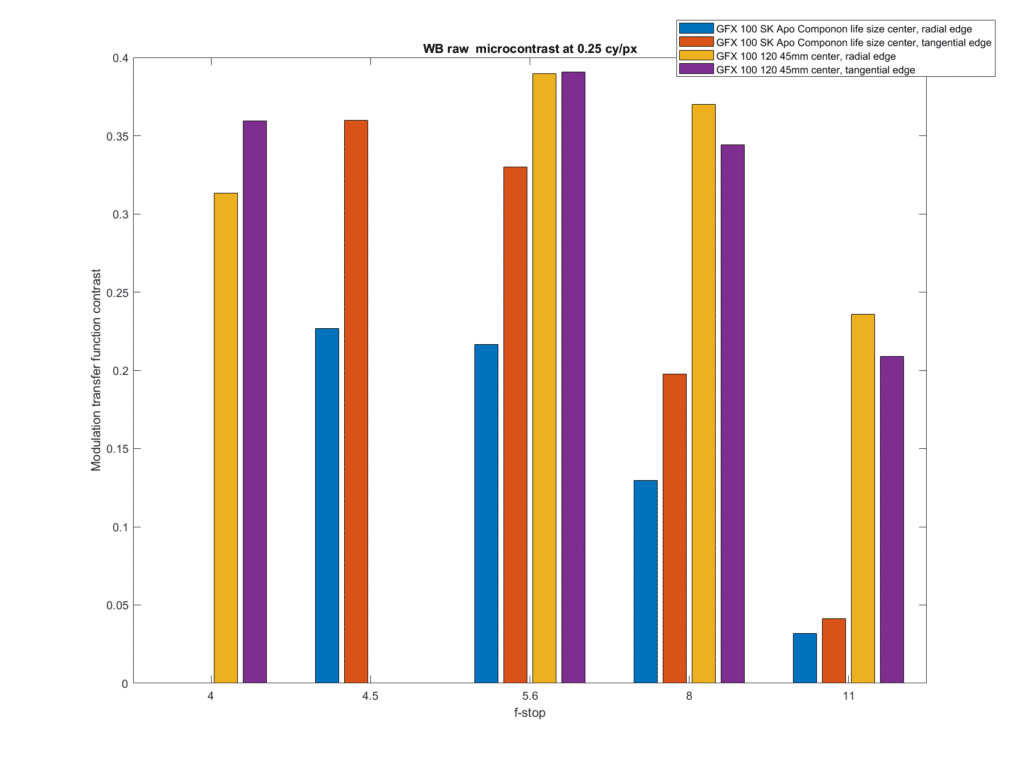
The Fuji lens is a clear winner. It should be noted that the effective aperture of the 120 GF is one-third to two-thirds of a stop wider than the Schneider when the indicated f-stop is the same.
At the edge:

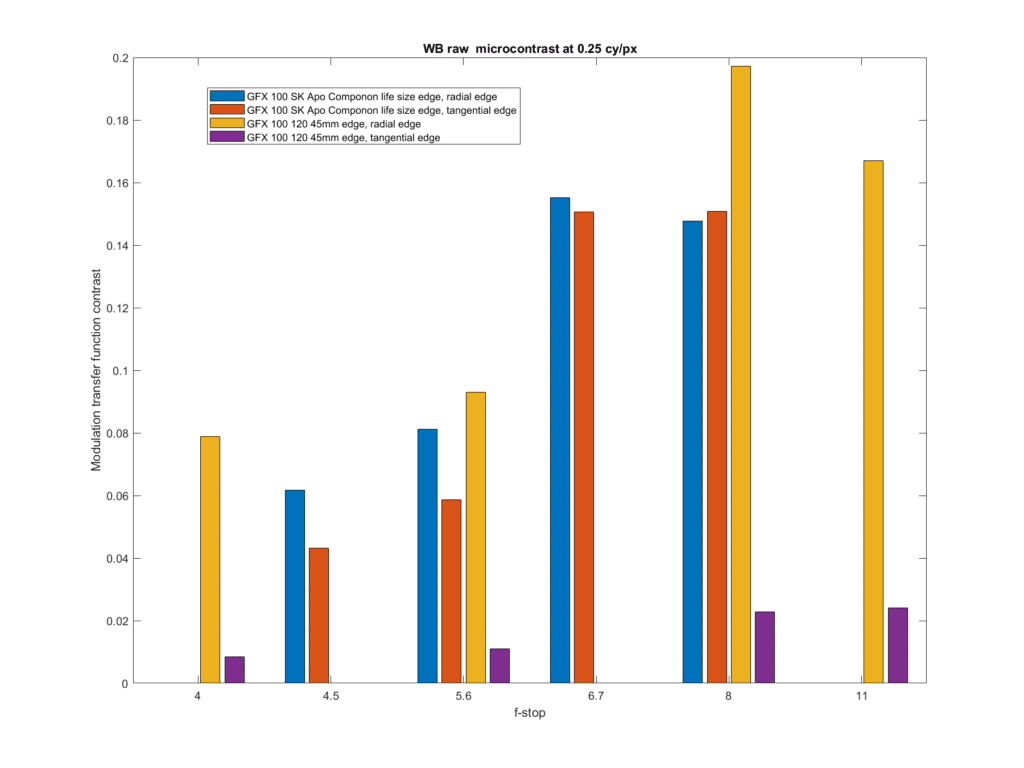
Now the Schneider lens looks better. The Schneider seems to have a flatter field than the Fuji lens, but since I’m planning on stacking, I haven’t looked at that in any detail.
So far, the best lens I’ve tested for 1:1 performance is the CV 125/2.5.
Jim:
I was wondering what it would take to be able to use a Fuji GFX 100s to digitize 35mm film. Its benefits for 35mm film digitization probably not worth either the cost or trouble, I think a far better case can be made for using a Fuji GFX-series camera to digitize larger formats, especially sheet film, but bear with me. And of course it could also be used for other greater-than 1:1 work, just as sheet film was sometimes used back-in-the-day.
For 35mm film digitization, the different aspect ratios means that the 36mm long side of 24x36mm film gets enlarged to the 44mm long side of the Fuji. So operating at 1.22:1 magnification, even greater that the 1:1 you experimented with. (DoF probably requires focus bracketing and stacking to accomodate the film curvature of mounted slides, and maybe even the tolerances of bare negatives, at least some film stocks).
I don’t have any of the Fuji GFX cameras, and can’t justify the expense for this use, so this is entirely a thought experiment.
To make use of a medium format camera worthwhile would require a top-notch lens, otherwise one might as well just use
an A7Riv, with pixel-shift, with the latest Sigma 105mm f/2.8 “Art” Macro for mirrorless, which has gotten great reviews and is probably the best current affordable and widely-available 1:1 macro lens.
So what lens to use on a Fuji GFX100s? What do you think of using that aforementioned Sigma, reverse mounted on a Fuji GFX100s? Since the Sigma macro is focus-by-wire, and with electronic diaphram control, what about hooking it up to a separate Sony body with something like the Novoflex cabling to fool it into thinking it’s mounted on a Sony body? Only manual focus and aperture, of course. Though if that Sony camera was operated tethered to a computer, one could increment focus that way and thereby do a “semi-manual” focus bracketing.
https://www.novoflex.de/en/products-637/macro/reverse-lens-adapter-canon-eos.html
(Flange focal distance on the Fuji body is more than on the Sigma for mirrorless Sony, but reverse mounted and used at greater-than 1:1, that issue would presumably not come into play).
Am I missing any important considerations here, with this thought experiment?
And do you think any available lenses for a Fuji GFX100s are good enough optically (i.e. especially resolution and field-flatness wise) to significantly-better an A7Riv used with the newest Sigma 105 macro (“Art” DG DN) to digitize 4×5 inch sheet film?
If you’re looking specifically at 1:1 copy work you should consider using a process lens like an APO Ronar.
I would not bet on an old fashioned 4 lens elements design for large format. The pixel peep era is retiring many well established formulas from even quite recent optics. That is well shown in the Apo-Componon test in series, as this former state of the art lens for enlarging and copy cannot hold such new standards requirements.
The best results here at 1:1 are from the CV 125. But even this lens may have been surpassed by the Apo-Lanthar Macro 110mm f/2.5. As can be read in Cosina’s website:
“The lens covers the full frame image area, and achieves a maximum image reproduction of 1:1 life size with no additional attachments. In order to ensure subjects from minimum focus distance to infinity are captured with extremely high image quality, a 3-group floating mechanism is employed to adjust three optical groups according to focus distance.”
With 14 elements, 8 of them with anomalous dispersion, and the use of such (AFAIK) unprecedented floating mechanism to correct aberrations up to 1:1 without extra tube, this is the most promising lens available today to reach the high requirements of Jim’s tests.
But there’s no way to mount the 110/2.5 to the GFX.
An enlarging lens is designed for repro ratios much greater than 1:1. A process lens like an APO Ronar is optimized for 1:1 and flat field. The very modern, state of the art GF 120mm sucks at 1:1 because it’snot made for it.
Now what an enlarging does well is when you going much larger than 1:1 and in that case you need to reverse the lens. BTW I own all the APO Rodagon-N enlarging lenses, the Rodenstock equivalent to the APO Componons and I would not use any of them 1:1.
I use a Rodenstock Rodagon f4:80mm to copy 35mm negatives 1:1 on a Sony a7RII and it works fine when reversed with the front pointing at the sensor. This also happens using the 2:3 crop on the Fuji GFX. At f8 there’s good rendition of the grain up to the corners and it has a very flat field.
I’ve not tested that lens, but I’ve had good luck with another Rodenstock lens that is characterized at 1:1.
https://blog.kasson.com/gfx-50s/rodenstock-75-4-apo-rodagon-d-on-gfx-100s-at-11/
Hi, Jim, have you seen the website https://www.closeuphotography.com/ ? Its author, Robert O’Toole tests various unorthodox macro lenses at high magnifications. You may find something useful there. For example one lens he praises is Scanner Nikkor ED 14-element (was used in the Nikon Coolscan 8000 ED and 9000ED film scanners) https://www.closeuphotography.com/scanner-nikkor-ed-lens (and it has 60 mm image circle, so should be usable on GFX)
Thanks. Who would have thought that the lens in a consumer scanner would be that good?