the last word

Photography meets digital computer technology. Photography wins -- most of the time.

  • site home
  • blog home
  • galleries
  • contact
  • underwater
  • the bleeding edge
You are here: Home / Leica Q2 Monochrom / What’s the focal length of the Leica Q2 lens?

What’s the focal length of the Leica Q2 lens?

June 18, 2022 JimK 3 Comments

This is the 18th post in a series about the Leica Q2 Monochrom. You can see all the other posts in the series by looking in the Category List drop-down menu on the right side of the page.

I was asked to calculate the focal length of the lens in the Q2. I don’t have a Q2, but I do have a Q2M, and I’m  going to assume that its lens has the same focal length.

I came up with this method for calculating the focal length:

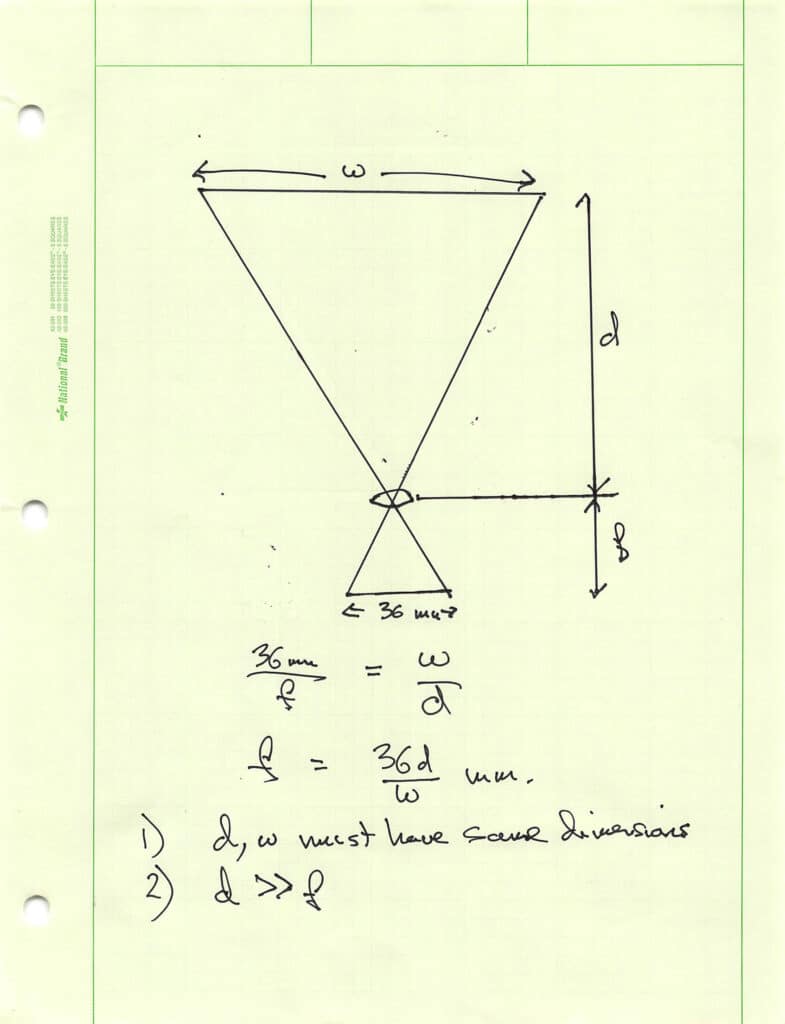
The method is based upon similar triangles on the object side and the image side of the lens. It depends on the lens being symmetrical, which is not true for the Q2 lens, but the differences should be small in this case if the target is far enough away.

Then I realized that, if the lens has significant distortion — which it does — I’d get an average focal length across the image field, but what I wanted was the focal length in the center of the field. So I decided to shoot a target that covered about a third of the horizontal width of the sensor. The rules of thirds grid in the camera made getting the target size in the frame about right. As you’ll see by the calculation to come, it doesn’t have to be exactly right.

I lined the camera square on to a garage door that’s 9 feet wide. I moved the camera back and forth until the garage door covered the central third of the image width in the finder. I captured a raw file. I measured the distance from the film plane to the garage door. It was 19 feet, 9 inches. I subtracted the putative focal length of the lens, and that gave me 19 feet 8 inches, or 19.67 feet.

I brought the captured image into RawDigger, and exported it as a TIFF, thus doing an end run around the software distortion correction built into Lightroom. I measured the extent of the door in the TIFF file with the Ps ruler: 2789 pixels. I measured the width of the image: 8376 pixels. Figuring that 8376 pixels is 36 mm, I calculated the width of the garage door on the sensor as 11.99 mm, which is pretty close to the 12 mm I was shooting for.

Then I performed the calculation above, replacing the 36mm constant with 11.99 mm. I got a focal length of 26.2 mm.

So, there’s your answer: 26.2 mm. After software distortion correction, the lens won’t appear to as wide and before, but it turns out that, with Adobe Lightroom and the default distortion correction, the effective focal length of the corrected lens is about the same as the uncorrected lens in the middle of the field: about 26 mm..

Leica Q2 Monochrom

← Effect of camera resolution on small prints DNS maintenance in progress →

Comments

  1. Jerry says

    June 21, 2022 at 4:15 am

    Hi Jim,
    your method is good if we know the putative focal length of the lens,
    but if we have no idea of its focal length we may transform the equation to get:
    f = (36 x D)/(36 + W)
    where D is the distance from the sensor plane to the target (d+f on your drawing)
    and W is the width of the target.
    By replacing 36 with w (sensor width) we get equation for all film formats
    f = (w x D)/(w + W)
    To simplify calculations all dimensions should be in mm

    Reply
    • JimK says

      June 21, 2022 at 8:14 am

      Making the putative focal length of the lens 0 only changes the results by 0.4% using my method, so it’s not a very important part of the calculation.

      Reply
  2. Alan says

    June 24, 2022 at 12:18 am

    If you take a picture of the night sky and then send the file to https://nova.astrometry.net/upload

    It will do fancy calculations and tell you the number of arc seconds per pixel which will give you another way to calculate the FOV. It will be in the log that is shown after solving but before you go to the solution.

    Reply

Leave a Reply Cancel reply

Your email address will not be published. Required fields are marked *

March 2023
S M T W T F S
 1234
567891011
12131415161718
19202122232425
262728293031  
« Jan    

Articles

  • About
    • Patents and papers about color
    • Who am I?
  • Good 35-70 MF lens
  • How to…
    • Backing up photographic images
    • How to change email providers
  • Lens screening testing
    • Equipment and Software
    • Examples
      • Bad and OK 200-600 at 600
      • Excellent 180-400 zoom
      • Fair 14-30mm zoom
      • Good 100-200 mm MF zoom
      • Good 100-400 zoom
      • Good 100mm lens on P1 P45+
      • Good 120mm MF lens
      • Good 18mm FF lens
      • Good 24-105 mm FF lens
      • Good 24-70 FF zoom
      • Good 35 mm FF lens
      • Good 60 mm lens on IQ3-100
      • Good 63 mm MF lens
      • Good 65 mm FF lens
      • Good 85 mm FF lens
      • Good and bad 25mm FF lenses
      • Good zoom at 24 mm
      • Marginal 18mm lens
      • Marginal 35mm FF lens
      • Mildly problematic 55 mm FF lens
      • OK 16-35mm zoom
      • OK 60mm lens on P1 P45+
      • OK Sony 600mm f/4
      • Pretty good 16-35 FF zoom
      • Pretty good 90mm FF lens
      • Problematic 400 mm FF lens
      • Tilted 20 mm f/1.8 FF lens
      • Tilted 30 mm MF lens
      • Tilted 50 mm FF lens
      • Two 15mm FF lenses
    • Found a problem – now what?
    • Goals for this test
    • Minimum target distances
      • MFT
      • APS-C
      • Full frame
      • Small medium format
    • Printable Siemens Star targets
    • Target size on sensor
      • MFT
      • APS-C
      • Full frame
      • Small medium format
    • Test instructions — postproduction
    • Test instructions — reading the images
    • Test instructions – capture
    • Theory of the test
    • What’s wrong with conventional lens screening?
  • Previsualization heresy
  • Privacy Policy
  • Recommended photographic web sites
  • Using in-camera histograms for ETTR
    • Acknowledgments
    • Why ETTR?
    • Normal in-camera histograms
    • Image processing for in-camera histograms
    • Making the in-camera histogram closely represent the raw histogram
    • Shortcuts to UniWB
    • Preparing for monitor-based UniWB
    • A one-step UniWB procedure
    • The math behind the one-step method
    • Iteration using Newton’s Method

Category List

Recent Comments

  • JimK on Sony 135 STF on GFX-50R, sharpness
  • K on Sony 135 STF on GFX-50R, sharpness
  • Mal Paso on Christmas tree light bokeh with the XCD 38V on the X2D
  • Sebastian on More on tilted adapters
  • JimK on On microlens size in the GFX 100 and GFX 50R/S
  • Kyle Krug on On microlens size in the GFX 100 and GFX 50R/S
  • JimK on Hasselblad X2D electronic shutter scan time
  • Jake on Hasselblad X2D electronic shutter scan time
  • Piotr Chylarecki on Who am I?
  • JimK on Who am I?

Archives

Copyright © 2023 · Daily Dish Pro On Genesis Framework · WordPress · Log in

Unless otherwise noted, all images copyright Jim Kasson.