• site home
  • blog home
  • galleries
  • contact
  • underwater
  • the bleeding edge

the last word

Photography meets digital computer technology. Photography wins -- most of the time.

You are here: Home / Nikon Z6/7 / 50 mm f/1.8 Nikkor-S transition point spread functions

50 mm f/1.8 Nikkor-S transition point spread functions

January 5, 2019 JimK 16 Comments

This is one in a series of posts on the Nikon Z6 and Z7. You should be able to find all the posts about that camera in the Category List on the right sidebar, below the Articles widget. There’s a drop-down menu there that you can use to get to all the posts in this series; just look for “Nikon Z6/7”.

I have long published out-of-focus point spread functions (OOF PSFs) for lenses, since it’s a good way to learn the far-OOF bokeh characteristics of a lens. Here’s a set of OOF PSFs from the 50 mm f/1.8 Nikkor-S.

Marianne Oelund has taken that a step further, and looked at PSFs as the lens is progressively defocused. I thought I’d take a leaf from her book and give that a try with the Nikon 50S on a Z7. I used an Astrozap artificial star for the target, and the Z7’s focus shift shooting (FSS) feature for the focusing, with the star in the center of the field.

Here’s what I got:

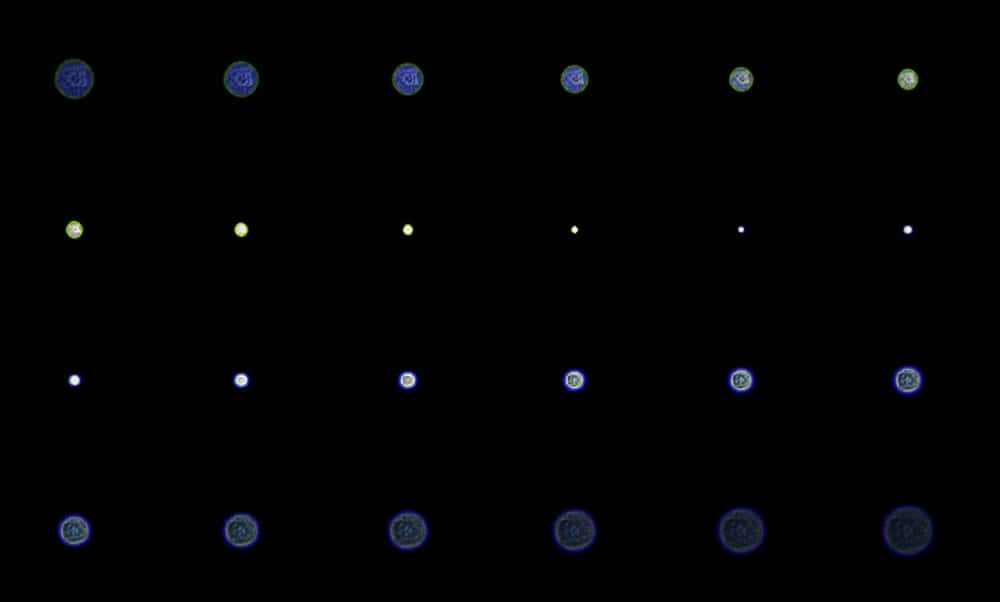
The closest-focused image is the one at the upper left. Focusing is progressively moved further away in steps that move the image at the sensor by about 90 micrometers. Perfect focus is not achieved, but the next-to-last image in the second row is closest. White balance, exposure, and the raw processing was the same for all the images, and the darkening of the further OOF PSFs is what you’d expect since the same amount of light energy is being spread over a larger area.

What can we learn from these?

First off, there is a bright ring around the further-OOF images. We’ve seen that before. But now there’s an interesting asymmetry: the ring is more pronounced when the lens is back-focused than when it’s front-focused. It’s also a different color: When the lens is front-focused, it’s green, and when it’s back-focused, it’s bluish, but appears weaker. I suspect that the relative weakness is due to the characteristics of the human eye, which is much more sensitive to green light than blue light.

We can also see longitudinal chromatic aberration, with the close-but-no-cigar front-focused images green and the near back-focused ones blue.

Here’s what happens when you place the star off-axis, in this case almost all the way to the left-center edge of the frame:


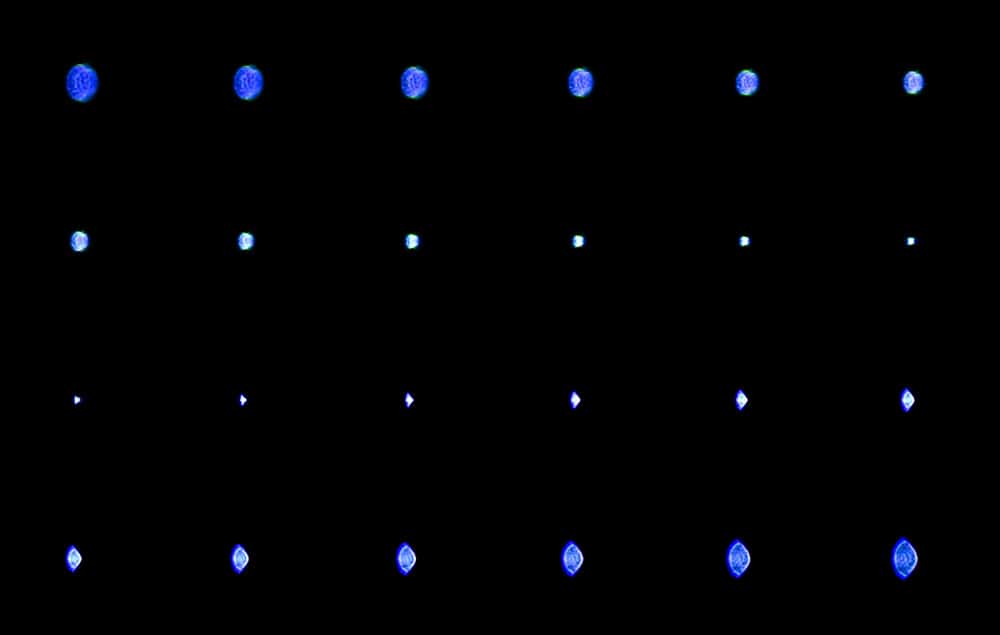
Now the shape of the PSF is quite different when the lens is front-focused (top two rows) than when it is back-focused in the bottom two rows. There is not much coma for front-focusing and a comet-lookalike for the barely back-focused images. There is astigmatism that shows up in the orientation of the greenish parts of the periphery.

I’d like to perform the same sort of test with another lens. I think the Nikon 58 mm f/1.8G would be an interesting candidate.

Nikon Z6/7

← Nikon 50/1.8S near-focus bokeh Better Nikon 50/1.8S transition point spread functions →

Comments

  1. Maximilian says

    January 6, 2019 at 12:17 pm

    Are you talking about this lens?
    https://nikonrumors.com/2012/11/28/nikkor-s-5cm-12-lens-review.aspx/

    Reply
    • JimK says

      January 6, 2019 at 3:52 pm

      My bad. Fixed.

      Reply
  2. Brandon Dube says

    January 6, 2019 at 8:43 pm

    The almost perfectly triangular PSF at the edge of the field is interesting. Its neighbor diamonds (as on playing cards) look like a classic combination of astigmatism and coma, but I have no intuition for how you get a triangle. It is probably to do with vignetting. I’ll poke around in my simulator and see if I can come up with something reasonable. Are these images linear (or at least as close as you can get with demosaicing?) . If not, C1 has a linear color profile (I don’t know how linear it really is) that would help with interpretation.

    BTW, what is the magnification here? You have a 100 micron pinhole in object space — if the magnification is small enough that the geometric image of the pinhole becomes << the pixel size (say, 1 micron…) you might be able to do wavefront sensing to retrieve the aberrations of lenses with this setup.

    Reply
    • JimK says

      January 7, 2019 at 9:35 am

      what is the magnification here?

      About 1/60.

      if the magnification is small enough that the geometric image of the pinhole becomes << the pixel size (say, 1 micron…) you might be able to do wavefront sensing to retrieve the aberrations of lenses with this setup.

      I could back up a bit and get to 1 um in image space, but I have no idea how to do wavefront sensing.

      Reply
      • Brandon Dube says

        January 7, 2019 at 3:16 pm

        It’s an optimization problem that would need a small mountain of code behind it. I already have one for doing it with MTF, but the PSF through focus is the classical and preferred input.

        I could modify my code to use the PSF if you wanna give it a whirl.

        Reply
        • JimK says

          January 7, 2019 at 8:35 pm

          I’m in the middle of a big networking project now. I don’t think I have the bandwidth. Thanks for the offer.

          Reply
    • JimK says

      January 7, 2019 at 9:36 am

      Are these images linear (or at least as close as you can get with demosaicing?) .

      No, I used the standard Lr Adobe Color profile.

      Reply
      • Jack Hogan says

        January 7, 2019 at 10:08 am

        That’s one reason for color shifts. Given the fact that the subject is monochromatic I think it would be useful to also look at undemosaiced, white balanced raw images.

        Reply
        • JimK says

          January 7, 2019 at 11:13 am

          The subject is monochromatic, but the image projected by the lens on the sensor is not.

          Reply
          • Jack Hogan says

            January 7, 2019 at 11:24 am

            Good point. Though I think that the star in the center of an in-spec lens should not show much lateral CA, and if the blue were due to axial CA it should change color as it goes through focus (maybe it does?)

            Reply
            • JimK says

              January 7, 2019 at 11:30 am

              Stay tuned. I’ll be posting more images today or tomorrow.

              Reply
          • Brandon Dube says

            January 7, 2019 at 3:15 pm

            If the object is monochromatic, the image must necessarily also be monochromatic. The object being “white” or spectrally uniform is not the same as monochromatic.

            Reply
            • JimK says

              January 7, 2019 at 4:36 pm

              We must not be communicating. What are those green and blue rings about if the image is monochromatic? Oh, I get it, I think: you mean monochromatic in the sense of having only one wavelength? In that sense, the target is not monochromatic. In the sense of monochromatic meaning “all the same color”, the target is, but the image is not.

              Reply
              • Brandon Dube says

                January 8, 2019 at 8:29 am

                Ah, yes. Not communicating — who knew there would be a difference in interpretation of a technical term between fields 🙂

                Reply
                • JimK says

                  January 8, 2019 at 8:56 am

                  Ah, yes. And, to peel the onion back one more layer, in the color biz, monochromatic means “all the same chroma”; luminance variations are allowed.

Trackbacks

  1. Better Nikon 50/1.8S transition point spread functions says:
    January 13, 2019 at 3:16 pm

    […] Oelund looked at what I did here, and made two […]

    Reply

Leave a Reply Cancel reply

Your email address will not be published. Required fields are marked *

May 2025
S M T W T F S
 123
45678910
11121314151617
18192021222324
25262728293031
« Apr    

Articles

  • About
    • Patents and papers about color
    • Who am I?
  • How to…
    • Backing up photographic images
    • How to change email providers
    • How to shoot slanted edge images for me
  • Lens screening testing
    • Equipment and Software
    • Examples
      • Bad and OK 200-600 at 600
      • Excellent 180-400 zoom
      • Fair 14-30mm zoom
      • Good 100-200 mm MF zoom
      • Good 100-400 zoom
      • Good 100mm lens on P1 P45+
      • Good 120mm MF lens
      • Good 18mm FF lens
      • Good 24-105 mm FF lens
      • Good 24-70 FF zoom
      • Good 35 mm FF lens
      • Good 35-70 MF lens
      • Good 60 mm lens on IQ3-100
      • Good 63 mm MF lens
      • Good 65 mm FF lens
      • Good 85 mm FF lens
      • Good and bad 25mm FF lenses
      • Good zoom at 24 mm
      • Marginal 18mm lens
      • Marginal 35mm FF lens
      • Mildly problematic 55 mm FF lens
      • OK 16-35mm zoom
      • OK 60mm lens on P1 P45+
      • OK Sony 600mm f/4
      • Pretty good 16-35 FF zoom
      • Pretty good 90mm FF lens
      • Problematic 400 mm FF lens
      • Tilted 20 mm f/1.8 FF lens
      • Tilted 30 mm MF lens
      • Tilted 50 mm FF lens
      • Two 15mm FF lenses
    • Found a problem – now what?
    • Goals for this test
    • Minimum target distances
      • MFT
      • APS-C
      • Full frame
      • Small medium format
    • Printable Siemens Star targets
    • Target size on sensor
      • MFT
      • APS-C
      • Full frame
      • Small medium format
    • Test instructions — postproduction
    • Test instructions — reading the images
    • Test instructions – capture
    • Theory of the test
    • What’s wrong with conventional lens screening?
  • Previsualization heresy
  • Privacy Policy
  • Recommended photographic web sites
  • Using in-camera histograms for ETTR
    • Acknowledgments
    • Why ETTR?
    • Normal in-camera histograms
    • Image processing for in-camera histograms
    • Making the in-camera histogram closely represent the raw histogram
    • Shortcuts to UniWB
    • Preparing for monitor-based UniWB
    • A one-step UniWB procedure
    • The math behind the one-step method
    • Iteration using Newton’s Method

Category List

Recent Comments

  • JimK on Goldilocks and the three flashes
  • DC Wedding Photographer on Goldilocks and the three flashes
  • Wedding Photographer in DC on The 16-Bit Fallacy: Why More Isn’t Always Better in Medium Format Cameras
  • JimK on Fujifilm GFX 100S II precision
  • Renjie Zhu on Fujifilm GFX 100S II precision
  • JimK on Fuji 20-35/4 landscape field curvature at 23mm vs 23/4 GF
  • Ivo de Man on Fuji 20-35/4 landscape field curvature at 23mm vs 23/4 GF
  • JimK on Fuji 20-35/4 landscape field curvature at 23mm vs 23/4 GF
  • JimK on Fuji 20-35/4 landscape field curvature at 23mm vs 23/4 GF
  • Ivo de Man on Fuji 20-35/4 landscape field curvature at 23mm vs 23/4 GF

Archives

Copyright © 2025 · Daily Dish Pro On Genesis Framework · WordPress · Log in

Unless otherwise noted, all images copyright Jim Kasson.