• site home
  • blog home
  • galleries
  • contact
  • underwater
  • the bleeding edge

the last word

Photography meets digital computer technology. Photography wins -- most of the time.

You are here: Home / Nikon Z6/7 / Nikon Z7 banding constancy

Nikon Z7 banding constancy

October 18, 2018 JimK 7 Comments

This is one in a series of posts on the Nikon Z7. You should be able to find all the posts about that camera in the Category List on the right sidebar, below the Articles widget. There’s a drop-down menu there that you can use to get to all the posts in this series; just look for “Nikon Z6/7”.

It’s been hard to reproduce the banding consistently. Is there a shot to shot variation?

There are questions about how much what’s going on in one side of the image affect banding in the other.

I set up an experiment to shed light on both those things.

I put a light on the right side of an otherwise-pretty-dark scene.

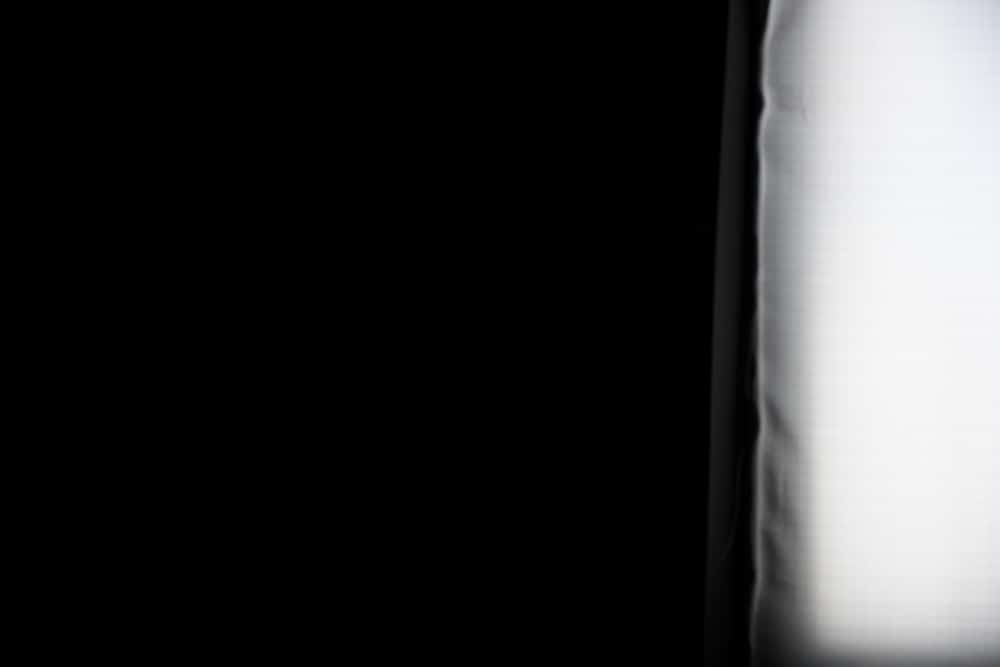
I made 10 exposures with the camera set to ISO 64, the shutter to 1/640, the 24-70mm f/4 at 70 mm and f/4. That was enough exposure to get the light within a stop or two of saturation, but definitely below that.

Then I turned down the light a bit and made 10 more exposures. I did that for 4 sets, then I turned the light off and made 10 exposures, for 50 exposures in all.

Then cropped all the images to the left half, and plotted the mean values of the PDAF rows and the non-PDAF rows.


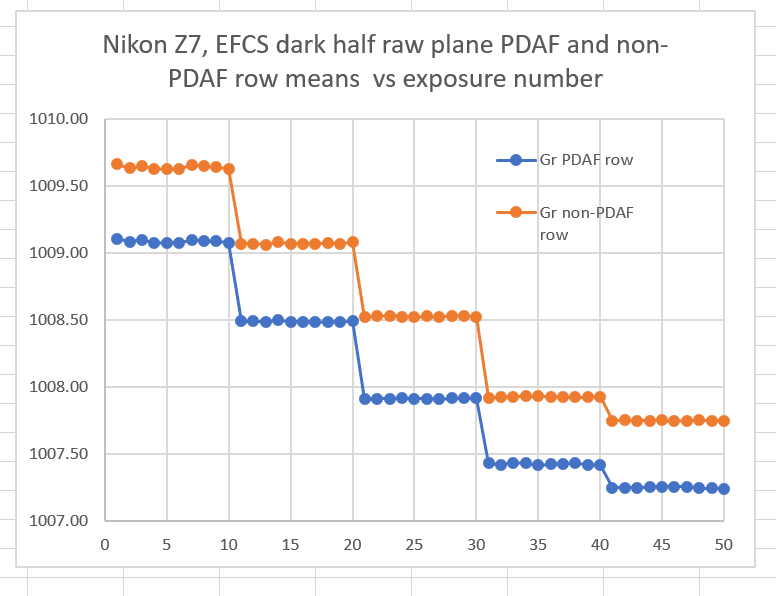
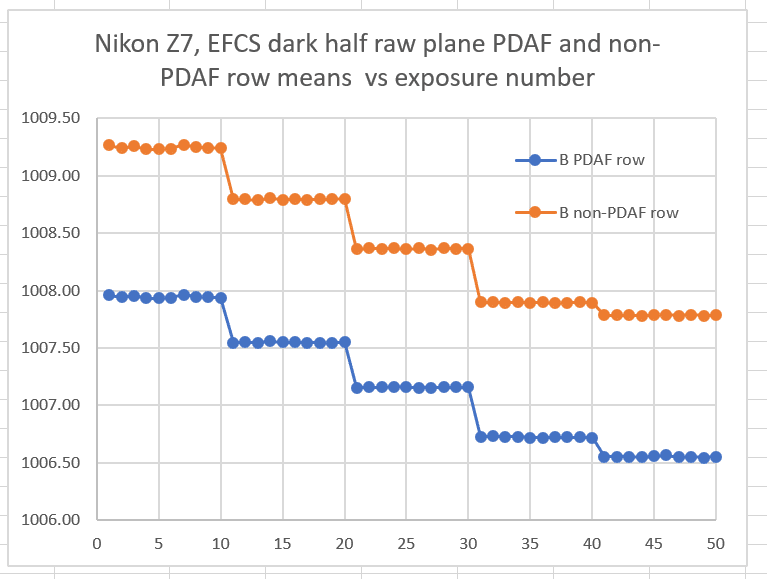
Flare causes the left-hand values to drop as the light is turned down. But the values for each of the sets of ten exposures are consistent, and the difference between the means of the PDAF and non-PDAF rows is not much affected.

My preliminary conclusions are that the banding is consistently there or not there and that it is not heavily affected by light on the other side of the image. I suspect that its visibility is affected by both the setup and the luck of the draw, though.

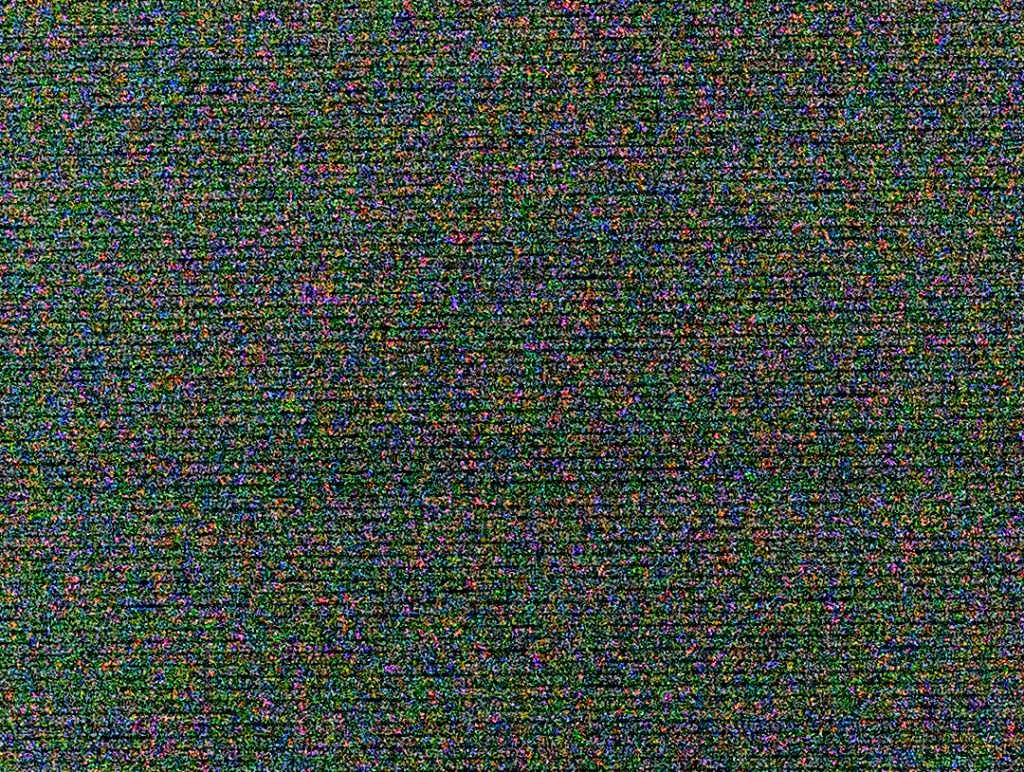
Here’s a crop of the left side of the image with a +5 Exposure push and a +100 shadow boost in ACR PV 5.

Nikon Z6/7

← Nikon Z7 banding in dark-field images Adobe Process Version 5 changes Z7 colors →

Comments

  1. Jonathan Perkins says

    October 18, 2018 at 3:22 pm

    Hi Jim,

    Thanks for doing this analysis, I find it interesting as a potential Z7 owner (and just out of curiosity as well!).

    I wondered if the visibility of the bands is enhanced by black level clipping? Although this would be a global change, just wondered if you used ExifTool to reduce the black level by a few steps across all channels if that would provide a quick visual masking/reduction pending a more sophisticated fix (perhaps by manipulating the raw data).

    Jonathan

    Reply
    • Jonathan Perkins says

      October 18, 2018 at 4:20 pm

      I’m sure you know, but the ExifTool syntax is e.g:

      exiftool -BlackLevel=’1006 1006 1006 1006′

      to update the black levels (it should create an _original backup by default, but please test on a file copy first). I know this is a bit crude and too much of an adjustment may introduce a colour cast but if it helped mitigate the banding it might be useful.

      Jonathan

      Reply
      • JimK says

        October 18, 2018 at 5:23 pm

        In order to mitigate this issue, you need to change the black point only for the B and Gr pixels in the PDAF rows. If you want to crush the blacks, you can do that after demosaicing.

        Reply
        • Jonathan Perkins says

          October 19, 2018 at 1:47 am

          Sure Jim, understood. What I was worried about was if the raw converter was making the banding more visible by discarding all samples below the black level, thereby turning the distribution of the PDAF values into one solid black value. Reducing the black level threshold could re-introduce the distribution, fuzzing the visual effect of the banding.

          It should be possible to do something akin to the M240 shadows plugin that applies an offset + noise dither to the PDAF samples, but will be challenging in this case due to the small offsets relative to the quantisation steps. It took me quite a bit of experimentation with dithering to best visually hide the correction offsets for the M240, and in this case we are trying to lose a very obvious linear pattern. It may be that small adjustments are best applied in the raw converter in a floating point (or at least scaled up) number space to avoid quantisation of the correction offsets.

          Jonathan

          Reply
          • JimK says

            October 19, 2018 at 7:28 am

            It may be as simple as:

            Add x counts to the blue pixels in the PDAF rows of the raw file.
            Add y counts to the Gr pixels in the PDAF rows of the raw file.
            Develop normally from then on.
            A starting place for x is 1.3 counts. A starting place for x is 0.5 counts.

            Reply
  2. Jack Hogan says

    October 19, 2018 at 12:05 am

    Jim, is the banding inclined?

    Reply
    • JimK says

      October 19, 2018 at 7:26 am

      On the raw, no.

      Reply

Leave a Reply Cancel reply

Your email address will not be published. Required fields are marked *

May 2025
S M T W T F S
 123
45678910
11121314151617
18192021222324
25262728293031
« Apr    

Articles

  • About
    • Patents and papers about color
    • Who am I?
  • How to…
    • Backing up photographic images
    • How to change email providers
    • How to shoot slanted edge images for me
  • Lens screening testing
    • Equipment and Software
    • Examples
      • Bad and OK 200-600 at 600
      • Excellent 180-400 zoom
      • Fair 14-30mm zoom
      • Good 100-200 mm MF zoom
      • Good 100-400 zoom
      • Good 100mm lens on P1 P45+
      • Good 120mm MF lens
      • Good 18mm FF lens
      • Good 24-105 mm FF lens
      • Good 24-70 FF zoom
      • Good 35 mm FF lens
      • Good 35-70 MF lens
      • Good 60 mm lens on IQ3-100
      • Good 63 mm MF lens
      • Good 65 mm FF lens
      • Good 85 mm FF lens
      • Good and bad 25mm FF lenses
      • Good zoom at 24 mm
      • Marginal 18mm lens
      • Marginal 35mm FF lens
      • Mildly problematic 55 mm FF lens
      • OK 16-35mm zoom
      • OK 60mm lens on P1 P45+
      • OK Sony 600mm f/4
      • Pretty good 16-35 FF zoom
      • Pretty good 90mm FF lens
      • Problematic 400 mm FF lens
      • Tilted 20 mm f/1.8 FF lens
      • Tilted 30 mm MF lens
      • Tilted 50 mm FF lens
      • Two 15mm FF lenses
    • Found a problem – now what?
    • Goals for this test
    • Minimum target distances
      • MFT
      • APS-C
      • Full frame
      • Small medium format
    • Printable Siemens Star targets
    • Target size on sensor
      • MFT
      • APS-C
      • Full frame
      • Small medium format
    • Test instructions — postproduction
    • Test instructions — reading the images
    • Test instructions – capture
    • Theory of the test
    • What’s wrong with conventional lens screening?
  • Previsualization heresy
  • Privacy Policy
  • Recommended photographic web sites
  • Using in-camera histograms for ETTR
    • Acknowledgments
    • Why ETTR?
    • Normal in-camera histograms
    • Image processing for in-camera histograms
    • Making the in-camera histogram closely represent the raw histogram
    • Shortcuts to UniWB
    • Preparing for monitor-based UniWB
    • A one-step UniWB procedure
    • The math behind the one-step method
    • Iteration using Newton’s Method

Category List

Recent Comments

  • bob lozano on The 16-Bit Fallacy: Why More Isn’t Always Better in Medium Format Cameras
  • JimK on Goldilocks and the three flashes
  • DC Wedding Photographer on Goldilocks and the three flashes
  • Wedding Photographer in DC on The 16-Bit Fallacy: Why More Isn’t Always Better in Medium Format Cameras
  • JimK on Fujifilm GFX 100S II precision
  • Renjie Zhu on Fujifilm GFX 100S II precision
  • JimK on Fuji 20-35/4 landscape field curvature at 23mm vs 23/4 GF
  • Ivo de Man on Fuji 20-35/4 landscape field curvature at 23mm vs 23/4 GF
  • JimK on Fuji 20-35/4 landscape field curvature at 23mm vs 23/4 GF
  • JimK on Fuji 20-35/4 landscape field curvature at 23mm vs 23/4 GF

Archives

Copyright © 2025 · Daily Dish Pro On Genesis Framework · WordPress · Log in

Unless otherwise noted, all images copyright Jim Kasson.