• site home
  • blog home
  • galleries
  • contact
  • underwater
  • the bleeding edge

the last word

Photography meets digital computer technology. Photography wins -- most of the time.

You are here: Home / Nikon Z6/7 / Nikon Z7 IBIS with 24-70 at 70 mm

Nikon Z7 IBIS with 24-70 at 70 mm

October 16, 2018 JimK 4 Comments

This is one in a series of posts on the Nikon Z7. You should be able to find all the posts about that camera in the Category List on the right sidebar, below the Articles widget. There’s a drop-down menu there that you can use to get to all the posts in this series; just look for “Nikon Z6/7”.

This is a test that I really don’t like doing; the captures are tricky, and the processing has manual components. Here’s the protocol:

  • A single Westcott 1×2 foot LED panel in a Westcott softbox.
  • Nikkor S 24-70/4 set at f/4
  • Heliopan variable ND filter on the lens
  • ISO set to 1000, f-stop set to 4
  • Focusing manually using maximum magnification wide open,
  • Drive set to single
  • EFCS on
  • Aperture-preferred exposure mode.
  • “Pete Souza” grip: left palm under base, left fingers bracing the underside of the front part of the lens, elbows against chest, and following this rifle-range release protocol: Inhale, exhale, brace gently, think calm thoughts, squeeze the shutter release, remembering to “pull through”
  • Exposure protocol: ND filter to most transparent, which gets the shutter to 1/400 second, make 10 exposures.  Turn the filter down a stop, repeat the exposures, until you get to about 1/20 of a second.
  • Make one series with IBIS on, and one with it off.
  • Develop in Lightroom CC  with standard settings except for turning sharpening off and custom white balance.
  • Crop and align all the crops by hand
  • Export as TIFFs, analyze for horizontal edge MTF50 in Imatest.
  • Export the results to Excel, crunch the stats, and graph.

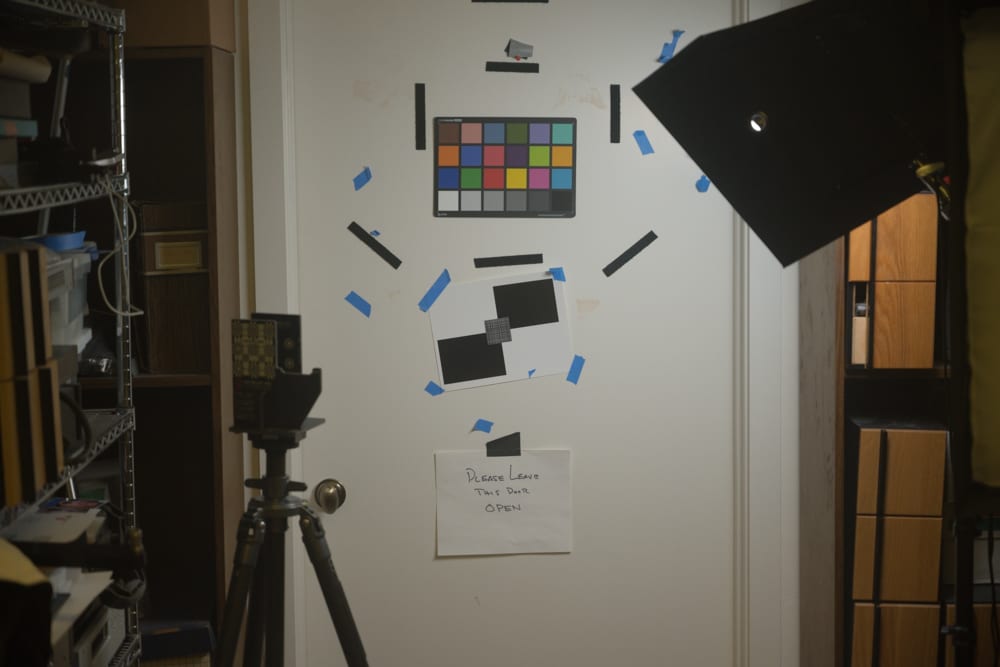
And here’s a sample capture:

The results:

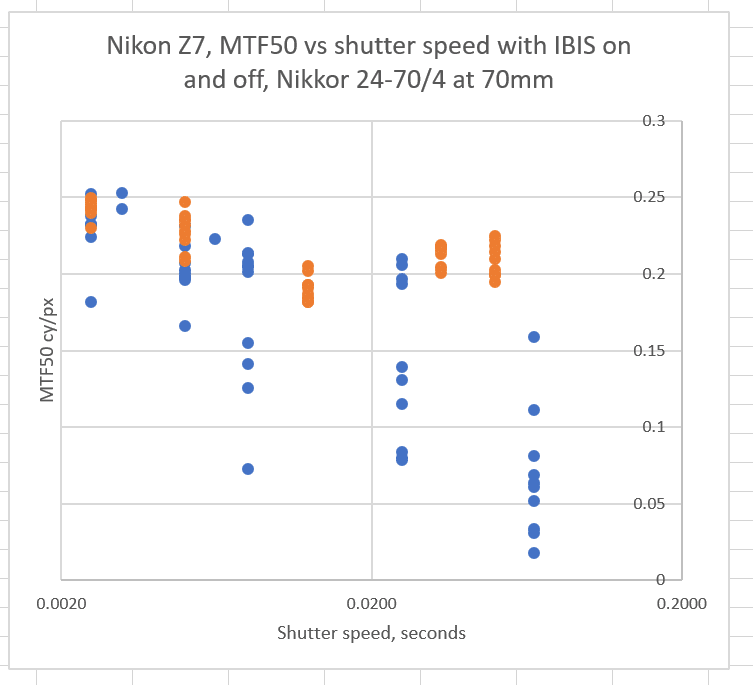
The orange dots are with IBIS on, and the blue dots are with it off. IBIS clearly makes the sharpness more consistent as well as increasing it. Note that the sharpest image of all, at 1/400, was with IBIS off, though. In general, I wouldn’t recommend using IBIS at shutter speeds faster than 1/1000.

Nikon Z6/7

← A copy project with the Z7 Nikon Z7 banding in dark-field images →

Comments

  1. David Berryrieser says

    October 19, 2018 at 11:45 am

    Thanks for posting your methodology. I’m looking to repeat this test with the Fuji IBIS system and am looking to streamline the process. I am particularly interested in exploring how much IBIS reduces image resolution and if that effect can be measured more conclusively.

    Reply
    • JimK says

      October 19, 2018 at 11:54 am

      The key to the success of that test will be to obtain enough samples at high shutter speeds. IBIS will definitely help at low to moderate ones. In the Nikon, the IBIS can be turned off and the sensor locked. In the Sony a7x cameras, you can’t really turn it off. The best you can do is tell it not to try to correct for camera motion, but keep on correcting for sensor shifts due to vibration. I don’t know which camp the Fuji IBIS falls into.

      Reply
  2. David Berryrieser says

    October 19, 2018 at 5:56 pm

    Thanks. great point, and I can’t seem to find any solid information on exactly how the Fuji IBIS system operates in ‘off’ mode. But yes, ideally the sensor would lock down when IBIS is turned off, and kudos to Nikon for including that feature.

    Reply

Trackbacks

  1. Equipment Review: Nikon Z7 » Michael Clark Photography says:
    October 25, 2018 at 8:02 am

    […] can actually detract from the image quality when used at higher shutter speeds, just as VR can. Jim Kasson did some testing with IBIS and recommends that photographers turn it off when shooting at shutter […]

    Reply

Leave a Reply Cancel reply

Your email address will not be published. Required fields are marked *

May 2025
S M T W T F S
 123
45678910
11121314151617
18192021222324
25262728293031
« Apr    

Articles

  • About
    • Patents and papers about color
    • Who am I?
  • How to…
    • Backing up photographic images
    • How to change email providers
    • How to shoot slanted edge images for me
  • Lens screening testing
    • Equipment and Software
    • Examples
      • Bad and OK 200-600 at 600
      • Excellent 180-400 zoom
      • Fair 14-30mm zoom
      • Good 100-200 mm MF zoom
      • Good 100-400 zoom
      • Good 100mm lens on P1 P45+
      • Good 120mm MF lens
      • Good 18mm FF lens
      • Good 24-105 mm FF lens
      • Good 24-70 FF zoom
      • Good 35 mm FF lens
      • Good 35-70 MF lens
      • Good 60 mm lens on IQ3-100
      • Good 63 mm MF lens
      • Good 65 mm FF lens
      • Good 85 mm FF lens
      • Good and bad 25mm FF lenses
      • Good zoom at 24 mm
      • Marginal 18mm lens
      • Marginal 35mm FF lens
      • Mildly problematic 55 mm FF lens
      • OK 16-35mm zoom
      • OK 60mm lens on P1 P45+
      • OK Sony 600mm f/4
      • Pretty good 16-35 FF zoom
      • Pretty good 90mm FF lens
      • Problematic 400 mm FF lens
      • Tilted 20 mm f/1.8 FF lens
      • Tilted 30 mm MF lens
      • Tilted 50 mm FF lens
      • Two 15mm FF lenses
    • Found a problem – now what?
    • Goals for this test
    • Minimum target distances
      • MFT
      • APS-C
      • Full frame
      • Small medium format
    • Printable Siemens Star targets
    • Target size on sensor
      • MFT
      • APS-C
      • Full frame
      • Small medium format
    • Test instructions — postproduction
    • Test instructions — reading the images
    • Test instructions – capture
    • Theory of the test
    • What’s wrong with conventional lens screening?
  • Previsualization heresy
  • Privacy Policy
  • Recommended photographic web sites
  • Using in-camera histograms for ETTR
    • Acknowledgments
    • Why ETTR?
    • Normal in-camera histograms
    • Image processing for in-camera histograms
    • Making the in-camera histogram closely represent the raw histogram
    • Shortcuts to UniWB
    • Preparing for monitor-based UniWB
    • A one-step UniWB procedure
    • The math behind the one-step method
    • Iteration using Newton’s Method

Category List

Recent Comments

  • JimK on Goldilocks and the three flashes
  • DC Wedding Photographer on Goldilocks and the three flashes
  • Wedding Photographer in DC on The 16-Bit Fallacy: Why More Isn’t Always Better in Medium Format Cameras
  • JimK on Fujifilm GFX 100S II precision
  • Renjie Zhu on Fujifilm GFX 100S II precision
  • JimK on Fuji 20-35/4 landscape field curvature at 23mm vs 23/4 GF
  • Ivo de Man on Fuji 20-35/4 landscape field curvature at 23mm vs 23/4 GF
  • JimK on Fuji 20-35/4 landscape field curvature at 23mm vs 23/4 GF
  • JimK on Fuji 20-35/4 landscape field curvature at 23mm vs 23/4 GF
  • Ivo de Man on Fuji 20-35/4 landscape field curvature at 23mm vs 23/4 GF

Archives

Copyright © 2025 · Daily Dish Pro On Genesis Framework · WordPress · Log in

Unless otherwise noted, all images copyright Jim Kasson.