• site home
  • blog home
  • galleries
  • contact
  • underwater
  • the bleeding edge

the last word

Photography meets digital computer technology. Photography wins -- most of the time.

You are here: Home / The Last Word / a7RII read noise spectra at high ISO settings

a7RII read noise spectra at high ISO settings

August 7, 2015 JimK 8 Comments

Earlier, we saw indications that the Sony a7RII was doing spatial filtering of raw images at ISO 32000 and above.

In such situations, I find it instructive to look at spatial frequency graphs. Assuming that some of you do as well, here is a graph of the horizontal and vertical spectra of a 1000×1000 pixel patch in the green channel of a single shot shutter image at ISO 25600:

FFT25600

If the read noise is Gaussian, it should be white, and it is.

Now let’s look at what happens when we increase the ISO to 32000:

FFT32000

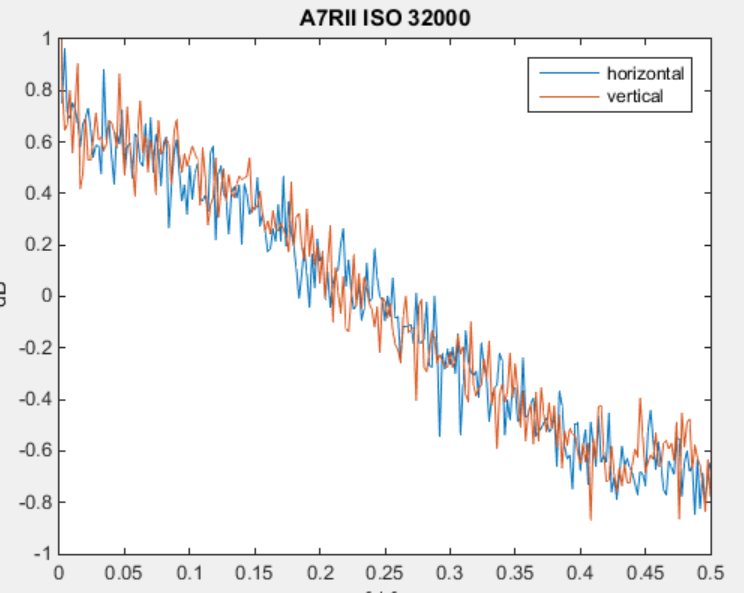
Note that I had to change the vertical scale to fit the curve in. The horizontal axis is spatial frequency as a fraction of the sampling frequency. Anything above half the sampling frequency is aliased, so the graph stops there. This is a lowpass filtering of the read noise with peak attenuation of about 2 decibels. Not a strong filter, but a filter nonetheless.

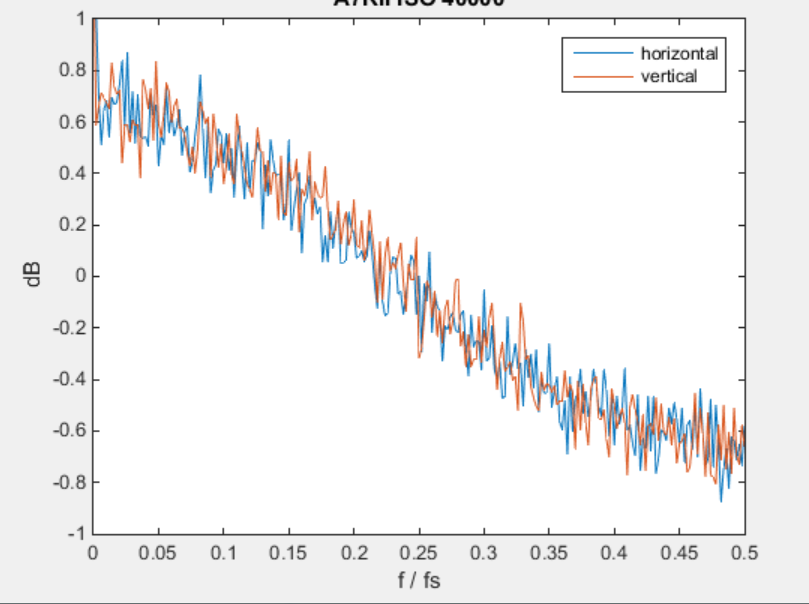
If we turn the ISO up a third of a stop, things don’t change materially:

FFT40000

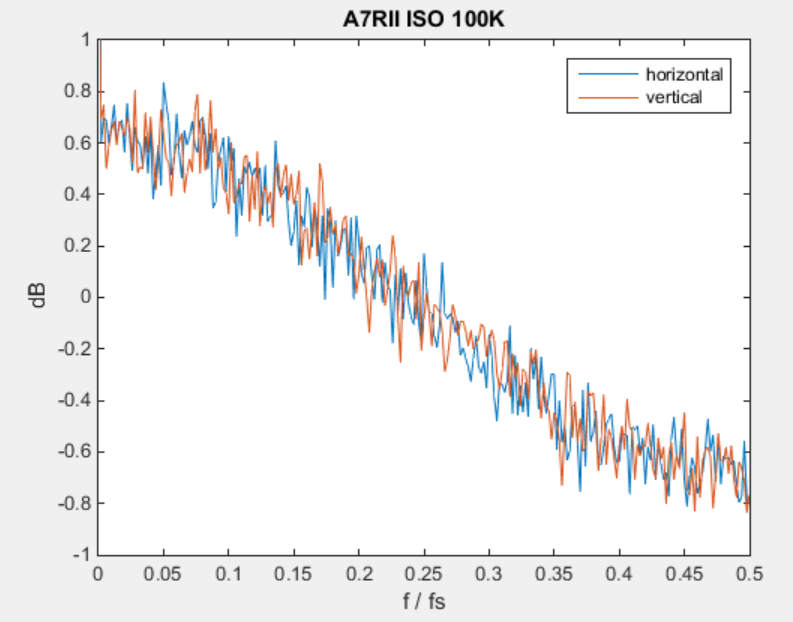
Nor do they all the way at the highest ISO the camera can handle:

FFT100000

This is not good news for uninformed raw shooters, although it could help the OOC JPEGs. I wouldn’t turn the ISO up beyond 25600 if I were shooting raws. Actually, I probably wouldn’t turn it up past 1600, but that’s just me.

The Last Word

← Nikon D810 vs Sony a7RII dark-field noise Sony a7RII bulb spatial filtering →

Comments

  1. Michael Stratil says

    August 8, 2015 at 7:14 am

    None of the cases you deal with involves ISO 1600. So I am mystified why you offer your conclusion about avoiding photographing above 1600. Would you please explain. This seems to come out of the blue.

    Reply
    • Jim says

      August 8, 2015 at 7:21 am

      1600 plus a three stop push in post gives the equivalent of 12800 with no push. I don’t photograph things in light so dim that that’s not more than enough. YMMV.

      Reply
  2. Harris says

    August 8, 2015 at 8:53 am

    Nice straightforward post where I learned something both useful and informative. While I’m holding out the next version of the RX1 (for my shooting purposes), this is of interest to friends of mine who are considering the A7rII. Thanks, Jim!

    Reply
  3. Dmitri Tsitelauri - videographer says

    August 8, 2015 at 2:03 pm

    Im curious to know why is it that low light performance is so much better in crop mode when shooting video. Maybe you could shed light on? Thanks!

    Reply
    • Jim says

      August 8, 2015 at 2:14 pm

      I don’t plan to use this camera in video mode, at least for now. I don’t expect to be testing the video features.

      Sorry.

      Jim

      Reply
  4. Richard says

    August 8, 2015 at 2:14 pm

    The specs on dpreview say that the base ISO range of the camera is ISO 100 to 25600, expandable to 50 to 102400. So if you go beyond 25600 that it’s clear that some software postprocessing happens. If someone doesn’t like Sony’s take at postprocessing, as you say ISO 25600 is the way to go – you’ll get the “real” raw data before it was pushed in-camera.

    Reply
    • Jim says

      August 8, 2015 at 2:16 pm

      D’accord.

      Reply

Trackbacks

  1. MUST READ! Great A7rII tests by electrical engineer Kasson! | sonyalpharumors says:
    August 8, 2015 at 6:00 am

    […] read noise spectra at high ISO settings (Kasson). Nikon D810 vs Sony a7RII dark-field noise (Kasson). a7rII read noise vs shutter speed (Kasson). […]

    Reply

Leave a Reply Cancel reply

Your email address will not be published. Required fields are marked *

May 2025
S M T W T F S
 123
45678910
11121314151617
18192021222324
25262728293031
« Apr    

Articles

  • About
    • Patents and papers about color
    • Who am I?
  • How to…
    • Backing up photographic images
    • How to change email providers
    • How to shoot slanted edge images for me
  • Lens screening testing
    • Equipment and Software
    • Examples
      • Bad and OK 200-600 at 600
      • Excellent 180-400 zoom
      • Fair 14-30mm zoom
      • Good 100-200 mm MF zoom
      • Good 100-400 zoom
      • Good 100mm lens on P1 P45+
      • Good 120mm MF lens
      • Good 18mm FF lens
      • Good 24-105 mm FF lens
      • Good 24-70 FF zoom
      • Good 35 mm FF lens
      • Good 35-70 MF lens
      • Good 60 mm lens on IQ3-100
      • Good 63 mm MF lens
      • Good 65 mm FF lens
      • Good 85 mm FF lens
      • Good and bad 25mm FF lenses
      • Good zoom at 24 mm
      • Marginal 18mm lens
      • Marginal 35mm FF lens
      • Mildly problematic 55 mm FF lens
      • OK 16-35mm zoom
      • OK 60mm lens on P1 P45+
      • OK Sony 600mm f/4
      • Pretty good 16-35 FF zoom
      • Pretty good 90mm FF lens
      • Problematic 400 mm FF lens
      • Tilted 20 mm f/1.8 FF lens
      • Tilted 30 mm MF lens
      • Tilted 50 mm FF lens
      • Two 15mm FF lenses
    • Found a problem – now what?
    • Goals for this test
    • Minimum target distances
      • MFT
      • APS-C
      • Full frame
      • Small medium format
    • Printable Siemens Star targets
    • Target size on sensor
      • MFT
      • APS-C
      • Full frame
      • Small medium format
    • Test instructions — postproduction
    • Test instructions — reading the images
    • Test instructions – capture
    • Theory of the test
    • What’s wrong with conventional lens screening?
  • Previsualization heresy
  • Privacy Policy
  • Recommended photographic web sites
  • Using in-camera histograms for ETTR
    • Acknowledgments
    • Why ETTR?
    • Normal in-camera histograms
    • Image processing for in-camera histograms
    • Making the in-camera histogram closely represent the raw histogram
    • Shortcuts to UniWB
    • Preparing for monitor-based UniWB
    • A one-step UniWB procedure
    • The math behind the one-step method
    • Iteration using Newton’s Method

Category List

Recent Comments

  • JimK on Goldilocks and the three flashes
  • DC Wedding Photographer on Goldilocks and the three flashes
  • Wedding Photographer in DC on The 16-Bit Fallacy: Why More Isn’t Always Better in Medium Format Cameras
  • JimK on Fujifilm GFX 100S II precision
  • Renjie Zhu on Fujifilm GFX 100S II precision
  • JimK on Fuji 20-35/4 landscape field curvature at 23mm vs 23/4 GF
  • Ivo de Man on Fuji 20-35/4 landscape field curvature at 23mm vs 23/4 GF
  • JimK on Fuji 20-35/4 landscape field curvature at 23mm vs 23/4 GF
  • JimK on Fuji 20-35/4 landscape field curvature at 23mm vs 23/4 GF
  • Ivo de Man on Fuji 20-35/4 landscape field curvature at 23mm vs 23/4 GF

Archives

Copyright © 2025 · Daily Dish Pro On Genesis Framework · WordPress · Log in

Unless otherwise noted, all images copyright Jim Kasson.