• site home
  • blog home
  • galleries
  • contact
  • underwater
  • the bleeding edge

the last word

Photography meets digital computer technology. Photography wins -- most of the time.

You are here: Home / The Last Word / Adding off-axis imaging to the bokeh simulator

Adding off-axis imaging to the bokeh simulator

May 6, 2017 JimK 2 Comments

This is the sixth in a series of posts about building a bokeh simulator. This series starts here.

It’s become apparent to me that what many people talk about when they discuss a lens’ out of focus (OOF,  as opposed to almost-focused) bokeh is related to the off -axis occluding of the sensor’s view of the lens aperture that occurs when the lens is fairly wide open. It is with some reluctance that I begin to contemplate how to simulate that. I expect it will be more difficult to code than the simple on-axis model that I have now, and that it will take a lot loonger to run.

Nevertheless, I am starting to explore the idea. I was pretty sure that I knew about what was happening here, but, just to make sure, I made 35 exposures with a Batis 85 (which is known for its imperfections in this regard) on a Sony a7RII. Then I stacked them all (8.4GB!) in Photoshop, and set the layer blend to “lighten”. 

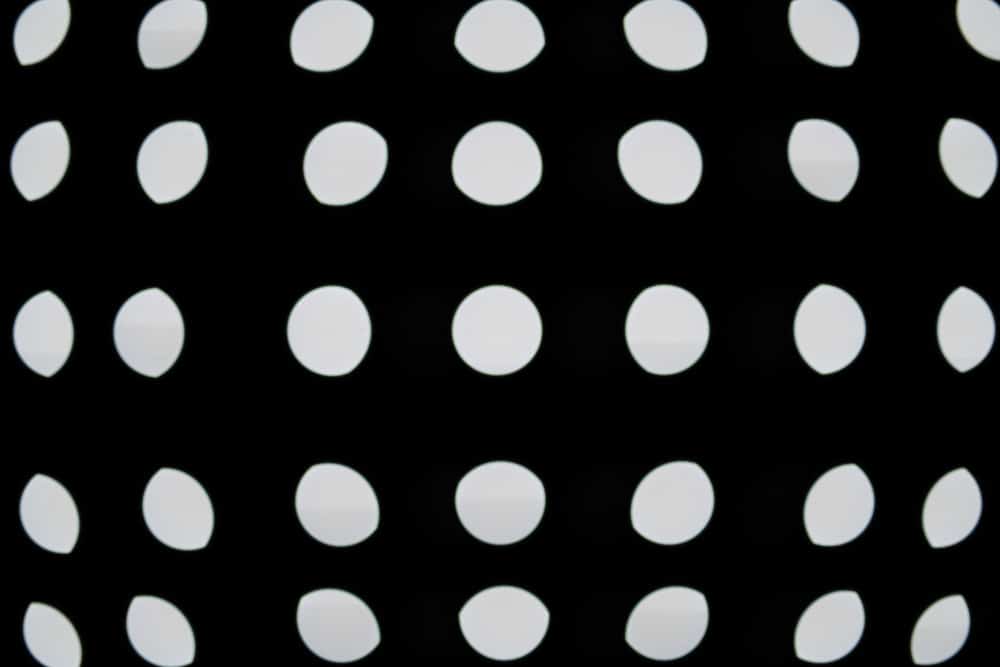
What do we have here? Y0oou can see that, as you move away from the axis, the inner edge of the ono-axis OOF point spread function (PSF) is cut away by a circle whose diameter is somewhat larger than the diameter of the on-axis OOF PSF itself.

Here’s a similar set of images with the Otus 85, likewise wide open (which is f/1.4 on the Otus, as opposed to f/1.8 on the Batis).

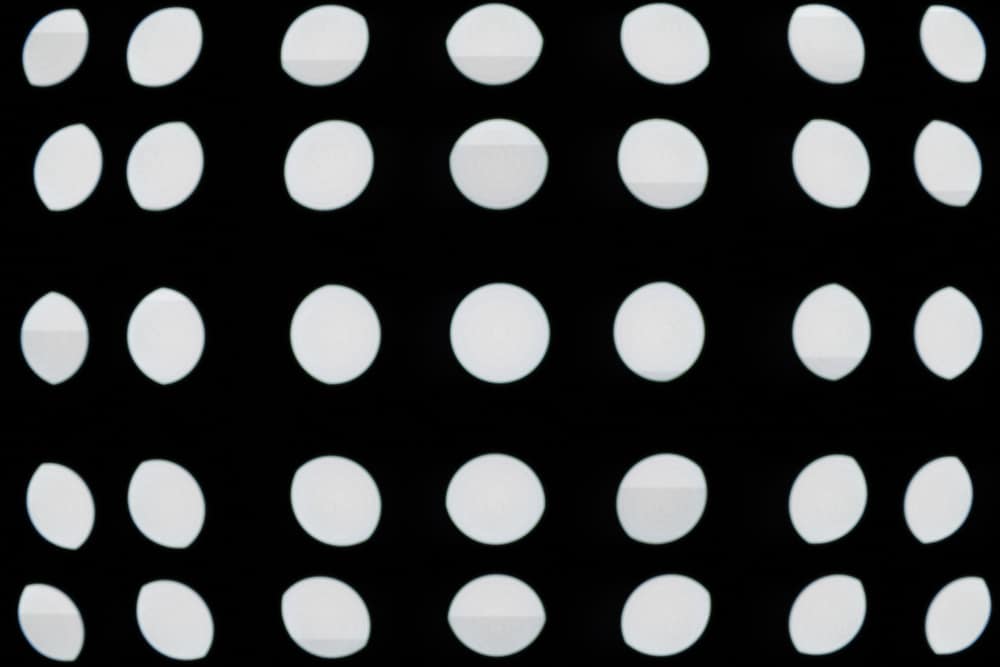
The idea is the same, but the amount of occlusion is somewhat less for the Otus, even though it’s a faster lens. The radii of the two circles are nearly the same in the Otus image.

Can we parameterize this? I’m thinking that this would be a good place to start:

  1. Off-axis distance before occlusion begins.
  2. Radius of the occluding circle as a proportion to that of the on-axis OOF PSF
  3. Amount of overlap of the centers of the two circles as a proportion to radius of the on-axis OOF PSF

In the above two images, it looks like the dimension in 1 is near zero, but I’ve seen lenses where the occlusion didn’t start happening right away. Anybody know the function that relates 3 above to off-axis distance?

Comments and suggestions are appreciated. 


The Last Word

← Comparing real and simulated defocus blur — Zeiss 135/2 Apo-Sonnar Off-axis OOF PSFs of the Sony 135/2.8 STF →

Comments

  1. Brandon Dube says

    May 6, 2017 at 7:28 pm

    http://imgur.com/a/3FKlV

    This is a gallery of a constant amount of defocus and increasing amounts of astigmatism. Same basic code as last time.

    You can create this phenomenon with just astigmatism, but vignetting also contributes to it. Vignetting truncates the pupil in the direction along the extent of the object (so in +Y, there is less extent to the pupil in Y, in +X there is less in X, etc). “Upper” and “Lower” vignetting are distinct, one referring to the upper half of the pupil, and one the lower half.

    You can use astigmatism and vignetting against each other to combat this, but it takes a lot of astigmatism to do much of significance.

    You can test if the effect is predominantly from one or the other in a lens by looking at the dots in front of and behind focus. Astigmatism will flip the axes of the lemon, vignetting won’t.

    Reply
  2. Tony A. says

    May 8, 2017 at 11:31 am

    ” Amount of overlap of the centers of the two circles as a proportion to radius of the on-axis OOF PSF

    In the above two images, it looks like the dimension in 1 is near zero, but I’ve seen lenses where the occlusion didn’t start happening right away. Anybody know the function that relates 3 above to off-axis distance?”

    That can be simulated in a geometric model via introducing a longitudinal separation between the aperture and the occluding circle. With a suitably larger occluding circle there would be a central “dead zone” of zero occlusion. That diameter won’t necessarily be something you can touch with calipers, it would be the apparent size of the obstruction as seen through the leading lens elements.

    Reply

Leave a Reply Cancel reply

Your email address will not be published. Required fields are marked *

May 2025
S M T W T F S
 123
45678910
11121314151617
18192021222324
25262728293031
« Apr    

Articles

  • About
    • Patents and papers about color
    • Who am I?
  • How to…
    • Backing up photographic images
    • How to change email providers
    • How to shoot slanted edge images for me
  • Lens screening testing
    • Equipment and Software
    • Examples
      • Bad and OK 200-600 at 600
      • Excellent 180-400 zoom
      • Fair 14-30mm zoom
      • Good 100-200 mm MF zoom
      • Good 100-400 zoom
      • Good 100mm lens on P1 P45+
      • Good 120mm MF lens
      • Good 18mm FF lens
      • Good 24-105 mm FF lens
      • Good 24-70 FF zoom
      • Good 35 mm FF lens
      • Good 35-70 MF lens
      • Good 60 mm lens on IQ3-100
      • Good 63 mm MF lens
      • Good 65 mm FF lens
      • Good 85 mm FF lens
      • Good and bad 25mm FF lenses
      • Good zoom at 24 mm
      • Marginal 18mm lens
      • Marginal 35mm FF lens
      • Mildly problematic 55 mm FF lens
      • OK 16-35mm zoom
      • OK 60mm lens on P1 P45+
      • OK Sony 600mm f/4
      • Pretty good 16-35 FF zoom
      • Pretty good 90mm FF lens
      • Problematic 400 mm FF lens
      • Tilted 20 mm f/1.8 FF lens
      • Tilted 30 mm MF lens
      • Tilted 50 mm FF lens
      • Two 15mm FF lenses
    • Found a problem – now what?
    • Goals for this test
    • Minimum target distances
      • MFT
      • APS-C
      • Full frame
      • Small medium format
    • Printable Siemens Star targets
    • Target size on sensor
      • MFT
      • APS-C
      • Full frame
      • Small medium format
    • Test instructions — postproduction
    • Test instructions — reading the images
    • Test instructions – capture
    • Theory of the test
    • What’s wrong with conventional lens screening?
  • Previsualization heresy
  • Privacy Policy
  • Recommended photographic web sites
  • Using in-camera histograms for ETTR
    • Acknowledgments
    • Why ETTR?
    • Normal in-camera histograms
    • Image processing for in-camera histograms
    • Making the in-camera histogram closely represent the raw histogram
    • Shortcuts to UniWB
    • Preparing for monitor-based UniWB
    • A one-step UniWB procedure
    • The math behind the one-step method
    • Iteration using Newton’s Method

Category List

Recent Comments

  • bob lozano on The 16-Bit Fallacy: Why More Isn’t Always Better in Medium Format Cameras
  • JimK on Goldilocks and the three flashes
  • DC Wedding Photographer on Goldilocks and the three flashes
  • Wedding Photographer in DC on The 16-Bit Fallacy: Why More Isn’t Always Better in Medium Format Cameras
  • JimK on Fujifilm GFX 100S II precision
  • Renjie Zhu on Fujifilm GFX 100S II precision
  • JimK on Fuji 20-35/4 landscape field curvature at 23mm vs 23/4 GF
  • Ivo de Man on Fuji 20-35/4 landscape field curvature at 23mm vs 23/4 GF
  • JimK on Fuji 20-35/4 landscape field curvature at 23mm vs 23/4 GF
  • JimK on Fuji 20-35/4 landscape field curvature at 23mm vs 23/4 GF

Archives

Copyright © 2025 · Daily Dish Pro On Genesis Framework · WordPress · Log in

Unless otherwise noted, all images copyright Jim Kasson.