• site home
  • blog home
  • galleries
  • contact
  • underwater
  • the bleeding edge

the last word

Photography meets digital computer technology. Photography wins -- most of the time.

You are here: Home / The Last Word / Headroom in ETTR exposures

Headroom in ETTR exposures

May 22, 2012 JimK 6 Comments

It was clear in the previous post that a two-stop overexposure using expose-to-the-right (ETTR) was not recoverable. Is there enough headroom in the Lightroom/D4 pair for a one-stop overexposure? Let’s find out.

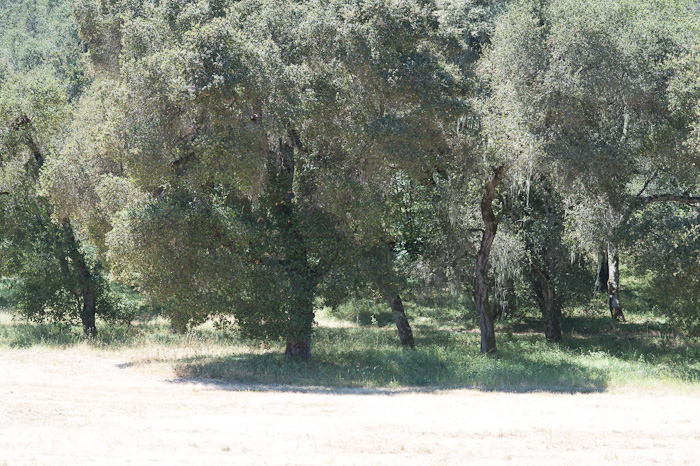
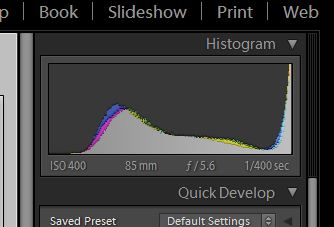
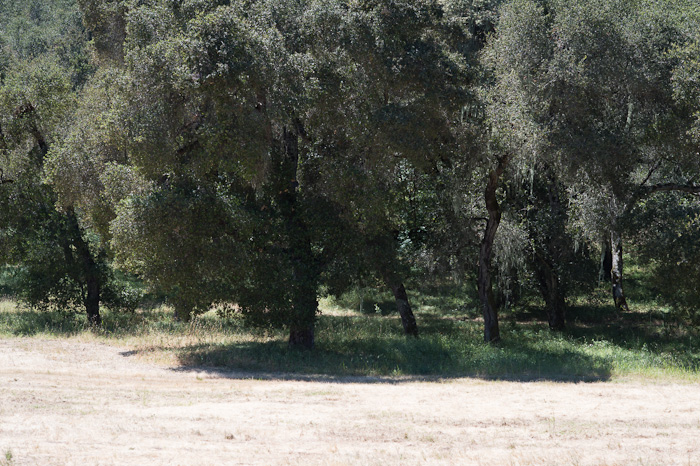
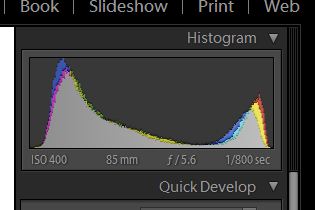
Here it the correctly-exposed image and its histogram:

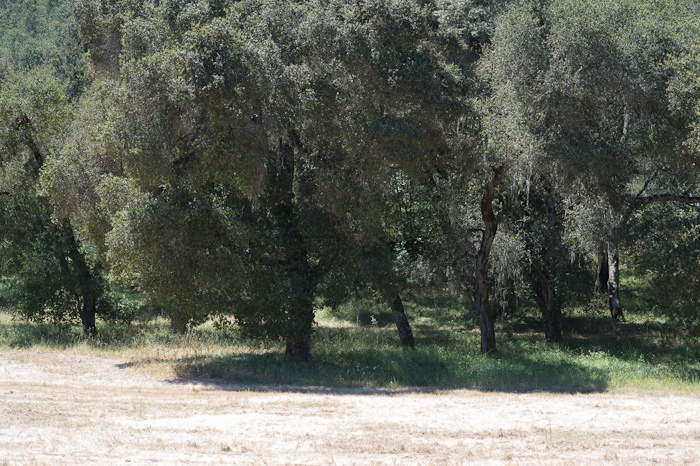
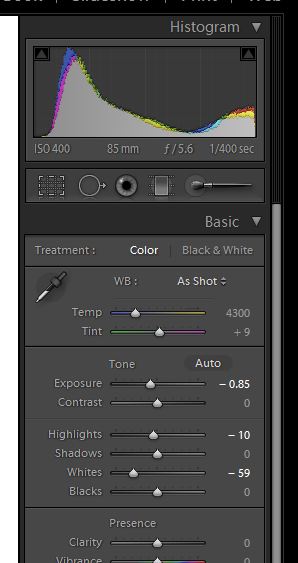
Here is a one-stop over image and its histogram:

Here’s what I could do in Lightroom, and what I did to get there:

The result, while credible, is not the same as the correctly exposed image.

My conclusion: don’t count on any headroom at all when you’re doing ETTR. Lightroom is pretty amazing, but you’re better off not pushing that histogram too far to the right.
The Last Word

← Histogram depopulation in image editing, part 5 Histogram depopulation in image editing, part 6 →

Comments

  1. John says

    May 22, 2012 at 4:48 pm

    The problem with you ETTR exposure is that you broke the prime tenant…do not overexpose any significant highlights…not in the camera histogram, but the raw histogram? Since you are using LR 4, the initial histogram will have blown highlights up against the right wall.

    Emil Martinec, in a DPR post said:

    What is the appropriate mantra?  I would prefer “Maximize Exposure”; maximize subject to three constraints:

    (1) maintaining needed DoF, which limits how much you can open up the aperture;
    (2) freezing motion, which limits the exposure time;
    (3) retaining highlight detail, by not clipping wanted highlight areas in any channel.  

    Note that ISO is not part of exposure; on many cameras (those with CCD sensors, and the newer Sony Exmor sensors), there is little or no advantage to raising the ISO, which compromises point (3), even though leaving the ISO at a low value may leave the histogram “to the left” for your chosen exposure; such cameras can safely be operated at close to their lowest ISO (the precise optimal ISO depends on the details of a given camera design).  On many other CMOS sensor’d cameras, such as Canon’s offerings, and Nikons with Nikon-designed CMOS sensors (D3/D700/D3s, for example), noise relative to exposure is improved by increasing the ISO; after you have maximized the exposure (ie by satisfying criteria (1) and (2)), you have a tradeoff to make for (3) — raising the ISO lowers shadow noise (up to a camera-specific point of diminishing returns, usually about ISO 1600), therefore improving S/N, but reduces highlight headroom for your chosen exposure, so one has to decide how high the ISO can go and still keep wanted highlights unclipped.  

    Reply
    • Jim says

      May 22, 2012 at 5:46 pm

      I can argue with some of the details of the DPR post, but I’m not sure it’s useful. I consider the point of view valid.

      It is certainly true that the right setting of the ISO control depends heavily on the camera design. An extreme case is the Betterlight scanning back that I’m using, in which setting the ISO is controlling the gain of an amplifier before the analog-to-digital converter. In that case, you’d much rather push things to the right before they’re quantized. Fortunately, the Betterlight software provides a raw histogram, so there’s no guesswork about where clipping occurs.

      Reply
  2. John says

    May 22, 2012 at 4:51 pm

    Oooops….forgot to add…the only reason for ETTR, i.e. maximizing exposure is to reduce noise, by increasing the SNR. Histogram “combing”, etc. doesn’t matter

    Reply
  3. Jim says

    May 22, 2012 at 5:52 pm

    I agree that SNR is the most important reason, and by far. If I believed that all the bits in a fourteen-bit ADC were meaningful, I’d say that it’s the only reason. However, I’m a little suspicious of those ADCs.

    As for “combing” not mattering, you’re preaching to the choir. That was the main point of this series of posts.

    Jim

    Reply
  4. John says

    May 23, 2012 at 4:38 am

    All the bits are not meaningful. However, maximizing the exposure, i.e. getting the most light on the sensor, will minimize noise and make more of the bits meaningful.

    Reply
    • Jim says

      May 23, 2012 at 7:02 am

      Precisely.

      Reply

Leave a Reply Cancel reply

Your email address will not be published. Required fields are marked *

May 2025
S M T W T F S
 123
45678910
11121314151617
18192021222324
25262728293031
« Apr    

Articles

  • About
    • Patents and papers about color
    • Who am I?
  • How to…
    • Backing up photographic images
    • How to change email providers
    • How to shoot slanted edge images for me
  • Lens screening testing
    • Equipment and Software
    • Examples
      • Bad and OK 200-600 at 600
      • Excellent 180-400 zoom
      • Fair 14-30mm zoom
      • Good 100-200 mm MF zoom
      • Good 100-400 zoom
      • Good 100mm lens on P1 P45+
      • Good 120mm MF lens
      • Good 18mm FF lens
      • Good 24-105 mm FF lens
      • Good 24-70 FF zoom
      • Good 35 mm FF lens
      • Good 35-70 MF lens
      • Good 60 mm lens on IQ3-100
      • Good 63 mm MF lens
      • Good 65 mm FF lens
      • Good 85 mm FF lens
      • Good and bad 25mm FF lenses
      • Good zoom at 24 mm
      • Marginal 18mm lens
      • Marginal 35mm FF lens
      • Mildly problematic 55 mm FF lens
      • OK 16-35mm zoom
      • OK 60mm lens on P1 P45+
      • OK Sony 600mm f/4
      • Pretty good 16-35 FF zoom
      • Pretty good 90mm FF lens
      • Problematic 400 mm FF lens
      • Tilted 20 mm f/1.8 FF lens
      • Tilted 30 mm MF lens
      • Tilted 50 mm FF lens
      • Two 15mm FF lenses
    • Found a problem – now what?
    • Goals for this test
    • Minimum target distances
      • MFT
      • APS-C
      • Full frame
      • Small medium format
    • Printable Siemens Star targets
    • Target size on sensor
      • MFT
      • APS-C
      • Full frame
      • Small medium format
    • Test instructions — postproduction
    • Test instructions — reading the images
    • Test instructions – capture
    • Theory of the test
    • What’s wrong with conventional lens screening?
  • Previsualization heresy
  • Privacy Policy
  • Recommended photographic web sites
  • Using in-camera histograms for ETTR
    • Acknowledgments
    • Why ETTR?
    • Normal in-camera histograms
    • Image processing for in-camera histograms
    • Making the in-camera histogram closely represent the raw histogram
    • Shortcuts to UniWB
    • Preparing for monitor-based UniWB
    • A one-step UniWB procedure
    • The math behind the one-step method
    • Iteration using Newton’s Method

Category List

Recent Comments

  • bob lozano on The 16-Bit Fallacy: Why More Isn’t Always Better in Medium Format Cameras
  • JimK on Goldilocks and the three flashes
  • DC Wedding Photographer on Goldilocks and the three flashes
  • Wedding Photographer in DC on The 16-Bit Fallacy: Why More Isn’t Always Better in Medium Format Cameras
  • JimK on Fujifilm GFX 100S II precision
  • Renjie Zhu on Fujifilm GFX 100S II precision
  • JimK on Fuji 20-35/4 landscape field curvature at 23mm vs 23/4 GF
  • Ivo de Man on Fuji 20-35/4 landscape field curvature at 23mm vs 23/4 GF
  • JimK on Fuji 20-35/4 landscape field curvature at 23mm vs 23/4 GF
  • JimK on Fuji 20-35/4 landscape field curvature at 23mm vs 23/4 GF

Archives

Copyright © 2025 · Daily Dish Pro On Genesis Framework · WordPress · Log in

Unless otherwise noted, all images copyright Jim Kasson.