• site home
  • blog home
  • galleries
  • contact
  • underwater
  • the bleeding edge

the last word

Photography meets digital computer technology. Photography wins -- most of the time.

You are here: Home / The Last Word / High-ISO push processing with the Sony a7S

High-ISO push processing with the Sony a7S

July 9, 2014 JimK 2 Comments

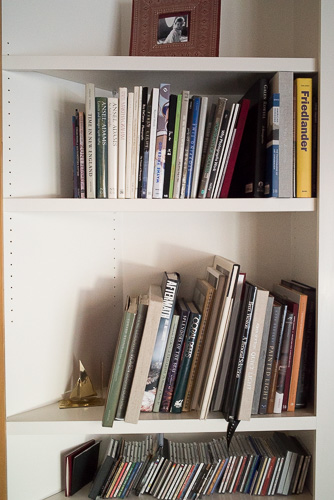
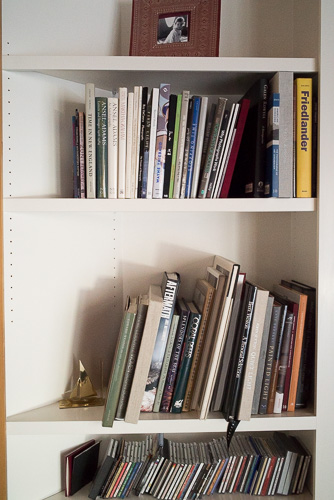
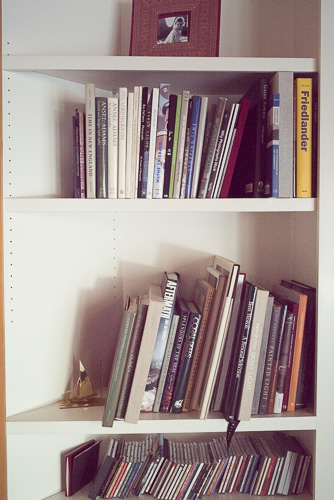
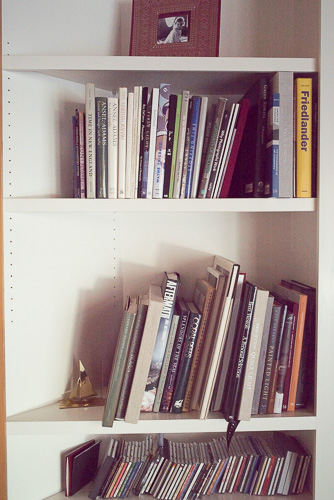
I ran a similar series of bookcase pictures as the ones I posted earlier today, only with 3 stops higher ISO settings.

I put a Zeiss 35 mm f/2 Biogon ZM on the Sony a7S, using a Novoflex adapter. I put the camera on a big RRS carbon fiber tripod. I set the ISO to 25K, the aperture to f/8, focused with live view, and set the shutter speed for an ETTR exposure. I took a picture:


ISO 25K
ISO 25K

Then I changed the ISO to 12K. I did not change the f-stop or the shutter speed. I took another picture. I continued that pattern all the way to ISO 800.

I developed the images in Lightroom 5.5 with default settings except for all noise reduction off. Then I set the Exposure control on the ISO 800image to an extra +5, the Exposure control on the ISO 1600 image to an extra +4, the Exposure control on the ISO 3200 image to an extra +3, the Exposure control on the ISO 6400 image to an extra +2, the Exposure control on the ISO 12K image to an extra +1, and didn’t adjust the Exposure of the ISO 25K image. I white balanced the ISO 25K picture and set all the others to that WB.

Here are the overall pictures, less the ISO 25K one above:


ISO 12K
ISO 12K


ISO 6400
ISO 6400


ISO 3200
ISO 3200


ISO 1600
ISO 1600


ISO 800
ISO 800

Here are the crops:


ISO 25K
ISO 25K


ISO 12K
ISO 12K


ISO 6400
ISO 6400


ISO 3200
ISO 3200
ISO 1600
ISO 1600
ISO 800
ISO 800

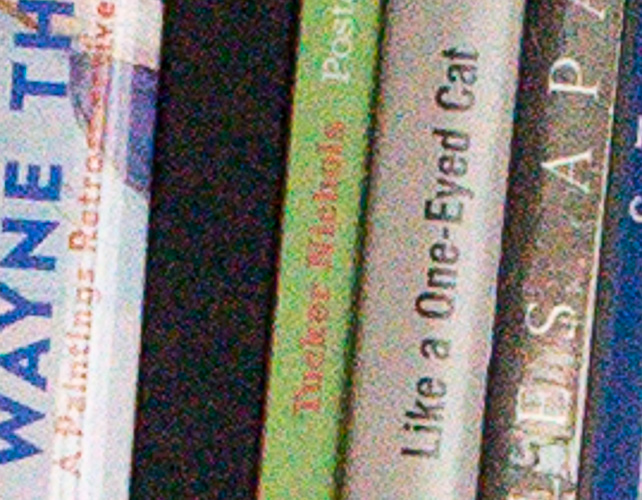
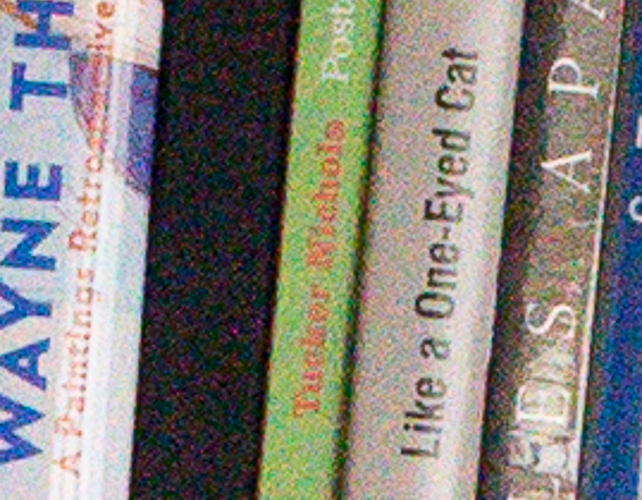
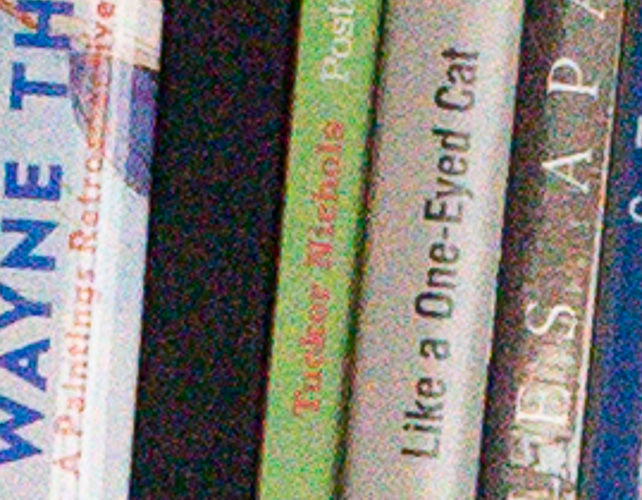
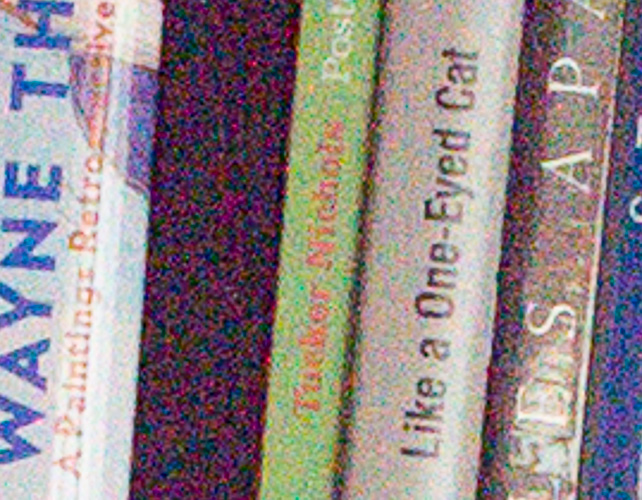
The binding of the black book is noisier and brighter at ISO 1600 and ISO 800 than in the other images. I think this is because of lower sensor-refered read noise at ISO 2000 and above. I attribute this to the conversion gain change that I think is happening as the ISO is changed from 1600 to 2000.

If, as I suspect, Sony is using the Aptina switched capacitor conversion efficiency change technique, it’s working well for them.

The Last Word

← Push processing a7S images Leica WATE on the a7S at 16mm →

Comments

  1. Nasri Lian says

    July 18, 2014 at 4:38 am

    Thanks for this second test! Both tests were shot in RAW i presume?

    Interesting how the quality changes when ISO in camera is set to at least over ISO 2000.

    However, from these pushing the exposure up tests sparked a curiosity. Say to compare two pictures shot with the same aperture and shutter:

    1. ETTR, shot in ISO 800.
    2. Same aperture and shutter but the ISO raised to 3200 (which may introduce overexposing the image).

    Lightroom – Take Picture No.2, bring the exposure down to match the level in picture No.1. I wonder what would the result be.

    Traditionally, I’m sure those clipped out highlights can be brought back from ISO 3200 as long as it was captured in RAW.

    Reply
    • Jim says

      July 18, 2014 at 8:39 am

      Yes, all images were exposed and processed in raw. This wouldn’t work in JPEG.

      About Lr’s highlight recovery. Lr can recover some data if one or two raw channels are clipped, when measured with a raw histogram analyzer like RawDigger. It guesses at what the clipped channel(s) would have looked like by looking at the unclipped one(s). It can’t do anything if all channels are clipped.

      Most people don’t look at real raw histograms, but the JPEG ones on the back of the camera or the PPRGB with sRGB tone curve on in Lr. Both of those usually show clipping even if the raw channels are actually fine.

      So, the answer to your question depends on what you mean by ETTR. If you mean real raw ETTR, what you propose won’t work. If you mean uncalibrated in-camera JPEG ETTR, it might.

      Take a look at this: http://blog.kasson.com/?page_id=2387

      Jim

      Reply

Leave a Reply Cancel reply

Your email address will not be published. Required fields are marked *

May 2025
S M T W T F S
 123
45678910
11121314151617
18192021222324
25262728293031
« Apr    

Articles

  • About
    • Patents and papers about color
    • Who am I?
  • How to…
    • Backing up photographic images
    • How to change email providers
    • How to shoot slanted edge images for me
  • Lens screening testing
    • Equipment and Software
    • Examples
      • Bad and OK 200-600 at 600
      • Excellent 180-400 zoom
      • Fair 14-30mm zoom
      • Good 100-200 mm MF zoom
      • Good 100-400 zoom
      • Good 100mm lens on P1 P45+
      • Good 120mm MF lens
      • Good 18mm FF lens
      • Good 24-105 mm FF lens
      • Good 24-70 FF zoom
      • Good 35 mm FF lens
      • Good 35-70 MF lens
      • Good 60 mm lens on IQ3-100
      • Good 63 mm MF lens
      • Good 65 mm FF lens
      • Good 85 mm FF lens
      • Good and bad 25mm FF lenses
      • Good zoom at 24 mm
      • Marginal 18mm lens
      • Marginal 35mm FF lens
      • Mildly problematic 55 mm FF lens
      • OK 16-35mm zoom
      • OK 60mm lens on P1 P45+
      • OK Sony 600mm f/4
      • Pretty good 16-35 FF zoom
      • Pretty good 90mm FF lens
      • Problematic 400 mm FF lens
      • Tilted 20 mm f/1.8 FF lens
      • Tilted 30 mm MF lens
      • Tilted 50 mm FF lens
      • Two 15mm FF lenses
    • Found a problem – now what?
    • Goals for this test
    • Minimum target distances
      • MFT
      • APS-C
      • Full frame
      • Small medium format
    • Printable Siemens Star targets
    • Target size on sensor
      • MFT
      • APS-C
      • Full frame
      • Small medium format
    • Test instructions — postproduction
    • Test instructions — reading the images
    • Test instructions – capture
    • Theory of the test
    • What’s wrong with conventional lens screening?
  • Previsualization heresy
  • Privacy Policy
  • Recommended photographic web sites
  • Using in-camera histograms for ETTR
    • Acknowledgments
    • Why ETTR?
    • Normal in-camera histograms
    • Image processing for in-camera histograms
    • Making the in-camera histogram closely represent the raw histogram
    • Shortcuts to UniWB
    • Preparing for monitor-based UniWB
    • A one-step UniWB procedure
    • The math behind the one-step method
    • Iteration using Newton’s Method

Category List

Recent Comments

  • JimK on Goldilocks and the three flashes
  • DC Wedding Photographer on Goldilocks and the three flashes
  • Wedding Photographer in DC on The 16-Bit Fallacy: Why More Isn’t Always Better in Medium Format Cameras
  • JimK on Fujifilm GFX 100S II precision
  • Renjie Zhu on Fujifilm GFX 100S II precision
  • JimK on Fuji 20-35/4 landscape field curvature at 23mm vs 23/4 GF
  • Ivo de Man on Fuji 20-35/4 landscape field curvature at 23mm vs 23/4 GF
  • JimK on Fuji 20-35/4 landscape field curvature at 23mm vs 23/4 GF
  • JimK on Fuji 20-35/4 landscape field curvature at 23mm vs 23/4 GF
  • Ivo de Man on Fuji 20-35/4 landscape field curvature at 23mm vs 23/4 GF

Archives

Copyright © 2025 · Daily Dish Pro On Genesis Framework · WordPress · Log in

Unless otherwise noted, all images copyright Jim Kasson.