• site home
  • blog home
  • galleries
  • contact
  • underwater
  • the bleeding edge

the last word

Photography meets digital computer technology. Photography wins -- most of the time.

You are here: Home / The Last Word / Image noise and print size

Image noise and print size

April 17, 2016 JimK 3 Comments

In conjunction with their annual photographic contest, the Weston Scholarship Fund is having an exhibition on May 5, and they’ve invited some guest photographers to participate. Gina Weston emailed me my invitation a few weeks ago. Last week I printed the picture.

All guest work will all be matted to 16×20 inches, so I wanted to print an 11×14 of this image:

_DSC4366 (3)-Edit

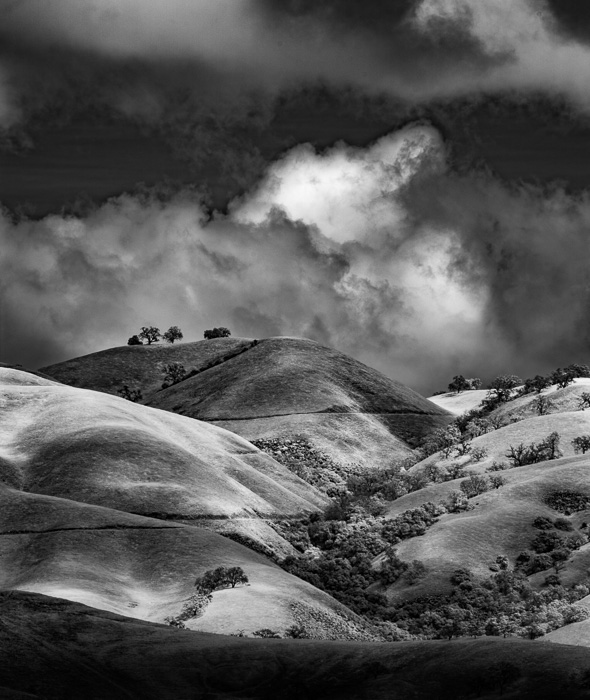
I looked it over in Lightroom. There has been quite a bit of contrast stretching and shadow enhancement, so, when viewed at 200% on a 4K monitor, a lot of noise was visible, especially in the clouds. At 100% it didn’t look bad, but you could still see some. It’s roughly a 5300×6300 pixel image, so it needed to be downsampled somewhat to print on an Epson 4900. I thought about working on the noise, but decided to make a test print first.

It looked fine. I examined it closely with a loupe. No noise.

First do no harm is — or should be — the motto of image editing. I left the image alone.

Sometimes you can see too much on a computer screen.

The Last Word

← Dither and image detail, natural scene A book report — page flatness and glue →

Comments

  1. David Braddon-Mitchell says

    April 17, 2016 at 4:15 pm

    So, so true.

    A really useful preset for Lightroom (especially when used on a 5k or 4k screen which perceptually from about 1m is not far off looking at a print) would be zoom settings that show you the image as it would look at different print sizes.

    Of course it’s easy enough to figure out, but I think that it might help a lot of people if it was there – it would teach them that relative to an intended output, there’s a lot of stuff they lose sleep and money over that literally doesn’t make any difference at all.

    Reply
  2. CarVac says

    April 18, 2016 at 4:34 am

    I’ve noticed that downsampling an image is not the same as shrinking the image at the same original resolution.

    Since getting a 4k screen I hardly sharpen or apply noise reduction anymore, because if there are real details visible, there’s no need to make them stand out like crazy, and the noise just disappears as you noticed when printing.

    Reply
  3. Herb says

    April 18, 2016 at 7:05 am

    Amen++

    Reply

Leave a Reply Cancel reply

Your email address will not be published. Required fields are marked *

May 2025
S M T W T F S
 123
45678910
11121314151617
18192021222324
25262728293031
« Apr    

Articles

  • About
    • Patents and papers about color
    • Who am I?
  • How to…
    • Backing up photographic images
    • How to change email providers
    • How to shoot slanted edge images for me
  • Lens screening testing
    • Equipment and Software
    • Examples
      • Bad and OK 200-600 at 600
      • Excellent 180-400 zoom
      • Fair 14-30mm zoom
      • Good 100-200 mm MF zoom
      • Good 100-400 zoom
      • Good 100mm lens on P1 P45+
      • Good 120mm MF lens
      • Good 18mm FF lens
      • Good 24-105 mm FF lens
      • Good 24-70 FF zoom
      • Good 35 mm FF lens
      • Good 35-70 MF lens
      • Good 60 mm lens on IQ3-100
      • Good 63 mm MF lens
      • Good 65 mm FF lens
      • Good 85 mm FF lens
      • Good and bad 25mm FF lenses
      • Good zoom at 24 mm
      • Marginal 18mm lens
      • Marginal 35mm FF lens
      • Mildly problematic 55 mm FF lens
      • OK 16-35mm zoom
      • OK 60mm lens on P1 P45+
      • OK Sony 600mm f/4
      • Pretty good 16-35 FF zoom
      • Pretty good 90mm FF lens
      • Problematic 400 mm FF lens
      • Tilted 20 mm f/1.8 FF lens
      • Tilted 30 mm MF lens
      • Tilted 50 mm FF lens
      • Two 15mm FF lenses
    • Found a problem – now what?
    • Goals for this test
    • Minimum target distances
      • MFT
      • APS-C
      • Full frame
      • Small medium format
    • Printable Siemens Star targets
    • Target size on sensor
      • MFT
      • APS-C
      • Full frame
      • Small medium format
    • Test instructions — postproduction
    • Test instructions — reading the images
    • Test instructions – capture
    • Theory of the test
    • What’s wrong with conventional lens screening?
  • Previsualization heresy
  • Privacy Policy
  • Recommended photographic web sites
  • Using in-camera histograms for ETTR
    • Acknowledgments
    • Why ETTR?
    • Normal in-camera histograms
    • Image processing for in-camera histograms
    • Making the in-camera histogram closely represent the raw histogram
    • Shortcuts to UniWB
    • Preparing for monitor-based UniWB
    • A one-step UniWB procedure
    • The math behind the one-step method
    • Iteration using Newton’s Method

Category List

Recent Comments

  • bob lozano on The 16-Bit Fallacy: Why More Isn’t Always Better in Medium Format Cameras
  • JimK on Goldilocks and the three flashes
  • DC Wedding Photographer on Goldilocks and the three flashes
  • Wedding Photographer in DC on The 16-Bit Fallacy: Why More Isn’t Always Better in Medium Format Cameras
  • JimK on Fujifilm GFX 100S II precision
  • Renjie Zhu on Fujifilm GFX 100S II precision
  • JimK on Fuji 20-35/4 landscape field curvature at 23mm vs 23/4 GF
  • Ivo de Man on Fuji 20-35/4 landscape field curvature at 23mm vs 23/4 GF
  • JimK on Fuji 20-35/4 landscape field curvature at 23mm vs 23/4 GF
  • JimK on Fuji 20-35/4 landscape field curvature at 23mm vs 23/4 GF

Archives

Copyright © 2025 · Daily Dish Pro On Genesis Framework · WordPress · Log in

Unless otherwise noted, all images copyright Jim Kasson.