• site home
  • blog home
  • galleries
  • contact
  • underwater
  • the bleeding edge

the last word

Photography meets digital computer technology. Photography wins -- most of the time.

You are here: Home / The Last Word / Sharpness testing, part 10

Sharpness testing, part 10

November 19, 2013 JimK Leave a Comment

I set out to find out what difference some of the shutter release mechanisms made to the image sharpness, using the same setup as I used for the aperture series in the previous post. I mounted the D800E to the StackShot rail that I will be using to make the exposures, and I mounted that to the RRS TVC-34L Versa Series 3 tripod and a RRS BH-55 ball head. I used the Zeiss 100mm f/2 ZF lens, set the ISO to 100, the aperture to f/8.

For a control, I made a series of 10 exposures with the target lit by a strobe. The shutter speed was 1/125, but the effective shutter speed was about 1/8000, since the strobe was set to 1/16 power. I pulled the synch cord from the strobe end, left the modeling light on high, and made a series of exposures at 1/1.6 second: hand tripped, electrically tripped with a wired remote, hand tripped with mirror up, electrically tripped with mirror up, hand tripped with three second shutter delay, and electrically tripped with three seconds shutter delay. Then I turned down the modeling light, set the shutter to five seconds, and did the same series.

Here are the results:

d800 release

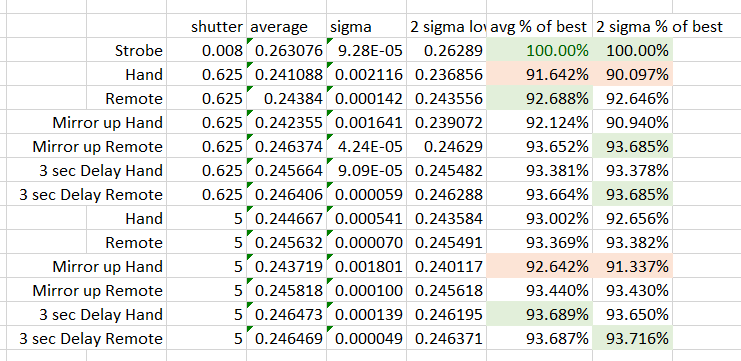
First, the bad news: none of the non-strobe images are anywhere near as sharp as the strobe images. In fact, they are degraded so that they’re close to the sharpness that you’d get with the strobe and the lens either wide open of stopped down all the way.

I’ve marked the worst results in red. Predictably, the hand released images are the worst at 1/1.6 seconds. They’re close to the worst at 5 seconds, too, but the mirror-up hand released images are even worse at that shutter speed. I put this down to chance; note that the standard deviation (sigma) of the hand tripped images is quite high.

If we want dependable results, we should look at the last column, which is the average minus two sigma results.  Remote operation is the best, and either flipping the mirror up or using the three-second shutter delay is effective.

But all of the results are disappointingly fuzzy. Why? I suppose that some of it could have to do with the color temperature of the illumination. The strobe is balanced for D50, and the modeling light is much redder than that, especially when turned down for the five-second exposure. Loger wavelengths of light suffer from more diffraction than short ones, so the change in color temperature will make the images using the modeling light alone slightly less sharp. That’s not enough to explain the differences, though.

Next, a more direct attack on camera vibration.

The Last Word

← Sharpness testing, part 9 Sharpness testing, part 11 →

Leave a Reply Cancel reply

Your email address will not be published. Required fields are marked *

June 2025
S M T W T F S
1234567
891011121314
15161718192021
22232425262728
2930  
« May    

Articles

  • About
    • Patents and papers about color
    • Who am I?
  • How to…
    • Backing up photographic images
    • How to change email providers
    • How to shoot slanted edge images for me
  • Lens screening testing
    • Equipment and Software
    • Examples
      • Bad and OK 200-600 at 600
      • Excellent 180-400 zoom
      • Fair 14-30mm zoom
      • Good 100-200 mm MF zoom
      • Good 100-400 zoom
      • Good 100mm lens on P1 P45+
      • Good 120mm MF lens
      • Good 18mm FF lens
      • Good 24-105 mm FF lens
      • Good 24-70 FF zoom
      • Good 35 mm FF lens
      • Good 35-70 MF lens
      • Good 60 mm lens on IQ3-100
      • Good 63 mm MF lens
      • Good 65 mm FF lens
      • Good 85 mm FF lens
      • Good and bad 25mm FF lenses
      • Good zoom at 24 mm
      • Marginal 18mm lens
      • Marginal 35mm FF lens
      • Mildly problematic 55 mm FF lens
      • OK 16-35mm zoom
      • OK 60mm lens on P1 P45+
      • OK Sony 600mm f/4
      • Pretty good 16-35 FF zoom
      • Pretty good 90mm FF lens
      • Problematic 400 mm FF lens
      • Tilted 20 mm f/1.8 FF lens
      • Tilted 30 mm MF lens
      • Tilted 50 mm FF lens
      • Two 15mm FF lenses
    • Found a problem – now what?
    • Goals for this test
    • Minimum target distances
      • MFT
      • APS-C
      • Full frame
      • Small medium format
    • Printable Siemens Star targets
    • Target size on sensor
      • MFT
      • APS-C
      • Full frame
      • Small medium format
    • Test instructions — postproduction
    • Test instructions — reading the images
    • Test instructions – capture
    • Theory of the test
    • What’s wrong with conventional lens screening?
  • Previsualization heresy
  • Privacy Policy
  • Recommended photographic web sites
  • Using in-camera histograms for ETTR
    • Acknowledgments
    • Why ETTR?
    • Normal in-camera histograms
    • Image processing for in-camera histograms
    • Making the in-camera histogram closely represent the raw histogram
    • Shortcuts to UniWB
    • Preparing for monitor-based UniWB
    • A one-step UniWB procedure
    • The math behind the one-step method
    • Iteration using Newton’s Method

Category List

Recent Comments

  • JimK on Sony 135 STF on GFX-50R, bokeh visuals
  • Manu on Sony 135 STF on GFX-50R, bokeh visuals
  • John Griffin on The 16-Bit Fallacy: Why More Isn’t Always Better in Medium Format Cameras
  • JimK on How Sensor Noise Scales with Exposure Time
  • Štěpán Kaňa on Calculating reach for wildlife photography
  • Štěpán Kaňa on How Sensor Noise Scales with Exposure Time
  • JimK on Calculating reach for wildlife photography
  • Geofrey on Calculating reach for wildlife photography
  • JimK on Calculating reach for wildlife photography
  • Geofrey on Calculating reach for wildlife photography

Archives

Copyright © 2025 · Daily Dish Pro On Genesis Framework · WordPress · Log in

Unless otherwise noted, all images copyright Jim Kasson.